Hawaiian Buns Recipe: Who can resist the irresistible aroma and sweetness of warm, fluffy Hawaiian buns fresh out of the oven? These golden, pillow-soft buns are a staple in many homes—not just in Hawaii—thanks to their delightful hint of sweetness and tender texture. If you’ve only had the store-bought version, you’re in for a real treat. Making them at home is not only doable, it’s fun, rewarding, and far more delicious. Whether you’re planning a backyard BBQ or just want a cozy baking project, this Hawaiian buns recipe will walk you through every step. Ready to bake? Let’s dive in.
List of Ingredients You’ll Need
Let’s talk ingredients. Hawaiian buns are known for their slightly sweet flavor and buttery softness, which come from a magical mix of pineapple juice, eggs, and a touch of sugar. Here’s everything you’ll need:
Dry Ingredients
- 4 ½ cups all-purpose flour (or bread flour for chewier texture)
- ⅓ cup granulated sugar
- 1 packet (2 ¼ tsp) active dry yeast
- 1 tsp salt
Wet Ingredients
- ¾ cup pineapple juice (room temperature)
- ½ cup warm whole milk (about 110°F/43°C)
- 2 large eggs
- 1 tsp vanilla extract
- ¼ cup unsalted butter (melted, plus more for brushing)
Optional Add-ins for Extra Flavor
- 1 tbsp honey for added sweetness
- Zest of 1 orange or lemon for citrusy brightness
- ½ tsp ground ginger or nutmeg for warm spice
These ingredients are simple, but when combined, they create that signature Hawaiian bun flavor you’ll crave again and again. Now that your ingredients are ready, let’s gather a few kitchen tools before we begin mixing.
Kitchen Tools You’ll Need
You don’t need fancy equipment to make Hawaiian buns, but having a few kitchen basics on hand will make things much easier.
- Large mixing bowl (or stand mixer with dough hook)
- Measuring cups and spoons
- Silicone spatula or wooden spoon
- Whisk
- Clean kitchen towel or plastic wrap
- Baking tray or sheet pan
- Parchment paper or silicone baking mat
- Pastry brush (for the butter glaze)
If you’re kneading by hand, clear off a clean countertop or large cutting board for dough work. Now, let’s talk about what makes these buns uniquely Hawaiian.
What Makes Hawaiian Buns Different?
What sets Hawaiian buns apart from your average dinner roll? It’s all in the sweetness and softness.
- Pineapple Juice – This is the star of the show. It lends a subtle tropical sweetness without making the buns taste like dessert.
- Eggs and Butter – These ingredients create a rich, tender crumb and a beautiful golden crust.
- Slightly Sweet Flavor – Perfectly balanced, so it works with both sweet and savory dishes.
- Super Fluffy Texture – Like biting into a cloud!
Think of these buns as the love child of a dinner roll and a brioche—just a tad sweeter and lighter. And yes, they’re just as versatile as they are tasty.
Preparation Tips Before You Begin
Before we jump into baking, there are a few essential prep tips that will help ensure your Hawaiian buns come out bakery-level perfect.
1. Proof Your Yeast First
Don’t skip this step! Mixing your yeast with warm milk and a bit of sugar will help ensure it’s alive and ready to work. It should foam up within 10 minutes.
2. Room Temperature Ingredients
Cold eggs or juice can slow down your dough rise. Let your ingredients sit out for 15–30 minutes before using.
3. Measure Accurately
Use a kitchen scale if you have one—especially for flour. Too much flour = dry, dense buns. Spoon flour into the measuring cup and level it off if going by volume.
4. Warm, Not Hot, Liquids
Milk should be warm to the touch (around 110°F), not hot. Hot liquids will kill your yeast, and that’s a baking buzzkill you don’t want.
Once you’ve got your mise en place (aka everything in its place), it’s go time.
Step-by-Step Guide to Make Hawaiian Buns
Now the fun part—let’s get baking! Follow each step carefully, and you’ll be pulling golden, fluffy buns from your oven in no time.
Step 1: Activating the Yeast
Warm milk or water to about 105–110°F (40–43°C). Stir in sugar and active dry yeast. Let it sit for 5–10 minutes until frothy. This step ensures the yeast is alive and ready to make your buns light and fluffy.
Step 2: Mixing the Dough
In a large bowl, combine the activated yeast mixture with eggs, pineapple juice, melted butter, sugar, and salt. Add flour gradually, mixing until a sticky dough forms. Hawaiian buns are naturally sweeter, thanks to the pineapple juice and sugar.
Step 3: Kneading Until Smooth
Transfer the dough to a lightly floured surface. Knead for 8–10 minutes until soft, elastic, and slightly tacky. Avoid adding too much flour—Hawaiian buns should remain moist.
Step 4: First Rise – Let the Dough Double
Place the dough in a greased bowl, cover with a towel or plastic wrap, and let rise in a warm spot for 1–2 hours, or until doubled in size. The pineapple juice helps create a soft, enriched dough.
Step 5: Shaping the Buns
Punch down the risen dough and divide into equal portions (12–15 pieces). Roll each into a smooth ball, tucking edges under for a round shape. Place on a baking tray or in a baking dish, spaced slightly apart.
Step 6: Second Rise – Let Them Puff Up
Cover the shaped buns and let them rise again for 30–45 minutes. This second proof gives them their signature pillowy texture.
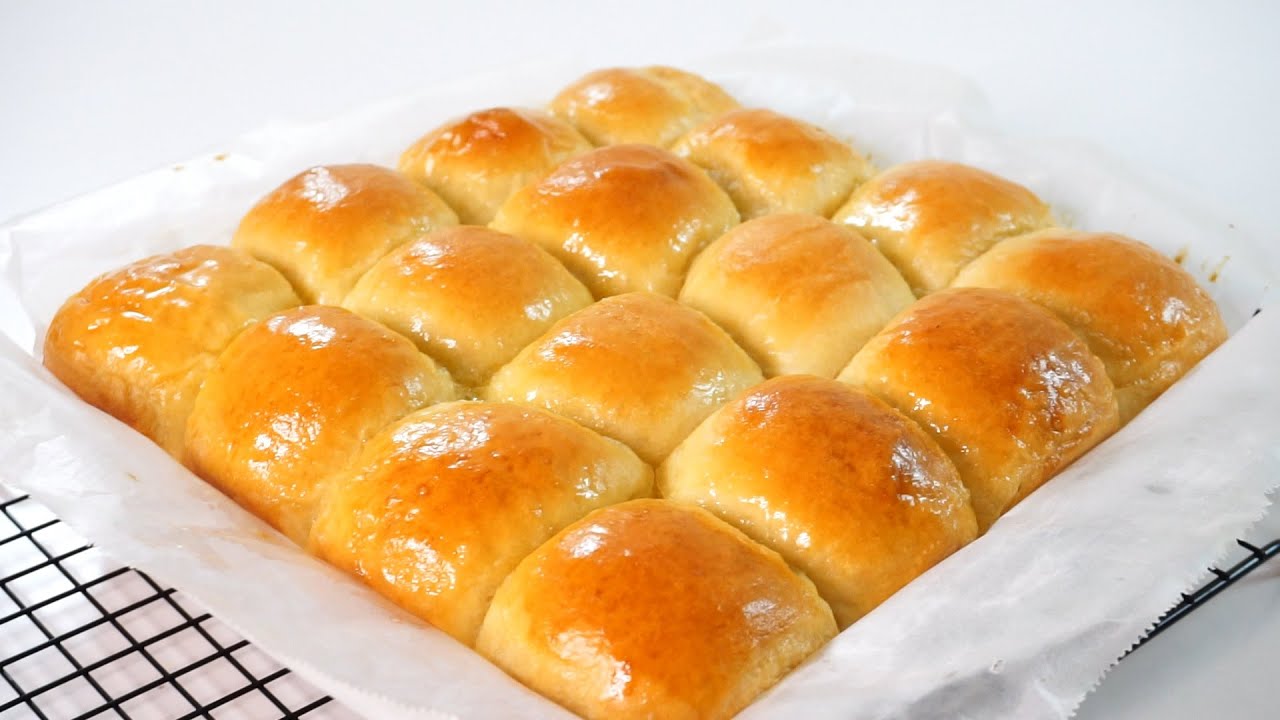
Step 7: Baking to Golden Perfection
Bake in a preheated oven at 350°F (175°C) for 18–22 minutes, or until the tops turn golden brown and the buns feel light.
Step 8: Brushing with Butter
Right after baking, brush the tops with melted butter for a shiny, soft finish. Serve warm and enjoy your homemade Hawaiian buns!
Troubleshooting Common Issues
Even seasoned bakers run into hiccups. Here’s how to fix some of the most common Hawaiian bun problems:
1. Dough Not Rising
- Check the yeast. Was it expired? Did it foam up during activation?
- Was the room too cold? Try moving the dough to a warmer spot next time.
2. Buns Too Dense or Dry
- You might have added too much flour.
- Make sure you knead long enough to develop gluten.
- Don’t skip the second rise—it helps lighten the dough.
3. Burnt Tops, Undercooked Centers
- Lower the oven rack or tent the buns with foil halfway through baking.
- Use an oven thermometer to check for hot spots.
Don’t worry—practice makes perfect, and even “mistakes” still taste pretty amazing when they’re fresh out of the oven.
Tips for the Perfect Hawaiian Buns
Want bakery-level results every time? Follow these pro tips:
- Use Bread Flour: For a chewier texture and better structure.
- Don’t Rush the Rise: Letting the dough rise fully is key to soft, fluffy buns.
- Use Pineapple Juice, Not Water: This gives the buns their signature flavor and sweetness.
- Knead Until Windowpane Test Passes: Stretch a piece of dough—if it stretches thin without tearing, you’ve kneaded enough.
- Brush with Butter Twice: Once right out of the oven and again after a few minutes for an extra-glossy finish.
These tips might seem small, but they make a huge difference in the final product.
Serving Suggestions
Hawaiian buns are wonderfully versatile. Here are a few tasty ways to serve them:
Savory Options
- Sliders: Perfect for pulled pork, chicken, or smash burgers.
- Breakfast Sandwiches: Add eggs, bacon, cheese, and avocado.
- Mini Sandwich Platters: Great for parties and potlucks.
Sweet Pairings
- Toast with Butter and Jam
- Spread with Nutella or Honey Butter
- Serve with a Tropical Fruit Salad
These buns walk the line between sweet and savory so you can get creative with your pairings. Don’t be afraid to experiment.
Storage Tips
Freshly baked Hawaiian buns are best the day they’re made, but they store pretty well too.
Storing:
- Keep in an airtight container or zip-top bag at room temperature for up to 3 days.
- Do not refrigerate—they’ll dry out faster.
Freezing:
- Let them cool completely.
- Wrap each bun individually in plastic wrap, then place them in a freezer bag.
- Freeze for up to 2 months.
To reheat, pop them in the microwave for 20 seconds or warm in the oven at 300°F for 10 minutes.
Can You Make This Dough Ahead of Time?
Absolutely. This recipe is perfect for prepping in advance.
- After kneading, cover and refrigerate the dough overnight.
- The next day, let it come to room temperature (about 30–45 minutes).
- Proceed with shaping, rising, and baking as usual.
This is a game-changer for holiday dinners or parties when you want freshly baked buns without the rush.
Making Hawaiian Buns Without a Stand Mixer
No mixer? No problem. Your hands are more than enough.
- Mix the dough with a wooden spoon until shaggy.
- Turn it onto a lightly floured surface and knead for 10–12 minutes.
- Rest your arms every few minutes if needed—kneading by hand is a mini workout!
Your buns might even turn out fluffier thanks to the care and time you give the dough.
Gluten-Free or Vegan Modifications
Want to make these delicious Hawaiian buns gluten-free or vegan? You totally can. With a few smart substitutions, you’ll still get that soft, sweet flavor you love—just tailored to your dietary needs.
Gluten-Free Version:
- Flour Substitute: Use a high-quality gluten-free flour blend (like Bob’s Red Mill 1:1 Baking Flour). Make sure it includes xanthan gum or add 1 tsp separately to help with texture.
- Kneading: Gluten-free dough won’t feel like regular dough. It’ll be more like a thick batter, so skip the kneading and instead mix thoroughly until smooth.
- Rise Time: Let it rise for 1 hour, then shape with oiled hands or a scoop since gluten-free dough is stickier.
Vegan Version:
- Egg Replacement: Use flax eggs (1 tbsp flaxseed meal + 3 tbsp water = 1 egg). Let it sit for 5 minutes to thicken before using.
- Butter Swap: Use plant-based butter or refined coconut oil.
- Milk Substitute: Use almond milk, oat milk, or soy milk—just make sure it’s unsweetened and warm before using.
Both versions come out soft and tasty—just a little different in texture. It may take a batch or two to perfect, but it’s worth it!
Creative Variations of Hawaiian Buns
Ready to mix things up a bit? Here are some creative twists to turn your classic Hawaiian buns into flavor-packed bites everyone will rave about.
1. Cheese-Stuffed Hawaiian Buns
- Add a cube of mozzarella or cheddar to the center of each bun before shaping.
- Bake as usual and enjoy a gooey, cheesy surprise in every bite.
2. Jalapeño and Pineapple Twist
- Mix in finely chopped pickled jalapeños and crushed pineapple (drained) into the dough.
- Great for spicy burger buns or BBQ sandwiches.
3. Coconut Hawaiian Rolls
- Add 2 tbsp shredded coconut into the dough.
- Brush with coconut milk instead of butter for a tropical finish.
4. Cinnamon-Sugar Hawaiian Buns
- After shaping, roll the tops in cinnamon sugar before baking.
- Drizzle with a vanilla glaze after baking for a sweet treat.
You can customize these buns endlessly—sweet or savory. Don’t be afraid to get creative in your kitchen.
FAQs about Hawaiian Buns Recipe
1. Can I use canned pineapple juice for Hawaiian buns?
Yes! Canned pineapple juice works perfectly for this recipe. Just make sure it’s 100% juice with no added sugar or preservatives for the most natural flavor.
2. Why is my dough too sticky?
Sticky dough usually means you need just a little more flour. Add 1 tablespoon at a time during kneading. But remember, slightly sticky dough makes for softer buns—don’t overdo it!
3. How do I know when the buns are fully baked?
Look for golden-brown tops and a hollow sound when tapped. For precision, use a thermometer: the internal temp should be about 190°F (88°C).
4. Can I substitute whole wheat flour?
You can, but only replace up to 50% of the flour. Whole wheat is heavier, and too much can make the buns dense. Mix it with all-purpose for the best texture.
5. What’s the best way to reheat Hawaiian buns?
Wrap in foil and warm in a 300°F oven for 8–10 minutes, or microwave individually for 15–20 seconds. Brush with a little butter before reheating for extra softness.
Conclusion
There you have it—an irresistible, foolproof, step-by-step guide to making the best Hawaiian buns right in your own kitchen. From the tropical sweetness of pineapple juice to the buttery, golden crust, these buns are guaranteed to win hearts at any table.
Whether you’re baking for a weeknight dinner, meal prepping for the freezer, or impressing guests at a gathering, this Hawaiian buns recipe delivers every time. It’s soft, fluffy, slightly sweet, and unbelievably satisfying.
The best part? Once you’ve mastered this base recipe, the variations are endless. You’ll never look at store-bought buns the same way again.
So grab your ingredients, tie on your apron, and start baking some island-inspired goodness. You won’t regret it!

