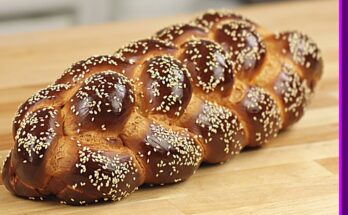
Hawaiian Buns Recipe: When you think of Hawaiian buns, your mind probably goes straight to that irresistibly soft, slightly sweet bread that’s perfect for sliders, burgers, or even as a snack on its own. Hawaiian buns are not just any bread—they stand out because of their unique balance of sweetness and fluffiness. Unlike traditional dinner rolls, these buns incorporate tropical flavors like pineapple juice, honey, and sometimes coconut milk to bring a taste of the islands right to your kitchen.
What’s more, they’re incredibly versatile. You can pair them with savory dishes like pulled pork, grilled chicken, or ham and cheese, and they’ll complement the flavors beautifully. But if you’re more of a sweet tooth person, you can enjoy them with butter, jam, or even use them as the base for French toast. The best part? You don’t have to buy them at the store—you can actually bake them at home with ease, and the homemade version is often softer, fresher, and more flavorful.
Making Hawaiian buns may sound intimidating at first, especially if you’re not used to working with yeast dough, but trust me—it’s much easier than you think. Once you understand the steps, you’ll be making them on repeat for family dinners, parties, or even meal prep. In this guide, we’ll break everything down in detail, from the ingredients you’ll need to the exact process for creating pillowy soft buns every time.
What Makes Hawaiian Buns Special?
So, why all the hype around Hawaiian buns? The secret lies in the ingredients. Unlike plain white rolls, Hawaiian buns are enriched with pineapple juice, eggs, and butter. This trio gives them their characteristic golden color, subtle sweetness, and soft, tender crumb. The pineapple juice isn’t overpowering—it doesn’t make the bread taste like fruit—it simply adds a gentle sweetness and acidity that enhances the yeast activity, making the bread rise beautifully.
Another factor is the texture. Hawaiian buns have a unique pillowy softness that almost melts in your mouth. This comes from the combination of kneading, proper resting, and using enough fat (like butter) to enrich the dough. It’s the kind of bread that feels like a treat even when eaten plain.
A Brief History of Hawaiian Sweet Bread
Hawaiian sweet bread has roots that trace back to Portuguese immigrants who came to Hawaii in the late 19th century. They brought with them a traditional bread called “pão doce,” which was a sweet, egg-rich bread often baked for holidays and special occasions. Over time, this bread was adapted to local Hawaiian tastes by incorporating pineapple juice and other tropical flavors.
In the 1950s, the famous King’s Hawaiian bakery popularized these buns across the U.S., and they quickly became a household favorite. Today, Hawaiian buns are not just associated with Hawaiian cuisine but are a staple in American kitchens for barbecues, sandwiches, and more.
Ingredients You’ll Need
When baking Hawaiian buns, using the right ingredients makes all the difference. While the recipe is simple, each component plays a crucial role in giving the buns their distinctive sweetness and softness. Below, we’ll break down everything you’ll need.
Main Ingredients for the Dough
- Pineapple Juice (1 cup, warm) – The star ingredient that adds sweetness and acidity, helping the yeast activate while giving the buns their signature flavor.
- Active Dry Yeast (2 ¼ teaspoons or 1 packet) – This is what makes the dough rise and become fluffy.
- Granulated Sugar (¼ cup) – Boosts the sweetness and also feeds the yeast.
- Unsalted Butter (4 tablespoons, melted) – Adds richness and softness to the dough.
- Eggs (2 large) – Provide structure and help with that golden color.
- All-Purpose Flour (4 to 4 ½ cups) – The base of the dough; bread flour can also be used for a chewier texture.
- Salt (1 teaspoon) – Balances out the sweetness and enhances flavor.
Optional Additions for Extra Flavor
- Honey (2 tablespoons) – For an even richer sweetness.
- Coconut Milk (replace some pineapple juice) – For a tropical twist.
- Vanilla Extract (1 teaspoon) – Adds a warm, aromatic touch.
Ingredient Substitutions
Don’t worry if you don’t have every ingredient on hand. Here are a few substitutions you can try:
- No pineapple juice? Use orange juice or apple juice as an alternative.
- No butter? You can swap with margarine or coconut oil.
- Gluten-free? Replace the all-purpose flour with a gluten-free bread flour blend.
Pro Tip: Always use warm (not hot) liquids when working with yeast. Too hot, and you’ll kill the yeast; too cold, and the dough won’t rise properly.
Tools and Equipment Required
Before you dive into baking, it’s a good idea to have the right tools ready. You don’t need a fancy setup, but a few essentials will make the process smoother.
Baking Essentials
- Mixing Bowls – You’ll need at least two: one for mixing the dough and another for proofing.
- Measuring Cups and Spoons – Accuracy is key in baking, so measure carefully.
- Wooden Spoon or Dough Hook – For mixing the ingredients before kneading.
- Baking Sheet or 9×13 Pan – Depending on whether you want buns close together (pull-apart style) or separate.
- Plastic Wrap or Kitchen Towel – To cover the dough while it rises.
Helpful Kitchen Gadgets
- Stand Mixer with Dough Hook – Makes kneading much easier if you don’t want to do it by hand.
- Instant-Read Thermometer – Helps check the temperature of liquids and ensure your bread is fully baked.
- Bench Scraper – Useful for dividing and shaping dough.
Remember: Hawaiian buns can be made with just the basics, but having these tools will save you time and effort.
Step-by-Step Guide to Making Hawaiian Buns
This is where the magic happens. Baking bread may feel like a science experiment, but once you follow the steps, it becomes second nature. Let’s walk through the entire process in detail.
Step 1 – Preparing the Yeast Mixture
The first and most important step is activating the yeast. In a small bowl, combine warm pineapple juice (about 110°F), a tablespoon of sugar, and the yeast. Stir gently and let it sit for 5–10 minutes. You should see the mixture turn foamy and bubbly—that’s how you know the yeast is alive and ready to go.
If it doesn’t foam, the yeast may be expired, or the liquid was too hot or too cold. Always test this step, because if the yeast doesn’t activate, the buns won’t rise properly.
Step 2 – Mixing the Dough
Once your yeast mixture is foamy and activated, it’s time to start building the dough. In a large mixing bowl (or the bowl of a stand mixer), combine the yeast mixture with the melted butter, eggs, remaining sugar, and salt. Mix everything together until the ingredients are well blended.
Now, gradually add the flour—about one cup at a time—stirring after each addition. The dough will start off sticky but will slowly come together into a soft, slightly tacky ball. You don’t want it to be too dry, so avoid adding extra flour too quickly. The right consistency should allow the dough to stick a little to your fingers without leaving a messy residue.
If you’re using a stand mixer with a dough hook, let the machine do the work for you until the dough is smooth and elastic, usually about 5–6 minutes. If you’re mixing by hand, switch to a wooden spoon once the dough becomes too thick to stir easily. Then, you’ll move on to kneading by hand in the next step.
Step 3 – Kneading and First Rise
Kneading is the step that transforms your dough from a sticky mess into a soft, elastic, and airy bread. Lightly flour your work surface and transfer the dough onto it. Knead the dough by pushing it forward with the heel of your hand, folding it over, and repeating the process. Keep this rhythm going for about 8–10 minutes.
As you knead, you’ll notice the dough becoming smoother and springier. The gluten strands are developing, which is what gives bread its structure. To test if you’ve kneaded enough, use the “windowpane test”: stretch a small piece of dough between your fingers. If it forms a thin, translucent sheet without tearing, you’re good to go.
Once kneaded, shape the dough into a ball and place it in a greased bowl. Cover the bowl with a kitchen towel or plastic wrap and let it rest in a warm place for 1 to 2 hours, or until it has doubled in size. This first rise is essential—it allows the yeast to work its magic, producing carbon dioxide that makes the dough light and fluffy.
Step 4 – Shaping the Buns
After the first rise, punch down the dough gently to release excess air. Then, transfer it to a lightly floured surface. Use a bench scraper or knife to divide the dough into equal portions. For standard buns, you’ll want about 12–15 pieces, depending on how large you prefer them.
Roll each piece into a smooth ball by cupping your hand over the dough and moving it in small circles against the surface. This helps create surface tension, which makes the buns hold their shape better while baking.
Arrange the dough balls in a greased 9×13 baking pan if you want soft pull-apart buns. Alternatively, you can place them spaced apart on a baking sheet for separate buns with golden edges.
Step 5 – Second Rise and Baking
Cover the shaped buns again and let them rest for another 45 minutes to 1 hour. This second rise, known as proofing, gives the buns their final airy texture. They should nearly double in size and feel puffy to the touch.
While the dough is rising, preheat your oven to 350°F (175°C). Just before baking, you can brush the tops of the buns with an egg wash (1 beaten egg with a tablespoon of water) for a shiny golden finish, or melted butter for a softer crust.
Bake for 20–25 minutes, or until the tops are golden brown and the internal temperature reaches about 190°F (88°C). Once done, remove them from the oven and brush with a little more butter for that bakery-style sheen. Allow them to cool slightly before serving.
And there you have it—soft, sweet, irresistible Hawaiian buns fresh out of your own oven!
Tips for Perfect Hawaiian Buns
Even though this recipe is straightforward, a few extra tricks can help ensure success every time.
Common Mistakes to Avoid
- Killing the yeast: Always check the liquid temperature before adding yeast. Anything above 115°F can kill it.
- Adding too much flour: Many beginners panic when the dough feels sticky and add excessive flour. Sticky dough is normal at first; just knead until it becomes elastic.
- Skipping the rise times: Patience is key. If you don’t let the dough rise fully, the buns will turn out dense.
- Overbaking: Hawaiian buns should be soft. Take them out when golden brown, not dark brown.
How to Get the Perfect Texture
- Use bread flour if you want chewier buns.
- Add a little milk powder to make the buns extra soft and fluffy.
- Bake them in a pan close together to get that classic pull-apart style.
Remember, bread-making is as much about practice as it is about precision. The more often you bake, the more comfortable you’ll become at recognizing when the dough is just right.
Serving Ideas for Hawaiian Buns
Fresh out of the oven, Hawaiian buns are irresistible on their own, but their versatility is what makes them a true kitchen staple. Because they’re slightly sweet, they balance out savory and spicy flavors beautifully, while still being indulgent enough for desserts.
One classic use is as slider buns. Imagine tender pulled pork with barbecue sauce tucked inside a fluffy Hawaiian bun—it’s a match made in heaven. The sweetness of the bread cuts through the richness of the meat and sauce, creating the perfect bite. They’re also excellent for mini burgers, especially when you want something different from standard white rolls.
If you’re hosting a brunch, Hawaiian buns can be used to make a bread pudding or French toast casserole. The sweetness of the buns eliminates the need for too much extra sugar, and they soak up custard beautifully without falling apart.
For a lighter option, try pairing them with deli meats and cheese. Ham and Swiss or turkey with cranberry spread are excellent pairings that make quick, crowd-pleasing sandwiches. Or keep it simple by spreading butter or fruit preserves on a warm bun for a comforting snack.
And if you’re feeling creative, slice them open and toast them lightly to use as a base for sliders, bruschetta, or even mini pizzas. They’re the kind of bread you’ll find yourself reaching for no matter the occasion.
Storage and Make-Ahead Tips
Like all fresh breads, Hawaiian buns are best eaten the day they’re baked. But don’t worry—you can still enjoy them for days if you store them correctly.
After cooling completely, place the buns in an airtight container or sealable plastic bag. They’ll stay soft at room temperature for about 3–4 days. Avoid refrigerating them, as that tends to dry bread out faster.
For longer storage, freeze the buns. Wrap them individually in plastic wrap, then place them in a freezer-safe bag. They’ll last for up to 2 months. To reheat, thaw at room temperature and warm them in the oven at 300°F for about 10 minutes, or microwave briefly for soft, fresh-tasting buns.
If you’d like to prepare them ahead of time, you can also freeze the dough. Shape the buns after the first rise, then place them on a baking sheet and freeze until solid. Transfer to a freezer bag. When you’re ready to bake, thaw them overnight in the fridge, let them rise until puffy, and bake as usual. This make-ahead method is a lifesaver during holidays or parties.
Variations of Hawaiian Buns
The beauty of homemade Hawaiian buns is that you can customize them in endless ways. Once you’ve mastered the basic recipe, try experimenting with these variations:
Savory Hawaiian Buns
Add shredded cheddar, garlic powder, or chopped herbs into the dough for a savory twist. These pair especially well with soups and stews.
Coconut Hawaiian Buns
Replace some of the pineapple juice with coconut milk, and sprinkle shredded coconut on top before baking. This adds an extra tropical flavor that’s perfect for summer gatherings.
Whole Wheat Hawaiian Buns
Swap out half the all-purpose flour with whole wheat flour for a healthier option. The buns will be a little denser but still soft and delicious.
Stuffed Hawaiian Buns
Get creative by filling the buns before baking! Try cream cheese and jam, Nutella, or even savory fillings like ham and cheese. These become little surprise-filled rolls that everyone will love.
Mini Hawaiian Buns
Make smaller dough balls for bite-sized buns—perfect for party appetizers or kids’ snacks.
By playing with flavors and fillings, you can transform this basic recipe into a whole new dish every time.
Pairing Hawaiian Buns with Meals
While Hawaiian buns are amazing on their own, they truly shine when paired with the right dishes. Here are some tasty pairing ideas:
- Pulled Pork or BBQ Chicken Sliders – The sweetness of the buns balances smoky, tangy barbecue.
- Grilled Burgers – Swap standard buns for Hawaiian rolls to add a sweet kick.
- Holiday Hams – Use leftover ham and cheese for mini sandwiches the next day.
- Breakfast Sandwiches – Pair with eggs, bacon, and cheese for a breakfast that’s both hearty and slightly sweet.
- Soups and Stews – Hawaiian buns make the perfect side for dipping.
They’re also a great base for appetizers. Slice them in half, add toppings like spinach artichoke dip or buffalo chicken, and bake until bubbly. Suddenly, you’ve got party food that disappears in minutes.
The truth is, once you start using Hawaiian buns in your meals, you’ll find dozens of excuses to bake them again and again.
Nutritional Information of Hawaiian Buns
While Hawaiian buns are undeniably delicious, it’s always good to know what’s in them nutritionally. On average, one medium-sized bun contains:
| Nutrient | Approximate Value |
|---|---|
| Calories | 120–150 |
| Carbohydrates | 22–28 g |
| Protein | 3–4 g |
| Fat | 3–4 g |
| Sugar | 5–8 g |
| Fiber | 1–2 g |
These numbers can vary depending on the exact ingredients and portion sizes. Using whole wheat flour increases fiber, while adding honey or coconut milk may slightly increase sugar and fat content.
Hawaiian buns aren’t exactly diet food, but they’re a balanced treat when enjoyed in moderation. Since they’re versatile, you can also make smaller rolls if you want lighter portions without sacrificing flavor.
Troubleshooting Hawaiian Bun Problems
Even experienced bakers run into hiccups when making bread. Hawaiian buns are forgiving, but here are a few common problems and how to fix them:
Problem 1: Dough Didn’t Rise
This usually happens if the yeast is dead or the liquid was too hot or too cold. Always test your yeast by blooming it in warm pineapple juice before starting. If it doesn’t foam, toss it and start over with fresh yeast.
Problem 2: Buns Are Too Dense
Dense buns often mean the dough wasn’t kneaded long enough, or it didn’t rise fully. Kneading develops gluten, which creates structure and air pockets. Make sure to give the dough enough time to double in size during each rise.
Problem 3: Buns Too Dry
Adding too much flour is the usual culprit. Dough should feel slightly sticky, not dry. Measure flour carefully, and resist the urge to over-flour the surface while kneading.
Problem 4: Uneven Baking
If the tops are browning too quickly while the centers are undercooked, tent the buns with aluminum foil during the last 10 minutes of baking. This prevents over-browning while allowing the centers to finish cooking.
Problem 5: Flavor is Lacking
If your buns taste bland, you may have skipped the pineapple juice or used too little sugar. Remember, the sweetness is what makes these buns unique. A pinch of honey or vanilla extract can also boost flavor.
FAQs about Hawaiian Buns Recipe
1. Can I make Hawaiian buns without pineapple juice?
Yes, but pineapple juice is key to the flavor and texture. If you don’t have it, you can substitute orange juice or apple juice. Just keep in mind the flavor won’t be quite the same.
2. Can I make Hawaiian buns gluten-free?
Absolutely! Use a gluten-free bread flour blend, but add a binding agent like xanthan gum to help with structure. Gluten-free buns will be a bit denser but still tasty.
3. Why do my buns taste yeasty?
This happens if the dough over-ferments or if too much yeast was used. Make sure to measure yeast correctly and don’t let the dough rise much longer than recommended.
4. How do I make Hawaiian buns sweeter?
Increase the sugar or add honey to the dough. You can also brush the tops with honey butter after baking for an extra sweet touch.
5. Can I make the dough in advance?
Yes! You can prepare the dough, shape the buns, and refrigerate them overnight. The next day, let them come to room temperature, rise until puffy, and then bake.
Conclusion
By following this step-by-step guide, you now have everything you need to make bakery-quality buns right at home. From choosing the right ingredients to mastering kneading and proofing, every detail adds up to fluffy, golden rolls that’ll impress your family and friends.
The beauty of baking Hawaiian buns is that once you’ve mastered the basic recipe, you can get creative. Try adding coconut, cheese, or fillings to make them uniquely yours. And don’t be discouraged if your first batch isn’t perfect—bread-making is a journey, and each attempt gets you closer to mastering it.
So, roll up your sleeves, grab that pineapple juice, and bring a little taste of Hawaii into your kitchen. One bite of these warm, homemade buns, and you’ll understand why they’ve become a favorite worldwide.