Ham Sliders Recipe: Ham sliders are the ultimate finger food — bite-sized, cheesy, and packed with savory goodness. Whether you’re throwing a party, hosting a game day gathering, or just want something quick and satisfying for dinner, these mini sandwiches are a guaranteed hit. What makes them so irresistible? It’s the combination of soft, buttery buns, warm layers of deli-style ham, gooey melted cheese, and a flavorful glaze baked to perfection.
The best part? They’re super easy to make and incredibly versatile. You can whip them up in under 30 minutes, customize them to suit your taste, and scale the recipe up or down depending on your crowd. Let’s dive into the delicious world of ham sliders and walk through a foolproof, step-by-step guide to mastering this beloved dish.
Ingredients You’ll Need
Let’s break down everything you’ll need to create mouthwatering ham sliders:
Main Ingredients:
- 12 Hawaiian slider buns – soft, slightly sweet, and perfect for holding all the goodness together.
- 1 pound deli ham – honey ham, black forest, or smoked ham all work well.
- 12 slices Swiss cheese – classic choice, but provolone or cheddar also taste great.
- 1/2 cup unsalted butter – melted, for the glaze.
- 1 tablespoon Dijon mustard – adds a tangy kick.
- 1 tablespoon Worcestershire sauce – for depth and umami.
- 1 tablespoon poppy seeds – optional, for texture and flavor.
- 1/2 teaspoon onion powder – subtle savoriness.
Optional Add-Ons:
- Pickles for crunch
- Caramelized onions for sweetness
- Jalapeños for spice
- Garlic powder in the glaze
These ingredients are pantry staples in most homes, and even if you’re missing one or two, there’s usually an easy substitution that works just as well.
Tools and Equipment Required
Don’t worry, you won’t need any fancy gadgets for this recipe. Just some basic kitchen tools:
Essentials:
- A baking dish (9×13 inch works best)
- Knife or bread slicer
- Mixing bowl and spoon
- Aluminum foil
- Pastry brush (optional, for glaze)
Nice-to-Haves:
- Serrated knife (for clean bun slicing)
- Spatula (for removing baked sliders easily)
- Small saucepan (for melting butter and mixing the glaze)
Having these tools ready before you start cooking can make the process smoother and more enjoyable.
How to Make Ham Sliders – Step-by-Step Instructions
Let’s get cooking! Follow these simple steps to make perfect ham sliders.
Step 1: Preheat the Oven
First things first — preheat your oven to 350°F (175°C). This temperature is ideal for warming the sliders evenly and letting the cheese melt without drying out the bread. Always start with a preheated oven to ensure consistent results.
Step 2: Prepare the Slider Buns
Using a sharp serrated knife, slice the slider buns horizontally in one piece, keeping them connected. Place the bottom half of the buns into your baking dish.
These Hawaiian rolls are super soft, so go slow to avoid squishing them. Don’t separate the buns individually yet; keeping them in one large piece helps with even layering and reduces mess.
Now you’ve got a soft, golden foundation for your sliders.
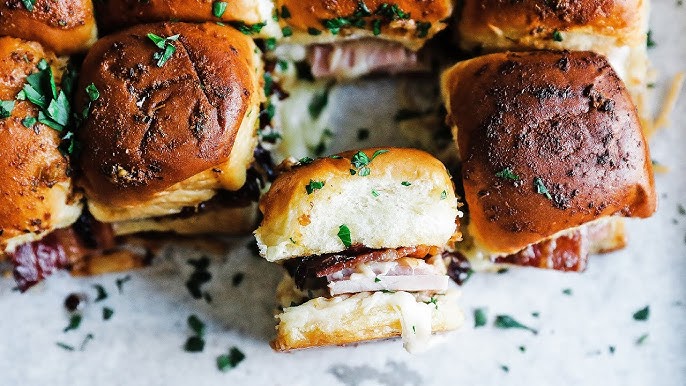
Step 3: Add Layers of Ham and Cheese
Time to build that flavor! Lay the sliced ham generously across the bottom buns. You want a solid layer so every bite is meaty. Fold the slices if needed to fit the bun’s shape.
Next, layer the cheese on top of the ham. Swiss cheese gives that perfect melty stretch and mild nutty flavor. Add a bit more ham on top if you’re feeling generous!
Once your layers are set, place the top half of the buns back on.
Step 4: Make the Butter Sauce
In a bowl (or saucepan), combine the melted butter, Dijon mustard, Worcestershire sauce, poppy seeds, and onion powder. Stir well until it’s smooth and fragrant. This sauce is what gives the sliders their signature flavor – buttery, tangy, slightly sweet, and packed with umami.
Use a spoon or pastry brush to generously spread this glaze over the top of the buns. Be thorough – it’s okay if it runs down the sides!
Cover the baking dish with foil so everything bakes evenly and stays moist.
Step 5: Bake the Sliders
Slide your dish into the oven and bake for 15 minutes covered. Then, remove the foil and continue baking for another 7-10 minutes, or until the tops are golden brown and the cheese is melted.
You’ll know they’re ready when the kitchen smells amazing, and the tops have a buttery, golden glow. Remove from the oven and let them cool for 5 minutes before slicing.
Serving Suggestions
Ham sliders are incredibly versatile, so when it comes to serving them, you’ve got tons of tasty options. Whether you’re putting together a casual dinner or feeding a crowd, here are a few side dishes and presentation tips to make your sliders the star of the show.
Top Side Dishes:
- Potato Wedges or Fries – A crispy, salty side is always a hit.
- Coleslaw – The crunchy, tangy contrast works perfectly with the warm, cheesy sliders.
- Pickles or Pickled Veggies – Adds a zesty crunch that cuts through the richness.
- Tomato Soup – Sounds odd? Try dipping the slider in the soup—it’s comfort food heaven.
- Chips and Salsa – If you’re keeping it light and simple.
Presentation Tips:
- Serve them on a wooden cutting board for that rustic, casual look.
- Use toothpicks or slider sticks to hold them together neatly.
- Sprinkle a few extra poppy seeds or parsley flakes on top before serving for added flair.
- If you’re hosting, offer a variety with different fillings on a single tray—some spicy, some cheesy, and some classic.
The beauty of ham sliders is their ability to elevate even a basic meal into something special. Serve them with style, and they’ll disappear before you know it.
Storage and Reheating Tips
Got leftovers? Lucky you! Ham sliders store and reheat beautifully, so you can enjoy them even the next day. Here’s how to do it without sacrificing that just-baked flavor.
Storing:
- Allow the sliders to cool completely.
- Wrap them tightly in foil or place them in an airtight container.
- Store in the refrigerator for up to 3 days.
Freezing Tips:
- Wrap individual sliders in plastic wrap, then place them in a freezer-safe bag or container.
- Freeze for up to 2 months.
- To reheat, thaw overnight in the fridge for best texture.
Reheating:
- Oven: Preheat to 300°F, wrap sliders in foil, and warm for 10–15 minutes.
- Microwave: Wrap a slider in a damp paper towel and microwave for 30–45 seconds. Great for a quick fix, but may soften the bun.
- Air Fryer: Reheat at 300°F for about 3–5 minutes for a crispy top.
Keep in mind, reheating in the oven delivers the best texture—soft on the inside, golden and toasty on top.
Variations and Twists
If you’ve made the classic version and want to shake things up, here are some tasty tweaks and creative ideas to try next time:
1. Cheese Swaps:
- Try cheddar for extra sharpness.
- Pepper Jack if you want a spicy kick.
- Mozzarella for that gooey pull.
2. Different Meats:
- Use turkey, roast beef, or even pulled pork.
- Combine ham and turkey for a layered deli flavor.
3. Vegetarian Sliders:
- Use grilled mushrooms, zucchini, and provolone.
- Try eggplant slices with marinara and mozzarella for an Italian twist.
4. Sweet & Savory:
- Add pineapple rings or apple slices between the ham and cheese.
- Drizzle a bit of honey or maple syrup into the glaze for a hint of sweetness.
5. Spicy Versions:
- Add jalapeños or crushed red pepper to the glaze.
- Spread a thin layer of sriracha mayo inside the buns.
With just a few tweaks, ham sliders can fit any mood or menu, from comfort food to gourmet bites.
Tips for Perfect Sliders Every Time
Want sliders that are always a hit? Keep these pro tips in mind every time you bake:
Avoid Soggy Bottoms:
- Don’t overload the ham with moisture (like wet pickles or sauces).
- Toast the bottom buns slightly before assembling if making ahead.
Perfect Glaze Every Time:
- Taste your butter sauce before pouring. Adjust salt, mustard, or sweetness to suit your flavor.
- Let it soak in for 5–10 minutes before baking for extra flavor.
Golden Tops and Gooey Centers:
- Keep the foil on for the first bake to prevent burning.
- Take it off at the end to crisp the tops and finish melting the cheese.
Even Cooking:
- Make sure all sliders are evenly layered and spaced.
- Press gently before baking to hold everything together.
Follow these tips, and your sliders will come out picture-perfect every single time!
FAQs about Ham Sliders Recipe
What type of ham works best for ham sliders?
You can use pretty much any sliced ham you love — honey ham, smoked ham, or even leftover holiday ham. Thin-sliced deli ham is super convenient and melts beautifully with the cheese!
Can I make ham sliders ahead of time?
Absolutely! You can assemble the sliders, cover them tightly with foil, and refrigerate for up to 24 hours before baking. Perfect for when you want to look like you have your life together at parties.
What’s the best cheese for ham sliders?
Swiss cheese and cheddar are crowd favorites, but honestly, anything gooey and melty will steal the show — mozzarella, provolone, or even pepper jack if you’re feeling spicy.
Do I have to use Hawaiian rolls?
Nope, but they’re kind of iconic. The sweetness of Hawaiian rolls really complements the salty ham and savory fillings. If you’re out of them, use any soft dinner rolls you have.
How do I prevent soggy sliders?
The trick is not to overdo it with the butter sauce. Brush it lightly and bake uncovered for part of the time so the tops get golden and slightly crisp. Nobody wants a soggy bottom — Mary Berry taught us that.
Can ham sliders be frozen?
Yep, you can freeze them! Assemble the sliders, wrap them tightly, and freeze for up to 2 months. When you’re ready, thaw them in the fridge and bake until hot and melty.
What sides go well with ham sliders?
Oh, you have options! Think coleslaw, potato salad, chips, or even a cozy tomato soup. Ham sliders are the social butterflies of the food world — they get along with almost anything.
How long do baked ham sliders last?
Stored in an airtight container in the fridge, they’ll stay good for about 3 days. But let’s be real — they rarely last that long once people know they’re in the kitchen.
Conclusion
There you have it — the ultimate ham sliders recipe that’s equal parts simple and satisfying. With just a handful of ingredients and easy-to-follow steps, you can whip up a tray of delicious, cheesy, golden sliders that everyone will rave about. Whether you’re feeding a hungry family or prepping for a game-day crowd, this dish is guaranteed to please.
So go ahead, customize them with your favorite flavors, serve them up with tasty sides, and watch them disappear. Ham sliders might be small, but they sure do pack a punch when it comes to flavor and fun!