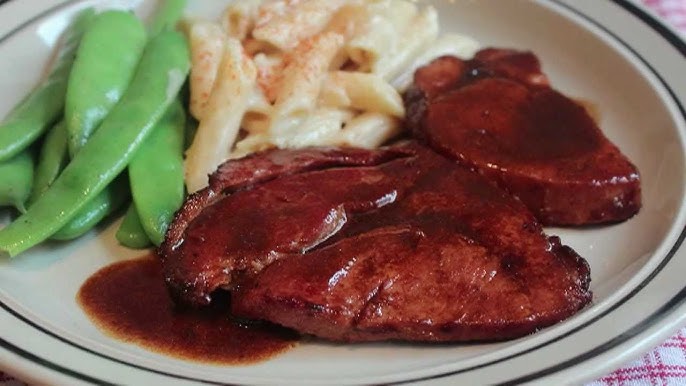
Ham Gravy Recipe: Ham gravy is one of those old-fashioned comfort foods that never goes out of style. It’s a savory, salty, flavorful sauce made using the pan drippings from baked or fried ham. If you’ve ever had a holiday ham and watched that flavorful liquid collect in the pan, that’s culinary gold right there. With a little flour, broth or milk, and seasoning, you turn those humble drippings into a rich, smooth gravy that pairs perfectly with biscuits, mashed potatoes, or even breakfast grits.
This gravy isn’t just tasty; it’s steeped in tradition. Originating from Southern kitchens, ham gravy was often used to stretch a meal further. It’s the kind of simple, resourceful cooking that transforms leftovers into something special.
Why You’ll Love This Recipe
Let’s face it—ham gravy doesn’t get the credit it deserves. While turkey or chicken gravy gets the spotlight during holidays, ham gravy quietly holds its ground with bold, salty, umami-packed flavor. If you’ve never made it before, prepare to fall in love with how easy and rewarding it is.
This recipe is quick to make, uses ingredients you probably already have in your kitchen, and is incredibly versatile. Whether you’re hosting a brunch, prepping a weeknight dinner, or using up holiday leftovers, this gravy will instantly elevate your meal. Plus, it’s beginner-friendly—if you can stir, you can make this gravy.
Ingredients for Classic Ham Gravy
Key Ingredients Breakdown
- Ham Drippings – This is the star of the show. These are the juices and fat left in the pan after cooking ham. They add the smoky, salty foundation of your gravy.
- All-Purpose Flour – Used to make the roux, which thickens the gravy.
- Liquid (Water, Milk, or Broth) – Depending on your preference, each adds a different texture and flavor. Milk makes it creamier, broth makes it richer.
- Black Pepper – Adds just the right kick to balance the saltiness.
- Butter (Optional) – A little butter can mellow out the salt and add smoothness if your drippings are too salty.
Substitutes and Variations
If you’re missing something, don’t worry! There are easy swaps you can make:
- Cornstarch Instead of Flour – Great for gluten-free versions. Just mix with cold water before adding.
- Vegetable Broth – Works fine if you don’t want to use milk or meat broth.
- Additions – Some like to add chopped onions, garlic, or even a splash of heavy cream for an extra touch of richness.
This flexibility makes ham gravy a go-to recipe you can tailor to any meal or dietary need.
Tools You’ll Need
Making ham gravy doesn’t require any fancy equipment. You just need:
- A medium saucepan or skillet
- A whisk (essential for smooth gravy)
- Measuring cups and spoons
- A heat-safe bowl (if you’re collecting drippings ahead of time)
- Fine mesh strainer (optional, if your drippings have solids)
The simplicity of this recipe makes it perfect for beginner cooks or those looking to make something impressive with minimal cleanup.
Preparing Your Ham Drippings
Collecting the Drippings
Once your ham is done cooking, don’t toss the juice that’s gathered in the bottom of the pan. That golden liquid is packed with smoky, salty, porky flavor that forms the base of your gravy.
Here’s how to collect it:
- Let the drippings cool slightly.
- Pour them through a fine mesh strainer to remove any large bits.
- If there’s a thick layer of fat on top, you can skim some off, but keep a good portion—it adds flavor!
You can use these immediately or save them for later.
Storing Leftover Drippings
If you’re not making gravy right away, store the drippings in an airtight container. They’ll keep:
- In the fridge: up to 4 days
- In the freezer: up to 3 months
Before using refrigerated drippings, reheat them slightly to melt the fat back into liquid form. Frozen drippings should be thawed in the fridge overnight for best results.
Step-by-Step Ham Gravy Recipe
Step 1: Heat the Drippings
Start by pouring your ham drippings into a medium saucepan or skillet. Turn the heat to medium and let them warm up gently. If your drippings were refrigerated, you might notice a layer of solid fat on top—this will melt as the pan heats. Stir occasionally to help the mixture become uniform.
This step is crucial because it reactivates the flavors and ensures even distribution of fat, which you’ll need to form your roux. Be careful not to overheat or burn the fat—gentle heat is key. If your pan is too hot, the drippings could scorch, adding a bitter taste to your gravy. Once the drippings are fully melted and warm, you’re ready for the next step.
Step 2: Create the Roux
Now that your drippings are hot and liquid, it’s time to make a roux, which is simply a mixture of fat and flour. Sprinkle in about 2 to 3 tablespoons of all-purpose flour for every cup of drippings. The amount may vary based on how thick you like your gravy.
Whisk continuously to prevent lumps from forming. The mixture will thicken quickly and should take on a light brown color as the flour cooks. Let the roux cook for 1-2 minutes to get rid of the raw flour taste. This step also deepens the flavor, giving your gravy a toasty, nutty undertone that complements the smokiness of the ham.
Consistency is key here. You want a smooth paste that’s not too runny but not too dry. Adjust by adding more flour or drippings as needed. A perfect roux lays the groundwork for a silky, luscious gravy.
Step 3: Add Liquid and Simmer
Once the roux is golden and smooth, gradually whisk in your liquid—this could be milk, water, or broth. Start with 1 cup and add more as needed based on the thickness you prefer. Continue whisking to incorporate everything smoothly. The gravy should start to bubble and thicken as it simmers.
Don’t rush this part. Let the gravy simmer gently for 5 to 10 minutes, stirring often. This allows the flavors to meld together and the flour to fully activate as a thickening agent. If the gravy becomes too thick, just splash in a bit more liquid. Too thin? Let it cook a little longer or add a cornstarch slurry.
Taste as you go. This is your moment to adjust everything to perfection.
Step 4: Season to Perfection
Now that your gravy is almost ready, it’s time to season. Since ham drippings are usually salty, go light on the salt—sometimes you won’t need any at all. Add freshly cracked black pepper for depth. You can also mix in a small dab of butter if your gravy tastes too salty or needs a smoother finish.
Optional seasonings:
- A pinch of garlic or onion powder
- A dash of paprika for smokiness
- A bit of Dijon mustard for tang
- A splash of vinegar or lemon juice to balance the salt
Once it tastes just right, remove it from the heat and let it sit for a minute or two. It will continue to thicken slightly as it cools.
Tips for the Best Ham Gravy
To make sure your ham gravy turns out restaurant-worthy every time, follow these expert tips:
- Whisk constantly – This prevents lumps and helps the gravy stay smooth.
- Taste before salting – Ham drippings are naturally salty. Always taste before adding salt.
- Use a fat separator if needed – Too much fat can make the gravy greasy. A separator helps balance richness.
- Simmer slowly – Rushing the cooking process can lead to a gritty or uneven texture.
- Add richness smartly – Butter or cream can add depth, but use sparingly to avoid overpowering the ham flavor.
A good gravy should enhance your meal, not overpower it. These tips help you strike the perfect balance every time.
Common Mistakes to Avoid
Even simple recipes can go sideways. Here are common pitfalls when making ham gravy—and how to steer clear:
- Using cold liquid – Always add warm or room temperature liquid to your roux to prevent clumping.
- Not cooking the flour – Raw flour gives a pasty taste. Always cook the roux until it’s lightly browned.
- Over-seasoning – It’s easy to go overboard with salt, especially if your drippings are already salty.
- Skipping the whisking – This is a hands-on recipe. Whisking is essential to prevent lumps.
- Burning the drippings – Always use medium heat and keep an eye on the pan. Burned drippings ruin the whole batch.
Avoid these errors, and you’ll have a gravy that’s worthy of center stage on any dinner table.
Serving Suggestions
Pairing Ideas
Ham gravy is incredibly versatile, and once you’ve made it, the only question left is: what should you pour it on? The possibilities are mouthwatering. Here are some of the best dishes to pair it with:
- Biscuits – A Southern staple. Warm, fluffy biscuits smothered in savory ham gravy make for an irresistible breakfast or brunch.
- Mashed Potatoes – Skip the traditional turkey or beef gravy and drizzle this smoky goodness over a mound of creamy mashed potatoes.
- Fried or Baked Ham Slices – Enhance the flavor of your main dish by pouring the gravy right on top.
- Cornbread or Corn Muffins – The salty-sweet balance here is pure comfort food magic.
- Scrambled Eggs – Don’t knock it till you try it. A little ham gravy over eggs and toast turns a simple breakfast into something indulgent.
- Southern Grits – For a hearty, soul-warming meal, add ham gravy to creamy grits with a sprinkle of cheese.
The savory, slightly salty flavor of ham gravy complements just about anything you’d serve with ham. It elevates simple sides and turns leftovers into next-day favorites.
Leftover Magic
Got leftovers? Ham gravy is your secret weapon. It transforms even the dullest dish into something extraordinary. Here’s how to stretch your gravy for days:
- Gravy Bowl – Think rice or mashed potatoes, sautéed veggies, and leftover ham all in one bowl, smothered with gravy.
- Savory Bread Pudding – Add a ladle of gravy to cubed bread, cheese, and veggies, then bake it.
- Pasta or Egg Noodles – It’s like carbonara’s country cousin. A creamy, salty coating over warm noodles? Yes, please.
- Open-Faced Sandwiches – Top bread with ham, a slice of cheese, and ham gravy, then broil until melty.
- Ham Gravy Casserole – Layer it with pasta or rice, ham, peas, and cheese, and bake until bubbly.
The best part? You’ll never waste a drop.
Storing and Reheating
Ham gravy stores surprisingly well, making it ideal for make-ahead meals or saving leftovers. Here’s how to keep it fresh and reheat it like a pro:
Storage Tips:
- Refrigerator – Pour leftover gravy into an airtight container and refrigerate for up to 4 days.
- Freezer – Freeze for up to 3 months. Use a freezer-safe bag or container and label it with the date.
Reheating Tips:
- On the Stove – Heat gently in a saucepan over low to medium heat. Add a splash of milk, broth, or water to loosen it up.
- Microwave – Use a microwave-safe dish. Heat in 30-second bursts, stirring in between. Add a bit of liquid if it’s too thick.
- Avoid Boiling – Boiling can cause separation and ruin the smooth texture. Low and slow is the way to go.
When properly stored and gently reheated, ham gravy keeps its rich flavor and velvety texture—perfect for second (or third) helpings.
FAQs about Ham Gravy Recipe
1. Can I make ham gravy without drippings?
Yes! Use ham bouillon or ham base dissolved in water, add butter or oil as the fat, and proceed with the same steps.
2. Is ham gravy gluten-free?
Not usually, since it uses flour. But you can substitute with cornstarch or a gluten-free flour blend for a GF version.
3. What if my gravy is too salty?
Add a little sugar, cream, or unsalted broth to balance the salt. Potatoes or rice can also soak up the extra salt if served underneath.
4. Can I add herbs to my ham gravy?
Absolutely! Fresh thyme, parsley, or a bay leaf can add depth. Just remove any whole herbs before serving.
5. How do I fix lumpy gravy?
Use a whisk vigorously, or pour the gravy through a fine mesh sieve. You can also blend it for a smoother texture.
Final Thoughts
Ham gravy is one of those simple joys in life that doesn’t require a lot of fuss but delivers massive flavor. Whether you’re whipping it up after a holiday meal, looking to elevate a regular weeknight dinner, or just craving some comfort food, this recipe has you covered.
It’s rich, savory, and deeply satisfying—a true kitchen staple that deserves a permanent place in your recipe rotation. With this step-by-step guide, you’ve got everything you need to make your ham gravy thick, flavorful, and perfectly smooth every single time.
So go ahead, pour it on thick—you’ve earned it.