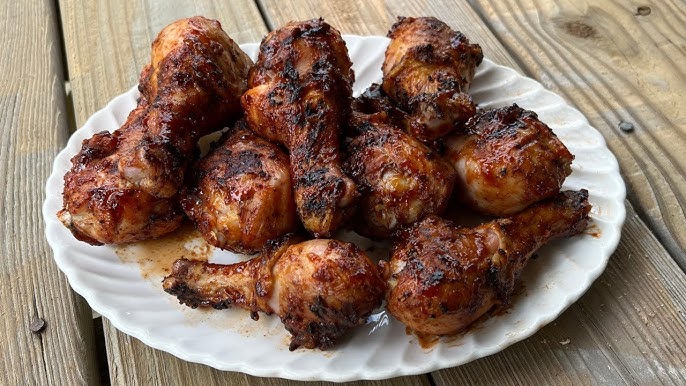
Grilled Chicken Legs Recipe: Grilled chicken legs are one of the most flavorful, affordable, and satisfying meals we can prepare on a grill. When cooked properly, they deliver crispy skin, juicy meat, and a rich smoky taste that makes them perfect for family dinners, outdoor cookouts, weekend gatherings, and simple weeknight meals. This method focuses on creating tender grilled chicken legs with a well-seasoned exterior and deep, savory flavor in every bite.
The beauty of this grilled chicken legs recipe is that it uses simple ingredients, straightforward preparation, and an easy grilling process that produces reliable results. With the right seasoning blend, proper heat control, and a careful finishing step, we can achieve chicken drumsticks that look impressive and taste even better.
Ingredients You’ll Need
To make the best grilled chicken legs, we need fresh ingredients that build bold flavor and help the chicken stay moist while cooking.
For the Chicken
- 8 chicken legs
- 2 tablespoons olive oil
- 1 tablespoon paprika
- 1 teaspoon smoked paprika
- 1 teaspoon garlic powder
- 1 teaspoon onion powder
- 1 teaspoon dried thyme
- 1 teaspoon dried parsley
- 1 teaspoon black pepper
- 1½ teaspoons salt
- ½ teaspoon cayenne pepper optional
- 1 tablespoon brown sugar
- 1 tablespoon lemon juice
Optional Basting Sauce
- ¼ cup barbecue sauce
- 1 tablespoon honey
- 1 teaspoon apple cider vinegar
These ingredients create a strong balance of smoky, savory, slightly sweet, and fresh flavors. The oil helps the seasoning stick to the chicken, while the spices build color and depth during grilling.
How to Prepare Chicken Legs for Grilling
Before we place the chicken on the grill, proper preparation is essential. Start by rinsing the chicken legs if preferred, then pat them completely dry with paper towels. Dry skin is important because it helps the surface brown better and prevents steaming on the grill.
Trim away any excess loose skin or fat hanging from the drumsticks. This keeps flare-ups under control and gives the chicken a cleaner appearance. Once the chicken is dry and trimmed, place it in a large bowl.
Drizzle the olive oil and lemon juice over the chicken legs. In a separate small bowl, mix the paprika, smoked paprika, garlic powder, onion powder, thyme, parsley, black pepper, salt, cayenne pepper, and brown sugar. Sprinkle the seasoning blend evenly over the chicken and rub it thoroughly into every piece. Make sure the seasoning reaches all sides so the flavor stays consistent.
Let the chicken rest for at least 30 minutes after seasoning. For deeper flavor, cover and refrigerate it for 2 to 8 hours. This extra time allows the spices to penetrate the meat and improves the final taste.
Best Grill Setup for Chicken Legs
The secret to perfectly cooked grilled chicken drumsticks is using a two-zone grilling method. Chicken legs contain more connective tissue and bone than boneless cuts, so they need enough time to cook through without burning on the outside.
Prepare the grill with:
- One side on medium heat
- One side on low heat or with no direct flame underneath
For a gas grill, light only one or two burners and leave another section cooler. For a charcoal grill, move most of the coals to one side so there is a hot zone and a cooler zone.
Preheat the grill to about 375°F to 400°F. Clean the grates well and lightly oil them to reduce sticking. This setup helps the chicken cook slowly at first and finish over direct heat for color and crispness.
Step-by-Step Guide to Grilling Chicken Legs
Step 1 – Preheat and Prepare the Grill
Heat the grill to medium temperature and create separate cooking zones. Once hot, brush the grates clean and oil them lightly. Properly prepared grill grates help prevent tearing the chicken skin during cooking.
Step 2 – Place Chicken on the Cooler Side First
Arrange the seasoned chicken legs on the cooler side of the grill. Close the lid and allow them to cook gently for about 20 to 25 minutes, turning every 5 to 7 minutes. This slower stage gives the inside time to cook without charring the outside too quickly.
Cooking over indirect or lower heat first is the most effective way to make sure the meat near the bone becomes tender while the seasoning develops gradually.
Step 3 – Move Chicken to Direct Heat
Once the chicken has started to firm up and the skin begins to take on color, move the drumsticks to the hotter side of the grill. Grill them for another 10 to 15 minutes, turning frequently to avoid burning.
At this stage, the chicken develops that classic grilled chicken legs appearance: rich color, slight char, and crisp edges. If flare-ups occur, move the chicken briefly back to the cooler side until the flames settle.
Step 4 – Baste for Extra Flavor
If using the optional sauce, mix the barbecue sauce, honey, and apple cider vinegar in a small bowl. During the last 5 minutes of cooking, brush a thin layer over the chicken legs and turn them often.
Applying sauce too early can cause it to burn because of the sugar content. Brushing it on near the end gives the chicken a glossy finish and added flavor without scorching.
Step 5 – Check Internal Temperature
The chicken legs are done when the thickest part reaches an internal temperature of 175°F to 185°F. While chicken is technically safe at a lower point, drumsticks become much more tender when cooked slightly higher. Use a meat thermometer and avoid touching the bone for an accurate reading.
The finished chicken should have clear juices, well-rendered skin, and meat that pulls easily from the bone while staying juicy.
Step 6 – Rest Before Serving
Remove the chicken from the grill and let it rest for 5 to 10 minutes before serving. Resting helps the juices redistribute through the meat, keeping the chicken moist and flavorful.
Why This Grilled Chicken Legs Recipe Works
This method delivers excellent results because it combines seasoning, controlled heat, and proper finishing time. Chicken legs are naturally flavorful because of their dark meat content, but they need patience on the grill. A rushed cooking process often leaves the outside too dark while the inside remains undercooked.
By starting with moderate heat, we allow the chicken to cook evenly. By finishing over direct heat, we build the texture and color that make grilled chicken legs so appealing. The spice blend adds complexity without overpowering the natural chicken flavor.
Tips for the Best Grilled Chicken Legs
Pat the Chicken Dry
Dry skin browns better and holds seasoning more effectively. Excess moisture leads to steaming instead of grilling.
Use Oil Lightly
A small amount of oil is enough to coat the chicken and help the spices stick. Too much oil can cause unnecessary flare-ups.
Turn Frequently
Turning the chicken every few minutes keeps the skin from burning and helps it cook evenly on all sides.
Avoid High Heat Too Early
Direct high heat at the beginning can blacken the seasoning long before the meat is fully cooked. Start gently, then finish hot.
Use a Thermometer
A meat thermometer removes guesswork and ensures the chicken reaches the ideal texture and doneness.
Rest Before Serving
Even a short resting time improves moisture retention and overall flavor.
Flavor Variations for Grilled Chicken Legs
One of the best things about grilled chicken legs is how easily we can change the flavor profile.
Spicy Grilled Chicken Legs
Add more cayenne pepper, chili powder, and a dash of hot sauce to the seasoning mix for a hotter finish.
Garlic Herb Chicken Legs
Use more garlic powder, dried rosemary, parsley, and thyme for a fresher herb-forward flavor.
Sweet and Smoky Chicken Legs
Increase the brown sugar slightly and add extra smoked paprika for deeper caramelized notes.
Lemon Pepper Chicken Legs
Use fresh lemon zest, black pepper, garlic powder, and a touch of butter after grilling for a bright, bold result.
Barbecue Chicken Legs
Brush generously with your favorite barbecue sauce in the last few minutes of grilling for a sticky, classic cookout version.
What to Serve with Grilled Chicken Legs
These grilled chicken drumsticks pair well with many side dishes, making them ideal for both casual meals and larger gatherings. Excellent serving options include:
- Coleslaw
- Potato salad
- Grilled corn
- Baked beans
- Mac and cheese
- Rice pilaf
- Roasted vegetables
- Garden salad
- Garlic bread
For a lighter plate, serve them with sliced cucumbers, tomatoes, and a lemony yogurt dip. For a heartier meal, pair them with fries, mashed potatoes, or seasoned rice.
How to Store and Reheat Grilled Chicken Legs
Store leftover chicken legs in an airtight container in the refrigerator for up to 4 days. To reheat, place them in an oven at 350°F until warmed through. This method helps preserve the texture better than microwaving.
If using a microwave, cover the chicken lightly and heat in short intervals to avoid drying it out. Leftover grilled chicken legs can also be shredded and added to wraps, sandwiches, salads, or rice bowls.
Common Mistakes to Avoid
A few common mistakes can affect the outcome of grilled chicken:
Skipping the Drying Step
Wet chicken skin prevents proper browning and reduces texture.
Cooking Only Over Direct Heat
This often burns the outside before the inside fully cooks.
Adding Sauce Too Early
Sugary sauces burn fast and can turn bitter if applied too soon.
Not Monitoring Temperature
Visual cues help, but a thermometer provides the best accuracy.
Removing Chicken Too Soon
Drumsticks need enough time for the connective tissue to soften and the meat to become tender.
FAQs about Grilled Chicken Legs Recipe
1. What are grilled chicken legs?
Grilled chicken legs are chicken drumsticks cooked on a grill until the meat is tender, juicy, and the skin is lightly charred and flavorful.
2. Should we marinate chicken legs before grilling?
Yes, marinating helps add flavor, moisture, and tenderness. Even a short marinade can improve the taste.
3. How long do chicken legs take to grill?
They usually take about 30 to 40 minutes over medium heat, turning occasionally to cook evenly.
4. How do we know when grilled chicken legs are done?
The outside should be nicely browned, and the juices should run clear. The meat should be fully cooked and no longer pink near the bone.
5. What seasonings work well for grilled chicken legs?
They pair well with garlic, paprika, black pepper, herbs, lemon, barbecue seasoning, and simple spice blends.
6. Should we grill chicken legs over direct or indirect heat?
It is often best to start with indirect heat so they cook through, then finish over direct heat for a crisp, charred outside.
7. Can we use barbecue sauce on grilled chicken legs?
Yes, but it is best to add barbecue sauce toward the end of grilling so it does not burn too early.
8. What can we serve with grilled chicken legs?
They pair well with rice, salads, grilled vegetables, corn, potatoes, or flatbread.
9. Can we grill chicken legs without an outdoor grill?
Yes, we can use a grill pan, oven broiler, or air fryer for a similar result.
10. Can grilled chicken legs be stored and reheated?
Yes, they can be stored in an airtight container in the refrigerator for 3 to 4 days and reheated before serving.
Final Thoughts
This grilled chicken legs recipe is a dependable choice when we want a meal that is simple, budget-friendly, and full of bold flavor. With the right seasoning, balanced grill temperature, and careful timing, we can produce juicy grilled chicken legs with crisp skin and deep smoky taste every time.
Whether we are cooking for a weekend barbecue, a family dinner, or a relaxed outdoor gathering, these chicken legs offer the kind of flavor and texture that keep everyone reaching for another piece. The method is practical, the ingredients are accessible, and the results are consistently delicious. When we want perfect grilled chicken legs, this step-by-step guide gives us everything needed to make them successfully.