Grilled Chicken Breast Recipe: Grilled chicken breast is like that reliable friend who never lets you down. It’s quick, it’s healthy, and if done right, it’s insanely delicious. Whether you’re prepping for a week’s worth of meals or hosting a laid-back backyard BBQ, grilled chicken fits right in. The best part? You don’t need to be a pro chef to nail this recipe. All it takes is the right technique, a few everyday ingredients, and some patience.
Beyond the convenience, grilled chicken breast is packed with lean protein and low in fat, making it an ideal choice for fitness lovers and foodies alike. When seasoned and grilled just right, each bite is juicy, tender, and bursting with flavor. No more dry, bland chicken that makes you question your life choices—this guide is here to help you master grilled chicken once and for all.
So if you’ve ever wondered how restaurants get their grilled chicken just right, stick around. This article is your step-by-step blueprint to achieve that perfectly charred, flavorful chicken breast in your own kitchen—or backyard.
List of Ingredients You’ll Need
Let’s kick things off with the essentials. You don’t need a ton of fancy stuff to make grilled chicken taste amazing, but having the right ingredients makes all the difference. Here’s what you’ll want to gather:
Main Ingredients:
- 2 to 4 boneless, skinless chicken breasts (about 6-8 oz each)
- 2 tablespoons olive oil (or any neutral oil)
- Salt to taste
- Freshly ground black pepper
Optional Marinade Ingredients:
- 2 tablespoons soy sauce
- 1 tablespoon lemon juice or vinegar
- 1 teaspoon honey or brown sugar
- 2 cloves garlic (minced)
- 1 teaspoon Dijon mustard
- 1 teaspoon paprika or chili powder
Recommended Seasonings (Choose Your Combo):
- Italian seasoning
- Smoked paprika
- Onion powder
- Garlic powder
- Crushed red pepper flakes
- Cumin or coriander for a smoky twist
Tools You’ll Need:
- Grill (gas or charcoal)
- Tongs
- Meat thermometer
- Plastic wrap or resealable bag (for marinating)
- Knife and cutting board
- Basting brush (optional)
Mix and match your ingredients to suit your taste. Whether you’re a fan of bold spices or prefer it mild and herby, this recipe is super adaptable. Now that your ingredient list is sorted, it’s time to prep the chicken!
Preparing the Chicken
First things first, let’s talk about chicken prep. This step might not sound glamorous, but it’s crucial if you want juicy, evenly cooked chicken breasts.
Start by choosing high-quality chicken. Look for organic or free-range if possible—it tends to be more flavorful and tender. Once you’ve got your chicken, you’ll want to trim off any visible fat, cartilage, or tendons. Don’t skip this—it improves both the taste and texture.
Now here’s a pro tip: pound the chicken breasts to even thickness. This makes sure they cook evenly. If one end is thicker than the other, that part will take longer to cook, leaving the thin end overdone and dry. Place the chicken between two sheets of plastic wrap and gently pound it using a meat mallet or rolling pin until it’s about ½ to ¾ inch thick.
Give the chicken a quick rinse under cold water and pat dry with paper towels. Dry chicken takes on marinades better and creates a better sear on the grill.
Once trimmed and pounded, you’re ready to move to the fun part—marinating!
Marinating the Chicken
Marinating is like giving your chicken a spa treatment. It soaks up flavors and helps break down the proteins, making each bite juicier and more flavorful. You don’t need to go overboard with fancy ingredients—just a simple combo of acid, oil, salt, and spices does wonders.
Let’s keep it simple: mix olive oil, lemon juice, minced garlic, Dijon mustard, and a splash of soy sauce. Add in your preferred spices (paprika, cumin, or Italian seasoning work great). Whisk it all together in a bowl.
Place the chicken breasts in a resealable bag or a glass container and pour the marinade over them. Make sure the chicken is well coated. Seal the bag and place it in the fridge. Let it marinate for at least 30 minutes, but if you have more time, go for 4–6 hours. Overnight works too!
One quick tip: Don’t go past 24 hours. The acid can start to break down the meat too much and make it mushy.
When you’re done marinating, take the chicken out of the fridge about 15 minutes before grilling. Letting it come to room temperature helps it cook more evenly.
Prepping the Grill
Before you slap that chicken on the grill, let’s make sure the grill itself is ready to go. Whether you’re using a gas or charcoal grill, the prep work here is super important. A poorly prepped grill can lead to uneven cooking, sticking, and a sad, flavorless result. And we don’t want that, do we?
Gas vs. Charcoal: What’s the Difference?
- Gas grills are convenient and easy to control. Just turn the knob, and you’re ready to go.
- Charcoal grills give a smokier flavor but require more effort—lighting the coals, maintaining heat, and cleaning afterward.
No matter what you’re using, preheating is key. You want that grill hot—like 400°F (200°C) hot—before placing the chicken. This sears the outside and locks in juices.
Steps to Prep Your Grill:
- Clean the grates – Use a wire brush to scrub off any old food or debris.
- Oil the grates – Dip a paper towel in oil and use tongs to rub it over the grates. This helps prevent sticking.
- Set up heat zones – If using a gas grill, leave one side on medium-high heat and the other on low. For charcoal, pile coals on one side. This lets you move the chicken around if it starts cooking too fast.
Once your grill is clean, oiled, and properly heated, it’s showtime.
Step-by-Step Grilling Instructions
Alright, let’s break this down step by step so there’s no guesswork. Here’s exactly how to grill chicken breast like a seasoned pro:
Step 1: Preheat the Grill
Fire up your grill to medium-high heat. Give it about 10–15 minutes to fully heat. Don’t rush this part—high heat gives you those gorgeous grill marks.
Step 2: Oil the Grates
We already touched on this, but it’s worth repeating: oil the grates! A stuck chicken breast is a ruined chicken breast.
Step 3: Place the Chicken on the Grill
Lay the chicken breasts on the grill grates, smooth side down. Don’t move them around—let them sit and sear.
Step 4: Grill Time Per Side
Grill each side for about 5–7 minutes. Don’t flip too early. You’ll know it’s ready to flip when it easily lifts off the grill.
Step 5: Check Internal Temperature
Use a meat thermometer to check the thickest part of the chicken. It should hit 165°F (74°C) for safe eating.
Step 6: Rest the Chicken
This is a crucial step! Let the grilled chicken rest for 5–10 minutes after removing it from the grill. Resting locks in all those flavorful juices.
Boom—done! You’ve just grilled some epic chicken breasts.
Common Mistakes to Avoid
Even the most confident home chefs fall into a few common traps when grilling chicken. Let’s dodge those like a pro.
1. Overcooking the Chicken
Chicken breast is lean, which means it dries out fast. Always use a meat thermometer. Guessing doesn’t work here.
2. Not Letting It Rest
Cutting too soon lets the juices spill out. It’s like popping a balloon full of flavor—don’t do it.
3. Skipping the Oil on the Grates
Sticking equals tearing, which equals dry, sad chicken. Oil those grates.
4. Uneven Thickness
If one end is thick and the other is thin, it’ll cook unevenly. Always pound to even thickness.
5. Flipping Too Often
This is not a pancake. Flip only once to get that seared crust.
Avoid these mistakes, and your grilled chicken game will level up immediately.
Tips for Juicy Grilled Chicken Breast
Want next-level chicken that practically melts in your mouth? Here’s how to keep things juicy and flavorful every single time.
Brining vs. Marinating
If you’ve got time, brine your chicken in a saltwater solution for 30 minutes before marinating. This locks in moisture and adds a layer of seasoning from the inside out.
Use a Meat Thermometer
It’s your best friend. Remove the chicken once it hits 160°F—carryover cooking will bring it to 165°F while it rests.
Don’t Overcrowd the Grill
Space between chicken breasts lets the heat circulate, cooking everything evenly.
Let the Chicken Rest
Yep, repeating it again because it’s that important. Resting helps redistribute juices and keeps the meat tender.
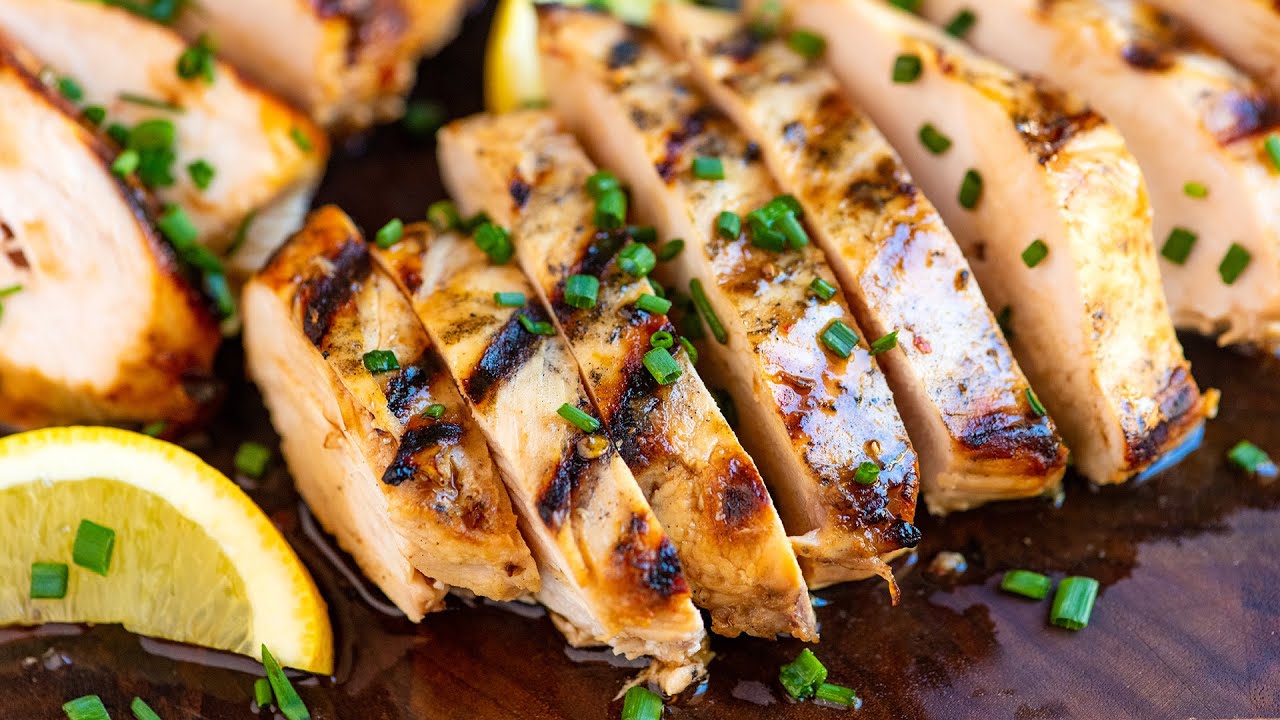
Slice Against the Grain
When you’re ready to serve, slice the chicken against the grain. This shortens the muscle fibers and makes each bite more tender.
With just a few of these tricks, even dry chicken days will be a thing of the past.
Serving Suggestions
So, your grilled chicken is hot off the grill, juicy, and full of flavor. Now what? The beauty of grilled chicken breast is its versatility—you can pair it with just about anything, from a fresh salad to creamy pasta. It’s like a blank canvas for deliciousness.
Classic Pairings:
- Grilled Vegetables – Bell peppers, zucchini, onions, or asparagus grilled alongside the chicken make a perfect match.
- Mashed or Roasted Potatoes – Creamy mashed potatoes or crispy herb-roasted ones complement the smoky chicken flavor.
- Rice or Quinoa – Go light with brown rice or mix it up with a quinoa salad.
Healthy Sides:
- Garden Salad with vinaigrette
- Steamed broccoli or green beans
- Cauliflower mash for a low-carb twist
Top It Off:
- A drizzle of garlic butter or herb-infused olive oil
- Sliced avocado or a dollop of Greek yogurt
- A spoonful of homemade salsa or chimichurri sauce
Meal Prep Ideas:
- Dice the chicken for wraps or burrito bowls
- Slice it over a Caesar or Cobb salad
- Pair it with pasta for a quick weeknight dinner
No matter how you serve it, grilled chicken breast plays well with just about any flavor combo. Go creative or keep it simple—it’s all good.
Variations of the Grilled Chicken Recipe
Ready to switch things up? While the classic grilled chicken breast is amazing on its own, adding a twist can take it to another level. Here are a few delicious variations to explore:
Spicy Grilled Chicken
Love some heat? Add cayenne pepper, chili flakes, or your favorite hot sauce to the marinade. Serve with cooling cucumber yogurt sauce or ranch on the side.
Lemon Herb Chicken
Bright and zesty! Marinate your chicken in lemon juice, olive oil, rosemary, thyme, and garlic. It’s fresh, flavorful, and perfect for summer dinners.
BBQ Glazed Chicken
Brush your chicken with BBQ sauce in the last 2–3 minutes of grilling. The sauce caramelizes and creates a sticky, smoky glaze that’s irresistible.
Mediterranean Style
Use olive oil, lemon, oregano, garlic, and a bit of yogurt for a Mediterranean flavor profile. Serve with couscous, olives, and feta.
Teriyaki Grilled Chicken
Make or buy a teriyaki marinade and let your chicken soak for a few hours. Grill and top with sesame seeds and green onions.
The variations are endless. Switch up your seasonings, try global flavors, and experiment with sauces to keep things interesting.
How to Store and Reheat Grilled Chicken
Grilled chicken is meal prep gold—but only if you store and reheat it right. Let’s make sure your leftovers stay as good as the first bite.
Storing:
- Let the chicken cool completely before storing.
- Place in an airtight container or wrap tightly with foil.
- Store in the refrigerator for up to 4 days.
Freezing:
- Wrap individual breasts in plastic wrap, then foil, or place them in freezer-safe bags.
- Label with the date.
- Freeze for up to 3 months.
Reheating Without Drying Out:
- Oven: Preheat to 325°F, cover the chicken with foil, and heat for 10–15 minutes.
- Microwave: Cover with a damp paper towel and heat in 30-second bursts to prevent overcooking.
- Skillet: Add a splash of broth or water and reheat over low heat with a lid.
Pro tip: slice before reheating for even warming and quicker cook times.
Nutritional Information
Grilled chicken breast isn’t just tasty—it’s a nutrition powerhouse, especially for anyone trying to eat clean or maintain a balanced diet.
| Nutrient | Per 6 oz (170g) Grilled Chicken Breast |
|---|---|
| Calories | ~280 |
| Protein | 52g |
| Total Fat | 6g |
| Saturated Fat | 1.5g |
| Carbohydrates | 0g |
| Fiber | 0g |
| Sugar | 0g |
| Sodium | Varies by seasoning/marinade |
- Gluten-Free – Naturally contains no gluten.
- Keto-Friendly – Zero carbs, high in protein and fat.
- Low-Calorie – Ideal for calorie-conscious diets.
The macros may vary slightly depending on your marinade or if you use skin-on chicken, but this gives a solid base for tracking.
Benefits of Eating Grilled Chicken Regularly
Grilled chicken breast isn’t just delicious—it’s one of the best foods you can add to your weekly meal plan. Seriously, it’s a clean-eating staple, packed with benefits that go far beyond just satisfying hunger. Let’s take a look at why adding grilled chicken to your diet is a smart (and tasty) move.
1. High-Quality Protein
Each grilled chicken breast is loaded with lean protein—about 50+ grams per serving. That’s essential for building and maintaining muscle, repairing tissue, and keeping you full longer. Whether you’re bulking, cutting, or just trying to stay healthy, chicken’s got your back.
2. Low in Fat and Calories
Unlike fried or breaded options, grilled chicken is low in saturated fat and calories. It gives you the nutrients you need without the extras you don’t. Perfect for anyone trying to lose weight, maintain a calorie deficit, or manage cholesterol levels.
3. Rich in Nutrients
Beyond protein, chicken breast provides B vitamins (especially niacin and B6), which help with energy metabolism and brain function. It also contains phosphorus and selenium, which are great for bones and immune health.
4. Heart-Healthy Option
When grilled instead of fried, chicken becomes a heart-smart choice. It supports cardiovascular health when included in a balanced diet with fruits, veggies, and whole grains.
5. Versatile for Any Diet
Whether you’re going gluten-free, low-carb, paleo, Whole30, or Mediterranean, grilled chicken fits the bill. It’s one of the few foods that can seamlessly adapt to nearly every dietary lifestyle.
So the next time someone says grilled chicken is boring, hit them with the facts—and maybe a bite of your perfectly seasoned, juicy chicken breast.
FAQs about Grilled Chicken Breast Recipe
Let’s tackle some of the most common questions people have when grilling chicken at home:
1. Can I grill frozen chicken breast?
Technically, yes—but it’s not ideal. Frozen chicken won’t cook evenly and is more likely to dry out. It’s best to thaw it completely in the fridge overnight before grilling for optimal texture and taste.
2. How do I know when chicken is fully cooked?
The best way is with a meat thermometer. Chicken is safe to eat at 165°F (74°C). If you don’t have a thermometer, cut into the thickest part—if the juices run clear and there’s no pink, you’re good to go.
3. What’s the best oil for grilling chicken?
Use oils with a high smoke point, like avocado oil, canola oil, or grapeseed oil. Olive oil works too but can burn if the grill is too hot.
4. Can I use this recipe for thighs or drumsticks?
Absolutely. Thighs and drumsticks are even juicier than breasts and work great on the grill. Just adjust the cooking time (usually longer) and check that the internal temp hits 165°F.
5. Is grilled chicken healthier than fried?
Definitely. Grilled chicken has far less fat and fewer calories than fried. It also avoids the harmful compounds that can form during deep frying. If health is your goal, grilled wins every time.
Conclusion
Grilled chicken breast is the ultimate kitchen MVP. It’s fast, easy, versatile, and loaded with lean protein and nutrients. Whether you’re aiming to eat healthier, build muscle, or just make weeknight dinners a little less chaotic, this step-by-step guide gives you all the tools you need.
From choosing your chicken and mastering marinades to grilling like a pro and storing leftovers the right way—this article has your back every step of the way. Don’t be surprised if grilled chicken becomes a go-to meal in your house. It’s tasty, it’s practical, and it never goes out of style.
Now get out there, fire up that grill, and show the world what perfectly cooked chicken really tastes like. You’ve got this.