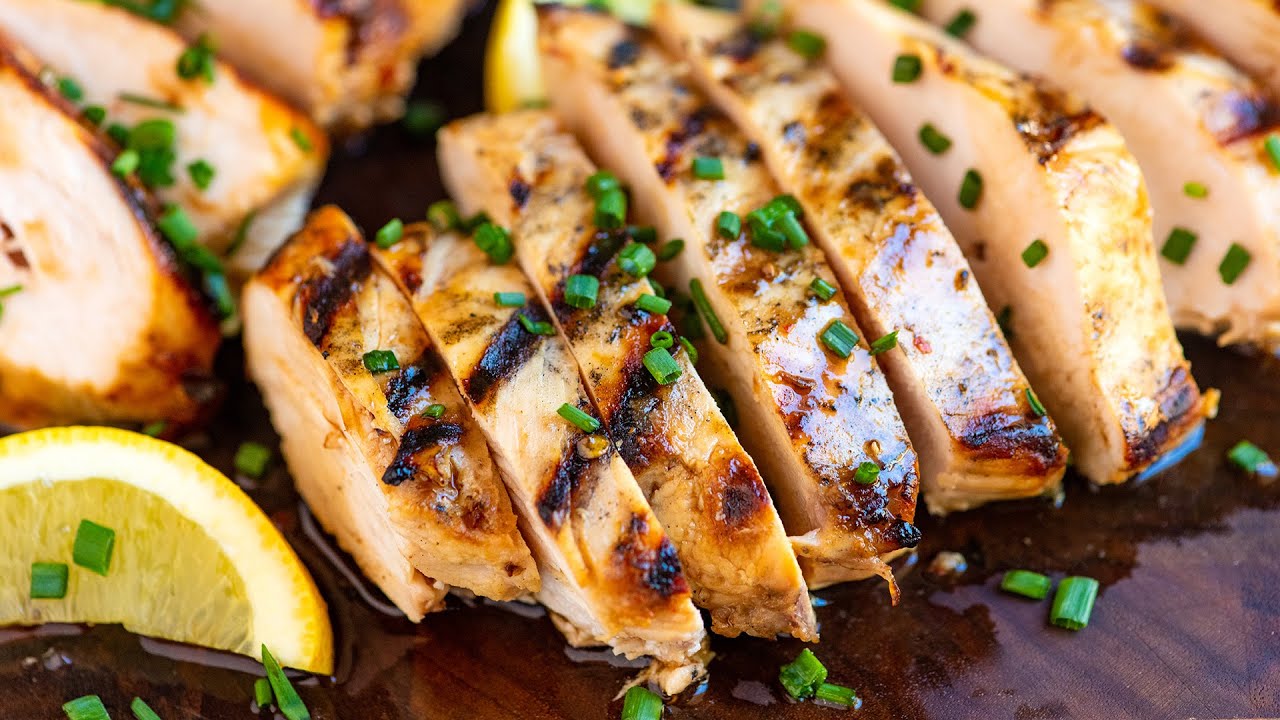
Grilled Chicken Breast Recipe: Ever stood in front of the grill wondering how people get their chicken breasts perfectly juicy, golden brown, and full of flavor? You’re not alone. Grilled chicken breast is one of those dishes that seem simple but can easily go wrong—rubbery texture, dry meat, uneven cooking… we’ve all been there. But here’s the thing—it doesn’t have to be that way.
Grilled chicken breasts are the MVP of healthy meals. They’re lean, high in protein, and a total blank canvas for all kinds of seasonings and marinades. Whether you’re cooking for a weeknight dinner, meal prepping for the week, or impressing guests at a BBQ, mastering this dish is worth it. Plus, the right grilled chicken breast can go from simple to sensational with just a few small tweaks.
In this guide, you’ll learn everything from selecting the best chicken breasts to marinating them, grilling them to perfection, and serving them like a pro. Ready to up your grill game? Let’s go step by step.
Ingredients You’ll Need
Before we fire up the grill, let’s get our ingredients in order. Keeping it simple is key, but don’t be afraid to experiment with flavors based on your mood or pantry.
Primary Ingredients:
- 2 boneless, skinless chicken breasts (about 6–8 oz each)
- 2 tablespoons olive oil
- 1 teaspoon salt (Kosher or sea salt works best)
- ½ teaspoon freshly ground black pepper
- 1 teaspoon garlic powder
- 1 teaspoon smoked paprika (optional but adds great depth)
Optional Flavor Boosters:
- Juice of 1 lemon or lime (for brightness)
- 1 tablespoon soy sauce (for umami)
- ½ teaspoon chili flakes (if you like heat)
- 1 tablespoon honey or maple syrup (for a sweet-savory combo)
- Fresh herbs like rosemary, thyme, or parsley (chopped)
You can go as minimal or as wild as you like. The beauty of grilled chicken breast is that it’s incredibly flexible. A simple salt-pepper combo can be just as delightful as a marinated masterpiece.
Equipment You’ll Need
Grilling chicken doesn’t require fancy tools, but a few key items will make your life easier and the outcome tastier.
Basic Tools:
- Grill (gas or charcoal)
- Tongs
- Meat thermometer (not optional if you want perfect doneness)
- Sharp knife
- Cutting board
Optional Tools:
- Grill brush (for cleaning grates)
- Basting brush (if using marinade during grilling)
- Meat mallet (for even thickness)
- Zip-top bag or shallow dish (for marinating)
Having the right gear ensures you’re set up for success and not scrambling mid-grill session. Ever tried flipping chicken with a fork? Yeah, don’t.
How to Choose the Best Chicken Breast
The quality of your chicken affects everything—flavor, texture, juiciness. So choose wisely!
Fresh vs. Frozen
Fresh chicken has better texture and tends to grill more evenly. However, if using frozen chicken, just make sure it’s fully thawed in the fridge (never at room temp) before grilling.
Organic or Conventional?
Organic, free-range chicken is typically less water-logged and more flavorful. But if budget is a concern, conventional chicken works fine—just consider brining or marinating to enhance taste and moisture.
Look for:
- Plump, pink chicken breasts
- No odd smell or slimy surface
- Uniform thickness (or pound it to even out)
Step-by-Step Guide to Making Perfect Grilled Chicken Breast
Time to get our hands dirty (literally). Follow these steps exactly, and you’ll end up with golden, juicy perfection every single time.
Step 1: Preparing the Chicken
Start by patting the chicken breasts dry with paper towels. This helps the seasoning stick and ensures a better sear. If your chicken is thicker on one side, use a meat mallet to pound it to an even ½–¾ inch thickness. This ensures even cooking and reduces the chance of dried-out edges.
Then, drizzle the olive oil and season evenly with salt, pepper, garlic powder, and paprika. Don’t just dump everything on top—rub it in like you mean it.
Step 2: Marinating the Chicken (Optional but Recommended)
Marinating adds moisture, tenderizes the meat, and deepens flavor. Even 30 minutes makes a difference, but overnight? That’s flavor magic.
Simple Marinade Recipe:
- ¼ cup olive oil
- 2 tbsp lemon juice
- 2 garlic cloves, minced
- 1 tsp oregano
- Salt and pepper to taste
Mix and pour into a zip-top bag with your chicken. Refrigerate and turn occasionally.
Step 3: Prepping the Grill
Preheat your grill to medium-high (about 400–450°F). This is crucial—never place chicken on a cold grill!
Clean and oil the grates. This prevents sticking and helps get those beautiful grill marks.
Step 4: Grilling the Chicken
Place the chicken on the grill and close the lid. Let it sear for 5–6 minutes. Don’t touch it! You want those sear marks.
Flip and grill the other side for another 5–6 minutes.
Step 5: Checking for Doneness
Use a meat thermometer inserted into the thickest part. You’re aiming for 165°F.
If you’re grilling thick pieces, move them to indirect heat after searing and cook a bit longer.
Step 6: Resting the Chicken
Once it hits 165°F, pull it off and let it rest for 5–10 minutes. This helps the juices redistribute so you don’t lose them when slicing.
Pro Tips for Juicy and Flavorful Chicken
Grilled chicken breast can go from mouthwatering to dry in the blink of an eye. But don’t worry—these tips will keep your chicken juicy, tender, and downright irresistible every single time.
- Pound It Out: Uneven chicken cooks unevenly. Thicker parts take longer, which means thinner parts get overcooked. Use a meat mallet to even it out before grilling.
- Let It Marinate: Even a short 30-minute marinade adds moisture and flavor. If you’ve got more time, let it sit overnight.
- Don’t Skip the Rest: Once off the grill, let the chicken sit for 5–10 minutes before slicing. This allows the juices to settle into the meat instead of dripping all over your cutting board.
- Use Indirect Heat for Thick Cuts: If your chicken is still thick after pounding, start with direct heat for searing, then move it to indirect heat to finish cooking without burning the outside.
- Oil the Chicken, Not the Grill: Brushing oil directly onto the chicken (instead of spraying the grill) helps prevent flare-ups and sticking.
- No Constant Flipping: Let the chicken grill for at least 5–6 minutes on one side before flipping. This helps you get a proper sear and those pretty grill marks.
Best Marinades for Grilled Chicken Breast
Marinades are where the real magic happens. They infuse your chicken with flavor and help keep it moist during cooking. Here are a few tried-and-true favorites:
1. Classic Lemon-Garlic Marinade
Perfect for a Mediterranean flair.
Ingredients:
- ¼ cup olive oil
- 2 tbsp lemon juice
- 2 garlic cloves, minced
- 1 tsp dried oregano
- Salt and pepper to taste
2. Spicy BBQ Marinade
For when you want bold, smoky, sweet heat.
Ingredients:
- 3 tbsp BBQ sauce
- 1 tbsp apple cider vinegar
- 1 tsp paprika
- ½ tsp chili powder
- 1 tbsp honey
3. Mediterranean Herb Marinade
Pairs beautifully with grain bowls and salads.
Ingredients:
- ¼ cup Greek yogurt
- 1 tbsp lemon juice
- 2 tsp dried herbs (rosemary, thyme, basil)
- 2 garlic cloves, minced
- Salt and pepper
Marinating Tips:
- Use a zip-top bag to fully coat the chicken and save fridge space.
- Don’t marinate too long with acidic marinades (like vinegar or citrus), or it may start to “cook” the meat and affect texture.
Alternative Seasoning Ideas
Not a fan of wet marinades? No problem. Dry rubs and simple seasoning blends can pack just as much punch.
Popular Dry Rub Mixes:
- Cajun Rub: Paprika, cayenne, garlic powder, onion powder, oregano, thyme.
- Smoky BBQ Rub: Brown sugar, smoked paprika, chili powder, cumin, garlic powder.
- Italian Herb Mix: Dried basil, oregano, rosemary, garlic, sea salt, black pepper.
Tip: Dry rubs work best if applied at least 15–30 minutes before grilling to let the flavors soak in.
Ready-Made Spice Blends to Try:
- Taco seasoning
- Lemon pepper
- Montreal chicken spice
- Za’atar or sumac for Middle Eastern flair
Keep a few blends on hand for last-minute grilling sessions when you’re short on time but still want flavor.
Grilling Time and Temperature Chart
Cooking times can vary based on the thickness of your chicken and whether you’re using a gas or charcoal grill. Here’s a helpful guide:
| Chicken Breast Thickness | Grill Time (Per Side) | Total Grill Time | Internal Temp |
|---|---|---|---|
| ½ inch | 3–4 minutes | 6–8 minutes | 165°F |
| ¾ inch | 5–6 minutes | 10–12 minutes | 165°F |
| 1 inch | 6–7 minutes | 12–14 minutes | 165°F |
Gas Grill Tip: Keep the lid closed to maintain steady heat.
Charcoal Grill Tip: Use a two-zone fire—direct heat for searing, indirect for finishing.
Common Mistakes to Avoid
Even seasoned grillers slip up sometimes. Here’s what not to do when grilling chicken breasts:
- Overcooking: This is the #1 reason chicken turns out dry. Always use a meat thermometer and aim for 165°F.
- Skipping the Marinade or Seasoning: Even just salt and pepper can dramatically improve flavor.
- Putting Cold Chicken on the Grill: Let your chicken sit at room temp for 20–30 minutes before grilling. It helps cook more evenly.
- Flipping Too Often: Let each side cook undisturbed to get those beautiful grill marks.
- Forgetting to Clean the Grill Grates: Old food bits can cause sticking and uneven grilling. A quick brush before and after grilling makes all the difference.
Serving Suggestions
Grilled chicken is ultra-versatile, and what you serve it with can transform the whole vibe of your meal.
Healthy Sides:
- Grilled veggies (zucchini, bell peppers, asparagus)
- Quinoa or brown rice
- Sweet potato wedges
- Steamed broccoli or green beans
Salads to Pair With:
- Caesar salad with homemade dressing
- Greek salad with feta and olives
- Kale and avocado salad with lemon vinaigrette
- Caprese salad with balsamic glaze
Sauces to Drizzle:
- Garlic aioli
- Pesto
- Tzatziki
- Chimichurri
Want to keep it low-carb? Serve your grilled chicken over a big, crunchy salad. Want to carb-load after a workout? Pair it with rice or pasta and call it a day.
How to Store and Reheat Grilled Chicken
So you’ve nailed the perfect grilled chicken breast—now what? Whether you cooked up extra for meal prep or just have leftovers from dinner, knowing how to properly store and reheat grilled chicken is key to keeping it moist and delicious.
Storing in the Refrigerator:
- Cool it first: Let the chicken cool completely before storing. Don’t toss hot chicken into the fridge—it creates condensation and promotes bacterial growth.
- Use airtight containers: Store in glass or BPA-free plastic containers to maintain freshness and prevent odor transfer.
- Shelf life: Grilled chicken will stay good in the refrigerator for up to 4 days.
Freezing Instructions:
- Freeze in portions: Slice or dice the chicken before freezing so you can defrost only what you need.
- Wrap tightly: Use freezer bags or vacuum-seal bags. Push out as much air as possible to prevent freezer burn.
- Label & date: Always label with the freezing date. It’s easy to forget when you made it!
- Storage time: Chicken can be frozen for up to 3 months.
Reheating Without Drying Out:
The biggest challenge with reheating grilled chicken? Keeping it juicy. Here’s how:
- Microwave (Quickest): Cover the chicken with a damp paper towel and microwave in 30-second intervals. Don’t overdo it!
- Oven (Best for Whole Pieces): Preheat to 325°F. Place chicken in a baking dish with a splash of broth or water, cover with foil, and heat for 15–20 minutes.
- Stovetop: Add a bit of oil or butter to a skillet, heat on medium, and warm the chicken for a few minutes on each side until hot.
Tip: Always reheat only what you plan to eat. Repeatedly reheating and cooling chicken can make it dry and less safe to eat.
Meal Prep Ideas Using Grilled Chicken Breast
Grilled chicken breast is the MVP of weekly meal prep. Once you’ve got a few pieces ready, the options are endless. Here are some delicious ways to turn that chicken into easy meals all week long:
1. Power Bowls:
Combine grilled chicken with:
- Brown rice or quinoa
- Roasted veggies (sweet potato, bell pepper, zucchini)
- A drizzle of tahini or hummus
2. Chicken Wraps:
Slice thin and stuff into:
- Whole wheat tortillas with lettuce, tomato, avocado, and ranch
- Low-carb wraps with cucumbers, feta, and tzatziki
3. Protein-Packed Salads:
Toss diced grilled chicken into:
- Caesar salad with croutons and shaved parmesan
- Spinach and berry salad with almonds and balsamic vinaigrette
- Taco salad with black beans, corn, and a lime crema
4. Pasta and Grains:
Chop and add to:
- Penne pasta with pesto and cherry tomatoes
- Couscous with herbs and lemon dressing
- Farro with roasted squash and arugula
5. Sandwiches and Paninis:
Layer grilled chicken onto:
- Ciabatta with fresh mozzarella and sun-dried tomato aioli
- Sourdough with bacon, lettuce, and tomato
- Bagels with cream cheese and arugula
Meal prep doesn’t have to mean boring. With just one batch of grilled chicken, you can eat differently every day of the week without breaking a sweat.
FAQs about Grilled Chicken Breast Recipe
1. Why is my grilled chicken rubbery?
Rubbery chicken is usually a result of overcooking or not pounding the meat evenly. Use a meat thermometer and ensure even thickness to avoid this common issue.
2. Can I grill chicken without marinating it?
Absolutely. While marinades enhance flavor and moisture, a simple olive oil + dry spice rub combo can yield amazing results too. Just season well and don’t skip resting after cooking.
3. How long can grilled chicken last in the fridge?
Stored in an airtight container, grilled chicken will stay fresh for up to 4 days in the refrigerator. For longer storage, freeze it.
4. Should I oil the chicken or the grill?
Oil the chicken, not the grill. Brushing oil directly onto the meat helps seasoning stick better and prevents sticking. Spraying oil onto a hot grill can be dangerous due to flare-ups.
5. What’s the best internal temperature for grilled chicken breast?
The USDA recommends an internal temperature of 165°F (75°C). Use an instant-read meat thermometer to check for doneness in the thickest part of the breast.
Conclusion
And there you have it—the ultimate step-by-step guide to grilled chicken breast that’s juicy, flavorful, and foolproof every time. Whether you’re firing up the grill for a backyard BBQ or just looking for a quick, healthy meal prep option, this recipe delivers.
Let’s recap what we’ve covered:
- Choosing the right chicken
- Prepping and marinating for flavor
- Grilling techniques for perfect doneness
- Storage, reheating, and creative meal ideas
The key is to keep it simple, stay patient, and let the ingredients (and grill) do the hard work. Once you’ve got the basics down, it’s easy to customize with different marinades, rubs, and sides.
So go ahead—grab some chicken, light up the grill, and enjoy the kind of meal that’s delicious, healthy, and made for sharing.


