Green Curry Paste Recipe: Green curry paste is the heartbeat of Thailand’s vibrant and fragrant green curry dishes. Known for its zesty, herbal, and spicy flavor, it’s what gives Thai green curry its characteristic aroma and bold taste. But what if you could bring that same authentic flavor into your own kitchen? That’s where this step-by-step guide to making green curry paste from scratch comes in. Whether you’re a Thai food lover or just a curious home cook, mastering this paste will completely level up your cooking game.
This paste isn’t just a one-trick pony either. Once you’ve made it, you can use it in a variety of dishes—from soups to stir-fries and even as a marinade. The key is using fresh ingredients and understanding the layering of flavors, something most store-bought versions just can’t deliver. So, ready to get that perfect balance of heat, herb, and savory in every bite? Let’s dive in.
Why Make Green Curry Paste at Home?
Sure, you could pop into a store and grab a jar off the shelf—but it just doesn’t compare to the fresh, fragrant explosion of flavors you get from a homemade green curry paste. Most commercial versions are overly salty, dull, or lacking the brightness you get from fresh herbs. Plus, when you make it yourself, you control everything: the spice level, the saltiness, the consistency—even the type of oil you use.
Another major reason? Dietary needs. Homemade green curry paste can easily be made gluten-free, vegan, or adjusted for allergies, whereas store-bought brands might sneak in shrimp paste, fish sauce, or preservatives. And let’s not forget the satisfaction of crafting your own flavor bomb from scratch. It’s kind of like brewing your own potion—except tastier.
You also get to play around with flavors, depending on the dish you’re making. Want more heat? Add more green chilies. Want a more herbaceous kick? Double up on the Thai basil. There’s no one-size-fits-all, and that’s the magic of it.
Authenticity vs Store-Bought: What’s the Difference?
Authenticity is everything when it comes to Thai cuisine, and that’s where homemade wins—hands down. Traditional green curry paste is made with ingredients like galangal, lemongrass, kaffir lime peel, and Thai green chilies, often pounded by hand in a mortar and pestle to bring out their essential oils. That slow, grinding process creates a depth and harmony of flavor that processors and commercial factories just can’t replicate.
Most store-bought pastes, on the other hand, use preservatives and fillers. Some even rely on artificial colorings to maintain that bright green hue. And don’t be surprised if you find a lot of salt in those jars—it’s a cheap way to enhance flavor and extend shelf life, but it drowns out the subtleties of real, fresh ingredients.
When you go homemade, you’re honoring the roots of Thai culinary tradition while customizing it for your palate and dietary preferences. And honestly? It just tastes better.
List of Ingredients You’ll Need
Before you start mixing and grinding, here’s a comprehensive list of what you’ll need for a traditional, aromatic green curry paste. These ingredients are chosen for their bold flavors and essential role in creating that signature Thai taste.
Fresh Herbs and Spices
- 8–10 fresh Thai green chilies (adjust to taste)
- 1 bunch fresh cilantro (with stems)
- 1/2 cup Thai sweet basil leaves
- 1 teaspoon kaffir lime zest (or zest of regular lime if unavailable)
Aromatics
- 2 stalks lemongrass (bottom part only, thinly sliced)
- 1-inch piece of galangal (or ginger if galangal is not available)
- 4 cloves garlic
- 2 shallots, chopped
Seasoning Ingredients
- 1 tablespoon shrimp paste (optional for vegans)
- 1/2 teaspoon white peppercorns
- 1 teaspoon sea salt
- 1 tablespoon coriander seeds
- 1/2 tablespoon cumin seeds
Feel free to tweak the ingredient list based on availability. Some substitutions can be made, which we’ll discuss later in the article.
Tools You’ll Need
The tools you use will impact the final flavor and texture of your green curry paste. Traditional Thai kitchens use a granite mortar and pestle for pounding the ingredients into a fine, aromatic paste. While it takes effort, the flavor payoff is huge.
Mortar and Pestle vs Food Processor
- Mortar and Pestle: Extracts oils and intensifies flavor, more authentic.
- Food Processor: Easier and faster, but may require a bit of oil or water to blend smoothly.
Measuring Tools and Kitchen Basics
- Sharp knife
- Cutting board
- Measuring spoons
- Small pan (for toasting spices, if using)
If you’re serious about cooking Thai food often, investing in a good mortar and pestle is well worth it.
How to Choose the Best Ingredients
You can’t build a masterpiece without quality materials, right? The same logic applies to curry paste. The fresher your ingredients, the better the taste. Let’s break this down.
Freshness Matters
- Use fresh green chilies—they’re the stars here. Old or dried ones can make your paste dull and muted.
- Cilantro stems carry a ton of flavor—don’t toss them!
- Galangal, lemongrass, and kaffir lime zest should smell citrusy and sharp—if they don’t, they’re past their prime.
Organic vs Conventional
If possible, go organic. You’re using the peel and outer parts of many herbs (like lemongrass and lime), so minimizing pesticides is ideal. That said, wash everything thoroughly if organic isn’t an option.
You’d be surprised how much the quality of a single ingredient—like fresh vs dried basil—can affect the final outcome.
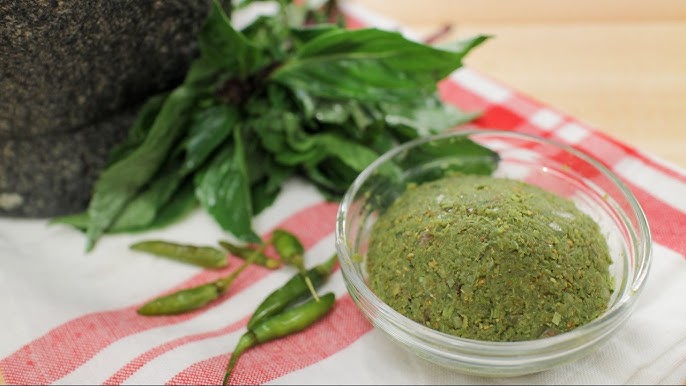
Step-by-Step Guide to Making Green Curry Paste
Step 1: Prep Your Ingredients
Gather fresh ingredients such as green chilies, lemongrass, garlic, shallots, galangal, kaffir lime zest, cilantro stems, and fresh basil. Wash, trim, and roughly chop everything to make blending easier.
Step 2: Toast the Spices (If Using Dry Spices)
If your recipe includes coriander seeds, cumin seeds, or white peppercorns, lightly toast them in a dry pan over low heat. Toasting enhances their aroma and deepens the overall flavor of the curry paste.
Step 3: Grind the Aromatics
Start by pounding tougher ingredients—lemongrass, galangal, and chilies—using a mortar and pestle or food processor. This ensures they break down smoothly. Then add garlic, shallots, and herbs.
Step 4: Combine Everything into a Paste
Mix all ground aromatics with the toasted spices. Continue pounding or processing until a smooth, vibrant green paste forms. Add a tiny splash of water if needed.
Step 5: Adjust for Texture and Taste
Taste and add more chilies for heat, lime zest for brightness, or herbs for freshness. Use immediately or refrigerate for up to a week. Enjoy!
Tips for the Perfect Green Curry Paste
- Use a variety of chilies for a complex heat profile. Thai bird’s eye chilies are traditional, but you can mix in jalapeños for more body.
- Always use fresh herbs, especially Thai basil and cilantro with stems. They pack more punch than the leaves alone.
- Pound, don’t just blend. A food processor is convenient, but if you have time, use a mortar and pestle—it unlocks flavor like nothing else.
- Don’t skip the lime zest—it adds that signature tang.
- Toast your spices if you’re using them whole—it’s a game-changer for depth and aroma.
- Make a double batch. You’ll thank yourself later when you’ve got homemade paste ready for a quick dinner.
How to Store Green Curry Paste
Once you’ve made your paste, it’s time to store it properly to maintain its vibrant flavor and color.
Refrigeration
Transfer the paste into an airtight glass jar. Smooth the top and pour a thin layer of oil (such as avocado or coconut oil) on top to seal it from air. This method helps keep it fresh for up to 2 weeks in the refrigerator.
Make sure to use a clean spoon every time you scoop some out. This prevents contamination and extends shelf life.
Freezing for Long-Term Use
For longer storage, spoon the paste into ice cube trays or silicone molds and freeze. Once solid, transfer the cubes to a zip-top freezer bag and store for up to 3 months.
This way, you can pop out a cube or two whenever you need a quick curry fix. Super convenient and saves loads of time.
How Long Does Homemade Curry Paste Last?
- In the fridge: Up to 2 weeks (with oil seal)
- In the freezer: Up to 3 months (frozen in cubes)
Always check for signs of spoilage like mold, a sour smell, or color change. If in doubt, toss it and make a fresh batch.
Creative Ways to Use Green Curry Paste
Let’s be real—this paste is way too flavorful to only use in green curry. Here are some fun and delicious ways to stretch its usage:
In Curries
The most obvious and traditional use. Simmer it with coconut milk, add your favorite veggies and protein, and serve over jasmine rice. Boom—authentic Thai curry at home.
In Soups and Noodles
A spoonful of green curry paste can transform a basic coconut soup into a bold, spicy masterpiece. Add it to your next bowl of ramen or Thai noodle soup for a kick.
As Marinade or Dipping Sauce
Mix the paste with a bit of coconut milk or yogurt and marinate chicken, tofu, or shrimp. Grill or roast and enjoy the flavor bomb. You can also thin it out with lime juice and use it as a dipping sauce for spring rolls or dumplings.
Substitutes for Hard-to-Find Ingredients
Not everyone has access to a Thai market, so here are some quick swaps you can make:
| Ingredient | Substitute |
|---|---|
| Galangal | Fresh ginger (use a bit less) |
| Thai basil | Regular basil + a few mint leaves |
| Kaffir lime zest | Regular lime zest + a tiny lime leaf |
| Shrimp paste | Miso paste or soy sauce (for vegan) |
| Thai green chilies | Serrano or jalapeño peppers |
These substitutions won’t give you a 100% match, but they’ll get you close enough for a flavorful, satisfying dish.
Common Mistakes to Avoid
- Using dried herbs: They lack the punch and brightness of fresh ones.
- Skipping the zest: Lime zest is crucial. Don’t rely solely on juice.
- Not toasting spices: If you’re using whole spices, always toast them.
- Blending too much: Over-processing makes it mushy and dull in flavor.
- Not storing properly: Exposure to air ruins the paste quickly.
Avoiding these simple mistakes can make a world of difference in your final dish.
Nutritional Value of Green Curry Paste
Green curry paste is low in calories but high in flavor. Here’s a rough breakdown per tablespoon (without shrimp paste):
| Nutrient | Amount |
|---|---|
| Calories | ~15–20 kcal |
| Fat | 0.5g |
| Carbohydrates | 2–3g |
| Fiber | 0.7g |
| Sodium | Varies by salt used |
| Protein | 0.5g |
The paste is also rich in antioxidants, vitamin C, and anti-inflammatory compounds from herbs like garlic, basil, and chilies. It’s flavorful, guilt-free, and incredibly versatile.
FAQs about Green Curry Paste Recipe
What’s the difference between green, red, and yellow curry paste?
Green uses fresh green chilies and herbs, red is made with dried red chilies and is usually spicier, while yellow includes turmeric and has a milder, earthy flavor.
Can I make this paste less spicy?
Absolutely! Just reduce the number of chilies or remove the seeds before blending.
Is green curry paste vegan?
It can be! Just omit the shrimp paste or replace it with miso paste or soy sauce for that umami flavor.
How much paste should I use per dish?
Typically, 2–3 tablespoons per dish serving 2–3 people. Adjust based on spice preference.
Can I use dried herbs instead of fresh?
It’s not recommended—dried herbs lack the freshness and punch needed for authentic curry paste.
Conclusion
There you have it—a complete, step-by-step guide to crafting your very own homemade green curry paste. It’s fresh, fiery, and full of authentic Thai flavor. Making it yourself not only gives you control over the ingredients and spice level but also rewards you with unmatched taste. Whether you’re whipping up a quick curry or exploring new recipes, this paste is your secret weapon.
Take your time with the process, play with the ingredients, and don’t be afraid to make it your own. Once you taste the difference, you’ll never go back to store-bought jars again.

