Graham Crust Recipe: If you’re looking for a foolproof base for your cheesecakes, pies, or no-bake desserts, a graham crust is a total game-changer. It’s buttery, crumbly, slightly sweet, and ridiculously easy to make from scratch. Whether you’re a kitchen newbie or a baking pro, this recipe guide will walk you through every single step—no guesswork, no fluff, just solid instructions and pro tips.
What Is a Graham Crust?
A graham crust is a type of pie crust made from crushed graham crackers, sugar, and melted butter. It’s most commonly used as the base for no-bake desserts like cheesecakes and icebox pies, but it can also be baked for a firmer, crunchier texture. Unlike traditional pastry crusts, it doesn’t require rolling, chilling, or cutting in cold butter. You just mix, press, and bake (or chill, depending on the recipe).
What makes it so lovable? It’s got that perfect combination of sweet and buttery with a slightly nutty crunch from the graham crackers. Plus, it’s way easier and quicker than making a pie dough from scratch.
Why Choose Graham Crust Over Traditional Pie Crust?
Let’s face it—traditional pie crusts can be intimidating. There’s flour everywhere, butter cubes that have to stay cold, and the fear of overworking the dough is real. Graham crust, on the other hand, is basically foolproof. Here’s why people love it:
- No rolling needed: Just press into the pan with your hands or a measuring cup.
- Time-saver: Prep time is usually under 10 minutes.
- Versatile: Works beautifully with both baked and no-bake desserts.
- Customizable: You can add spices, cocoa powder, or nuts to elevate the flavor.
- Kid-friendly: Perfect project for little bakers at home.
So if you’re looking for simplicity and flexibility without sacrificing flavor, graham crust is your go-to.
Best Uses for Graham Crust
Not sure what to use your graham crust for? Here’s a list of desserts that absolutely shine with it:
- Classic Cheesecake
- Key Lime Pie
- No-Bake Peanut Butter Pie
- S’mores Pie
- Chocolate Cream Pie
- Frozen Yogurt Pie
- Strawberry Icebox Cake
Basically, if your dessert is rich, creamy, or fruity, graham crust is the perfect base to balance it out with crunch and sweetness.
Ingredients You’ll Need for Graham Crust
Essential Ingredients
You only need three basic ingredients for a classic graham crust:
- Graham crackers – about 1½ cups finely crushed (roughly 10 full crackers)
- Melted butter – 6 tablespoons, unsalted
- Granulated sugar – ¼ cup
These come together to form that sweet, crumbly texture everyone loves. The butter acts as a binder, the sugar sweetens things up, and the graham crackers are your foundation.
Optional Add-Ins for Flavor
Want to level things up? Try mixing in:
- Brown sugar – for a deeper molasses note
- Cinnamon – adds warmth and spice
- Nutmeg or cardamom – just a pinch for complexity
- Crushed nuts – like almonds, pecans, or walnuts
- Cocoa powder – for a chocolate graham twist
Mix and match to suit your filling!
Tools and Equipment Needed
You don’t need fancy tools to make graham crust, but having the right gear makes it smoother. Here’s what helps:
- Mixing bowl
- Food processor or ziplock bag and rolling pin (to crush crackers)
- Rubber spatula or spoon
- Measuring cups/spoons
- 9-inch pie dish or springform pan
- Measuring cup or flat-bottomed glass (to press the crust evenly)
Choosing the Right Graham Crackers
The flavor and texture of your crust start with your graham crackers. Not all brands taste the same.
Store-Bought vs. Homemade Graham Crackers
- Store-bought: Honey Maid is the gold standard, but you can use cinnamon-flavored or chocolate grahams too.
- Homemade: If you’re going from scratch, aim for crisp, dry crackers. Moisture messes up the crust’s texture.
Pro tip: Avoid flavored or soft crackers—stick with the classics unless you’re going for a twist.
Step-by-Step Guide to Making Graham Crust
Step 1: Crush the Graham Crackers
Use a food processor for the quickest, most even crumb. No food processor? Pop them into a ziplock bag and smash them with a rolling pin. Aim for a fine, sandy texture—big chunks won’t hold together well.
Step 2: Add Sweetener and Mix
Pour the crushed grahams into a mixing bowl. Add the sugar (and any spices or cocoa powder if using). Stir until evenly distributed.
Step 3: Add Melted Butter
Drizzle in your melted butter while mixing. You want every crumb to be moistened but not soggy. It should look like wet sand and clump slightly when you squeeze it.
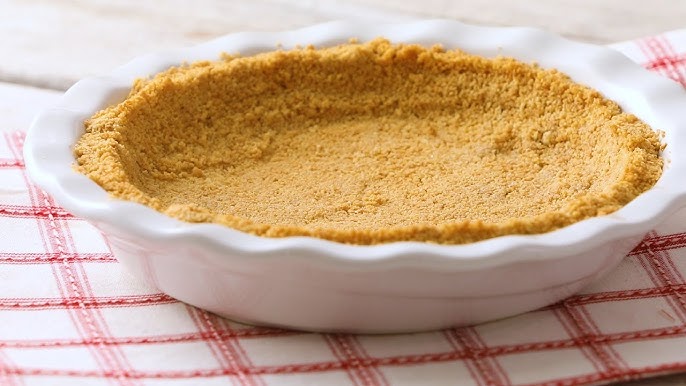
Step 4: Press into the Pan
Dump the mixture into your pie or springform pan. Use your fingers to spread it evenly, then press firmly with a flat-bottomed glass or measuring cup. Work the mixture up the sides of the pan too, creating a firm edge.
Step 5: Bake or Chill – Your Choice
- For baked desserts: Prebake at 350°F (175°C) for 8–10 minutes, then cool before adding your filling.
- For no-bake desserts: Chill the crust in the fridge for 1 hour (or freeze for 20 minutes) until firm.
How to Get the Perfect Texture
The key to a graham crust that holds its shape and doesn’t crumble apart is all about texture balance. You want it moist enough to bind, but not so wet that it turns soggy. Here’s how to achieve that perfect bite:
- Ratio matters: Stick to the basic formula—1 ½ cups of crumbs + ¼ cup sugar + 6 tablespoons melted butter. Straying too far can make your crust fall apart or feel greasy.
- Consistency test: After mixing, grab a small handful of the mixture. If it clumps easily without falling apart, you’re good. If it’s still dry and loose, add ½ tablespoon more melted butter.
- Press, but don’t pack like concrete: Firm pressure is key when pressing into the pan, but if you overdo it, the crust can become rock-hard and tough to cut.
- Even distribution: Make sure the crust is the same thickness throughout the base and sides. Uneven areas may burn or crumble when slicing.
Remember, achieving a beautiful crust is more about feel and intuition than perfection—like building a sturdy sandcastle with buttery sand.
Tips for Pre-Baking (Blind Baking)
Blind baking a graham crust ensures a crisp, golden base that won’t get soggy once filled. Here’s how to get it right:
- Preheat properly: Always start with a fully preheated oven (350°F/175°C). Temperature fluctuations can cause uneven baking.
- Don’t overbake: The crust should come out golden and fragrant, not brown or brittle. Stick to 8–10 minutes for most recipes.
- Let it cool fully: After baking, allow your crust to cool completely before adding fillings—especially important for no-bake cheesecakes and mousse pies.
- Optional trick: For an extra crispy finish, brush the baked crust with a bit of egg white and return it to the oven for 2–3 minutes. It creates a barrier that helps resist moisture from wet fillings.
Common Mistakes to Avoid
Even though it’s a simple recipe, there are a few common pitfalls that can mess up your graham crust. Let’s break them down:
- Using too much butter – It may seem like more butter equals better flavor, but overdoing it will give you a greasy, soggy crust that won’t firm up properly.
- Not pressing the crust tightly – Loose crumbs will fall apart after baking. Be sure to use even, firm pressure with a glass or measuring cup.
- Skipping the chill/bake step – If you’re making a no-bake dessert and don’t chill the crust, it won’t hold together. For baked desserts, always prebake to ensure the crust sets.
- Uneven crumb size – Chunks of crackers in your crust can cause weak spots. Make sure your graham cracker crumbs are uniform and fine like sand.
- Using soft or stale graham crackers – Moisture ruins the crumb. Stick to dry, crispy crackers for best results.
Learning these small things makes a huge difference between a crust that crumbles and one that impresses.
Flavor Variations for Your Graham Crust
Why settle for the standard when you can get creative? Graham crusts are incredibly versatile and love bold flavors. Here are some tasty variations to consider:
1. Chocolate Graham Crust
- Swap out regular graham crackers for chocolate-flavored ones.
- Add 1–2 tablespoons of cocoa powder for extra depth.
- Great for: chocolate cream pie, mocha cheesecake, and s’mores pies.
2. Spiced Graham Crust
- Add ½ teaspoon cinnamon, a pinch of nutmeg, and ginger for a warm, holiday-inspired crust.
- Great for: pumpkin cheesecake or apple tart.
3. Nutty Graham Crust
- Mix in ¼ cup of finely chopped pecans, almonds, or hazelnuts.
- Toast the nuts beforehand for added richness.
- Great for: nut-based pies or banana cream pie.
4. Coconut Graham Crust
- Add ¼ cup shredded coconut (sweetened or unsweetened).
- Toast it lightly for extra flavor.
- Great for: tropical desserts like key lime or pina colada pie.
These variations are easy to incorporate and make your dessert stand out from the crowd.
Storing and Freezing Your Graham Crust
Whether you’re prepping ahead for a party or have leftover crust, storing it properly will keep it tasting fresh and crispy.
- In the fridge: Store baked or unbaked graham crust covered tightly in plastic wrap for up to 4–5 days.
- In the freezer: Wrap well in plastic, then aluminum foil, and freeze for up to 3 months. Thaw at room temperature before filling.
- Pro tip: If freezing unbaked crust, press it into a disposable aluminum pie pan for easy storage and cleanup.
Once you make a few extra crusts and store them, you’ll always have a shortcut ready for your next dessert.
Graham Crust for Special Diets
Need to cater to dietary restrictions? No worries—graham crust can be easily adapted.
Gluten-Free Graham Crust
- Use certified gluten-free graham crackers.
- Brands like Pamela’s and Kinnikinnick make great substitutes.
- Be sure all your add-ins (like cocoa or nuts) are also gluten-free.
Vegan Graham Crust
- Use vegan graham crackers (some brands contain honey).
- Swap butter for melted coconut oil or vegan butter like Earth Balance.
- Add a little maple syrup if you want a hint of extra sweetness.
Both versions turn out just as delicious as the classic.
Pairing Graham Crust with Popular Desserts
Not sure what dessert to build on your graham crust? Here are a few all-time favorites that pair perfectly with it:
| Dessert | Why It Works with Graham Crust |
|---|---|
| Cheesecake | Classic combo; crust provides structure and crunch |
| Key Lime Pie | Tangy filling complements the sweet crust |
| Chocolate Tart | Richness of chocolate balanced by mild graham sweetness |
| S’mores Pie | Brings out nostalgic campfire vibes |
| Peanut Butter Pie | Nutty filling + graham = perfection |
| No-Bake Strawberry Pie | Light, fruity, and perfect for summer |
These pairings show just how universal and flexible graham crust really is.
FAQs about Graham Crust Recipe
1. Can I make a graham crust ahead of time?
Absolutely! You can make and store it in the fridge for 4–5 days or freeze it for up to 3 months.
2. Can I use flavored graham crackers like cinnamon or chocolate?
Yes, flavored crackers add a fun twist! Just adjust the sugar if needed, especially if they’re sweetened.
3. Do I have to bake the graham crust?
Not always. For no-bake desserts, chilling the crust for an hour sets it up nicely. For firmer structure, bake it for 8–10 minutes.
4. Why does my graham crust fall apart when I slice it?
Chances are it was either too dry or not pressed firmly enough. Add a touch more butter next time and be sure to pack it well.
5. Can I use this recipe for mini pies or tartlets?
Totally! Just divide the mixture evenly and reduce baking time by a few minutes if needed.
Conclusion
There’s something beautifully simple about a graham crust. It’s a humble blend of crackers, butter, and sugar, but it lays the foundation for some of the best desserts you’ll ever taste. Whether you’re whipping up a creamy cheesecake or a tangy key lime pie, this crust has your back.
It’s easy to make, endlessly customizable, and impressively sturdy once set. And the best part? You don’t have to be a professional baker to nail it. With just a few ingredients, a bit of pressing, and either some chilling or baking, you’re on your way to dessert greatness.
Now that you’ve mastered the graham crust, what delicious creation will you build on top of it?