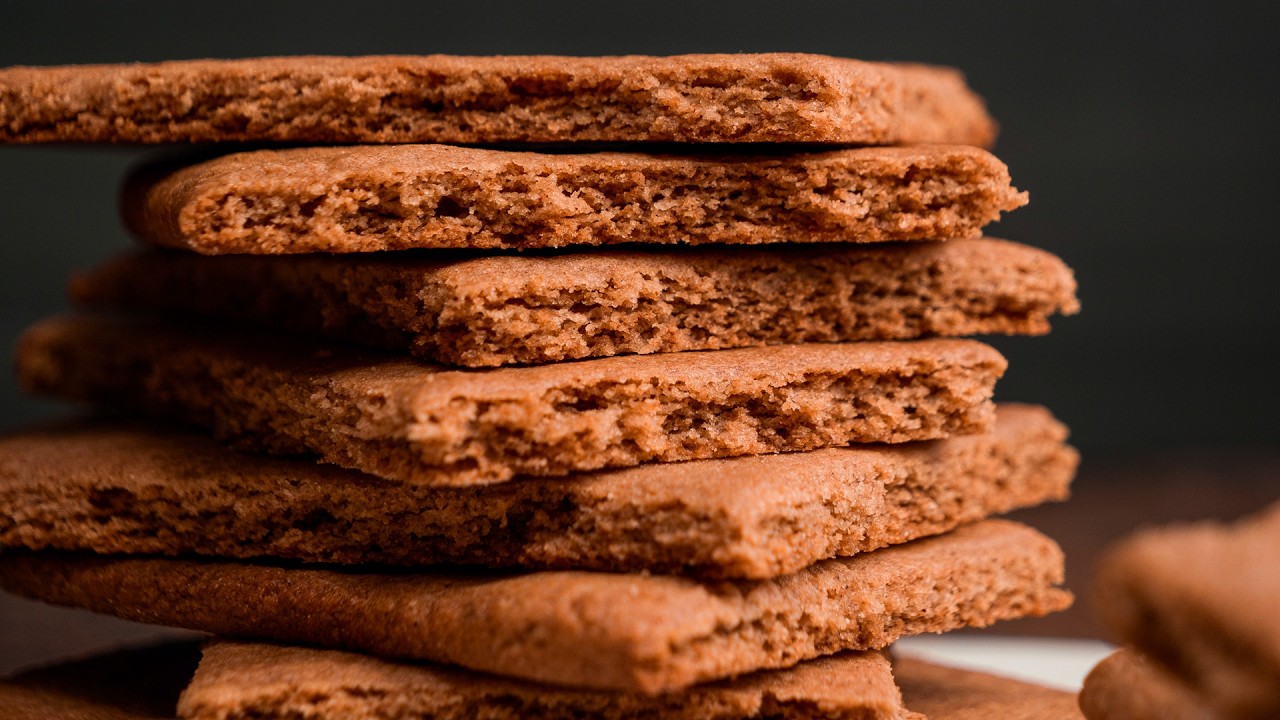
Graham Biscuit Recipe: If we want a simple, crisp, lightly sweet, and satisfying homemade biscuit, this graham biscuit recipe delivers excellent results with pantry-friendly ingredients and an easy process. These biscuits are perfect for everyday snacking, dessert bases, lunch boxes, tea-time treats, and even layered recipes that need a firm yet flavorful biscuit. With the right balance of whole wheat flavor, gentle sweetness, buttery richness, and a crisp finish, homemade graham biscuits can taste far better than many store-bought versions.
This guide covers everything needed to make golden, crunchy, flavorful graham biscuits from scratch. From ingredient selection to mixing, rolling, cutting, baking, and storing, every step is designed to help us produce biscuits with reliable texture and consistent flavor.
Ingredients You’ll Need for Graham Biscuit Recipe
To make a classic batch of homemade graham biscuits, we need basic baking ingredients that come together beautifully.
Dry Ingredients
- 1 1/2 cups whole wheat flour
- 1 cup all-purpose flour
- 1/2 cup brown sugar
- 1 teaspoon baking powder
- 1/2 teaspoon baking soda
- 1/2 teaspoon salt
- 1 teaspoon ground cinnamon
Wet Ingredients
- 1/2 cup unsalted butter, cold and cubed
- 1/4 cup honey
- 1/4 cup milk
- 1 teaspoon vanilla extract
These quantities create biscuits with a classic graham-style taste. The whole wheat flour provides the distinctive nutty depth, while the brown sugar and honey add warmth and sweetness. The butter helps create a crisp and tender bite, and cinnamon gives the biscuits that familiar comforting aroma.
Why These Ingredients Matter in a Graham Biscuit Recipe
A strong graham biscuit recipe depends on balance. Each ingredient plays a specific role in developing flavor and texture.
Whole wheat flour gives graham biscuits their signature earthy character. It makes the biscuits taste fuller and more wholesome than plain sweet crackers. All-purpose flour softens the density of the whole wheat flour so the biscuits remain crisp rather than overly heavy.
Brown sugar contributes moisture and a richer sweetness than white sugar. Honey deepens the flavor and helps create the slightly caramelized note associated with graham-style biscuits. Butter adds richness and supports a delicate crumb. Milk helps bring the dough together without making it too sticky. Vanilla enhances the sweetness, and cinnamon rounds out the overall flavor with warmth.
How to Prepare for the Best Graham Biscuit Results
Before mixing the dough, it helps to prepare the workspace properly. Good preparation makes the baking process smoother and helps the biscuits bake more evenly.
We should:
- Preheat the oven to 350°F (175°C)
- Line a baking tray with parchment paper
- Measure all ingredients accurately
- Keep the butter cold
- Set out a rolling pin and biscuit cutter or knife
Cold butter is especially important because it helps create a biscuit that bakes up crisp and light rather than greasy or dense. Accurate measuring also matters, since too much flour can make the dough dry and hard to roll.
Step-by-Step Guide to Make Graham Biscuit Recipe
Step 1 – Combine the Dry Ingredients
In a large mixing bowl, whisk together the whole wheat flour, all-purpose flour, brown sugar, baking powder, baking soda, salt, and cinnamon.
This step ensures the leavening agents and spices are evenly distributed. A proper mix at this stage helps prevent uneven flavor and texture later.
Step 2 – Cut in the Cold Butter
Add the cold cubed butter to the dry mixture. Using a pastry cutter, fork, or fingertips, rub the butter into the flour until the mixture resembles coarse crumbs.
This is one of the most important stages in the recipe. Small pieces of butter throughout the dough help the biscuits bake into a texture that is crisp, tender, and pleasantly layered.
Step 3 – Mix the Wet Ingredients
In a separate bowl or measuring cup, stir together the honey, milk, and vanilla extract until well combined.
The honey should blend smoothly with the milk. This mixture helps distribute sweetness more evenly through the dough.
Step 4 – Form the Dough
Pour the wet mixture into the dry ingredients little by little, stirring until the dough begins to come together. Use clean hands if needed to gently press it into a cohesive dough.
The dough should be soft but not sticky. If it feels too dry, add a teaspoon of milk at a time. If it feels too wet, dust it lightly with a little flour.
Step 5 – Chill the Dough
Wrap the dough and place it in the refrigerator for 20 to 30 minutes.
Chilling helps firm up the butter and relax the dough. This makes rolling easier and helps the biscuits keep their shape during baking.
Step 6 – Roll Out the Dough
Place the chilled dough on a lightly floured surface and roll it out to about 1/8 to 1/4 inch thickness, depending on how crisp we want the finished biscuits.
For a more classic crisp biscuit, roll thinner. For a slightly sturdier, heartier biscuit, roll a little thicker. Try to keep the thickness even so all the biscuits bake at the same rate.
Step 7 – Cut the Graham Biscuits
Use a cookie cutter, biscuit cutter, pizza wheel, or knife to shape the dough into rectangles, squares, or rounds.
If we want the biscuits to look more traditional, we can cut them into neat rectangles and prick the tops with a fork. This gives them a familiar appearance and helps steam escape while baking.
Step 8 – Arrange on the Baking Tray
Place the cut biscuits on the prepared tray, leaving a little space between them. They do not spread much, so the spacing does not need to be wide.
If desired, lightly sprinkle the tops with a little extra cinnamon or sugar for a more decorative finish.
Step 9 – Bake Until Golden
Bake in the preheated oven for 12 to 16 minutes, depending on thickness and size. The biscuits should look lightly golden around the edges and dry on the surface.
Watch closely during the final minutes. Thin biscuits can darken quickly. For a crisp finish, they should be baked through but not burnt.
Step 10 – Cool Completely
Transfer the baked biscuits to a wire rack and allow them to cool completely.
This cooling stage is essential because the biscuits continue to firm up as they cool. A biscuit that feels slightly soft straight from the oven will often become perfectly crisp after cooling.
Tips for Making the Best Homemade Graham Biscuit Recipe
A few smart baking tips can improve the final result significantly.
Use Cold Butter
Cold butter creates a better biscuit structure. If the butter becomes too soft before mixing, the biscuits may turn out flatter and less crisp.
Do Not Overwork the Dough
Mix only until the dough comes together. Overworking can make the biscuits tough.
Roll Evenly
Uneven dough thickness leads to uneven baking. Thin sections can burn before thicker areas finish baking.
Cool Before Storing
Warm biscuits stored too early can trap moisture and lose their crisp texture.
Bake in Batches if Necessary
Overcrowding trays can affect airflow and baking consistency. A single, evenly spaced layer works best.
Flavor Variations for Graham Biscuit Recipe
One of the best things about this graham biscuit recipe is how easily it can be adjusted to suit different tastes.
Honey Cinnamon Graham Biscuits
Increase the cinnamon slightly and brush the tops with a little extra honey before baking for a deeper sweet-spiced finish.
Vanilla Graham Biscuits
Add a little extra vanilla extract for a smoother, sweeter aroma.
Chocolate Graham Biscuits
Mix in a small amount of cocoa powder and slightly reduce the flour to create a richer variation.
Nutmeg-Spiced Graham Biscuits
Add a pinch of nutmeg alongside the cinnamon for a warmer, more festive profile.
Coconut Graham Biscuits
Incorporate a small amount of finely shredded coconut for extra texture and flavor.
How to Serve Graham Biscuits
Freshly baked graham biscuits are very versatile. They can be enjoyed in simple or more creative ways.
They are excellent:
- With tea or coffee
- As a lunch box snack
- With peanut butter or cream cheese
- Crushed into dessert crusts
- Layered into parfaits
- Served with fruit and yogurt
- Used in icebox cakes
- Packaged as homemade edible gifts
Because they are lightly sweet and pleasantly crisp, they work well both as a snack and as a recipe component.
How to Store Homemade Graham Biscuits
To keep the biscuits fresh and crisp, store them properly after they have cooled completely.
Place them in an airtight container at room temperature. They usually stay good for up to one week. For longer storage, they can be frozen in a sealed container or freezer-safe bag for several weeks.
If the biscuits lose a little crispness after storage, they can be refreshed in a low oven for a few minutes and then cooled again.
Common Mistakes to Avoid in Graham Biscuit Recipe
Even a simple biscuit recipe can go wrong if a few details are overlooked. Avoid these common issues for the best result.
Using Too Much Flour
Extra flour can make the dough dry and the biscuits overly hard.
Skipping the Chill Time
Warm dough is harder to roll and may bake less evenly.
Baking Too Long
Overbaking can make the biscuits bitter and too dark.
Storing Before Cooling
This traps steam and softens the biscuits.
Rolling Too Thick
Very thick dough may create biscuits that stay soft in the center rather than crisp.
Why Homemade Graham Biscuit Recipe Is Worth Making
A homemade graham biscuit recipe offers better control over sweetness, texture, flavor, and ingredient quality. It allows us to create biscuits that taste fresh, balanced, and far more satisfying than many packaged versions. The combination of whole wheat flour, honey, brown sugar, butter, and cinnamon produces a biscuit that feels classic, familiar, and versatile.
This recipe is also practical. The ingredients are accessible, the steps are easy to follow, and the final product can be used in many ways. Whether we want a simple snack, a crisp tea biscuit, or a base for layered desserts, graham biscuits are a dependable choice.
FAQs about Graham Biscuit Recipe
1. What are graham biscuits?
Graham biscuits are lightly sweet, crisp biscuits made with graham flour or whole wheat flour, sugar, butter, and a leavening agent. They are often enjoyed as snacks or used in dessert recipes.
2. What do graham biscuits taste like?
They have a mildly sweet, slightly nutty, and buttery flavor with a crisp texture that makes them perfect for eating plain or with toppings.
3. Are graham biscuits the same as graham crackers?
They are very similar. In many places, the terms are used interchangeably, although texture and sweetness may vary slightly by recipe or region.
4. What flour is used for graham biscuits?
Traditional recipes use graham flour, but many homemade versions use whole wheat flour or a mix of whole wheat and all-purpose flour.
5. Can we make graham biscuits without graham flour?
Yes, we can use whole wheat flour as a simple substitute and still get a similar flavor and texture.
6. How do we make graham biscuits crisp?
We should roll the dough evenly and bake until the biscuits are lightly golden and dry to the touch.
7. Can graham biscuits be used in desserts?
Yes, they are often crushed to make pie crusts, cheesecake bases, layered desserts, and snack bars.
8. How should we store graham biscuits?
We should keep them in an airtight container at room temperature to maintain their crisp texture.
9. How long do homemade graham biscuits last?
They usually stay fresh for about 1 week when stored properly.
10. Can we add flavor to graham biscuits?
Yes, we can add cinnamon, honey, vanilla, or a little brown sugar for extra taste and aroma.
Conclusion
This graham biscuit recipe is a reliable way to make crispy, flavorful, lightly sweet homemade biscuits with simple ingredients and consistent results. By combining whole wheat flour, all-purpose flour, butter, honey, brown sugar, and cinnamon, we create biscuits that are rich in flavor, easy to prepare, and perfect for everyday use. When mixed carefully, chilled properly, rolled evenly, and baked until golden, these biscuits deliver the ideal texture and taste every time.
For anyone looking for a classic homemade graham biscuit recipe, this method provides a strong foundation. It is easy to customize, simple to store, and delicious to serve in many ways. With the right technique, homemade graham biscuits can become a regular favorite in the kitchen.