Gorditas Recipe: If you’ve ever bitten into a freshly made gordita, you know just how magical this humble Mexican snack can be. Crispy on the outside, soft on the inside, and packed with flavorful fillings, gorditas are comfort food at its finest.
This step-by-step guide will walk you through making authentic gorditas right in your kitchen—no culinary degree needed!
What Are Gorditas?
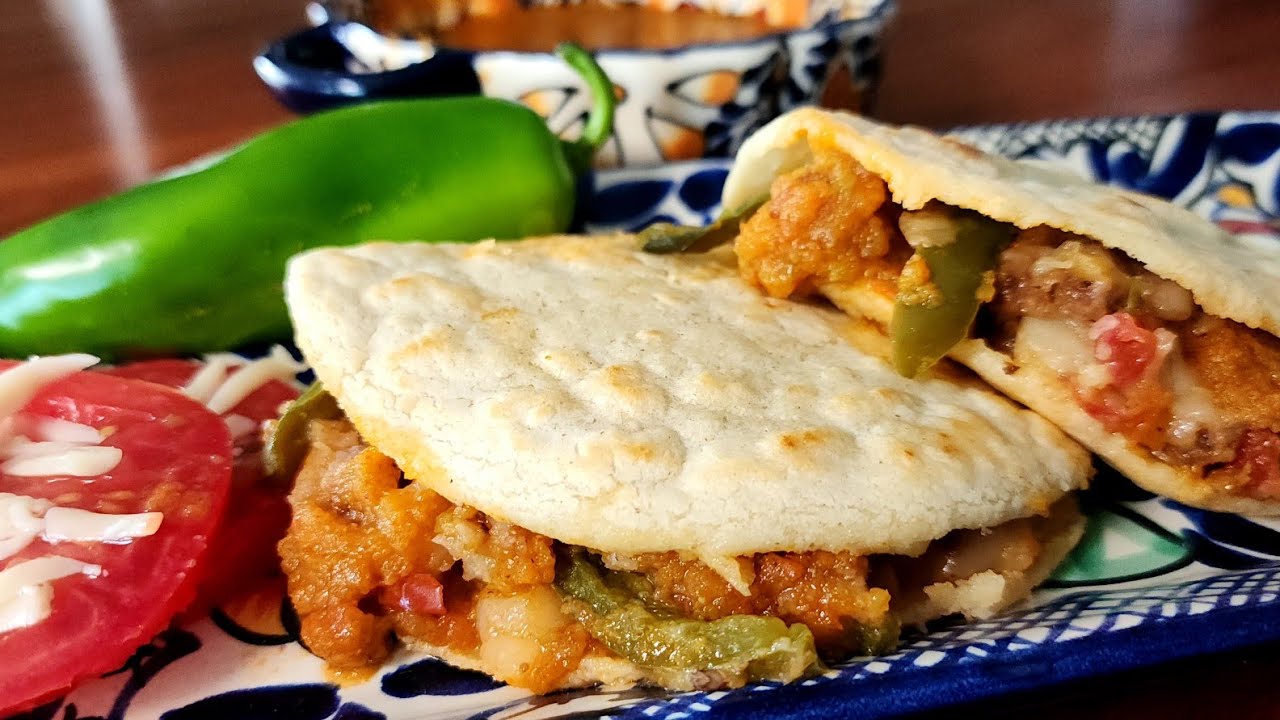
Gorditas are thick corn cakes that are cooked on a griddle or fried until crispy, then split open and stuffed with savory fillings. The word “gordita” literally means “little fat one” in Spanish, a nod to their plump, round shape. These pocket-style treats are a staple in Mexican street food culture and can be filled with anything from spicy meats to creamy beans or cheese.
Origin and Cultural Significance
Gorditas originated in Mexico, particularly in the northern regions like Chihuahua and Coahuila. Over time, they spread across the country and became a beloved part of the national cuisine. In traditional Mexican homes, they’re often served during special occasions, family gatherings, or simply as a delicious everyday meal. In many small towns, local vendors set up early in the morning, dishing out gorditas to loyal customers who line up before work.
What sets gorditas apart from similar foods like arepas or pupusas is their preparation method and texture. Gorditas have a distinct split that makes them ideal for stuffing, and their dough—made from masa harina (a special corn flour)—offers a unique flavor and tenderness that’s unmistakably Mexican.
Ingredients You’ll Need
Getting your ingredients ready is the first step to gordita greatness. Let’s break it down.
Basic Dough Ingredients
- 2 cups masa harina (like Maseca)
- 1 ½ cups warm water
- ½ tsp salt
- Optional: 1 tbsp vegetable oil or lard (for softer texture)
This simple dough is the foundation of any good gordita. Masa harina is different from regular cornmeal or flour—it’s made from corn that’s been nixtamalized, which gives it that signature flavor and texture.
Popular Fillings for Gorditas
Once your dough is ready, it’s time to get creative with the fillings. Here are some classic options:
- Refried beans and cheese
- Chorizo and potato
- Shredded chicken tinga
- Beef barbacoa
- Rajas (sautéed poblano strips with cream and cheese)
You can go all vegetarian or make it a meat-lover’s dream—the choice is yours.
Tools and Equipment
You don’t need a fancy kitchen to make delicious gorditas, but having the right tools can make things smoother.
Kitchen Tools Checklist
- Mixing bowl
- Cast iron skillet or griddle (comal)
- Spatula
- Plastic wrap or a tortilla press (optional but helpful)
- Clean kitchen towel
- Knife for splitting
- Tongs (if frying)
These basic tools help you shape, cook, and fill your gorditas with ease. Now let’s get to the fun part—making them!
Step-by-Step Guide to Making Gorditas
Here’s where the magic happens. Follow these detailed steps to master the art of gordita-making.
Step 1: Preparing the Masa (Dough)
In a mixing bowl, combine the masa harina and salt. Gradually add warm water and mix with your hands until the dough comes together. It should be soft but not sticky—kind of like play-dough. If it feels too dry, add a bit more water; if it’s too wet, sprinkle in more masa.
Once the dough is just right, cover it with a damp towel and let it rest for 5-10 minutes. This allows the masa to fully absorb the water, making it easier to work with.
Step 2: Shaping the Gorditas
Divide the dough into 10-12 equal balls. Flatten each ball into a thick disk about 4 inches in diameter and ½ inch thick. You can use your hands, a tortilla press, or even a heavy pot with plastic wrap to press them evenly.
Make sure they’re not too thin—gorditas need to be thick enough to split and fill later on.
Step 3: Cooking the Gorditas
Heat a skillet or griddle over medium heat. Place the gorditas on the hot surface and cook for about 2 minutes on each side, until they develop a light golden color and start to puff slightly. You’re looking for a toasty exterior while keeping the inside soft and steamy.
If you prefer crispy gorditas, you can deep-fry them at this point until they’re golden and crunchy. Just be careful with hot oil!
Step 4: Splitting and Filling
Let the cooked gorditas cool for a minute or two. Then, use a sharp knife to slice halfway through the edge, creating a pocket. Be gentle—you don’t want to cut all the way through.
Now, stuff your gorditas with your favorite fillings. Go generous—you’ve earned it!
Popular Gordita Filling Ideas
Gorditas are like blank canvases waiting to be filled with flavor. Whether you’re a meat lover, vegetarian, or somewhere in between, there’s a perfect gordita combo for you. Let’s dive into some irresistible filling options.
Vegetarian Options
Vegetarians, rejoice! Gorditas offer endless possibilities without the meat. Here are some delicious plant-based fillings to consider:
- Refried beans and queso fresco: A timeless favorite. Creamy beans and crumbly cheese make the perfect pair.
- Sautéed mushrooms with onions and garlic: Earthy and rich, mushrooms bring a meaty texture minus the meat.
- Rajas con crema: Strips of roasted poblano peppers sautéed with onions and finished with cream and cheese—pure heaven.
- Zucchini and corn mix: A lightly seasoned blend of summer veggies brings freshness and color to your gorditas.
Add fresh toppings like chopped lettuce, tomatoes, avocado slices, or a splash of lime for extra brightness and crunch.
Meat-Lovers’ Choices
If you’re after something hearty and satisfying, meat-filled gorditas won’t disappoint. Here are some fan-favorite picks:
- Carnitas (slow-cooked pork): Shredded and juicy, carnitas are a gordita classic.
- Chorizo and potato: The spice of chorizo paired with creamy potatoes is a rich, comforting choice.
- Chicken tinga: Shredded chicken simmered in tomato, chipotle, and onion—smoky, spicy, and unforgettable.
- Ground beef picadillo: Seasoned ground beef with diced veggies for a filling that’s packed with flavor and texture.
Don’t forget to top with crumbled queso fresco, crema, or your favorite salsa to take it to the next level.
Tips for Perfect Gorditas
Making gorditas might seem straightforward, but a few key tricks can turn them from good to great. Here’s how to master them every time.
- Use fresh masa harina: Old or improperly stored masa won’t yield the best results. Always check expiration dates and keep it sealed.
- Consistency is key: The dough should be soft, not dry or overly sticky. Adjust water or masa as needed.
- Don’t skip the rest period: Letting the dough sit for 10 minutes helps the flour hydrate, making the dough easier to shape.
- Thicker is better: Don’t flatten the dough too much. You want a thick cake so you can create a pocket after cooking.
- Griddle vs. frying: For a lighter gordita, use a griddle. For extra crunch, go for the deep-fry—but watch your oil temperature!
- Stuff while warm: Gorditas are easier to split and fill when slightly warm. Once they cool too much, they can harden and crack.
How to Serve Gorditas
Gorditas are incredibly versatile when it comes to serving. You can serve them as a snack, appetizer, or even a full meal depending on the filling and side dishes.
Serving Ideas:
- As a main dish: Pair with a side of rice and beans or a light salad for a full plate.
- At parties or gatherings: Make mini gorditas for a crowd-pleasing finger food.
- For breakfast: Fill with scrambled eggs, cheese, and salsa for a Mexican-style breakfast sandwich.
- Street food-style: Wrap them in parchment paper and serve with a selection of hot sauces and lime wedges.
Gorditas are best enjoyed hot off the griddle, with toppings and fillings bursting out of their crispy shell.
Storing and Reheating Tips
If you have leftovers (lucky you!), gorditas are surprisingly easy to store and reheat. Here’s how to keep them fresh and delicious.
Storage Tips:
- Unfilled gorditas: Let them cool completely, then wrap in plastic or foil and store in the fridge for up to 3 days.
- Filled gorditas: If already stuffed, store in an airtight container. They’ll keep for 2-3 days in the fridge.
Reheating Tips:
- On the skillet: Reheat on a dry skillet or griddle over medium heat until warmed through. This helps restore the crisp exterior.
- In the oven: Wrap in foil and bake at 350°F for 10-15 minutes.
- Microwave: Not ideal, but it works in a pinch. Cover with a damp paper towel and heat in short bursts to avoid drying out.
Freezing isn’t recommended for filled gorditas, but the plain cooked shells can be frozen and reheated later for quick meals.
FAQs about Gorditas Recipe
1. Can I use all-purpose flour instead of masa harina for gorditas?
No, masa harina is essential for authentic gorditas. All-purpose flour won’t give the same texture or flavor.
2. What’s the difference between gorditas and pupusas?
Gorditas are split and filled after cooking, while pupusas are stuffed before cooking and usually griddled rather than fried.
3. How do I make my gorditas puff up?
Make sure your griddle is hot enough and the dough isn’t too thick or too thin. Press gently during cooking to help them puff.
4. Can I make sweet gorditas?
Yes! Add a bit of sugar and cinnamon to the dough and fill with sweet fillings like dulce de leche or fruit.
5. Are gorditas gluten-free?
Yes, as long as you use pure masa harina made from corn and avoid any cross-contamination, they’re naturally gluten-free.
Conclusion
Making gorditas at home is easier than you think—and way more rewarding than picking up fast food. With just a few simple ingredients and a bit of love, you can create a meal that’s flavorful, satisfying, and deeply rooted in Mexican culinary tradition. Whether you’re whipping them up for a family dinner or your next party, gorditas are guaranteed to steal the show.
So grab that masa, fire up your griddle, and get ready to impress your taste buds and your guests. ¡Buen provecho!