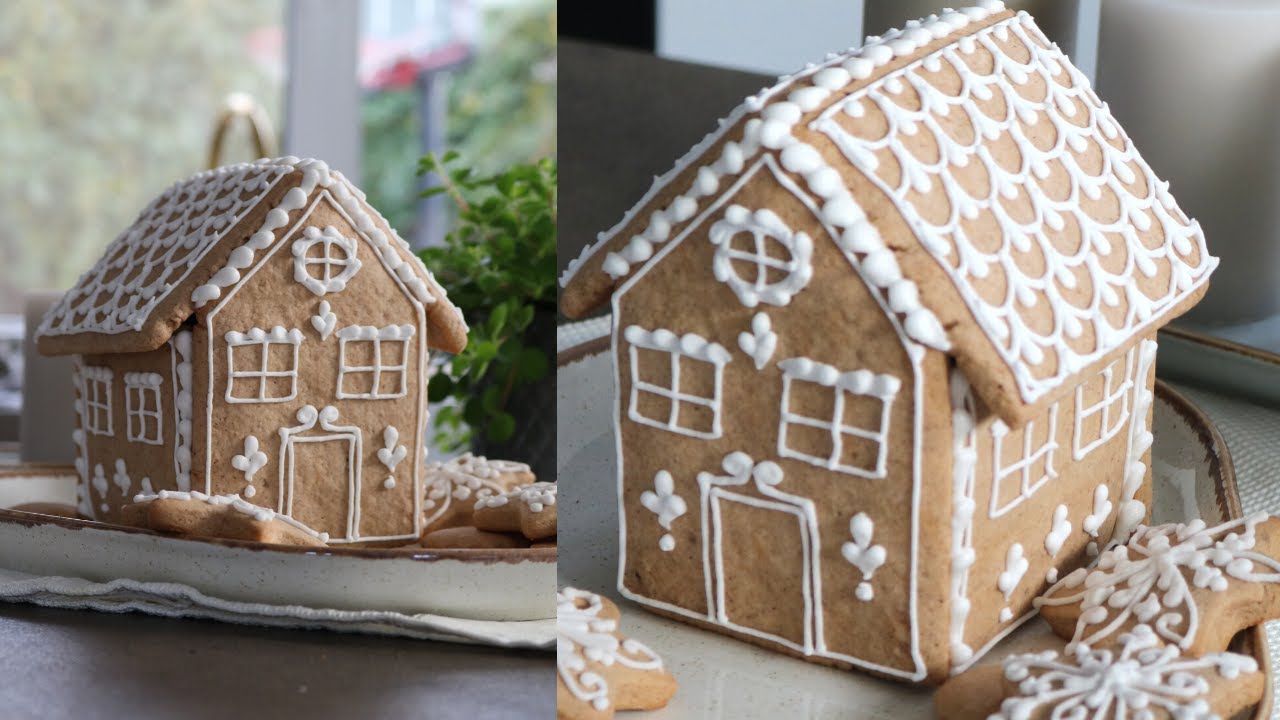
Gingerbread House Icing Recipe: Building a gingerbread house isn’t just a holiday tradition—it’s a creative adventure. But what’s the secret sauce (literally) that holds it all together? The icing. Not just any icing, though. You need one that dries hard, holds strong, and still looks amazing.
So, if you’re ready to whip up some magic, let’s dive into this foolproof, professional-grade guide to making gingerbread house icing.
What Makes Gingerbread House Icing Different?
You might think all icing is the same—after all, it’s just sugar, right? Not quite. The icing for gingerbread houses is made specifically to act like edible glue. It’s strong, dries quickly, and doesn’t budge once it sets. Unlike cake frosting that stays soft and creamy, this one is meant to harden like cement.
This icing doesn’t just serve a decorative purpose. It’s the framework. It’s what keeps your walls standing tall, your roof from caving in, and your candy-covered chimney right where it belongs. So while it may look like a sweet topping, this icing is the real structural MVP of your holiday display.
Why the Right Icing is Crucial for a Sturdy Gingerbread House
Imagine spending hours designing your gingerbread house, only to watch it collapse under the weight of a gumdrop roof. That’s the nightmare scenario we’re here to avoid. The right icing ensures your gingerbread masterpiece doesn’t crumble (literally).
Strong icing keeps the structure intact, even under the weight of candy canes, chocolate shingles, and layers of decorative detail. It also dries quickly, which means less time holding up pieces with your hands while praying they stick. With the right icing, your gingerbread house becomes a solid, long-lasting centerpiece that’s both impressive and delicious.
Types of Icing Used for Gingerbread Houses
Not all icing is created equal, especially when it comes to gingerbread construction. Let’s break down the common types and see what works best.
Royal Icing
This is the gold standard. Made with egg whites or meringue powder and powdered sugar, royal icing dries rock hard and is perfect for structural strength. It’s what professional bakers and serious crafters swear by.
Buttercream Icing
Delicious but too soft for construction. This icing is better used for decoration—like outlining windows or adding a snowy touch to the roof. It won’t hold up gingerbread walls or heavy candies.
Store-Bought Icing vs Homemade
Store-bought icing is convenient but often too soft and unreliable for serious construction. Homemade royal icing gives you full control over consistency, strength, and color.
Ingredients You’ll Need
Let’s talk about the basics you’ll need to get started.
Basic Royal Icing Ingredients
- 3 large egg whites (or 1/4 cup meringue powder + 1/2 cup water)
- 4 cups powdered sugar (confectioners’ sugar), sifted
- 1/2 teaspoon cream of tartar or 1 teaspoon lemon juice (optional for stability)
Optional Add-ins for Enhanced Strength or Appearance
- Gel food coloring (for decoration)
- Vanilla or almond extract (for a hint of flavor)
- Cornstarch (to stiffen if needed)
These simple ingredients work like a charm. The magic lies in how you combine them.
Tools You’ll Need
Before you dive in, make sure your kitchen is armed with the right tools:
- Electric mixer (stand mixer or hand mixer)
- Large mixing bowl
- Measuring cups and spoons
- Rubber spatula
- Piping bags and tips
- Airtight container (for storage)
These essentials make the whole process smoother—and trust me, you don’t want to be halfway through mixing and realize you’re missing a key tool.
Tips Before You Start Mixing
- Sift your powdered sugar to avoid lumps.
- Use room temperature egg whites if using fresh eggs.
- Clean your mixing bowl and beaters thoroughly—any grease can prevent the icing from whipping properly.
- Avoid overmixing. It can make the icing too stiff and hard to pipe.
- Decide your icing’s purpose: construction or decoration. Adjust consistency accordingly.
Step-by-Step Guide to Making Gingerbread House Icing
Let’s break this down into clear, simple steps so you can follow along easily.
Step 1: Gather Your Ingredients and Tools
Set everything up on your kitchen counter. Measure your ingredients accurately. Having everything ready before you begin ensures a smooth, stress-free process.
Step 2: Separate the Egg Whites (If Using Fresh Eggs)
Carefully separate the yolks from the whites—no yolk allowed. Even a tiny bit of fat can mess with the icing’s structure.
Step 3: Whip the Egg Whites Until Frothy
Using an electric mixer, beat the egg whites on medium speed until they turn foamy and frothy. This process helps build the structure of your icing.
Step 4: Gradually Add the Powdered Sugar
Slowly add the powdered sugar, one spoonful at a time, while continuing to beat the mixture. This keeps the texture smooth and prevents clumping.
Step 5: Add Lemon Juice or Cream of Tartar
This step is optional but recommended. Adding an acid like lemon juice or cream of tartar helps stabilize the egg whites and makes the icing stronger.
Step 6: Beat Until Stiff Peaks Form
Keep beating on high speed for about 5–7 minutes, or until the icing holds stiff peaks. That means when you lift the beaters, the icing stands straight up without collapsing.
Step 7: Check the Consistency
Construction icing should be thick and stiff—think toothpaste. If it’s too runny, add more powdered sugar. If it’s too thick, a few drops of water will loosen it.
How to Store Icing Correctly
Once your icing is ready, it’s important to store it properly to maintain its strength and usability. Royal icing dries out fast—like, rock-hard-in-minutes fast—so don’t just leave it exposed on the counter.
Here’s how to store it like a pro:
- Short-term storage: If you’re using the icing throughout the day, keep a damp paper towel over the bowl and cover it with plastic wrap. This prevents a crust from forming on top.
- Long-term storage: For leftovers, scoop the icing into an airtight container. It can stay fresh in the fridge for up to 3 days. Before reuse, bring it to room temperature and give it a good stir.
- Piping bags: If your icing is already in a piping bag, cover the tip with plastic wrap or a damp towel between uses to keep it from hardening.
Pro tip: Label your containers with the date you made the icing. That way, you’ll always know how fresh it is.
Coloring and Piping Tips
Now comes the fun part—making your icing colorful and creative! But be careful, not all food colorings are created equal when it comes to royal icing.
Coloring Tips:
- Always use gel or paste food coloring. Liquid colors add too much water, which can mess up the consistency.
- Add color a little at a time. It’s easier to darken icing than to lighten it.
- Let colored icing sit for 30 minutes—colors deepen over time.
Piping Tips:
- Use different piping tips for different effects—round tips for outlines, star tips for snow effects, leaf tips for greenery, etc.
- Fill your piping bags only halfway to maintain control.
- Use rubber bands or bag ties to seal the top of the piping bag—no icing explosions, please!
- Practice on parchment paper before decorating the real deal.
And remember: patience is key. Neat piping takes practice, but once you get the hang of it, it’s incredibly satisfying.
How to Fix Common Icing Problems
Even seasoned bakers run into icing issues. Don’t panic—most problems are totally fixable.
Problem #1: Icing is too runny
- Solution: Add more sifted powdered sugar, one tablespoon at a time. Mix well between additions.
Problem #2: Icing is too thick
- Solution: Add a few drops of water (seriously, drops!) until the consistency loosens.
Problem #3: Icing separates after sitting
- Solution: Just give it a good stir or quick whip with the mixer. It’ll come back together.
Problem #4: Icing is forming a crust
- Solution: Keep it covered at all times. Store it properly as described earlier.
By troubleshooting early, you’ll avoid disasters during decoration or construction.
Gingerbread House Assembly Tips
Okay, you’ve made your icing and it’s perfect—now what? Time to build! Here’s how to use your icing like edible glue to construct a gingerbread house that’s Instagram-worthy and durable.
- Prep your base. Use a sturdy surface like a cake board or cutting board.
- Start with the walls. Pipe a thick line of icing along the edges, then press the walls together. Hold them in place for a few minutes or prop them with cans or mugs while they dry.
- Attach the roof last. Let the walls dry for at least 30 minutes before adding the roof to avoid collapse.
- Use extra icing inside. Pipe along the inner seams to reinforce the structure.
- Let it dry overnight. For maximum strength, give your house time to fully cure before decorating.
Patience pays off here. A well-assembled gingerbread house is much easier to decorate—and less likely to collapse mid-photo.
Creative Decoration Ideas Using Icing
Sure, icing holds your house together, but it’s also your main tool for turning that plain gingerbread into a winter wonderland. Here are some fun ways to use your icing for decoration:
- Snowy rooftops: Use a star tip to create thick layers of snow on the roof edges.
- Icicles: Let thin icing drip from the roofline using a small round piping tip.
- Window frames: Outline windows and doors with a contrasting color for a festive look.
- Wreaths and garlands: Use green icing and a leaf tip to add greenery to your gingerbread house.
- Names or messages: Write names or greetings across the roof using a fine-tipped piping bag.
And don’t forget candy! Use icing as the glue to attach gumdrops, peppermints, chocolate chips, and sprinkles for extra flair.
Mistakes to Avoid When Making Gingerbread Icing
Let’s wrap up with some common mistakes people make—so you can avoid them from the start.
- Using unsifted powdered sugar: This creates lumpy icing. Always sift!
- Overmixing the icing: This introduces too much air and can make the texture weird.
- Not testing the consistency: Always check before using. Too thick? Too runny? Adjust now, not later.
- Leaving icing uncovered: It’ll crust fast. Cover it the second you’re done mixing.
- Using the wrong type of coloring: Liquid food coloring messes with texture—stick to gel.
Remember, baking is as much about preparation as execution. A little caution goes a long way.
FAQs about Gingerbread House Icing Recipe
1. Can I use store-bought icing for gingerbread houses?
Technically yes, but it’s not ideal. Most store-bought frostings are too soft and won’t hold the structure of a gingerbread house. Homemade royal icing is your best bet.
2. How do I make icing thicker or thinner?
To make it thicker, add more powdered sugar. To thin it out, add water one drop at a time. Always mix thoroughly between adjustments.
3. Is it safe to use raw egg whites in royal icing?
If you’re concerned, use pasteurized egg whites or meringue powder instead. These are safe and commonly used for royal icing.
4. Can I freeze leftover icing?
It’s not recommended. Freezing can change the texture of royal icing. Instead, store it in the fridge for up to 3 days.
5. What’s the best way to pipe icing neatly?
Practice on parchment paper first, use the right piping tips, and keep your pressure steady. Don’t overfill the bag—control is key.
Conclusion
So there you have it—your ultimate guide to making the perfect gingerbread house icing. Whether you’re building a humble cottage or an elaborate candy mansion, this icing will hold it all together (literally). With the right ingredients, tools, and techniques, your gingerbread house will not only look festive but stand tall and strong all season long.
Don’t be afraid to get creative, test your skills, and make a few messes along the way. Because at the end of the day, it’s not just about the icing—it’s about the memories you’re building with it.


