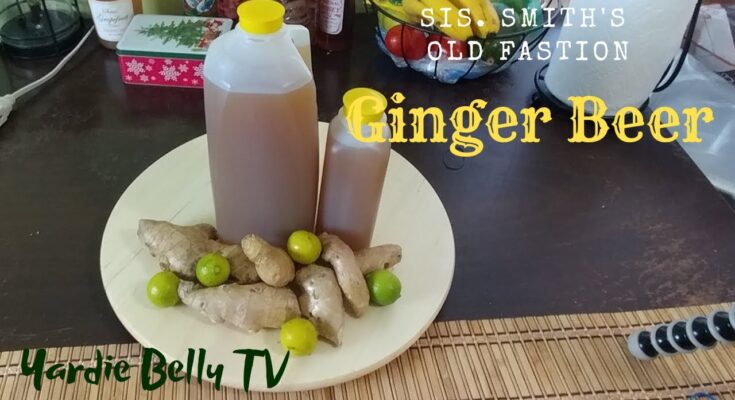
Ginger Beer Recipe: Ginger beer is a naturally fermented beverage with a spicy kick, deep flavor, and refreshing fizz. Despite its name, it’s not always alcoholic—most homemade versions contain very little to no alcohol. Historically, ginger beer originated in England during the 18th century and became popular for its zingy taste and natural fermentation process. Made from ginger root, sugar, lemon juice, water, and sometimes yeast, it’s a healthier and tastier alternative to commercial sodas.
Its signature taste comes from the sharp spiciness of ginger, balanced by the sweetness of sugar and the tang of lemon. Over time, the carbonation builds up through natural fermentation, giving it that bubbly texture we love.
Ginger Beer vs. Ginger Ale
People often confuse ginger beer with ginger ale, but they’re quite different. Ginger ale is typically a carbonated soft drink flavored with ginger extract and sweeteners. It’s usually much milder in flavor and made for commercial mass production. On the other hand, ginger beer is brewed and fermented, offering a much stronger and more authentic ginger flavor.
Ingredients Needed
Fresh and Quality Ingredients Matter
To make authentic ginger beer at home, you need simple but high-quality ingredients. Here’s what you’ll need:
- Fresh Ginger Root (1/2 cup, grated): The soul of your ginger beer. Fresh, aromatic ginger gives the best flavor.
- Granulated Sugar (1 cup): Essential for fermentation. You can experiment with raw sugar or even honey for unique twists.
- Lemon Juice (2 tablespoons): Adds a tangy balance to the spiciness of ginger.
- Active Dry Yeast (1/4 teaspoon): This triggers the fermentation and helps produce carbonation.
- Water (7 cups): Filtered or boiled and cooled for best results.
- Optional Flavor Enhancers: Mint, chili, lime zest, or fruit juices for added complexity.
These ingredients combine to form a mixture that, when fermented, becomes fizzy, flavorful, and refreshing ginger beer.
Equipment You’ll Need
Basic Kitchen Tools for Brewing
You don’t need fancy brewing equipment to make ginger beer at home. Most of the required tools are probably already in your kitchen:
- Grater or Food Processor: For grating fresh ginger.
- Large Saucepan: To dissolve sugar and prepare the syrup.
- Measuring Cups and Spoons: Precision matters in fermentation.
- Strainer or Cheesecloth: To filter out solids.
- Large Mixing Bowl or Jug: For combining all ingredients.
- Plastic or Glass Bottles with Tight Caps: For storing and fermenting. Avoid metal caps, as fermentation produces acid.
- Funnel: Makes bottling easier and cleaner.
Sterilize all your equipment before starting. This helps prevent unwanted bacteria from interfering with the fermentation process.
Step-by-Step Ginger Beer Recipe
Step 1: Grating the Ginger
Start with fresh, plump ginger roots. Wash them thoroughly and peel them using a spoon. Then grate about half a cup of ginger using a fine grater or food processor. The finer the ginger is grated, the more intense and flavorful your ginger beer will be.
Ginger has natural antimicrobial properties and also contains compounds that boost digestion and immunity. So not only does it make your drink delicious, but it also packs a health punch!
Place the grated ginger in a clean bowl and set it aside while you prepare the syrup.
Step 2: Preparing the Sugar Syrup
In a large saucepan, combine one cup of sugar with two cups of water. Heat it over medium heat, stirring until the sugar completely dissolves. Do not let it boil. Once the syrup is ready, remove it from the heat.
Add the grated ginger and let it steep in the syrup for 15–20 minutes. This infuses the syrup with that bold, spicy flavor. After steeping, add the lemon juice and stir it in. Then allow the mixture to cool to room temperature.
This step is crucial because adding yeast to hot syrup can kill the yeast and ruin the fermentation process.
Step 3: Mixing and Fermenting
Once the syrup is cooled, pour it into a large mixing jug or container. Add the remaining water (around 5 cups), and sprinkle in the active dry yeast. Gently stir to combine.
Cover the mixture with a cloth or paper towel secured with a rubber band. Let it sit at room temperature for about 24 to 48 hours. This is the fermentation period. The longer it ferments, the spicier and fizzier it becomes.
You’ll notice bubbles forming, a sign that fermentation is happening. Stir the mixture every 12 hours for even fermentation. When it’s bubbly and has the right zing, it’s ready for bottling.
Step 4: Bottling the Ginger Beer
Now that your ginger beer mixture is fizzy and fragrant, it’s time to bottle it up. First, strain the mixture using a fine mesh strainer or cheesecloth to remove the ginger solids. Then, using a funnel, carefully pour the liquid into clean, sterilized plastic or glass bottles. Make sure to leave at least one inch of headspace at the top of each bottle to allow for pressure buildup.
Tightly seal the bottles with caps or lids. It’s best to use plastic bottles for your first few batches because they’re safer—they expand with pressure and you can squeeze them to check the carbonation level. Glass bottles can be used but carry the risk of exploding if over-carbonated.
Once sealed, leave the bottles at room temperature for another 24 to 48 hours to continue fermenting. Check them daily—if they’re hard and pressurized, it means carbonation has built up. After that, refrigerate immediately to stop further fermentation and preserve the fizz.
Step 5: Storing and Serving
Your homemade ginger beer is now ready to drink! Keep it stored in the fridge to prevent it from over-fermenting or going flat. The cool temperature also helps keep the flavor sharp and the fizz intact.
When serving, pour it slowly into a glass to avoid disturbing the sediment at the bottom. Garnish with a slice of lemon or a sprig of mint for a refreshing presentation.
You can enjoy it chilled on a hot day, mix it into cocktails like Moscow Mule, or pair it with spicy dishes for a flavor explosion. Either way, this homemade brew will taste miles better than anything you’ll find in a can.
Tips for Perfect Homemade Ginger Beer
- Taste as You Go: Always taste your brew during fermentation to decide if you want it more or less spicy.
- Monitor Pressure: Squeeze plastic bottles gently to gauge pressure. Over-carbonation can be dangerous, especially with glass bottles.
- Use Filtered Water: Chlorinated tap water can kill the yeast. If using tap water, boil and cool it first.
- Don’t Rush the Chill: Let the bottles sit out long enough to build proper fizz before refrigerating.
- Experiment Slowly: Want to add pineapple juice or cayenne? Try it with small batches to avoid wasting ingredients.
These little tricks can elevate your ginger beer from good to “holy wow!”
Flavor Variations You Can Try
Tired of the plain ginger-lemon combo? Mix it up with these exciting flavor ideas:
- Spiced Ginger Beer: Add cinnamon sticks, cloves, or star anise to the boiling syrup for a warm, spicy twist.
- Citrus Blend: Use a mix of lemon, lime, and orange juice for a more tropical taste.
- Mint Infusion: Add crushed mint leaves during steeping for a crisp, cool flavor.
- Berry Boost: Add a few mashed raspberries or blackberries for a fruity spin and natural color.
- Pineapple Kick: Mix in pineapple juice before fermentation for a sweet, tangy edge.
Flavor experimentation is half the fun of home brewing. Just remember: any added sugars will continue to ferment, so refrigerate early to avoid explosions.
Common Mistakes to Avoid
Making ginger beer at home is simple, but there are some pitfalls that can ruin the batch if you’re not careful. Here are the most common mistakes and how to avoid them:
- Killing the Yeast: Adding yeast to a hot mixture is a big no-no. Always wait for your syrup to cool to room temperature before adding yeast. High heat can kill the active yeast, and without it, you’ll get flat, lifeless ginger beer.
- Using the Wrong Bottles: Avoid glass bottles unless you’re experienced with fermentation. Glass can explode under pressure, especially if over-fermented. Stick with plastic bottles—they’re safer and allow you to gauge pressure.
- Over-Fermenting: Leaving bottles at room temperature for too long will cause over-carbonation and may lead to explosions. Always refrigerate once the bottles are firm and fizzy.
- Not Measuring Ingredients Properly: Too much sugar or yeast can make the drink overly sweet or too bubbly. Stick to the recommended quantities until you get a feel for the process.
- Skipping Sterilization: Dirty equipment introduces bad bacteria, which can spoil your batch. Sterilize everything before starting.
Avoiding these common errors ensures your ginger beer is safe, delicious, and fizzy—just like it should be.
How to Store and Preserve Ginger Beer
Proper storage is crucial for maintaining the flavor and fizz of your homemade ginger beer. Once fermentation is complete and the bottles are firm, move them to the refrigerator. Cold temperatures slow down the yeast activity, preserving carbonation and preventing your bottles from turning into mini grenades.
Here are a few extra tips for storage:
- Use Clear Bottles: So you can see the sediment and avoid pouring it into your glass.
- Label Your Batches: Include the date bottled and any flavors added. It’s helpful when testing different recipes.
- Consume Within 1–2 Weeks: For peak freshness and optimal fizz, drink your ginger beer within this window.
- Don’t Shake: Agitating the bottle can disturb the sediment and cause excessive fizz when opened.
By storing ginger beer the right way, you can enjoy its bold taste and bubbly charm long after bottling.
Health Benefits of Ginger Beer
Homemade ginger beer isn’t just tasty—it’s also packed with natural health benefits, especially when made with fresh ginger and lemon.
- Digestive Support: Ginger is widely known for its ability to ease nausea and aid digestion. It’s great for settling the stomach after meals.
- Anti-Inflammatory Properties: Ginger contains powerful antioxidants like gingerol that help reduce inflammation and boost immunity.
- Probiotics (if naturally fermented): Fermented drinks can introduce beneficial bacteria to your gut, supporting better digestion and immunity.
- Natural Detox: Lemon juice and ginger help detoxify the liver and flush out toxins.
- Caffeine-Free Hydration: Unlike sodas or coffee, ginger beer hydrates your body without stimulating your nervous system.
Of course, the sugar content is something to be mindful of, but you can reduce it by tweaking the recipe or switching to healthier sugars like coconut or honey.
Is Ginger Beer Alcoholic?
Great question! The answer depends on how long you let it ferment.
Most homemade ginger beer is considered non-alcoholic, especially when fermented for 48 hours or less. During this short fermentation, only a tiny amount of alcohol (usually less than 0.5% ABV) is produced—far less than a typical beer or wine.
However, if you allow it to ferment for longer periods (5 days or more), the alcohol content will increase. That’s why it’s important to monitor your fermentation time based on your preference. If you want to keep it kid-friendly and safe for all ages, stick to the 24–48 hour fermentation window and refrigerate immediately after.
Serving Suggestions
Homemade ginger beer is extremely versatile. Here are some great ways to enjoy it:
- Straight Up: Serve over ice with a slice of lemon or lime.
- Mocktails: Mix with soda water, mint, or cucumber for a refreshing non-alcoholic cooler.
- Cocktails: Use as a base for classic drinks like the Moscow Mule, Dark ‘n’ Stormy, or Jamaican Mule.
- Food Pairing: Goes beautifully with spicy foods, BBQ, grilled meats, or even seafood.
- Holiday Drink: Add cloves, cinnamon, and orange for a warm, spiced winter version.
Whether it’s sunny outside or you’re cozying up in the winter, there’s always a reason to sip on a glass of zingy, fizzy ginger beer.
Safety Precautions When Fermenting
Fermentation is fun, but it comes with responsibilities. Here are some important safety tips to follow:
- Always Check Bottles for Pressure: Squeeze plastic bottles daily. If they feel rock-hard, refrigerate them immediately.
- Use the Right Containers: Don’t use mason jars or bottles not designed for carbonation.
- Watch for Mold: If you see mold or notice an off smell, discard the batch.
- Label Your Bottles: Write down the bottling date so you can monitor fermentation accurately.
- Release Pressure Safely: If bottles feel over-pressurized, slowly open the cap over a sink to let gas out gradually.
By following these tips, you can safely brew your ginger beer and avoid the drama of accidental explosions.
FAQs about Ginger Beer Recipe
Can I make ginger beer without yeast?
Yes, you can use a natural ginger bug instead of commercial yeast. It takes longer but adds natural probiotics.
How long does homemade ginger beer last?
Refrigerated ginger beer stays good for about 1 to 2 weeks. Always check for unusual smells or fizz levels before drinking.
Is ginger beer good for digestion?
Absolutely. Ginger is known for its stomach-soothing properties and can help with nausea and bloating.
Can kids drink homemade ginger beer?
Yes, as long as it’s lightly fermented (24–48 hours), it’s non-alcoholic and safe for kids.
Why is my ginger beer not fizzy?
It could be due to dead yeast (added to hot syrup), under-fermentation, or a loose bottle cap. Try adjusting fermentation time or yeast quality.
Conclusion
There you have it—your complete guide to making delicious, fizzy, homemade ginger beer. With just a few simple ingredients, some basic equipment, and a bit of patience, you can create a beverage that’s miles better than anything store-bought. It’s spicy, sweet, and refreshingly bold—perfect on its own or in a cocktail.
Plus, the creative freedom of adding your own flavors means every batch can be a new adventure. So what are you waiting for? Grab some fresh ginger and get brewing!


