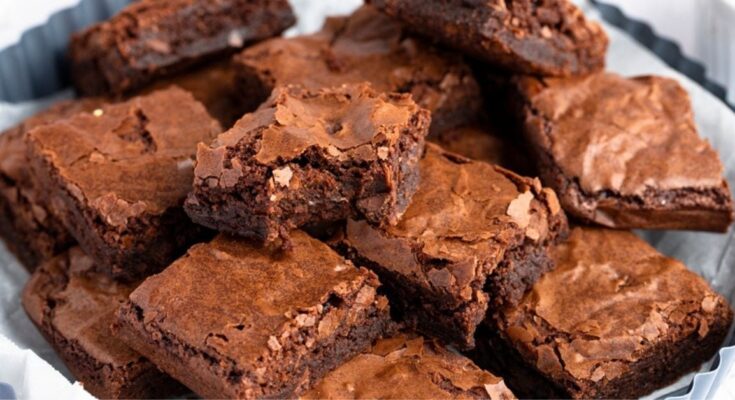
Ghirardelli Brownie Recipe: If you’re a fan of chocolate (who isn’t?), there’s a good chance you’ve heard of Ghirardelli brownies. These brownies aren’t just your average dessert—they’re rich, chewy, fudgy squares of chocolate heaven. Whether you’re baking them for a family get-together, a potluck, or just because it’s a Tuesday and you deserve a treat, Ghirardelli brownies hit the sweet spot every single time.
What makes them stand out? It’s all in the quality of ingredients. Ghirardelli has been around since 1852, perfecting the art of chocolate. Their brownie mixes come packed with premium cocoa and real chocolate chips that melt in your mouth with every bite. But the real secret to unforgettable Ghirardelli brownies? Knowing how to bake them just right.
In this complete guide, we’ll walk through everything from the list of ingredients you’ll need to pro tips that guarantee perfect brownies every time. Ready to become the go-to brownie baker in your circle? Let’s get started.
Why Ghirardelli? What Makes These Brownies So Special
You might be wondering—why choose Ghirardelli over other brands? The answer is simple: quality and taste. Ghirardelli uses high-quality cocoa, real chocolate chips, and time-tested recipes that deliver consistently delicious results. These brownies are incredibly fudgy, with a shiny, crackly top that just screams bakery-style.
Another huge bonus is the mix of convenience and customization. The boxed mixes save you time, but you can still play around with add-ins and baking times to create your own signature version. Whether you like yours extra gooey or more cake-like, Ghirardelli is a solid base to start with.
And let’s not forget—the chocolate. Ghirardelli is one of the oldest chocolate companies in America, and they know what they’re doing. Their brownie mixes aren’t just sugary blobs; they’re rich, complex, and full of deep cocoa flavor. When you want to impress, this is the brownie mix you reach for.
Types of Ghirardelli Brownie Mixes Available
You’ve got options when it comes to Ghirardelli brownie mixes. Here are the most popular varieties you’ll find in stores:
Classic Chocolate
This is the OG of the Ghirardelli lineup. Perfect for anyone who loves a rich, traditional chocolate brownie without too many bells and whistles.
Double Chocolate
Looking for something extra? Double chocolate brownies include extra chocolate chips in the mix, making every bite feel like a molten chocolate explosion.
Triple Chocolate
Why stop at double when you can go triple? This mix contains milk, dark, and semi-sweet chocolate chips. It’s like a chocolate lover’s dream come true.
Dark Chocolate
For those who prefer their brownies on the more sophisticated side, the dark chocolate mix is slightly less sweet and has a bold, intense flavor.
Each version has the signature Ghirardelli quality and richness, so feel free to experiment to find your favorite.
List of Ingredients You’ll Need
Let’s break it down between using a boxed mix and making them from scratch.
For the Boxed Mix
- 1 package of Ghirardelli Brownie Mix (your choice of flavor)
- 1/4 cup water
- 1/3 cup vegetable oil (or melted butter for extra richness)
- 1 large egg
Optional Add-ins:
- 1/2 cup chopped walnuts or pecans
- 1/2 cup semi-sweet chocolate chips
- Swirls of peanut butter, caramel, or Nutella
For a Homemade Ghirardelli-Style Brownie
If you’re going fully from scratch, here’s what you’ll need:
- 1 cup Ghirardelli Unsweetened Cocoa Powder
- 1 cup all-purpose flour
- 1/2 tsp baking powder
- 1/4 tsp salt
- 1 cup unsalted butter, melted
- 2 cups granulated sugar
- 4 large eggs
- 2 tsp vanilla extract
- 1 cup Ghirardelli chocolate chips or chunks
Pro tip: Use good quality ingredients—you’ll taste the difference, especially in something as flavor-packed as brownies.
Equipment You’ll Need
Nothing fancy here. Just the basics:
- Mixing bowl
- Measuring cups and spoons
- Rubber spatula or wooden spoon
- Whisk
- 8×8 or 9×9 baking pan
- Non-stick spray or parchment paper
- Toothpick (for doneness test)
- Cooling rack
If you have a stand mixer, great—but you don’t need one. Brownies are one of the few baked goods where less mixing actually leads to better results.
Preparation Tips Before You Start Baking
Before you even preheat the oven, here are a few golden tips that can make or break your brownie game.
Preheating and Pan Prep
- Always preheat your oven to 325°F or 350°F (depending on your box instructions).
- Grease your baking pan with butter or non-stick spray—or better yet, line it with parchment paper. This makes removing the brownies super easy and helps prevent burning the edges.
Measuring Ingredients Properly
- Use dry measuring cups for flour and sugar, and liquid measuring cups for water or oil.
- Don’t pack the flour—spoon it into the cup and level off with a knife.
Little things like these can drastically affect the texture and consistency of your final product. It’s worth the extra minute to get it right.
Step-by-Step Guide to Making Ghirardelli Brownies
Now comes the fun part—let’s bake! Follow these steps exactly, and you’ll end up with rich, moist, fudgy brownies that melt in your mouth.
Step 1: Preheat the Oven
Get that oven nice and hot. Preheat it to 325°F (for a glass pan) or 350°F (for metal pans). A properly heated oven ensures even baking and that beautiful crackly top.
Step 2: Prepare Your Baking Pan
Grease the pan thoroughly or line it with parchment paper. If you’re using parchment, let the sides overhang a bit—it’ll make it easy to lift the brownies out later.
Step 3: Mix the Wet Ingredients
In a medium bowl, combine:
- 1 egg
- 1/4 cup water
- 1/3 cup oil (or melted butter)
Whisk these until well combined. This is your liquid base and it’ll help bind the dry ingredients while giving the brownies their texture.
Step 4: Add the Ghirardelli Brownie Mix
Add the entire contents of the brownie mix package to the wet ingredients. Use a spatula or wooden spoon to mix until just combined. Do not overmix—this is key to soft, chewy brownies.
Step 5: Stir Until Just Combined
Mix gently. You’re not trying to whip it like cake batter. The goal is a thick, smooth batter with all dry bits fully incorporated. Add chocolate chips or nuts now if you’re using them.
Step 6: Pour the Batter into the Pan
Once your batter is ready, pour it into the prepared baking pan. Use a rubber spatula to spread it out evenly so that every corner is filled. The batter will be thick—that’s a good sign. Thick batter means fudgy brownies. Give the pan a gentle shake or tap it on the counter to even out the top and release any air bubbles.
If you’re adding any swirls like peanut butter or caramel, now’s the time. Drop small spoonfuls over the top of the batter and use a toothpick or knife to gently swirl them in. This not only adds amazing flavor but also gives your brownies a beautiful marbled look.
Step 7: Bake to Perfection
Slide the pan into your preheated oven and set your timer. For an 8×8 pan, bake for 38–40 minutes. For a 9×9 pan, check at around 30–35 minutes. The type of pan you use makes a big difference—glass pans take a bit longer, while metal heats faster.
Avoid opening the oven frequently while baking; this can make the brownies sink in the middle. Just keep an eye on them through the glass. You want the edges to be firm and the center to look set but slightly glossy.
Step 8: Cooling Time
When the timer goes off, don’t rush to cut them. Let the brownies cool completely in the pan—at least 1 hour. This waiting game helps the structure set and gives you clean, perfect slices. If you try to cut while they’re hot, they’ll crumble or be gooey in the worst way.
For easier removal, lift them out using the parchment paper and transfer to a cutting board. Then slice them into neat squares using a sharp knife. Pro tip: clean the knife between cuts to avoid a messy finish.
How to Tell When Brownies Are Done
Let’s be honest—this is the trickiest part. Brownies don’t behave like cakes when they’re ready, so the toothpick method requires a little nuance.
Here’s what to look for:
- Insert a toothpick about 2 inches from the edge: if it comes out with moist crumbs, you’re good.
- The center should no longer jiggle, but it shouldn’t be dry either.
- For fudgy brownies, the toothpick will come out slightly sticky.
- For cakier brownies, it will come out clean.
Remember, brownies continue to cook a little after you take them out of the oven. If you’re on the fence, it’s better to underbake slightly than overbake.
Optional Add-Ins to Elevate the Flavor
Want to make your Ghirardelli brownies your own? Here are some tasty extras that can take them from good to unforgettable.
Nuts
- Chopped walnuts or pecans add crunch and contrast to the soft brownie texture.
- Toast them lightly before mixing in for an added layer of flavor.
Chocolate Chips or Chunks
- Double up on the chocolate by adding more chips—semi-sweet, milk, or white.
- Use Ghirardelli chocolate chips for that signature quality.
Swirls & Fillings
- Peanut butter: Swirl a few tablespoons on top before baking.
- Caramel: Drop spoonfuls and swirl for a rich, buttery layer.
- Nutella: Adds a hazelnut-chocolate twist that’s dangerously good.
You can also experiment with crushed cookies, marshmallows, or even a shot of espresso powder for a mocha flavor kick.
Common Mistakes to Avoid When Baking Brownies
Let’s face it—even with a mix, things can go wrong. Here’s what not to do:
- Overmixing the batter: This activates the gluten in the flour and results in dense, tough brownies.
- Overbaking: Makes your brownies dry and crumbly. Always check early and monitor closely.
- Cutting too soon: Cutting while they’re hot will give you messy edges and gooey centers.
- Using cold eggs or butter: Room temperature ingredients blend better and create a smoother batter.
Avoiding these simple mistakes can mean the difference between just okay and “OMG these are amazing!”
How to Store Ghirardelli Brownies
If you have any leftovers (lucky you!), storing them properly is key to maintaining that chewy texture and rich flavor.
- Room temperature: Store in an airtight container for up to 3 days. Place parchment between layers to avoid sticking.
- Refrigerator: Brownies will last up to a week in the fridge, but they may dry out slightly.
- Tip: Place a slice of bread in the container to keep brownies soft.
Always let them cool completely before storing to avoid condensation that leads to sogginess.
Freezing and Reheating Tips
Want to make a big batch and freeze them for later? Smart move.
- Freezing: Wrap individual brownie squares tightly in plastic wrap, then place in a freezer-safe bag. They’ll keep for up to 3 months.
- Reheating: Microwave for 10–15 seconds for a gooey texture. Or reheat in the oven at 300°F for 5–8 minutes.
Frozen brownies are also great for blending into milkshakes or crumbling over ice cream. You’re welcome.
How to Make Brownies More Fudgy or Cakey
What’s your brownie personality? Fudgy or cakey? Here’s how to tweak the recipe to your liking.
For Fudgy Brownies:
- Use more butter and less flour.
- Add an extra egg yolk (not a whole egg).
- Don’t overbake!
For Cakey Brownies:
- Add an extra egg for structure.
- Use a bit of baking powder.
- Beat the eggs and sugar longer to incorporate air.
The Ghirardelli mix leans fudgy by default, but with a few small changes, you can make it your perfect texture.
Serving Suggestions
Brownies are great on their own, but pairing them with other treats takes things up a notch:
- Vanilla ice cream – Classic combo.
- Drizzle of caramel or chocolate syrup – Yes, please.
- Dusting of powdered sugar – Elegant and simple.
- Fresh berries – Adds tartness to balance the sweetness.
- Espresso shot – If you’re feeling fancy, turn your brownie into an affogato.
Or just eat them straight from the pan. No judgment.
FAQs about Ghirardelli Brownie Recipe
Q1: Can I make Ghirardelli brownies without eggs?
Yes! Try using a flax egg (1 tbsp ground flaxseed + 3 tbsp water) or applesauce (1/4 cup per egg). Just note, the texture may be slightly different.
Q2: Why are my brownies dry or crumbly?
Most likely, they were overbaked. Next time, start checking a few minutes before the timer goes off.
Q3: Can I make Ghirardelli brownies in a muffin tin?
Absolutely! Reduce the bake time to 18–22 minutes and keep an eye on them. Great for portion control.
Q4: How do I get clean brownie slices?
Let them cool completely, use a sharp knife, and wipe the blade between cuts. You can also chill them before slicing.
Q5: Can I double the recipe?
Yes, just use a 9×13-inch pan and extend the baking time slightly—usually around 40–45 minutes.
Conclusion
Whether you’re baking for a crowd or indulging in a solo chocolate session, Ghirardelli brownies never disappoint. They’re easy to make, rich in flavor, and endlessly customizable. With this step-by-step guide, you’re now equipped with all the tips, tricks, and secrets to bake the perfect batch every time.
Remember, baking is part science, part love. So grab that box, preheat that oven, and treat yourself to a slice of brownie bliss.


