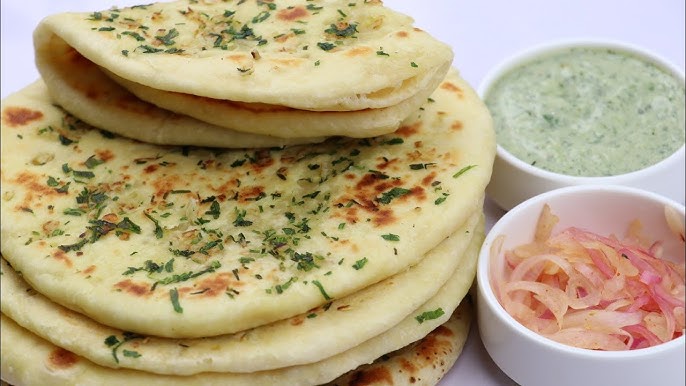
Garlic Naan Recipe: Garlic naan is a flavorful Indian flatbread that’s beloved around the world. It’s warm, soft, slightly chewy, and bursting with the aroma of garlic and herbs. You’ve probably had it at an Indian restaurant, served hot in a basket, paired with butter chicken, tikka masala, or lentil dal. But here’s the secret—making garlic naan at home is easier than you think, and the results? Absolutely mouthwatering.
This soft flatbread is made from a simple leavened dough and is traditionally cooked in a tandoor oven. But don’t worry, you can easily make it on a regular skillet at home and still get that perfect golden char and irresistible garlicky finish. The magic lies in the fluffy texture of the dough and the garlicky butter brushed on top right after cooking.
Whether you’re planning a cozy Indian dinner at home or just craving some garlicky carbs, this step-by-step guide will walk you through everything—from ingredients to the final brush of garlic butter. Ready to impress your family or guests with this restaurant-style treat? Let’s get started.
Ingredients You’ll Need
Before diving into the cooking process, let’s gather everything you’ll need. The best part? You probably already have most of these ingredients in your kitchen.
Key Ingredients for Dough:
- All-purpose flour (2 ½ cups): The base of the dough, it gives the naan a soft texture.
- Plain yogurt (½ cup): Adds richness and helps with fermentation.
- Warm milk (½ cup): Activates the yeast and makes the dough soft.
- Active dry yeast (1 tsp): Helps the dough rise and become fluffy.
- Sugar (1 tsp): Feeds the yeast.
- Salt (¾ tsp): Balances the flavor.
- Oil or melted butter (2 tbsp): For richness and softness.
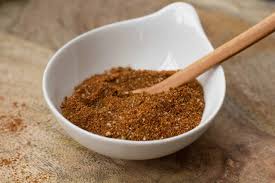
Ingredients for Garlic Butter Topping:
- Garlic cloves (4-5, finely minced): The star ingredient.
- Fresh cilantro (2 tbsp, chopped): Adds freshness and color.
- Unsalted butter (¼ cup): For that rich, glossy finish.
- Optional: Chilli flakes or sea salt for extra zing.
Each ingredient plays a crucial role—yogurt makes the dough tender, yeast ensures the naan is light and airy, and garlic butter adds that signature punch. Always use fresh garlic for the best flavor, and don’t skimp on the butter—it’s what gives naan its mouthwatering aroma and sheen.
Tools and Equipment Required
You don’t need fancy equipment to make garlic naan at home, but a few basic tools will make your life easier.
Basic Kitchen Tools:
- Mixing bowl: For kneading the dough.
- Rolling pin: To shape the naan evenly.
- Cast iron skillet or heavy-bottomed pan: Best for getting that restaurant-style char.
- Tongs or spatula: For flipping the naan.
- Pastry brush: To apply the garlic butter.
Optional Tools for Perfect Naan:
- Pizza stone or oven-safe skillet: For baking in the oven if you prefer that over stovetop.
- Stand mixer with a dough hook: Saves time when mixing and kneading dough.
- Clean towel or plastic wrap: To cover the dough while it rises.
Having the right tools will help you streamline the process and make it feel effortless. If you’re using a skillet, cast iron is ideal because it retains heat well and gives the naan that slightly crispy edge with golden spots.
How to Prepare Garlic Naan Dough
The foundation of any great naan is the dough. Here’s how to make it just right.
Step-by-Step Dough Making Process:
- Activate the yeast: In a small bowl, mix warm milk, sugar, and yeast. Let it sit for 10 minutes until frothy.
- Mix the dough: In a large mixing bowl, combine flour, salt, yogurt, and oil. Add the activated yeast mixture and start kneading.
- Knead until smooth: Knead the dough for 8-10 minutes until it’s soft and elastic. If it’s too sticky, add a bit more flour.
- Let it rise: Place the dough in a greased bowl, cover with a damp cloth or plastic wrap, and let it rise in a warm place for 1-2 hours until doubled in size.
Tips for Soft and Fluffy Naan:
- Don’t rush the rise. A slow, steady rise makes the dough airy and chewy.
- Use warm—not hot—milk to activate the yeast. Too hot and it’ll kill the yeast.
- Adding a spoonful of yogurt enhances the softness and flavor.
This dough can also be made a day ahead and stored in the fridge. Just bring it to room temperature before rolling.
How to Make Garlic Butter Topping
No garlic naan is complete without that shiny, fragrant butter glaze. This is where the flavor party really kicks off.
Making the Garlic Mixture:
- In a small pan, melt butter on low heat.
- Add finely minced garlic and sauté just until fragrant (don’t brown it).
- Stir in chopped cilantro and a pinch of salt. Remove from heat.
When to Apply on Naan:
The garlic butter should be applied right after the naan is cooked and still hot. This helps the bread soak in all that garlicky goodness. You can even apply it twice—once midway while cooking, and again after it’s done—for an extra punch of flavor.
Want a spicy twist? Sprinkle some chilli flakes on top of the butter before serving. Your taste buds will thank you!
How to Shape and Roll Garlic Naan
Once your dough has risen and doubled in size, it’s time to shape it. This is the part where you start to see your garlic naan come to life.
Step-by-Step Rolling Instructions:
- Divide the dough: Punch down the risen dough and divide it into 6-8 equal balls, depending on how large you want each naan.
- Preheat your skillet: Place your skillet or pan over medium-high heat so it’s hot and ready by the time your dough is rolled.
- Flour your surface: Lightly flour your rolling surface and rolling pin to prevent sticking.
- Roll it out: Take one ball and roll it into an oval or teardrop shape about ¼-inch thick. Don’t worry about perfect shapes—rustic looks great!
- Optional: Sprinkle a little chopped garlic or sesame seeds onto the rolled dough and press them in gently with the rolling pin.
Tips for Best Results:
- Don’t overwork the dough when shaping—it can become tough.
- Keep the rest of the dough balls covered while you roll each one to prevent them from drying out.
- Make them thinner if you like crispier naan or thicker for a chewier bite.
Rolling is a crucial step because the shape and thickness will determine the final texture. A slightly uneven, rustic naan has a homemade charm that adds to the flavor experience.
Cooking Garlic Naan on the Stove
This is where the magic happens. Cooking naan on the stove gives it those beautiful golden spots and chewy texture we all crave.
Cooking Instructions:
- Place the rolled naan on the hot skillet: Cook for 30-45 seconds or until bubbles form.
- Flip it: Turn the naan with tongs or a spatula. Cook the other side for another 30-40 seconds.
- Optional second flip: If you want char marks like a tandoor-style naan, flip it again and press gently.
- Apply garlic butter: As soon as you remove the naan from the pan, brush it generously with the garlic butter.
Repeat the process with all remaining dough balls.
Pro Tips for Stove Cooking:
- Don’t cook on low heat—it should be medium-high for those golden spots.
- If bubbles don’t form, the skillet might not be hot enough.
- Cover the skillet briefly with a lid if you want a puffier naan.
Cooking naan is quick, usually under a minute per side, so stay close and keep that butter ready. The aroma alone will tell you you’re doing it right!
Alternative Cooking Methods: Oven and Grill
If you’re cooking for a crowd or just want to try something different, the oven or grill is a great way to make multiple naans at once.
Baking in the Oven:
- Preheat the oven to 500°F (260°C) and place a pizza stone or baking sheet inside.
- Once the oven is hot, place rolled naan directly on the stone.
- Bake for 2-3 minutes until it puffs up and gets golden spots.
- Finish with a quick broil for extra charring if desired.
- Brush with garlic butter immediately after removing from the oven.
Grilling Garlic Naan:
- Preheat your grill to high.
- Place the naan directly on the grates.
- Grill for 1-2 minutes per side, until bubbly and slightly charred.
- Apply the garlic butter once it’s off the heat.
Grilling gives the naan a smoky flavor, perfect for outdoor meals. Whichever method you choose, the key is high heat and timing.
Serving Suggestions for Garlic Naan
Garlic naan is incredibly versatile. While it’s commonly served with Indian curries, its potential goes way beyond that.
Pair It With:
- Butter Chicken or Chicken Tikka Masala
- Paneer Butter Masala or Palak Paneer
- Dal Tadka or Chana Masala
- Raita and pickles on the side
- Lentils and veggie curries
Other Creative Uses:
- Use it as a pizza base with toppings.
- Turn it into a wrap with grilled meats and veggies.
- Serve it with dips like hummus or baba ganoush.
- Make garlic naan chips for snacking—just toast and slice!
It’s so flavorful you can even enjoy it solo with a cup of chai or soup. Honestly, once you start making garlic naan at home, you’ll be looking for excuses to whip up a batch.
Storing and Reheating Garlic Naan
So you’ve made a big batch of garlic naan—lucky you! But what if you have leftovers? No worries, naan stores and reheats beautifully when done right.
How to Store:
- Room Temperature (Short-Term): If you’re planning to eat it within a day, wrap the naan in foil or an airtight container. Keep it at room temperature to maintain its softness.
- Refrigerator (2-3 Days): Wrap individual pieces in parchment or foil and store them in an airtight container. This prevents them from drying out or becoming too hard.
- Freezer (Up to 2 Months): Want to keep naan for longer? Wrap each piece tightly in plastic wrap and place them in a freezer-safe bag. They freeze like a dream.
Reheating Tips:
- Stovetop: Place naan on a heated skillet for 1-2 minutes per side. Add a little butter or a sprinkle of water and cover with a lid for extra softness.
- Microwave: Wrap the naan in a damp paper towel and microwave for 20-30 seconds. This works great for quick results but can sometimes make the texture a bit chewy.
- Oven: Preheat to 350°F (175°C), wrap naan in foil, and heat for 5-7 minutes.
Pro tip: Always brush a little garlic butter on naan before reheating to bring back that fresh flavor and shine!
Common Mistakes to Avoid When Making Garlic Naan
Even though garlic naan is relatively simple to make, there are a few common mistakes that can throw off the texture or flavor. Here’s how to steer clear of them:
1. Using Cold Ingredients:
Make sure your milk and yogurt are at room temperature or slightly warm. Cold ingredients can slow yeast activation, making your dough dense instead of fluffy.
2. Not Letting the Dough Rise Properly:
Don’t rush the rise. If your dough hasn’t doubled in size, your naan will be flat and hard. Let it rest in a warm spot and give it time to rise well.
3. Skipping the Rest Time After Rolling:
Once you roll the dough into naan shapes, give it a few minutes to rest before cooking. This helps the gluten relax, leading to better puffing and texture.
4. Cooking on Low Heat:
Low heat = dry, pale naan. Use medium-high to high heat for the best bubbles and golden brown spots. Your pan should sizzle when the dough hits it.
5. Applying Garlic Butter Too Early:
Brushing garlic butter before cooking can lead to burnt garlic. Always apply it after cooking while the naan is still hot.
These tiny tweaks can make a massive difference in how your garlic naan turns out. So keep these in mind, and you’ll be making restaurant-worthy naan in no time.
Variations of Garlic Naan
Once you’ve mastered the classic garlic naan, why not get a little creative? There are tons of fun ways to switch it up and make each batch feel brand new.
1. Cheese Garlic Naan:
Add grated mozzarella or paneer to the dough or stuff it inside before rolling. Cheesy, garlicky goodness in every bite—what’s not to love?
2. Whole Wheat Garlic Naan:
For a healthier version, substitute part or all of the all-purpose flour with whole wheat flour. The texture will be slightly denser but still delicious.
3. Stuffed Garlic Naan:
Get adventurous with fillings like mashed potatoes, spiced onions, or even leftover curry. Just divide the dough, add the filling, and seal it like a pocket before rolling.
4. Spicy Garlic Naan:
Mix chilli flakes or finely chopped green chilies into your garlic butter for a little heat.
5. Vegan Garlic Naan:
Use plant-based yogurt and vegan butter. The result? Still super flavorful and perfect for anyone on a dairy-free diet.
The possibilities are endless. Garlic naan is the kind of bread that welcomes creativity. Play with the flavors and make it your own!
Health Considerations and Nutritional Info
While garlic naan is a tasty indulgence, it’s also helpful to know what’s going into your body—especially if you’re watching your diet.
Nutrition Breakdown (Per Piece Approximation):
| Nutrient | Amount |
|---|---|
| Calories | 200-250 |
| Carbohydrates | 35-40g |
| Protein | 5-7g |
| Fat | 7-10g |
| Fiber | 1-2g |
| Sodium | 200-300mg |
Values vary depending on ingredient brands and portion sizes.
Making it Healthier:
- Use whole wheat flour or a 50/50 blend.
- Reduce the amount of butter or use olive oil.
- Use Greek yogurt for more protein.
- Skip the extra garlic butter for a lighter version.
It’s all about balance. You can enjoy this delicious flatbread in moderation without guilt—especially when it’s made fresh at home.
Why Homemade Garlic Naan is Better Than Restaurant Naan
Let’s be honest—restaurant garlic naan is a treat, but making it at home? That’s next-level satisfying. Here’s why homemade naan wins every time:
1. Customization:
When you make garlic naan at home, you’re in control. Want it extra garlicky? Add more garlic. Prefer a cheesy twist? Toss in some mozzarella. Like it a little crispier? Roll it thinner. You can tailor it exactly to your taste.
2. Freshness and Quality:
Nothing beats the smell of fresh naan straight off the skillet. Restaurant naan may have been sitting under a heat lamp or reheated. Homemade naan is hot, soft, and slathered with butter the moment it’s cooked.
3. Healthier Option:
At home, you choose the ingredients—use less butter, skip preservatives, or swap in whole wheat flour. You can also make it vegan or gluten-free to fit your dietary needs.
4. Cost-Effective:
Restaurant naan can cost you a few bucks a piece. But at home? You can make 6-8 pieces for the price of one. It’s budget-friendly and way more rewarding.
5. Fun to Make:
From kneading the dough to brushing on that garlicky butter, making naan is a fun, hands-on experience. It’s also a great activity with kids or friends—everyone can roll their own.
Once you experience that first bite of warm, fluffy, homemade garlic naan, you might never want to order it out again.
FAQs about Garlic Naan Recipe
1. What is garlic naan made of?
Garlic naan is typically made with all-purpose flour, yogurt, yeast (or baking powder), sugar, salt, garlic, and butter or ghee. The garlic is either kneaded into the dough or brushed on top with melted butter after cooking.
2. Can I make garlic naan without yeast?
Yes! You can swap yeast with baking powder or baking soda mixed with yogurt. It still gives a soft, fluffy texture without waiting hours for the dough to rise.
3. Do I need a tandoor to make naan at home?
Nope, a tandoor is traditional, but a hot cast-iron skillet or non-stick pan does the trick at home. You can even finish it under a broiler or on an open flame to get that classic charred look and smoky flavor.
4. How do I store leftover garlic naan?
Wrap it in foil or an airtight container and refrigerate for up to 2 days. Reheat on a skillet or in the oven. Avoid microwaving unless you like rubbery naan (which we don’t recommend).
5. Can garlic naan be frozen?
Absolutely. Freeze it in layers with parchment paper between each piece. When you’re ready, just reheat straight from the freezer—no thawing needed.
6. Is garlic naan vegan?
Traditional garlic naan isn’t vegan because it includes yogurt and sometimes milk or butter. But don’t worry, plant-based swaps like coconut yogurt and vegan butter can make it 100% vegan-friendly.
7. What dishes go well with garlic naan?
Garlic naan pairs perfectly with curry dishes like butter chicken, tikka masala, palak paneer, or even lentil dal. Honestly, it’s also amazing solo—just tear, dip, and devour!
Conclusion
Making garlic naan at home isn’t complicated. With just a few ingredients and a bit of time, you can whip up soft, flavorful, restaurant-style naan right in your kitchen. From preparing the dough to mastering that golden char on the skillet, each step is easy and satisfying.
Plus, it’s incredibly versatile—stuff it, top it, or make it spicy. However you serve it, homemade garlic naan will always impress. So roll up your sleeves, fire up that skillet, and get ready to fall in love with the process (and the results).
Now that you know the full step-by-step guide, there’s only one thing left to do—start cooking and enjoy every garlicky bite.