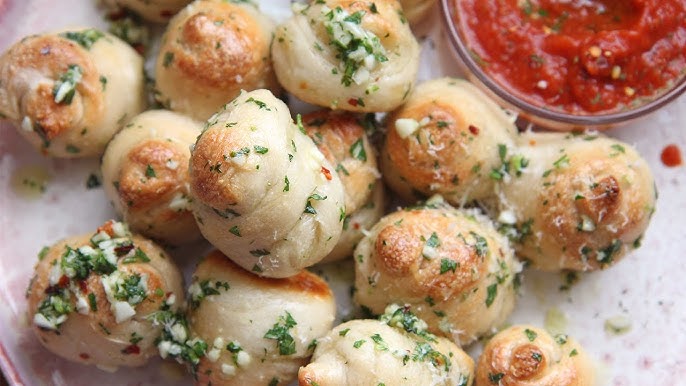
Garlic Knots Recipe: Garlic knots are a timeless classic. These soft, buttery, and aromatic bites are a must-have at parties, family dinners, or even as a solo snack.
Originally from Italian-American cuisine, garlic knots gained fame for their simple yet irresistible combination of bread and garlic butter.
Whether you’re a seasoned baker or a newbie, this guide will walk you through the process of making perfect garlic knots right in your kitchen.
Ingredients Needed for Garlic Knots
To make the best garlic knots, you’ll need fresh and quality ingredients. Here’s what you’ll need:
For the Dough:
- 2 ½ cups all-purpose flour
- 1 packet (2 ¼ tsp) instant yeast
- 1 tsp sugar
- 1 tsp salt
- ¾ cup warm water
- 3 tbsp olive oil
For the Garlic Butter:
- 4 tbsp unsalted butter
- 3 garlic cloves, minced
- 1 tsp dried parsley (or fresh, chopped)
- ¼ tsp salt
- Optional: grated Parmesan cheese for topping
Pro Tip: Use fresh garlic and high-quality butter to maximize flavor. Adjust the salt and garlic levels to suit your taste preferences.
Essential Tools and Equipment
Before you start, make sure you have these tools ready:
- A mixing bowl
- Measuring cups and spoons
- A rolling pin
- Baking sheet
- Parchment paper or silicone mat
- Pastry brush
- Small saucepan for garlic butter
Workspace Tip: Keep your workstation clean and dusted with flour to avoid sticking.
Preparing the Dough
The dough is the foundation of perfect garlic knots. Here’s how to prepare it step by step:
- Combine Dry Ingredients: In a large mixing bowl, whisk together the flour, yeast, sugar, and salt.
- Add Wet Ingredients: Gradually pour in warm water and olive oil. Mix until the dough starts to come together.
- Knead the Dough: Transfer the dough to a floured surface. Knead for about 8-10 minutes until smooth and elastic.
- Let It Rise: Place the dough in a lightly oiled bowl, cover it with a clean towel, and let it rise for 1-2 hours or until doubled in size.
Pro Tip: Ensure the water isn’t too hot; lukewarm water is perfect to activate the yeast without killing it.
Shaping the Garlic Knots
Once the dough has risen, it’s time to shape it into knots:
- Divide the Dough: Punch down the dough and divide it into 12 equal portions.
- Roll Into Strips: Roll each portion into a thin strip, about 6-8 inches long.
- Form Knots: Tie each strip into a simple knot and tuck the ends underneath for a neat look.
Creative Tip: For fun, shape some into braids or twists to surprise your guests.
Preparing the Garlic Butter
The garlic butter gives the knots their signature flavor. Follow these steps:
- Melt Butter: In a small saucepan, melt the butter over low heat.
- Add Garlic and Herbs: Stir in the minced garlic, parsley, and a pinch of salt. Let it simmer for a minute but don’t let the garlic brown.
- Cool Slightly: Remove from heat and let it cool slightly for easier application.
Flavor Adjustment: Add chili flakes for a spicy kick or grated Parmesan for a cheesy twist.
Applying the Garlic Butter to the Knots
Now that your garlic butter is ready and the knots are shaped, it’s time to coat them in that irresistible mixture.
- Brush Before Baking: Use a pastry brush to generously coat each knot with the prepared garlic butter. This ensures the flavor seeps into the dough as it bakes.
- Reserve Some Butter: Keep a small portion of the garlic butter aside for brushing after baking.
- Ensure Even Coating: Pay special attention to the folds and creases of the knots to ensure every bite is flavorful.
Pro Tip: If you love extra garlic flavor, save some minced garlic to sprinkle directly on the knots before baking.
Baking the Garlic Knots
The baking process is where the magic happens, turning your doughy knots into golden-brown delights.
- Preheat the Oven: Set your oven to 375°F (190°C) and allow it to fully preheat.
- Line the Baking Sheet: Arrange the knots on a parchment-lined baking sheet, leaving space between each to allow for expansion.
- Bake to Perfection: Place the sheet in the oven and bake for 15-18 minutes, or until the knots are golden and slightly puffed.
Monitoring Tip: Keep a close eye on the knots during the last few minutes of baking to prevent over-browning.
Adding the Final Touches
After baking, it’s time to elevate your garlic knots with some finishing touches.
- Brush with Reserved Garlic Butter: Immediately after removing the knots from the oven, brush them with the remaining garlic butter for a glossy finish.
- Garnish with Fresh Herbs: Sprinkle with chopped parsley or basil for a pop of color and added flavor.
- Optional Toppings: Add grated Parmesan, a dash of black pepper, or even red pepper flakes for variety.
Serving Tip: Serve the garlic knots warm for the best taste and texture.
Serving Suggestions
Garlic knots are versatile and can be paired with a variety of dishes or enjoyed on their own. Here are some serving ideas:
- With Marinara Sauce: A classic choice that enhances the flavor of the garlic and butter.
- As a Side Dish: Perfect with pasta dishes, soups, or salads.
- Snack Platter: Include them in a party platter with dips like pesto or ranch.
Presentation Tip: Serve them in a basket lined with a napkin for a cozy, rustic look.
Tips for Storing Leftovers
If you somehow have leftovers (which is rare!), storing them properly is crucial to maintaining their freshness.
- Refrigeration: Place the knots in an airtight container and store them in the refrigerator for up to 3 days.
- Freezing: Wrap individual knots in foil or plastic wrap and freeze for up to a month.
- Reheating: Warm them in the oven at 350°F (175°C) for 5-7 minutes or in the microwave for 15-20 seconds.
Storage Tip: Avoid over-microwaving, as it can make the knots chewy.
Creative Variations
Once you’ve mastered the basic garlic knots, why not experiment with some creative twists?
- Stuffed Garlic Knots: Add a cube of mozzarella or cheddar inside each knot before shaping.
- Herbed Knots: Incorporate Italian seasoning, rosemary, or thyme into the dough.
- Vegan Knots: Use olive oil instead of butter and skip the cheese for a vegan-friendly version.
Customization Idea: Create a dessert version by coating the knots with cinnamon sugar and melted butter instead of garlic.
Common Mistakes to Avoid
Even simple recipes can go awry if you’re not careful. Avoid these common pitfalls:
- Overproofing the Dough: This can make the knots too dense.
- Skipping the Butter Brush: This step is key to achieving the signature garlic flavor.
- Overbaking: Watch closely during baking to ensure they don’t dry out.
Troubleshooting Tip: If your dough feels too sticky, add a tablespoon of flour at a time until it becomes manageable.
Why Homemade Garlic Knots Are Better
Homemade garlic knots aren’t just delicious; they’re also a rewarding experience. You control the ingredients, adjust flavors to your liking, and enjoy the satisfaction of creating something from scratch. Plus, nothing beats the aroma of freshly baked bread wafting through your kitchen.
Fun Fact: Homemade knots are free from preservatives and can be made healthier with whole wheat flour or reduced butter.
FAQs about Garlic Knots Recipe
1. What ingredients do I need for garlic knots?
To make garlic knots, you typically need all-purpose flour, active dry yeast, sugar, salt, warm water, olive oil, butter, minced garlic, and herbs such as parsley or basil for garnish.
2. How long does it take to make garlic knots?
The total time to make garlic knots, including preparation and baking, is usually about 2 hours. This includes time for the dough to rise.
3. Can I use pre-made pizza dough for garlic knots?
Yes, pre-made pizza dough works perfectly for garlic knots. It’s a great shortcut that reduces preparation time and still delivers delicious results.
4. Are garlic knots vegan?
Garlic knots can be made vegan by substituting the butter with a vegan alternative and ensuring the dough does not contain any animal-derived ingredients like eggs or dairy.
5. How do I store leftover garlic knots?
Leftover garlic knots can be stored in an airtight container at room temperature for up to 2 days or refrigerated for up to a week. Reheat them in the oven or microwave before serving.
6. Can garlic knots be frozen?
Yes, garlic knots can be frozen either before or after baking. Store them in a freezer-safe bag or container for up to 3 months. Thaw and reheat in the oven to serve.
7. What are some common dipping sauces for garlic knots?
Popular dipping sauces include marinara sauce, ranch dressing, and garlic butter sauce. You can also try pesto or a cheesy dip for variety.
Conclusion
Congratulations! You’ve just learned how to make soft, buttery, and flavor-packed garlic knots from scratch. Whether it’s for a family dinner, a gathering with friends, or a quick snack, these garlic knots are guaranteed to impress. So roll up your sleeves, preheat that oven, and get ready to enjoy the ultimate comfort food.


