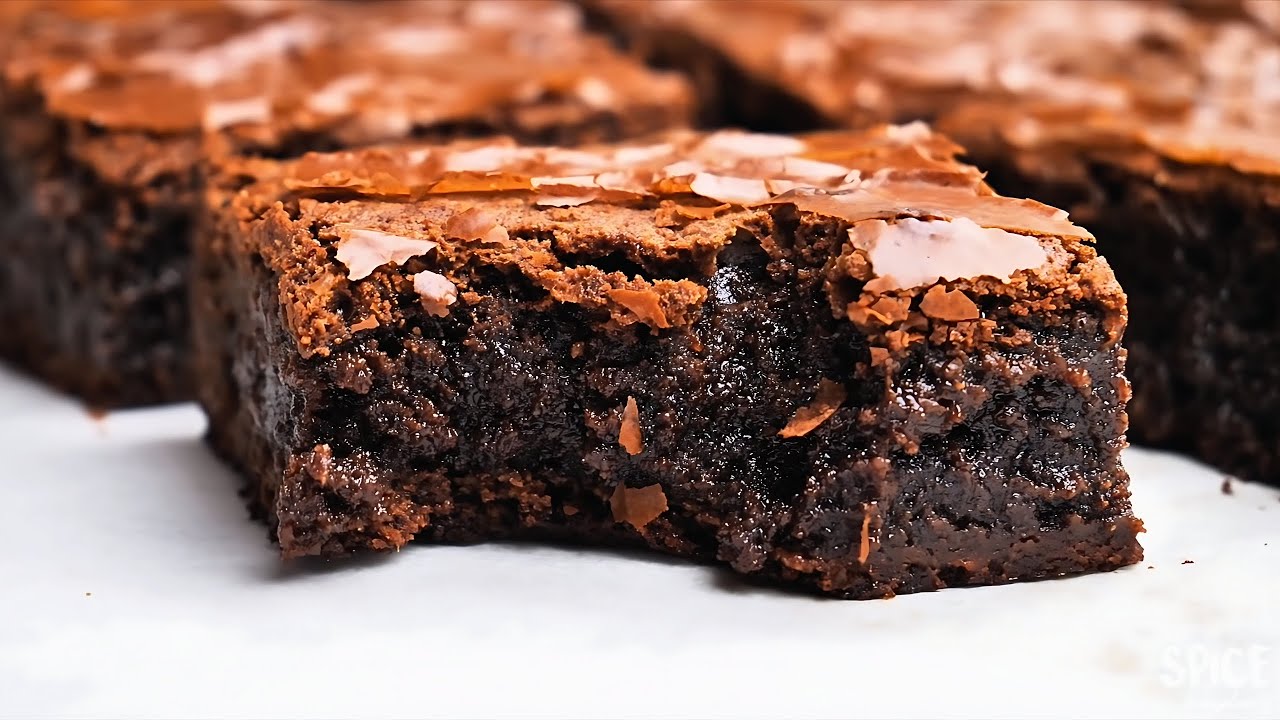
Fudgy Brownies Recipe: There’s something irresistible about a pan of rich, fudgy brownies fresh out of the oven. Whether you like the crackly top, gooey middle, or deep chocolate flavor, a great brownie can satisfy just about any dessert craving.
This step-by-step guide walks you through how to make homemade fudgy brownies that are chewy, moist, and downright decadent. And the best part? You don’t need any fancy ingredients or professional baking skills!
Introduction to the Ultimate Fudgy Brownies
Let’s be honest—there are hundreds of brownie recipes out there, but not all deliver that perfect blend of gooey center, chewy edge, and shiny, crackly top. These fudgy brownies hit all the marks and then some. The recipe focuses on using real melted chocolate (not just cocoa powder) to amp up that deep, chocolaty flavor, with just enough flour to keep it dense and rich without being cakey.
Think of these as the kind of brownies that make you close your eyes on the first bite. They’re the star of bake sales, family dinners, or lazy Sunday afternoons. No boxed mix can compare.
What Makes Brownies Fudgy vs. Cakey?
This is the million-dollar question, right? The key difference between a cakey and a fudgy brownie lies in the ratio of fat to flour. More fat (in the form of butter and chocolate) leads to a denser, fudgier texture. On the flip side, cakey brownies usually contain more flour and sometimes even baking powder to give them a lighter structure.
For a fudgy brownie:
- More butter
- Melted chocolate instead of just cocoa powder
- Fewer eggs (relative to cakey recipes)
- Less flour
Simple science, but it makes a world of difference. And trust me—you’ll taste that difference from the very first bite.
Why You’ll Love This Recipe
Here’s why this brownie recipe stands out:
- Crackly top like the bakery-style brownies you crave.
- Ultra-chocolatey flavor from real chocolate and cocoa powder.
- Chewy edges and gooey centers—the perfect balance!
- Easy to make with everyday ingredients.
- No mixer required! Just a whisk, a bowl, and a baking pan.
This is your new go-to recipe whether you’re baking for yourself, a crowd, or just because you’re craving something sinfully delicious.
List of Ingredients You’ll Need
Basic Pantry Staples
You probably already have most of these in your kitchen:
- 1 cup (226g) unsalted butter
- 8 oz (226g) semi-sweet chocolate, chopped or chips
- 1 ¼ cups (250g) granulated sugar
- ¾ cup (150g) brown sugar
- 3 large eggs
- 1 tbsp vanilla extract
- ¾ cup (90g) all-purpose flour
- ½ cup (50g) unsweetened cocoa powder
- ½ tsp salt
These ingredients are what make up the fudgy foundation. The real chocolate (combined with cocoa powder) gives the brownies depth, while the brown sugar adds extra chewiness.
Optional Add-ins and Toppings
Feel like customizing your brownies? Try mixing in:
- ½ cup chopped walnuts or pecans
- ½ cup chocolate chips (dark, milk, or white)
- Swirl in peanut butter, Nutella, or caramel
- Top with flaky sea salt before baking
Make it yours! That’s the beauty of a solid base recipe like this.
Tools and Equipment Needed
You don’t need anything fancy, but here’s what will help:
- Medium to large mixing bowl
- Whisk or rubber spatula
- Measuring cups and spoons
- 9×9 inch square baking pan (or 8×8 for thicker brownies)
- Parchment paper
- Double boiler or microwave-safe bowl (for melting chocolate)
- Oven thermometer (optional but helpful)
If you have a digital scale, even better. Baking by weight gives you more consistent results.
Step-by-Step Guide to Make Fudgy Brownies
Step 1: Preheat the Oven and Prepare Your Pan
Start by preheating your oven to 325°F (163°C). Lower temperature means slower baking—key for fudgy texture.
Next, line your baking pan with parchment paper, leaving some overhang on the sides for easy lifting. Lightly grease the sides, even with parchment, to prevent sticking.
Why not just bake directly in the pan? Well, parchment keeps the edges soft and makes cleanup a breeze.
Step 2: Melt the Butter and Chocolate
In a heat-safe bowl, combine your butter and semi-sweet chocolate.
- Use a double boiler or microwave in 30-second intervals, stirring until completely melted and smooth.
- Let it cool slightly—warm, not hot—so it doesn’t cook your eggs in the next step.
This step builds that rich chocolate base. Don’t rush it.
Step 3: Mix in Sugar
Add both your granulated sugar and brown sugar to the warm butter-chocolate mixture. Stir until fully combined.
The sugar doesn’t just sweeten—it’s what helps create that beautiful crackly top. Mixing it while the butter is still warm helps the sugar dissolve slightly, giving you that signature texture.
Step 4: Add the Eggs One by One
Crack in your eggs, one at a time, whisking well after each addition.
This adds structure to the brownies, helping bind everything together. Be sure not to overmix, or you’ll get more air in the batter—aka more cake-like brownies.
Keep it slow and smooth.
Step 5: Stir in Vanilla Extract
Now toss in your vanilla extract. It might seem small, but vanilla really enhances chocolate’s natural flavor. Don’t skip it!
Step 6: Sift and Add the Dry Ingredients
In a separate bowl, sift together your flour, cocoa powder, and salt. Sifting is important—it prevents lumps and evenly distributes the cocoa.
Gently fold the dry mix into your wet ingredients using a rubber spatula. Stop mixing once you no longer see flour streaks.
Too much mixing = tough brownies. Handle with care.
Step 7: Optional Add-ins (Nuts, Chips, Swirls)
If you’re adding mix-ins, now’s the time. Fold in:
- Nuts
- Chocolate chunks
- Caramel swirls
This is the fun part. Go wild if you want!
Step 8: Pour into Pan and Level the Batter
Pour the batter into your prepared baking pan and smooth the top with a spatula. Try to get it as even as possible for consistent baking.
Optional: Sprinkle extra chocolate chips or sea salt on top for a beautiful finish.
Step 9: Bake Perfectly (Don’t Overbake!)
Bake at 325°F (163°C) for 30–35 minutes (9×9 inch pan) or 35–40 minutes (8×8 inch pan).
- A toothpick inserted should come out with a few moist crumbs.
- If it comes out clean, you’ve gone too far.
It’s better to underbake slightly—brownies continue to cook as they cool.
Step 10: Cool, Slice, and Enjoy
Let your brownies cool completely in the pan for at least 1 hour before slicing. This allows them to set and gives you clean, sharp edges.
Use a sharp knife wiped clean between each cut for perfect squares.
Common Mistakes to Avoid
Even though brownies seem simple, a few small missteps can lead to disappointment. Here are some mistakes to watch out for:
- Overbaking: This is the #1 mistake. Remember, brownies continue to cook as they cool. If your toothpick comes out clean, they’re already overdone.
- Using cold eggs: Eggs straight from the fridge can cause the melted chocolate and butter to seize up. Always bring your eggs to room temperature.
- Skipping the parchment paper: It might seem like a small thing, but parchment helps prevent sticking and gives you clean edges when lifting brownies out.
- Overmixing the batter: Once you add flour, stir just until incorporated. Overmixing develops the gluten, leading to tough brownies.
- Cutting too soon: It’s tempting to dive in right away, but cutting warm brownies will leave you with a gooey mess. Let them set!
Avoid these pitfalls, and you’ll be rewarded with a perfect pan every time.
Tips for Extra Fudgy Results
Want to go full-on fudge mode? Try these pro tips:
- Use more brown sugar than white sugar – Brown sugar adds moisture and chew.
- Replace a bit of flour with extra cocoa powder – Less flour means more fudgy.
- Use high-quality chocolate – The better the chocolate, the deeper the flavor.
- Don’t skip the salt – It enhances sweetness and balances the richness.
- Chill your brownies overnight – It sounds weird, but fudgy brownies taste even better the next day after setting in the fridge!
These small adjustments make a big difference when you’re aiming for peak brownie bliss.
Best Brownie Pan Size and Baking Time Chart
| Pan Size | Brownie Thickness | Baking Temp | Bake Time |
|---|---|---|---|
| 8×8 inch | Thick and chewy | 325°F (163°C) | 35–40 mins |
| 9×9 inch | Slightly thinner | 325°F (163°C) | 30–35 mins |
| 9×13 inch | Thin and soft | 325°F (163°C) | 25–30 mins |
For gooier brownies, use a smaller pan and bake less. For firmer, less fudgy brownies, increase the baking time slightly or use a larger pan.
How to Store Brownies for Maximum Freshness
Brownies don’t last long in most homes—but if you’re saving some for later, here’s how to keep them fresh:
- Room Temperature: Store in an airtight container at room temp for up to 4–5 days. Add a slice of bread to keep them soft.
- Refrigeration: Not ideal unless your brownies have cream cheese or other perishable toppings.
- Avoid leaving uncovered: Brownies dry out quickly in open air, so wrap tightly with plastic wrap or foil.
Bonus tip: Warm them slightly in the microwave for that “just-baked” feel.
How to Freeze Brownies (With and Without Slicing)
Freezing brownies is super easy, and they actually taste even fudgier once thawed!
To freeze whole:
- Let brownies cool completely.
- Wrap tightly in plastic wrap, then foil.
- Store in a freezer-safe bag for up to 3 months.
To freeze sliced:
- Cut into squares and layer with parchment between pieces.
- Place in an airtight container or freezer bag.
To reheat: Let them thaw at room temp or microwave for 15–20 seconds for a melty, fudgy center.
Ideas for Serving Fudgy Brownies
Sure, brownies are amazing on their own. But if you want to serve them as a show-stopping dessert, try one of these ideas:
- Warm brownie + vanilla ice cream + hot fudge drizzle
- Stacked brownie tower with whipped cream layers
- Brownie sundae bar with toppings like nuts, candies, and sauces
- Crumble over milkshakes or yogurt parfaits
- Dip in melted chocolate and serve as brownie bites
Make dessert unforgettable with just a little creativity.
Brownie Variations You Can Try
Once you’ve mastered the basic fudgy brownie, try mixing things up:
- Espresso Brownies: Add 1 tsp instant espresso to boost the chocolate flavor.
- Salted Caramel Swirl: Swirl in caramel sauce and sprinkle with sea salt before baking.
- Mint Chocolate: Add mint extract and chocolate chunks for a refreshing twist.
- S’mores Brownies: Top with crushed graham crackers and mini marshmallows.
- Peanut Butter Brownies: Drop spoonfuls of peanut butter and swirl before baking.
There’s no limit to brownie creativity. Use this recipe as your base and let your imagination run wild.
FAQs about Fudgy Brownies Recipe
1. Can I double this brownie recipe?
Yes! Just double all ingredients and bake in a 9×13-inch pan. Add 5–10 minutes to the bake time.
2. Why did my brownies come out cakey instead of fudgy?
You likely added too much flour, overbaked them, or overmixed the batter. Follow the recipe exactly for best results.
3. Can I use only cocoa powder instead of chocolate?
You can, but the flavor and texture will change. Using both gives the richest, fudgiest result.
4. How do I know when brownies are done?
Insert a toothpick into the center—if it comes out with moist crumbs (not wet batter), they’re ready.
5. Can I make these brownies gluten-free?
Yes! Substitute with a 1:1 gluten-free baking flour. The results will still be fudgy and delicious.
Conclusion
You’ve just walked through every step of creating the perfect, rich, fudgy brownies. From choosing the right ingredients to baking and storing them like a pro, this recipe guarantees consistent, indulgent results every single time. Whether you’re making a treat for yourself or wowing guests, these brownies will always deliver that melt-in-your-mouth experience.
No box mix needed—just real ingredients, a little patience, and a big appetite. So grab that spatula, preheat your oven, and get ready to bake your new favorite dessert.