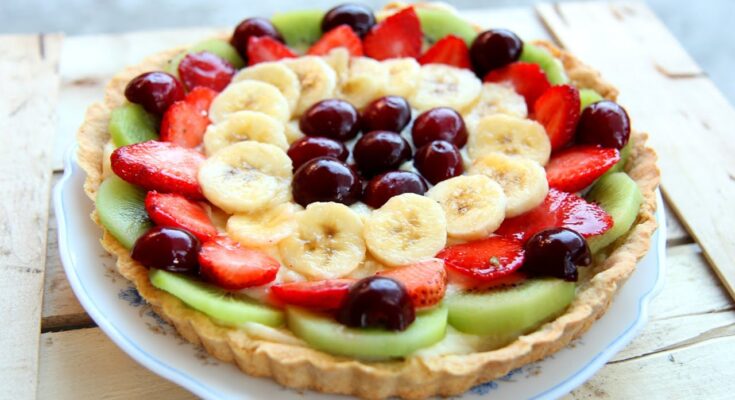
Fruit Tart Recipe: Fruit tarts are the epitome of elegance when it comes to desserts. These delightful creations combine a buttery, flaky crust, velvety pastry cream, and an array of fresh, vibrant fruits arranged like edible art. Originating from French patisseries, fruit tarts have won hearts worldwide with their versatility and irresistible flavor combinations.
While they may seem like a masterpiece reserved for skilled bakers, making a fruit tart at home is surprisingly achievable with the right guidance. Plus, nothing beats the satisfaction of crafting one from scratch.
Ingredients Needed for a Perfect Fruit Tart
Crust Ingredients
To make a classic tart crust, also known as pâte sucrée:
- 1 ½ cups (190g) all-purpose flour.
- ½ cup (115g) unsalted butter, cold and cubed.
- ¼ cup (50g) granulated sugar.
- 1 large egg.
- Pinch of salt.
Substitutions: For a gluten-free crust, replace all-purpose flour with almond or rice flour. For a vegan crust, substitute butter with coconut oil and the egg with a flaxseed mixture.
Filling Ingredients
For the silky pastry cream:
- 2 cups (500ml) whole milk.
- ½ cup (100g) granulated sugar.
- 3 egg yolks.
- 3 tablespoons (25g) cornstarch.
- 1 teaspoon vanilla extract.
- 2 tablespoons (30g) unsalted butter.
Healthier alternatives include low-fat milk or almond milk and reducing sugar quantity.
Topping Suggestions
Here’s where the creativity shines:
- Classic options: Strawberries, kiwis, blueberries, and raspberries.
- Seasonal picks: Cherries in summer, figs in autumn, or pomegranates in winter.
- Exotic additions: Mango, dragon fruit, or passionfruit for a tropical twist.
Essential Kitchen Tools
Before diving in, ensure you have:
- A tart pan with a removable bottom.
- Rolling pin and pastry cutter.
- Mixing bowls, whisk, and spatula.
- A fine mesh sieve for the cream.
- Parchment paper and pie weights for blind baking.
Having these tools at hand makes the process smoother and more enjoyable.
Preparing the Tart Crust
Mixing the Dough
Start by combining flour, sugar, and salt in a mixing bowl. Add the cold butter and use your fingertips or a pastry cutter to blend it into pea-sized crumbs. Add the egg and mix just until the dough forms.
Chilling the Dough
Wrap the dough in plastic wrap and refrigerate for at least 30 minutes. This helps prevent shrinking during baking.
Rolling and Shaping
Roll the chilled dough on a floured surface to about 1/8-inch thickness. Carefully transfer it to your tart pan, pressing it gently into the edges. Trim the excess for a neat finish.
Pre-baking the Crust
Cover the crust with parchment paper and fill it with pie weights or dried beans. Bake in a preheated oven at 375°F (190°C) for 15 minutes, then remove the weights and bake for an additional 10 minutes until golden.
Making the Pastry Cream
Cooking the Cream Base
In a saucepan, heat milk until it just starts to simmer. In a separate bowl, whisk egg yolks, sugar, and cornstarch until smooth. Gradually add the hot milk to the mixture while whisking continuously, then return it to the saucepan. Cook over medium heat until thickened.
Cooling and Storing
Once the cream is thick, remove it from heat and stir in butter and vanilla. Strain through a sieve for extra smoothness and cover with plastic wrap to prevent a skin from forming. Chill until ready to use.
Assembling the Fruit Tart
Filling the Crust
Spread the chilled pastry cream evenly into the pre-baked tart crust, using a spatula to smooth the surface.
Arranging the Fruits
Arrange your fruits in a visually pleasing pattern. Start from the outside and work inward, layering colors and shapes for an eye-catching effect.
Adding the Glaze
Warm apricot or apple jelly and lightly brush it over the fruits to give them a shiny finish. This glaze not only enhances the look but also keeps the fruit fresh longer.
Tips for Customizing Your Fruit Tart
Making a fruit tart is like painting on a blank canvas—there’s so much room for creativity! Here are a few ideas to make your tart unique:
- Flavor Enhancements: Add citrus zest (lemon, lime, or orange) to the pastry cream for a zingy kick.
- Infused Creams: Experiment with infusing flavors like lavender, cinnamon, or even matcha into the cream base.
- Crust Variations: Swap the classic crust for a chocolate-flavored one by mixing in cocoa powder or a nut-based crust for added texture.
- Creative Toppings: Use edible flowers, toasted nuts, or a sprinkle of powdered sugar for an artistic touch.
Your imagination is the only limit when it comes to customizing your tart to suit any occasion or taste preference.
Storage and Serving Suggestions
A fruit tart is best enjoyed fresh, but if you have leftovers or want to prepare in advance, follow these storage tips:
- Refrigeration: Keep the tart in the fridge, covered with plastic wrap or stored in an airtight container, for up to 2–3 days.
- Avoid Freezing: While the crust can be frozen separately, the assembled tart doesn’t freeze well as the fruits and pastry cream can lose their texture.
- Serving Tips: Serve chilled for a refreshing treat. Pair with a dollop of whipped cream or a drizzle of caramel sauce for added indulgence.
Make sure to slice the tart with a sharp knife to preserve the presentation of the fruits.
Common Mistakes to Avoid
Even seasoned bakers can encounter hiccups when making fruit tarts. Here’s how to sidestep common pitfalls:
- Overworking the Dough: Handle the crust dough gently to prevent it from becoming tough.
- Skipping the Chill Time: Skipping this step can result in a shrunken or uneven crust.
- Burnt or Soggy Crusts: Always blind-bake the crust with pie weights to ensure a crispy base.
- Runny Pastry Cream: Take your time cooking the cream until thickened and strain it for a smooth finish.
- Overloading with Fruits: While tempting, too much fruit can make the tart top-heavy or difficult to slice neatly.
With a little patience and attention to detail, your fruit tart will turn out flawless.
Healthier Alternatives and Modifications
Want to enjoy a fruit tart without the guilt? Here are some adjustments to make it healthier:
- Low-Calorie Crust: Substitute part of the butter with Greek yogurt or use a nut-based crust made from almonds and dates.
- Sugar-Free Cream: Use a sugar substitute like stevia or monk fruit in the pastry cream.
- Light Creams: Opt for almond milk or a dairy-free alternative to reduce calories.
- Fresh Fruits Only: Skip the glaze for a more natural, wholesome topping.
These modifications let you enjoy the dessert while catering to specific dietary preferences or restrictions.
FAQs about Fruit Tart Recipe
What fruits work best for a fruit tart?
For a fruit tart, you want fruits that not only taste great but also hold up well without releasing too much juice, which can make the crust soggy. Berries such as strawberries, blueberries, and raspberries are popular choices. Stone fruits like peaches and plums also work well when in season. For a tropical twist, consider mango or kiwi.
Can I make a fruit tart ahead of time?
Yes, you can prepare a fruit tart in advance. Bake the crust and prepare the filling a day ahead, storing them separately in the refrigerator. Assemble the tart a few hours before serving to prevent the crust from becoming soggy.
What is the best way to store a fruit tart?
Fruit tarts are best enjoyed the day they are made, but you can store them in the refrigerator. Cover the tart lightly with plastic wrap or keep it in an airtight container to maintain freshness. Consume within two days for the best taste and texture.
Is there a gluten-free option for the crust?
Absolutely! To make a gluten-free fruit tart, you can use a blend of gluten-free flours such as almond flour and coconut flour. These alternatives provide a delicious, nutty flavor to the crust and are excellent for those avoiding gluten.
How do I keep the fruit from browning on the tart?
To prevent fruit from browning, especially applicable to fruits like apples and bananas, brush them lightly with a solution of lemon juice and water. This not only adds a slight zesty flavor but also preserves the vibrant colors of the fruits.
Conclusion
A fruit tart is not just a dessert; it’s a celebration of flavors, textures, and creativity. Whether you’re crafting it for a special occasion or simply to satisfy a sweet craving, this step-by-step guide ensures a foolproof and satisfying experience. By mastering the art of making a buttery crust, velvety pastry cream, and perfectly arranged fruits, you’re bound to impress anyone who takes a bite.
Ready to roll up your sleeves and give it a try? The result will be a feast for both the eyes and the taste buds!


