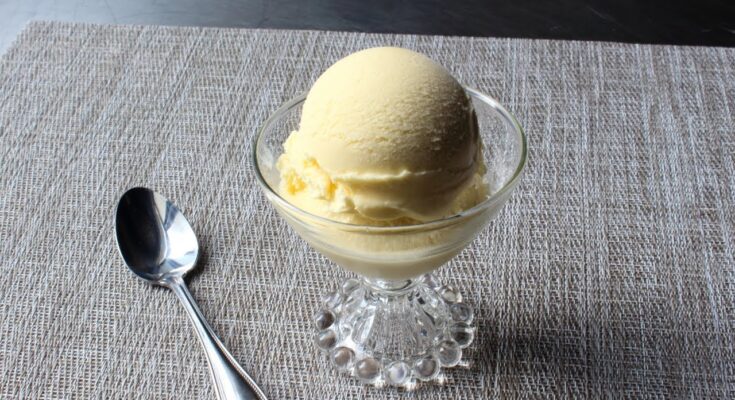
Frozen Custard Recipe: When it comes to frozen desserts, nothing quite matches the silky-smooth texture and rich flavor of frozen custard. Unlike ordinary ice cream, frozen custard is creamier, denser, and has a melt-in-your-mouth quality that dessert lovers can’t resist.
The secret lies in the addition of egg yolks, which give custard its signature taste and luscious texture. If you’ve always wanted to recreate this classic treat at home, you’re in the right place.
This step-by-step guide will take you from gathering the right ingredients to serving a bowl of homemade frozen custard that rivals any custard stand.
Introduction to Frozen Custard
Frozen custard is often considered ice cream’s smoother, more luxurious cousin. While both share the same base of milk, cream, and sugar, frozen custard adds egg yolks into the mix, creating a thicker, richer consistency. Unlike standard ice cream, it’s churned at a slower pace, which reduces air and gives it that velvety, dense texture that dessert enthusiasts adore.
What Makes Frozen Custard Different from Ice Cream
The biggest difference lies in the ingredients and texture. Ice cream is typically light and airy, while frozen custard is richer because of egg yolks. The slower churning process also keeps air to a minimum, ensuring every bite feels indulgent. If ice cream is like a refreshing scoop on a hot day, frozen custard is the gourmet version—decadent, creamy, and deeply satisfying.
A Brief History of Frozen Custard
Frozen custard has its roots in Coney Island, New York, where it was first sold at amusement parks in the early 1900s. It quickly spread throughout the Midwest, particularly in states like Wisconsin, where custard stands became iconic summer destinations. Today, frozen custard remains a nostalgic dessert that people associate with fairs, family outings, and summertime joy. Making it at home brings a piece of that history into your own kitchen.
Ingredients You’ll Need
Before diving into the process, let’s gather everything you’ll need. Choosing high-quality ingredients is key because custard relies on a simple base, and every element plays a role in the final taste.
Essential Dairy Ingredients
- Heavy cream – Provides richness and body.
- Whole milk – Balances creaminess without making it too heavy.
- Egg yolks – The star ingredient that sets custard apart from ice cream.
The dairy components should be fresh because they directly impact the creaminess of your custard. Avoid using low-fat substitutes, as they won’t give the same indulgent texture.
Sweeteners and Flavor Enhancers
- Granulated sugar – Adds sweetness while helping stabilize the mixture.
- Vanilla extract or vanilla bean – Classic flavor base for custard.
- Pinch of salt – Enhances sweetness and balances flavors.
You can also experiment with cocoa powder, coffee extract, or almond flavoring depending on your taste.
Optional Toppings and Mix-Ins
Frozen custard tastes amazing on its own, but toppings can take it to another level. Try:
- Chocolate chips or chunks
- Crushed cookies
- Caramel or fudge sauce
- Fresh berries
- Toasted nuts
Mix-ins should be added toward the end of churning so they stay evenly distributed.
Equipment Required for Making Frozen Custard
While the ingredient list is simple, the equipment you use can make a big difference in achieving that silky custard texture.
Ice Cream Maker vs. Custard Machine
Most home cooks don’t have a custard machine, but that’s perfectly fine. An ice cream maker works just as well. The key is slow churning, which helps limit air. If you don’t have an ice cream maker, you can still make custard using the freeze-and-stir method, though the texture might not be as smooth.
Kitchen Tools for Preparation
- Medium saucepan (for heating the mixture)
- Whisk (for blending yolks and sugar)
- Fine mesh strainer (to remove any cooked egg bits)
- Mixing bowls
- Rubber spatula (for stirring and scraping)
- Storage container with lid (for freezing)
These tools ensure your custard turns out smooth, lump-free, and easy to store.
Step-by-Step Guide to Making Frozen Custard
Now comes the exciting part—making your frozen custard from scratch. Follow these steps carefully, and you’ll have a dessert worth savoring.
Step 1 – Preparing the Base Mixture
In a medium mixing bowl, whisk together the egg yolks and sugar until the mixture is pale and slightly thickened. This step is crucial because it sets the foundation of your custard. The yolks should be creamy, and the sugar should be well incorporated. In a separate saucepan, heat the milk and cream over medium heat until it’s just about to simmer (don’t let it boil). Slowly add the hot milk mixture into the yolks while whisking constantly to temper them. This prevents the eggs from scrambling.
Step 2 – Cooking the Custard
Once the egg yolk mixture and warm cream are combined, transfer everything back into the saucepan. Place it over medium-low heat and stir continuously with a rubber spatula or wooden spoon. The goal here is to gently cook the custard without allowing it to curdle.
Keep stirring until the mixture thickens slightly and coats the back of the spoon. You’ll know it’s ready when you can run your finger across the spoon and the line stays visible. This usually takes 5–7 minutes. Do not let the mixture boil, as boiling will scramble the eggs and ruin the smooth texture you’re aiming for.
At this stage, you may also add flavorings like vanilla extract or cocoa powder. For an extra luxurious touch, consider using a real vanilla bean. Simply split the bean in half, scrape out the seeds, and stir them into the custard base. The tiny black flecks of vanilla will add both flavor and a beautiful look.
If you notice any small lumps, don’t panic—just strain the mixture through a fine mesh sieve into a clean bowl. This ensures your custard remains silky and smooth.
Step 3 – Cooling and Chilling the Mixture
After cooking, the custard base needs to cool before it can be churned. Cooling is essential because it allows the flavors to deepen and ensures the mixture reaches the right consistency for freezing.
First, place the bowl of custard over an ice bath to bring down the temperature quickly. Stir gently until it feels cool to the touch. Once cooled, cover the bowl with plastic wrap, pressing it directly against the surface of the custard to prevent a skin from forming. Refrigerate the mixture for at least 4 hours, though overnight chilling is ideal for the richest flavor.
Patience is key here. Skipping this step or rushing the chilling process often leads to icy or uneven custard. Think of it as letting the custard “rest” so all the ingredients can blend into a perfectly smooth base.
Step 4 – Churning for Creamy Texture
Once the custard base is fully chilled, it’s time to churn. Pour the mixture into your ice cream maker or custard machine and follow the manufacturer’s instructions. The slow churning process incorporates minimal air, which is what gives frozen custard its famously dense texture.
Churning usually takes about 20–25 minutes, depending on your machine. You’ll notice the custard thickening as it spins, turning into a creamy, soft-serve-like consistency. At this point, you can also add mix-ins like chocolate chips, cookie chunks, or fruit pieces. Add them during the last 5 minutes of churning so they distribute evenly without sinking to the bottom.
The beauty of churning is watching liquid transform into a luscious dessert right before your eyes. If you’ve ever marveled at custard stands swirling out creamy cones, this is your chance to recreate that magic at home.
Step 5 – Freezing and Serving
After churning, your frozen custard will be soft and creamy, similar to soft serve. If you like it that way, you can serve it immediately. For a firmer texture, transfer it into an airtight container and freeze for 2–3 hours. This allows it to set properly while still keeping its smooth consistency.
When serving, scoop it into bowls, cones, or even sandwich it between cookies for a fun treat. Garnish with your favorite toppings—whipped cream, fudge drizzle, caramel sauce, or fresh fruit. Frozen custard pairs beautifully with pies, brownies, or simply enjoyed on its own.
If you want to get creative, try layering it with sauces and toppings in a clear glass to make a custard parfait. The presentation alone will impress family and guests.
And here’s the best part: once you master this recipe, you can experiment with endless flavor variations, from classic vanilla to gourmet salted caramel or even seasonal pumpkin spice.
Tips for Perfect Frozen Custard Every Time
Making frozen custard is simple, but a few tricks will help you achieve consistent, professional results at home.
Achieving the Right Texture
- Always cook the custard base until it coats the back of a spoon—this ensures creaminess.
- Chill thoroughly before churning to avoid icy crystals.
- Don’t rush the churning process; slow and steady makes it smooth.
Balancing Flavors
- Use high-quality vanilla or cocoa for the best taste.
- A tiny pinch of salt enhances sweetness.
- For bolder flavors, infuse the milk with coffee beans, cinnamon sticks, or citrus zest before cooking.
Common Mistakes to Avoid
- Overheating the mixture – causes scrambled eggs.
- Skipping the straining step – leaves lumps behind.
- Insufficient chilling – results in icy or grainy custard.
- Overloading with mix-ins – too many additions can ruin the texture.
Remember, frozen custard is about indulgence and simplicity. A smooth, creamy base with just the right amount of flavor is always better than something overloaded and complicated.
Flavor Variations You Can Try
One of the best things about making frozen custard at home is the freedom to experiment with flavors. Once you’ve mastered the base recipe, you can get creative and craft endless variations to suit your taste. Whether you prefer something classic, fruity, or adventurous, there’s a custard flavor for everyone.
Classic Vanilla and Chocolate
These timeless flavors never go out of style. For vanilla, stick with a good-quality extract or, even better, a fresh vanilla bean for that authentic speckled look. For chocolate, whisk in unsweetened cocoa powder or melt a bar of dark chocolate into the warm custard base before chilling. Both flavors can be enjoyed as is or paired with toppings like hot fudge, sprinkles, or caramel drizzle.
Fruity and Refreshing Flavors
Want something light and refreshing? Fresh fruits add natural sweetness and color. Strawberry, mango, and raspberry are popular options. Simply puree the fruit and fold it into the custard base before churning. For citrusy flavors like lemon or orange, add zest to the milk while heating—it infuses a bright, zippy flavor. Fruit-based custards pair wonderfully with shortbread cookies or sponge cake.
Unique and Gourmet Ideas
If you’re feeling adventurous, try gourmet twists that elevate your custard to restaurant-quality. Salted caramel custard is a favorite, combining sweet and salty notes for a flavor explosion. Coffee custard is another crowd-pleaser—add instant espresso powder for a robust kick. Seasonal variations like pumpkin spice or peppermint are also fun to make during the holidays. For something truly unique, experiment with flavors like lavender honey or matcha green tea.
The beauty of frozen custard is that the creamy base acts like a blank canvas, ready to absorb any flavor you dream up. Don’t be afraid to mix and match until you find your signature creation.
Pairing Frozen Custard with Desserts
Frozen custard is delicious on its own, but it becomes even more indulgent when paired with other desserts. The creamy, rich texture makes it the perfect complement to baked goods.
Custard with Pies and Cakes
Imagine a warm slice of apple pie with a scoop of vanilla custard melting on top—it’s comfort food at its finest. Custard also pairs beautifully with chocolate cake, carrot cake, or even cheesecake. The richness of custard balances the sweetness of cakes, creating a well-rounded dessert experience.
Custard with Cookies and Brownies
Cookies and brownies get a major upgrade when served with custard. A scoop of chocolate custard between two cookies makes an irresistible ice cream sandwich. Custard on top of a warm, fudgy brownie creates a gooey, melty dessert that tastes straight out of a restaurant menu. You can also crumble cookies directly into custard for extra crunch.
Pairing frozen custard is all about contrast—creamy with crunchy, warm with cold. The combinations are endless, and each one offers a new way to enjoy this classic treat.
Storage and Shelf Life of Frozen Custard
If you make a big batch of custard, proper storage is essential to keep it tasting fresh and creamy. Unlike store-bought ice cream, homemade custard doesn’t contain preservatives, so it needs a little extra care.
How to Store Properly
Transfer your custard into an airtight, freezer-safe container. Press a piece of parchment paper or plastic wrap directly onto the surface before sealing the lid. This prevents ice crystals from forming and keeps the texture smooth.
Shelf Life Tips
Homemade frozen custard is best enjoyed within 3–4 days. While it can last up to a week in the freezer, the quality starts to decline after the fourth day, becoming icy or grainy. For the freshest taste, make smaller batches that you can finish quickly.
Pro tip: if the custard becomes too hard in the freezer, let it sit at room temperature for 5–10 minutes before scooping. This softens it just enough to restore its creamy texture.
Healthier Alternatives and Dietary Modifications
Love custard but want a lighter version? With a few tweaks, you can create healthier variations without losing too much of the creamy goodness.
Sugar-Free Options
Replace granulated sugar with natural sweeteners like stevia, monk fruit, or erythritol. Keep in mind that some sugar substitutes taste sweeter than sugar, so adjust the amount accordingly. A touch of honey or maple syrup can also add natural sweetness while bringing unique flavor notes.
Dairy-Free or Vegan Custard
For a vegan-friendly version, swap out milk and cream for full-fat coconut milk or almond milk. Instead of egg yolks, use cornstarch or arrowroot powder as a thickener. While it won’t taste exactly like traditional custard, it still delivers a creamy, frozen dessert that satisfies cravings.
You can also experiment with oat milk or cashew milk for different flavor profiles. Vegan custard pairs beautifully with fruit-based flavors like mango, strawberry, or passionfruit.
Making healthier versions doesn’t mean compromising on flavor—it just means getting creative with substitutions while keeping the essence of custard intact.
FAQs about Frozen Custard Recipe
1. Can I make frozen custard without an ice cream maker?
Yes, but the texture may not be as smooth. You can use the freeze-and-stir method: freeze the custard base in a shallow dish, stirring every 30 minutes until creamy.
2. What’s the difference between frozen custard and gelato?
Gelato has less fat and air compared to ice cream but doesn’t include egg yolks. Frozen custard always contains yolks, making it richer and denser.
3. Why does my frozen custard taste icy?
This usually happens when the custard base isn’t chilled long enough before churning or if it’s stored improperly. Always chill overnight for best results.
4. Can I use low-fat milk instead of whole milk?
You can, but the custard won’t be as creamy. Whole milk and cream are recommended for the best texture.
5. How do I add alcohol to frozen custard?
Alcohol like rum, bourbon, or liqueurs can be added, but only in small amounts (1–2 tablespoons). Too much prevents custard from freezing properly.
Conclusion
Frozen custard is more than just a dessert—it’s a rich, creamy experience that brings joy with every bite. Whether you stick with classic vanilla, experiment with bold flavors, or pair it with your favorite baked goods, making custard at home is both rewarding and delicious. With the right ingredients, tools, and a little patience, you can create a treat that rivals any custard stand.
Next time you crave something sweet, skip the store-bought tub and whip up a batch of homemade frozen custard. Once you taste the velvety texture and depth of flavor, you’ll never look at ice cream the same way again.


