Fried Turkey Recipe: There’s just something magical about fried turkey that keeps people coming back year after year. When it comes to Thanksgiving or any festive gathering, many families are now ditching the traditional roasted bird for the incredibly juicy, flavorful, and crispy-skinned alternative—fried turkey.
Why? It’s all about the texture and taste. Deep-frying locks in moisture like nothing else. The outer skin becomes a golden-brown crispy shell that gives way to perfectly tender meat inside. That contrast—crispy on the outside, succulent on the inside—is what sets fried turkey apart.
But it’s not just about flavor and texture. Fried turkey is also a time-saver. Traditional roasted turkeys can take several hours to cook in the oven. With deep-frying, you can have a fully cooked turkey in less than an hour, depending on its size. That gives you more time to spend with family and less time babysitting your bird.
People also love the showmanship. Lowering a big bird into a pot of bubbling hot oil outdoors is an event in itself. It creates a moment for guests to gather around, take pictures, and feel like something exciting is about to happen—because it is.
If you’ve never tried fried turkey before, prepare yourself for a game-changing experience. This isn’t just another way to cook poultry; it’s a celebration on a plate.
The Appeal of Deep-Fried Turkey Over Roasted
Let’s face it—oven-roasted turkey often ends up dry or bland, even with the best intentions. Unless you’re a seasoned chef with years of experience, achieving the perfect roast is a gamble. Fried turkey, on the other hand, is almost foolproof when done right.
Deep-frying ensures even cooking and moisture retention that roasting simply can’t match. The oil seals the outside quickly, keeping all the natural juices inside the bird. Plus, there’s no basting involved, no flipping, no checking for hot or cold spots in the oven.
Time efficiency is another major win. A 12-pound turkey takes around 45 minutes to fry. Compare that to the 3 to 4 hours it would take in a traditional oven, and it’s clear why deep-frying is becoming the go-to method for holiday feasts.
Flavor-wise, frying brings out a rich, nutty tone in the skin and creates a textural contrast that’s hard to beat. Pair it with the right seasoning or marinade, and your guests will be raving about it for weeks.
Safety First – Deep Frying Precautions
Common Safety Hazards to Avoid
Before we dive into ingredients or steps, let’s address the elephant in the room—safety. Deep-frying a turkey can be dangerous if not done correctly. The internet is full of videos showing fireballs and grease fires. But don’t let that scare you. With proper preparation and caution, it’s completely safe.
Here are the most common safety hazards:
- Overfilling the fryer with oil – When the turkey is added, displaced oil can overflow and ignite.
- Dropping a frozen or partially frozen turkey into hot oil – This is a recipe for explosive results. Water and hot oil don’t mix.
- Unattended frying – Never walk away while frying a turkey. Always have an eye on the temperature and the setup.
- Setting up near flammable items – Fry your turkey outdoors, far from walls, decks, garages, or anything that can catch fire.
- Using incorrect equipment – Don’t attempt this in a regular pot or indoor kitchen setup. Always use a purpose-built turkey fryer.
Being mindful of these hazards isn’t just responsible—it’s essential. You’re handling gallons of scalding oil and an open flame. Respect the process, and you’ll be rewarded with both safety and deliciousness.
Tools and Gear You’ll Need for Safe Frying
To keep everything running smoothly and safely, invest in the right gear. Don’t try to cut corners. Here’s what you’ll need:
- Turkey Fryer Kit: This usually includes a large stockpot (28–30 quarts), a poultry rack, and a lifting hook.
- Propane Burner: A sturdy stand-alone burner powered by a propane tank.
- Oil Thermometer: To monitor oil temperature (should be around 325°F–350°F).
- Meat Thermometer: To check internal temperature of the turkey (must hit 165°F).
- Heat-Resistant Gloves: Your hands will thank you.
- Fire Extinguisher: Always keep one nearby rated for grease fires (Class K).
- Outdoor Space: At least 10 feet from any structures.
Having the right tools isn’t just about convenience—it’s about creating a safe and enjoyable cooking experience. Think of it like camping: you wouldn’t go into the woods without the proper gear. Frying a turkey is no different.
Ingredients You’ll Need
Main Ingredients for the Turkey
Let’s talk ingredients. You don’t need a lot of fancy stuff to make a mind-blowing fried turkey. The basics are:
- 1 whole turkey (10-14 lbs) – Fresh or fully thawed if frozen
- 3–5 gallons of peanut oil – High smoke point, best for deep-frying
- Kosher salt and black pepper – Simple but essential
- Garlic powder and onion powder – Adds depth to the flavor
- Paprika – For color and mild heat
That’s the foundation. You can season it more heavily depending on your taste, but even with just salt and pepper, a fried turkey is next-level delicious.
Optional Marinades and Rubs
If you really want to take things to the next level, consider using a marinade or dry rub. Here are a few ideas:
Wet Marinades (Injectable):
- Cajun butter (melted butter, garlic, Cajun seasoning)
- Lemon-herb blend (olive oil, lemon juice, rosemary, thyme, garlic)
Dry Rubs:
- Brown sugar and chili powder for a sweet-spicy kick
- Smoked paprika, cumin, and coriander for a bold, earthy vibe
You can inject the marinade deep into the meat using a turkey injector. This ensures flavor all the way through, not just on the skin.
Oil Selection – What Works Best
Not all oils are created equal. You need something that can handle high heat without breaking down.
Best oils for frying turkey:
- Peanut oil – Best choice; neutral flavor and high smoke point (450°F)
- Canola oil – Decent alternative; slightly lower smoke point
- Corn oil – Another option but with a bit of flavor
Avoid using olive oil, butter, or anything with a low smoke point. Your kitchen (and eyebrows) will thank you.
Equipment Checklist
Deep Fryer or Propane Frying Kit
If you’re going to fry a turkey the right (and safe) way, your deep fryer setup is absolutely critical. Don’t just grab a big pot and think that’ll do the job. A turkey fryer kit specifically designed for this task is essential. These kits typically come with:
- A large aluminum or stainless-steel pot (28–30 quarts is ideal).
- A poultry rack with a hook to lift the turkey in and out.
- A propane burner designed to handle large pots and maintain stable flame.
Choose a kit with sturdy construction. A flimsy stand or burner is not only annoying—it’s dangerous. Look for one with solid legs, good wind protection, and a long enough hose for safe propane connection. Many modern kits even come with built-in thermometers, but you should still have a backup thermometer to be safe.
If you’re planning to make this an annual tradition (which you probably will after one taste), it’s worth investing in a high-quality fryer. Stainless steel versions are more durable and easier to clean than aluminum ones, though they may cost a bit more.
Thermometers and Fire Safety Tools
Temperature control is where most turkey-frying disasters begin. That’s why thermometers are non-negotiable.
- Oil thermometer: Clips to the side of the pot and gives real-time oil temperature readings.
- Meat thermometer: The only way to ensure your turkey hits the safe internal temperature of 165°F in the breast and 175°F in the thigh.
A digital instant-read thermometer is fast, accurate, and user-friendly. Don’t rely on the little pop-up timers that come with some turkeys—they’re often unreliable and too late.
For fire safety, keep a Class K fire extinguisher nearby at all times. This type is specifically designed for grease and oil fires. Water will make a grease fire worse, so never use it under any circumstance.
Also, keep a fire blanket handy as an extra layer of protection. If a fire does start, smothering it quickly is key.
Miscellaneous Tools (Gloves, Racks, Injector, etc.)
There are a few extra tools that might not be essential but can make your fried turkey adventure a whole lot easier:
- Heat-resistant gloves: Handling hot metal gear or a turkey rack isn’t fun with bare hands. Get silicone or heavy-duty fryer gloves.
- Turkey injector: Perfect for getting marinades deep into the bird. It’s like flavor delivery right to the center.
- Paper towels: For patting the turkey dry before frying. Moisture and hot oil don’t mix well.
- Tongs and long-handled tools: In case you need to reposition anything safely.
- Carving board with a juice groove: After frying, your turkey is going to be juicy. Keep that mess contained.
These tools may seem like small additions, but when you’re juggling a hot fryer, a slippery bird, and excited guests, you’ll be grateful for anything that adds convenience and safety.
Step-by-Step Guide to Frying a Turkey
Step 1 – Thawing the Turkey Properly
This is non-negotiable: you must thaw the turkey completely before frying. Deep-frying a partially frozen turkey is incredibly dangerous—it can cause the oil to bubble over violently and start a fire.
Here’s how to do it safely:
- Place your frozen turkey in the refrigerator for 24 hours for every 4–5 pounds of turkey. So, a 12-pound bird needs about 3 days to thaw in the fridge.
- If you’re in a rush, you can use the cold water method. Submerge the bird in a cooler or large sink of cold water (still in its packaging), changing the water every 30 minutes. It takes about 30 minutes per pound using this method.
Once thawed, remove the giblets and neck from inside the bird. Rinse the turkey inside and out under cold water, then pat it completely dry with paper towels.
Drying the turkey is critical. Excess moisture will react violently with hot oil and can lead to dangerous splattering.
Step 2 – Cleaning and Prepping the Turkey
After thawing and drying, it’s time to prep your bird for seasoning.
- Trim any excess fat or hanging skin near the neck and cavity.
- Tuck the wings under the bird or tie them down to prevent burning.
- If you’re using a marinade injector, this is the time to inject the flavor. Insert the needle deep into the meat and slowly release the liquid as you pull it out.
- Want extra crispy skin? Let your seasoned turkey sit uncovered in the fridge for 12–24 hours. This dries the skin, which crisps beautifully when fried.
Before frying, let the bird sit at room temperature for 30–60 minutes. A cold bird lowers oil temperature rapidly and can lead to undercooked meat or greasy results.
Step 3 – Applying Marinade or Dry Rub
Here’s where the real magic happens. You’ve got two main options for adding flavor: injectable marinades or dry rubs.
Injectable Marinades:
- Inject about 1–2 ounces per pound of turkey into different parts of the bird—breast, thighs, legs, and wings.
- Let it rest at least 1 hour, or ideally overnight.
Dry Rubs:
- Mix salt, pepper, garlic powder, paprika, and any other spices you love.
- Rub it all over the turkey, inside and out. For best results, apply the rub under the skin of the breast too.
Combination Approach:
Many people use both—injecting flavor deep into the meat while coating the outside with a flavorful dry rub. Just make sure the outside is still dry before frying.
This step is all about personal taste, so don’t be afraid to experiment a little. Want Cajun heat? Go heavy on the cayenne. Craving herbaceous depth? Add thyme, rosemary, or sage to your rub.
Step 4 – Heating the Oil to the Right Temperature
This step is where patience and precision really matter. The oil needs to be at the perfect temperature before you even think about lowering the turkey in.
- Ideal oil temperature: 325°F to 350°F (163°C to 177°C)
- Use a deep-fry thermometer attached to the pot to monitor the temperature constantly.
Start heating your oil before prepping the bird. It can take 30–45 minutes to reach the right temperature, especially if you’re frying outdoors in colder weather. Use peanut oil if you have it—it’s got a high smoke point and adds a light nutty flavor.
How much oil do you need?
The amount of oil depends on the size of your bird and pot. Use the water displacement method:
- Place the turkey in the fryer pot.
- Fill with water until the turkey is just submerged.
- Remove the turkey and note the water level.
- Dry the pot completely, then fill with oil to that marked line.
Do not overfill the pot. Oil expands and can overflow, which is extremely dangerous.
As the oil approaches temperature, reduce the flame to maintain it in the 325°F–350°F sweet spot. Once it hits 375°F, stop heating immediately and let it cool slightly. Hotter oil cooks the outside too fast and leaves the inside undercooked.
Step 5 – Lowering the Turkey Safely into the Oil
This is the most critical moment in the entire process. One wrong move, and you’re dealing with an oil fire. But done right, it’s a smooth, impressive step.
How to do it safely:
- Wear heat-resistant gloves.
- Turn off the flame temporarily as an extra safety measure.
- Attach the turkey to the fryer’s lifter hook or rack securely.
- Very slowly and gradually lower the turkey into the hot oil. Go inch by inch—let it adjust to the heat.
- Once fully submerged, relight the flame and return the oil to the target temperature (325°F).
Safety tip: Don’t drop or dunk the turkey. Even a small splash can cause a serious burn or fire. Move slowly and stay focused.
You’ll hear the oil start to bubble vigorously once the turkey is in. That’s normal. Just monitor everything closely for the first few minutes.
Step 6 – Cooking Time and Monitoring
Now that the turkey is safely in the fryer, it’s time to let the oil work its magic. But don’t walk away—this is not a set-it-and-forget-it moment.
General frying rule:
- Cook for 3 to 3.5 minutes per pound
- So a 12-pound turkey takes about 36–42 minutes
Maintain your oil temperature at 325°F throughout the cook. If it drops too low, the turkey gets greasy. If it gets too high, the outside will burn before the inside is done.
Check the oil temp frequently and adjust the flame as needed. At the halfway mark, use a long-handled thermometer to check progress, but avoid lifting the bird out too often.
Final internal temperature to check for doneness:
- 165°F in the thickest part of the breast
- 175°F in the thickest part of the thigh
Once it hits those targets, it’s time to take that beautiful bird out!
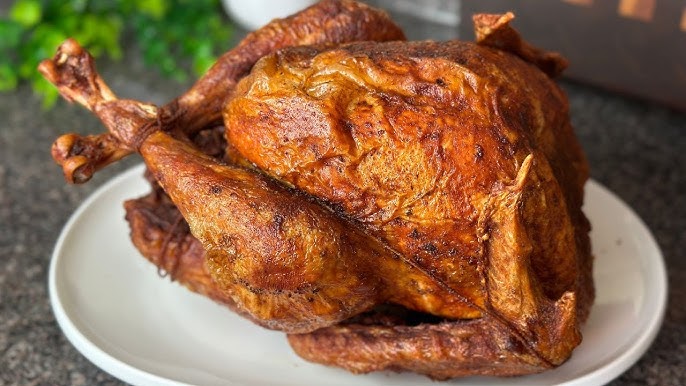
Step 7 – Removing, Resting, and Carving the Turkey
With the frying complete, it’s time to finish strong. Turn off the flame and very carefully lift the turkey out of the oil using the hook or rack. Hold it above the pot for a minute or two to allow excess oil to drain.
Place it on:
- A baking sheet lined with paper towels
- A wire rack over a drip tray
Let the turkey rest for at least 20–30 minutes before carving. This step allows juices to redistribute throughout the meat, giving you a moist, flavorful result.
Carving tips:
- Use a sharp carving knife.
- Start with the legs and thighs.
- Slice the breast meat against the grain for tenderness.
- Save the wings for the crispy lovers in your crowd.
The aroma, the golden-brown skin, and the juicy interior will make every guest drool. Serve hot with your favorite sides and prepare for compliments.
Tips for the Juiciest Fried Turkey
How to Prevent Dryness
No one wants a dry turkey—fried or not. Thankfully, deep-frying gives you a natural advantage, but a few extra tips will guarantee juicy perfection:
- Don’t overcook – Monitor the temperature closely. Even a few extra minutes can dry it out.
- Inject moisture – Use melted butter or marinade before cooking to add internal juiciness.
- Let it rest – Always allow the turkey to rest before carving. This keeps the juices inside the meat.
- Don’t pierce the skin during cooking – It releases moisture and can make the turkey dry.
Avoid crowding the fryer with sides or trying to rush the process. Fried turkey is quick, but it still needs your attention.
Best Marinade Combinations
Want to elevate the flavor even more? Try these marinade combos that add flair without overpowering the turkey’s natural taste:
- Cajun Butter Blast
- Melted butter, garlic, paprika, cayenne, lemon juice
- Herb Garlic Heaven
- Olive oil, minced garlic, thyme, rosemary, sage
- Sweet & Smoky
- Brown sugar, smoked paprika, black pepper, mustard powder
- Asian Twist
- Soy sauce, ginger, sesame oil, honey, garlic
- Classic Southern
- Buttermilk, hot sauce, black pepper, garlic powder
These combinations work well with both injection and surface application. Just remember to let the flavors soak in for a few hours—or overnight for best results.
What to Serve with Fried Turkey
Side Dish Ideas
A crispy, golden fried turkey deserves sides that complement its bold flavor. Whether you’re cooking for Thanksgiving or a summer backyard feast, these side dishes bring balance and variety to the table:
- Classic Mashed Potatoes
Creamy, buttery mashed potatoes are a must. The richness pairs beautifully with the crispy turkey skin. - Cranberry Sauce
The tart sweetness of cranberry sauce adds a refreshing contrast to the savory, juicy turkey. - Mac and Cheese
A gooey, cheesy mac is a fan favorite, especially when made with a crunchy breadcrumb topping. - Green Bean Casserole
A creamy casserole topped with crispy onions adds texture and a touch of nostalgia to any plate. - Cornbread or Dinner Rolls
Use them to mop up the juices or make little turkey sandwiches afterward. - Sweet Potato Casserole
Marshmallows, brown sugar, and pecans on top? Yes, please. The sweetness is a great complement to savory fried meat. - Coleslaw
For a lighter option, tangy coleslaw brings crunch and a fresh bite. - Fried Okra or Hush Puppies
Double down on the Southern vibe with these deep-fried delights. - Gravy
You might not think fried turkey needs gravy—but trust us, a drizzle of pan-made gravy over mashed potatoes ties everything together.
Dipping Sauces to Elevate Flavor
While fried turkey is flavorful on its own, having a few dipping sauces on the side can take it up another notch. Here are some crowd-pleasers:
- Cajun Ranch: Mix ranch dressing with a dash of Cajun seasoning.
- Honey Mustard: A sweet and tangy favorite.
- Spicy Mayo: Mayo, Sriracha, and a squirt of lime juice.
- Garlic Aioli: A creamy, garlicky dip perfect for white meat slices.
- BBQ Sauce: Choose a smoky or tangy blend for dark meat cuts.
Set out a few small bowls so guests can pick their favorites. It adds a fun, interactive element to the meal and gives everyone a personalized experience.
Cleanup Tips After Frying
Handling and Disposing of Oil
Once the turkey is devoured and your guests are dozing off from food comas, it’s time to tackle cleanup. Step one? Deal with the oil.
- Let the oil cool completely. This can take several hours. Don’t rush it—it’s dangerous.
- Strain the oil using cheesecloth or a fine-mesh strainer to remove food bits.
- Store it in a clean, sealed container if you plan to reuse it. Peanut oil can often be reused 2–3 times.
- Disposal: If you’re not reusing, never pour oil down the sink. Check your local disposal guidelines. Some cities have cooking oil recycling centers or hazardous waste programs.
Cleaning Equipment Safely
Your gear worked hard—it deserves a proper scrub-down.
- Pot & Rack: Soak in warm, soapy water to loosen grease. Use a non-abrasive scrubber.
- Thermometers: Wipe with a damp cloth. Avoid submerging if they’re not waterproof.
- Fryer Stand/Burner: Wipe down with a degreasing cleaner and a cloth once it cools.
- Injector: Disassemble and clean thoroughly to avoid clogs or bacteria buildup.
It may be a bit of work, but taking care of your equipment means you’ll be ready for the next big feast with minimal hassle.
Nutritional Information
Calories and Macronutrients
Fried turkey is certainly indulgent, but surprisingly, it’s not drastically unhealthier than roasted turkey—especially if you drain and blot the bird well.
On average (per 3.5 oz serving):
- Calories: 190–220
- Protein: 25–27g
- Fat: 10–12g
- Carbs: 0g (unless breaded or seasoned with sugary marinades)
Dark meat portions will be slightly higher in fat and calories than white meat, but both are solid protein sources.
Healthier Frying Alternatives
If you want a healthier option but still crave that crispy skin:
- Use an air fryer for smaller birds or turkey parts.
- Bake after marinating to mimic that fried flavor without submerging in oil.
- Spatchcock and roast at high heat for a crisp exterior and juicy interior.
These won’t replace the flavor of true deep-frying, but they offer a solid compromise if you’re watching fat or cholesterol.
Common Mistakes to Avoid
Temperature Mismanagement
Letting your oil get too hot or too cold is the number one mistake that ruins fried turkey.
- Too hot: Outside burns, inside stays raw.
- Too cold: Turkey absorbs oil and ends up greasy.
Always keep your thermometer in place and adjust the flame as needed. Don’t wing it—precision is your best friend here.
Skipping the Thawing Process
Frying a partially frozen turkey is the most dangerous mistake you can make.
- Ice or water rapidly turns to steam in hot oil.
- That steam expands and can cause the oil to bubble over and ignite.
Avoid disaster by thawing fully and patting the turkey dry before it ever touches the oil.
FAQs about Fried Turkey Recipe
Can I fry a turkey indoors?
No. Never attempt to fry a turkey indoors. Always fry outdoors, far from buildings, garages, and flammable materials. Indoor frying is a major fire hazard.
What’s the ideal size of a turkey to fry?
Aim for a turkey between 10 to 14 pounds. Anything bigger may be too large for most fryers and won’t cook evenly.
How long does it take to deep fry a turkey?
Fry your turkey for 3 to 3.5 minutes per pound. A 12-pound turkey takes about 36–42 minutes.
Can I reuse the oil after frying a turkey?
Yes, you can reuse peanut oil up to 2–3 times. Strain it well and store in a sealed container in a cool, dark place.
What’s the best way to season a fried turkey?
Use a combo of injected marinade and dry rub. Inject for internal flavor, and rub the outside to get a flavorful, crispy skin.
Conclusion
Fried turkey isn’t just a fun cooking method—it’s a whole experience. From the prep and seasoning to the dramatic moment of lowering the bird into the fryer, it brings excitement, flavor, and a bit of Southern flair to your table.
With the right tools, attention to safety, and a bit of patience, you can serve a turkey that’s crispy, juicy, and unforgettable. Whether it’s for a holiday feast or a weekend cookout, this method will quickly become a new tradition in your home.
So grab your gear, get your oil hot, and fry up a feast that’ll have everyone coming back for seconds (and thirds).