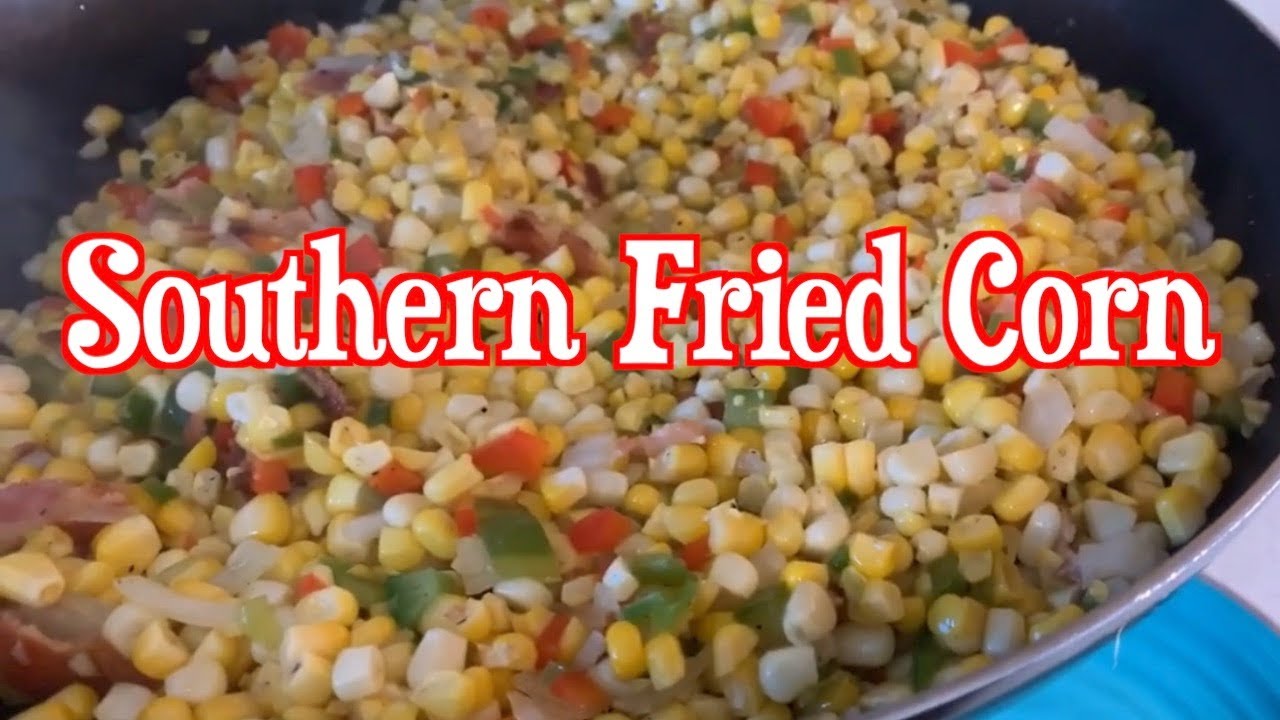
Fried Corn Recipe: Fried corn is a soul-warming, skillet-cooked dish that celebrates the sweet flavor of corn in its purest form. Unlike deep-fried foods, fried corn is pan-fried—usually in butter or bacon grease—until it’s golden, slightly caramelized, and full of flavor. It’s a Southern staple that has stood the test of time, bringing a little crunch, a little sweetness, and a lot of comfort to dinner tables across the country.
This recipe doesn’t just come with flavor—it comes with heart. It’s the kind of dish your grandmother might’ve made, using nothing but a cast iron skillet and love. Whether you’re pairing it with barbecue or simply want a side that steals the show, fried corn is your go-to.
Why You’ll Love This Southern Classic
If you’ve never had fried corn before, prepare to fall in love. It’s:
- Quick and easy – From prep to plate in under 30 minutes.
- Budget-friendly – Requires only a handful of pantry staples.
- Versatile – Pairs well with meats, greens, or on its own.
- Crowd-pleaser – Perfect for family dinners, BBQs, or holiday spreads.
And honestly, it’s just dang delicious.
Ingredients You’ll Need
A few humble ingredients are all you need to whip up this mouthwatering dish. The key is fresh corn and bold seasoning.
Fresh vs. Frozen Corn
Fresh Corn on the Cob: This is the traditional choice. When corn is in season (usually late spring to early fall), nothing beats the flavor of freshly cut kernels. It’s sweet, juicy, and has a natural crunch.
Frozen Corn: If fresh corn isn’t available, frozen works just fine. Make sure to thaw and pat it dry before using so it doesn’t steam in the skillet.
Ingredients List:
- 4 cups of corn kernels (fresh or frozen)
- 2 tbsp butter or bacon grease
- ½ cup finely chopped onion
- 1 garlic clove, minced (optional)
- Salt and pepper to taste
- ½ tsp smoked paprika (optional)
- ½ tsp sugar (if your corn isn’t sweet enough)
Optional Add-Ins to Elevate the Flavor
Want to take it to the next level? Try these tasty additions:
- Crispy bacon bits
- Chopped bell peppers
- A splash of heavy cream
- Chili flakes or hot sauce for a kick
- Fresh herbs like parsley or thyme
These can help tailor the flavor to suit your meal or occasion.
Tools and Equipment Needed
Before you start, make sure you have these kitchen essentials:
- Cast iron skillet or heavy-bottom pan
- Sharp knife (for cutting corn off the cob)
- Cutting board
- Wooden spoon or spatula
- Measuring spoons
A cast iron skillet really is ideal—it retains heat like a champ and gives your corn those crispy, caramelized edges that are absolutely divine.
How to Make Fried Corn – Step-by-Step Instructions
Now, let’s break down how to make this amazing dish from scratch.
Step 1 – Prepping the Corn
If you’re using fresh corn:
- Remove the husks and silk from the corn.
- Stand the cob upright on a cutting board and slice downward with a sharp knife to remove the kernels.
- Try not to cut too deep; you want to avoid cutting into the cob itself.
If you’re using frozen corn:
- Thaw completely.
- Pat the corn dry with a paper towel to avoid excess moisture in the skillet.
Step 2 – Heating the Skillet
Place your skillet over medium heat and add your butter or bacon grease. Let it melt completely and begin to sizzle—this is your flavor foundation.
Once hot, toss in the chopped onions. Stir frequently until they become soft and translucent, about 3–5 minutes. If you’re using garlic, add it in the last minute so it doesn’t burn.
Step 3 – Sautéing the Ingredients
Now, add the corn to the skillet. Spread it out so it forms a single layer. Let it sit for a couple of minutes without stirring—this helps get that lovely caramelization going.
After the corn starts to brown on the edges, stir and continue cooking for about 10–12 minutes. Keep stirring every couple of minutes to avoid burning while still allowing the corn to crisp.
Step 4 – Seasoning and Simmering
Now that your corn is starting to look golden and smells incredible, it’s time to bring in the flavor powerhouses. Sprinkle in your salt and pepper to taste. If you’re using smoked paprika, this is when it goes in. It’ll give the dish a slightly smoky depth that really enhances the sweetness of the corn.
Want your corn on the slightly sweeter side? A touch of sugar—about half a teaspoon—can balance out the savory notes and add a pleasant contrast.
If you’re using heavy cream, pour in a splash now. This gives the fried corn a rich, creamy finish, almost like a cross between sautéed corn and creamed corn. Stir gently and let the mixture simmer for a couple more minutes, just until everything is coated and heated through.
Step 5 – Final Touch and Serving
By now, your fried corn should be glistening with buttery goodness and slightly crispy at the edges. Take a moment to taste and adjust seasoning. Need more salt? A dash of pepper? Go for it.
You can finish it off with a sprinkle of fresh herbs—parsley, chives, or thyme all work wonders. They add a pop of color and a bit of freshness to balance the richness of the corn.
Transfer the corn to a serving bowl or just take the whole skillet straight to the table (no judgment here!). Serve hot and watch it disappear faster than you can say “pass the cornbread.”
Tips for the Best Fried Corn
- Use a heavy skillet – Cast iron is king here. It retains heat evenly and helps caramelize the corn without burning it.
- Don’t overcrowd the pan – Too much corn in the skillet will steam instead of fry. Cook in batches if needed.
- Let it sit – Resist the urge to stir constantly. Letting the corn sit undisturbed for a minute or two helps it get that crispy golden texture.
- Use real butter or bacon grease – These fats bring unmatched flavor to the dish.
- Season gradually – Taste as you go and adjust the flavors to your preference.
Serving Suggestions
Fried corn is super versatile and can be paired with a ton of dishes. Here are some classic combos:
- With BBQ meats: Pork ribs, brisket, or grilled chicken.
- Next to greens: Collard greens or mustard greens make a balanced Southern plate.
- Alongside rice and beans: A hearty, comforting trio.
- Topped with cheese and hot sauce: A spicy, cheesy upgrade.
- As a taco or burrito filler: Yes, really. Fried corn in a tortilla is next-level.
You can also scoop it over baked potatoes, toss it into pasta, or eat it straight from the pan with a fork—we won’t judge.
Variations of Fried Corn
Want to mix it up? Here are a few creative spins:
- Mexican-style Fried Corn: Add cumin, lime juice, cotija cheese, and chopped cilantro.
- Creamy Fried Corn: Stir in a splash of heavy cream or half-and-half near the end.
- Cheesy Corn Skillet: Mix in sharp cheddar or pepper jack cheese for a melty, gooey twist.
- Spicy Kick: Add jalapeños, cayenne pepper, or hot sauce for some heat.
- Sweet & Savory: Drizzle a little honey or maple syrup at the end for a sweet balance.
These tweaks let you customize your corn to suit your mood, your meal, or whatever you’ve got in the fridge.
Common Mistakes to Avoid
Even with a simple recipe like fried corn, a few small missteps can keep your dish from reaching its full potential. Here are some common pitfalls and how to avoid them:
- Overcrowding the Pan: This is the #1 mistake. Too many kernels in the pan mean they’ll steam instead of fry. If your skillet’s looking full, split the batch in half. It’s worth the extra few minutes.
- Using Low Heat: Fried corn needs medium to medium-high heat to get that signature caramelization. Low heat will cook the corn, sure, but it won’t give you those toasty brown bits that make the dish shine.
- Skipping the Drying Step (for Frozen Corn): If you don’t pat your thawed corn dry, it’ll release too much moisture and turn mushy instead of crisp.
- Stirring Too Often: Yes, it’s tempting to stir constantly—but don’t. Let the corn rest in the skillet for a minute or two at a time so it can brown properly.
- Under-seasoning: Corn has a naturally sweet flavor, but it still needs a bit of seasoning to come alive. Don’t forget the salt and pepper!
Avoiding these rookie errors will take your fried corn from good to unforgettable.
Storing and Reheating Leftovers
Have leftovers? Lucky you! Fried corn stores really well and can be revived with a quick reheating.
Storage Tips:
- Let the corn cool completely before transferring it to an airtight container.
- Store in the refrigerator for up to 3–4 days.
Reheating Tips:
- Skillet Method (Best): Heat a small amount of butter or oil in a skillet, then reheat the corn over medium heat. This keeps it crispy and fresh-tasting.
- Microwave Method: Place in a microwave-safe bowl, cover with a damp paper towel, and heat in 30-second intervals until hot.
- Oven Method: Spread on a baking sheet, cover with foil, and reheat at 350°F (175°C) for 10–15 minutes.
Avoid freezing fried corn if possible. While it can be done, the texture may suffer during thawing, and you’ll lose that irresistible skillet crispness.
Nutritional Information
Let’s break down the average nutritional profile for one serving (about ¾ cup) of fried corn prepared with butter and basic seasonings.
| Nutrient | Amount (Approx.) |
|---|---|
| Calories | 180–220 kcal |
| Carbohydrates | 24g |
| Protein | 3–4g |
| Fat | 10–12g |
| Fiber | 2g |
| Sugar | 5g |
| Sodium | 150–200mg |
Note: Nutritional values vary depending on what you add (bacon, cream, cheese, etc.).
Despite being rich and indulgent, fried corn still provides fiber and essential nutrients like vitamin C, folate, and antioxidants from the corn itself.
FAQs about Fried Corn Recipe
1. What is the best corn to use for fried corn?
Fresh sweet corn is ideal for fried corn recipes. It’s juicy, tender, and packed with flavor. However, frozen or canned corn can be used as a convenient alternative—just make sure to drain and pat dry before frying.
2. Can I make fried corn without butter?
Yes, you can use alternatives like olive oil, avocado oil, or even bacon grease for added flavor. Butter gives a rich taste, but oil-based options work just as well.
3. How do I keep fried corn from becoming soggy?
To avoid sogginess, ensure the corn is dry before frying. Cook it over medium-high heat so it sears quickly and retains a slightly crispy texture.
4. Can I add other ingredients to my fried corn?
Absolutely! Popular add-ins include chopped onions, bell peppers, garlic, jalapeños, crumbled bacon, and herbs. These enhance flavor and add texture.
5. Is fried corn a side dish or a main course?
Fried corn is typically served as a side dish, especially with Southern meals like fried chicken, BBQ ribs, or grilled fish. But with added protein like sausage or beans, it can stand alone as a light main dish.
6. How long does fried corn last in the fridge?
Fried corn stays fresh in the refrigerator for up to 3–4 days. Store in an airtight container and reheat in a skillet to maintain its texture.
7. Can I make this recipe vegan?
Yes, simply replace butter with a plant-based oil and skip any animal-based add-ins like bacon or cheese. Add spices and herbs to boost flavor naturally.
8. What spices go well with fried corn?
Try smoked paprika, black pepper, cayenne, thyme, cumin, or garlic powder for bold flavor. A sprinkle of sugar or honey can also balance the savory taste.
9. Is fried corn gluten-free?
Yes, plain fried corn is naturally gluten-free. Just ensure all added ingredients and seasonings are certified gluten-free.
10. Can I freeze leftover fried corn?
While you can freeze it, the texture might change slightly upon thawing. It’s best enjoyed fresh, but freezing in a sealed container is fine for up to one month.
Final Thoughts
Fried corn is more than just a side dish—it’s a warm, buttery bite of nostalgia. Whether you keep it classic or add your own twist, it’s a recipe that delivers big flavor with minimal fuss. With just a handful of ingredients and a trusty skillet, you’ve got everything you need to create a side that’s equal parts comfort food and conversation starter.
So go ahead—grab some corn, heat up that pan, and fry up a batch of golden goodness. Your taste buds (and your guests) will thank you.