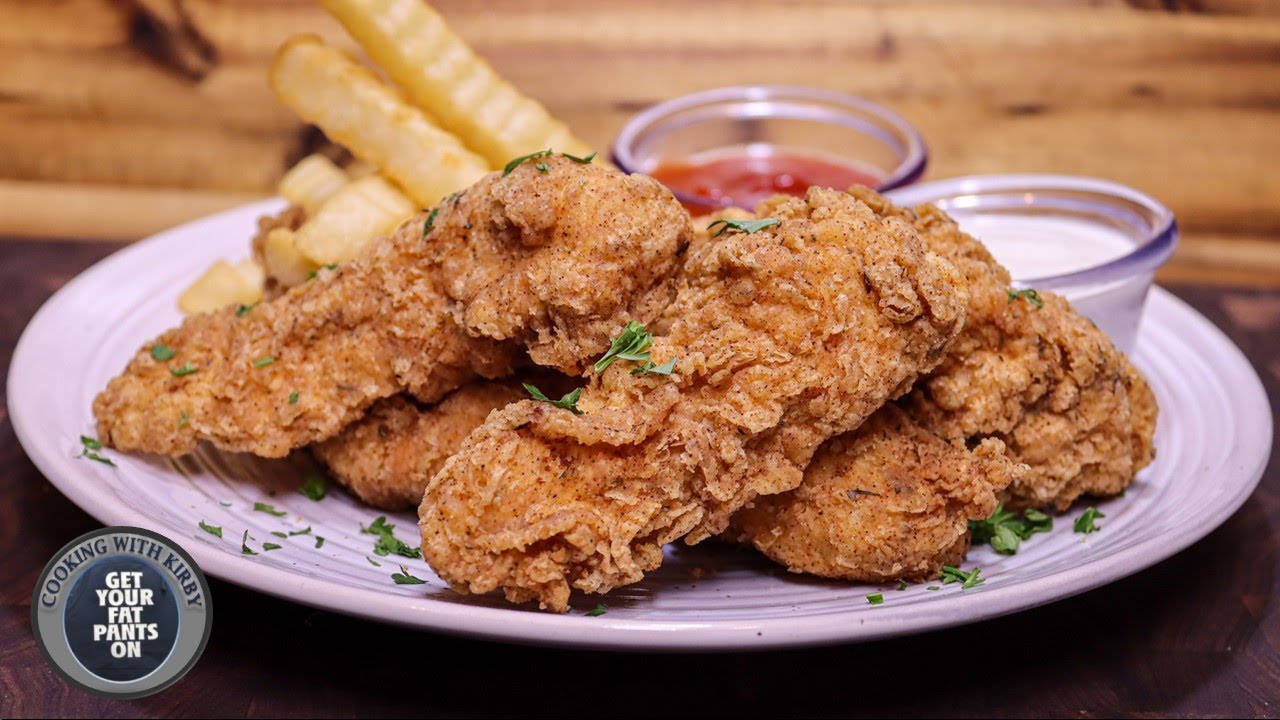
Fried Chicken Strips Recipe: Craving something crispy, golden, and delicious? Fried chicken strips are a crowd favorite, whether you’re whipping up a weekend snack, feeding a hungry family, or prepping for a casual party.
These juicy strips, when done right, have that perfect crunch on the outside while staying tender and flavorful on the inside.
This easy-to-follow, step-by-step guide will take you from kitchen rookie to fried chicken expert in no time. Let’s get into it, shall we?
Ingredients Needed
Before you start frying, gather all your ingredients. You don’t want to be halfway through the recipe and realize you’re missing eggs or breadcrumbs.
For the Chicken Marinade
- 1.5 lbs (700g) boneless chicken breasts or thighs, cut into strips
- 1 cup buttermilk (or 1 cup milk + 1 tbsp vinegar as a substitute)
- 1 tsp salt
- 1 tsp garlic powder
- 1 tsp onion powder
- ½ tsp paprika
- ½ tsp black pepper
For the Coating
- 1 cup all-purpose flour
- 1 cup breadcrumbs or crushed cornflakes (for extra crunch)
- 2 eggs
- 1 tsp paprika
- ½ tsp salt
- ½ tsp pepper
For Frying
- Vegetable oil (canola or sunflower oil also works well) – enough for deep frying
Preparation Tips Before You Start
- Use Fresh Chicken: Always start with fresh, high-quality chicken for the juiciest results.
- Dry the Chicken: Pat the chicken strips dry before marinating to help the marinade stick better.
- Temperature Control: Use a cooking thermometer if possible. Maintaining oil temperature between 350°F to 375°F (175°C to 190°C) ensures a crispy, non-greasy finish.
- Organize Your Station: Set up your breading station before you heat the oil—this makes everything more efficient and less messy.
How to Make Fried Chicken Strips – Step-by-Step Instructions
Step 1 – Prepare the Chicken Strips
Begin by washing and drying your chicken. Then slice it into even-sized strips, around ½ inch thick. Uniform sizes help them cook evenly, ensuring no piece is over or undercooked.
Want extra juicy chicken? Use chicken thighs instead of breasts. They contain more fat and tend to stay moist even after frying.
Step 2 – Marinate the Chicken
In a bowl, mix your buttermilk with garlic powder, onion powder, salt, paprika, and black pepper. Add your chicken strips to the bowl, making sure every piece is coated. Cover it and let it rest in the fridge for at least 1 hour—overnight is even better.
Why marinate? Buttermilk breaks down the proteins in chicken, making it incredibly tender and flavorful. Skipping this step is a rookie mistake!
Step 3 – Prepare the Breading Station
Grab three bowls or shallow dishes.
- In the first bowl: all-purpose flour mixed with salt, pepper, and paprika.
- In the second bowl: beaten eggs.
- In the third bowl: breadcrumbs or crushed cornflakes.
This triple-dip system gives your chicken a crispy, crunchy outer layer that doesn’t fall apart after frying.
Step 4 – Coat the Chicken Strips
Remove the chicken from the marinade. Shake off the excess liquid. Now dip each strip first in flour, then in egg, and finally coat it generously with breadcrumbs. Press down gently to help the coating stick well.
Want next-level crunch? Double dip. That means going back into the egg and breadcrumbs one more time.
Step 5 – Deep Fry to Perfection
Heat oil in a deep skillet or fryer to 350°F (175°C). Drop a few coated strips in—don’t overcrowd the pan! Fry for about 5-7 minutes, flipping once, until golden brown and fully cooked inside.
Place them on a plate lined with paper towels to drain the excess oil. Sprinkle with a bit of salt while they’re still hot to lock in flavor.
Serving Suggestions
So, you’ve nailed the crispy coating and juicy center—now what? Time to serve it up like a pro. Fried chicken strips are incredibly versatile. Here are some awesome ways to enjoy them:
- With Dips: Classic choices like honey mustard, ranch, barbecue sauce, or spicy mayo never fail. Want to turn up the heat? Try a buffalo dip or sriracha aioli.
- In a Wrap or Sandwich: Toss a few strips in a tortilla with lettuce, tomato, and sauce. Or sandwich them between two buns with cheese and pickles for an unbeatable fried chicken sandwich.
- On a Salad: Slice the strips and top them over a bed of greens. Add cherry tomatoes, cucumbers, shredded cheese, and a tangy dressing to balance the richness.
- With Sides: You can’t go wrong with fries, coleslaw, baked beans, or mac and cheese. These sides turn your chicken strips into a full, satisfying meal.
Presentation tip: Serve on a wooden platter or a rustic plate with dipping bowls. Sprinkle some chopped parsley or chives on top for that gourmet touch.
Storage and Reheating Tips
Let’s say you went all out and made a big batch—no worries! Fried chicken strips store and reheat surprisingly well if done right.
Storing:
- Let the chicken strips cool completely before storing.
- Use an airtight container lined with a paper towel (to absorb moisture).
- Store in the fridge for up to 3-4 days.
Freezing:
- Arrange the strips in a single layer on a baking sheet and freeze for an hour.
- Once frozen, transfer to a freezer-safe bag or container.
- They’ll stay good for up to 2 months.
Reheating:
- Oven: Preheat to 375°F (190°C), place the strips on a wire rack or baking sheet, and heat for 10-15 minutes.
- Air Fryer: 375°F for 5-7 minutes. They come out crisp as new!
- Avoid microwaving if you can—it makes them soggy.
Tips and Tricks for the Best Fried Chicken Strips
Want to level up your chicken strip game? Here are some golden tips you’ll wish you knew sooner:
- Use Cornstarch in the Flour Mix: Replace ¼ of the flour with cornstarch for an extra light and crispy crust.
- Let Coated Strips Rest Before Frying: After breading, let the strips sit for 10–15 minutes. This helps the coating adhere better and prevents it from falling off during frying.
- Season Every Layer: Don’t just season the meat—season the flour, eggs, and breadcrumbs too.
- Double Fry for Extra Crispiness: Fry the strips once, rest for a minute, then fry again for 1–2 minutes. This method is used by pros to lock in the crunch.
Common Mistakes to Avoid
Even seasoned home cooks can slip up. Let’s sidestep the most common blunders:
- Using Cold Oil: Frying in oil that hasn’t reached the right temperature results in greasy, soggy chicken.
- Overcrowding the Pan: This lowers the oil temperature drastically, which leads to uneven cooking and a limp texture.
- Skipping the Marinade: You’ll lose out on flavor and tenderness—marinating is essential.
- Not Draining Properly: Piling hot chicken strips on a plate without paper towels means excess oil stays trapped, turning your crispy strips into a soggy mess.
- Uneven Sizes: Different sizes = different cooking times. Always cut your chicken into uniform pieces.
Healthier Alternatives
Looking for something a little lighter but still want that crispy bite? Here’s how to make healthier chicken strips:
- Baked Chicken Strips: Preheat your oven to 400°F (200°C). Place the breaded strips on a baking sheet with a wire rack and lightly spray with cooking oil. Bake for 20–25 minutes, flipping halfway through.
- Air-Fried Chicken Strips: Toss the coated strips in the air fryer at 375°F for 12–15 minutes. Crispy outside, tender inside—with way less oil.
- Use Whole Wheat or Gluten-Free Breadcrumbs: Great for those watching their carbs or dealing with gluten sensitivities.
- Low-Fat Marinade: Swap buttermilk for Greek yogurt mixed with lemon juice for a tangy, protein-packed marinade.
These tweaks are simple, but the results are still finger-lickin’ good.
FAQs about Fried Chicken Strips Recipe
Q1: What’s the best cut of chicken for strips?
The best cut for chicken strips is boneless, skinless chicken breasts. They’re easy to slice into even strips and cook quickly, delivering that perfect crispy texture.
Q2: How do I make fried chicken strips extra crispy?
Double-dip the strips in seasoned flour and buttermilk or egg wash, then fry in hot oil at 350°F. This method ensures a golden, crunchy coating.
Q3: Can I use an air fryer instead of deep frying?
Yes! For a healthier option, air fry the chicken strips at 375°F for about 12–15 minutes, flipping halfway. Spray lightly with oil for extra crispiness.
Q4: What dipping sauces go well with chicken strips?
Popular choices include honey mustard, ranch, BBQ sauce, buffalo sauce, and spicy mayo. Feel free to mix up your favorites for extra flavor!
Q5: Can I freeze fried chicken strips?
Absolutely. Let them cool, place in an airtight container, and freeze for up to 2 months. Reheat in an oven or air fryer to restore crispiness.
Q6: How long do fried chicken strips last in the fridge?
Store them in the fridge for up to 3 days in a sealed container. Reheat in the oven for best texture—avoid microwaving to prevent sogginess.
Conclusion
There you have it—a foolproof guide to making irresistible fried chicken strips right at home. Whether you’re cooking for family, friends, or just yourself, these golden, crispy delights never disappoint. With the right marinade, a crunchy coating, and just a bit of patience, you can achieve restaurant-quality results without stepping out of your kitchen.
So grab that apron, heat up the oil, and let the sizzle begin. With this guide in your back pocket, you’re well on your way to becoming everyone’s favorite home cook. Don’t forget to pair those strips with some killer dipping sauces and side dishes to take things to the next level.
Now go on—make that first batch and enjoy the crunch. You deserve it.