Fridge Pickles Recipe: Who doesn’t love a good crunchy pickle? Whether you’re topping a burger, snacking straight from the jar, or adding a tangy crunch to your sandwich, pickles can elevate your meal instantly. But instead of buying another jar from the store, why not make your own at home? Fridge pickles are one of the easiest and most satisfying DIY projects you can tackle in the kitchen. No fancy equipment, no special skills required—just fresh veggies, a few ingredients, and your fridge.
Let’s dive into this comprehensive guide where we’ll break down the whole process, from the ingredients you’ll need to the exact steps to follow, so you can enjoy crisp, flavorful pickles any time you want.
What Are Fridge Pickles?
Fridge pickles, also known as refrigerator pickles, are a no-cook, no-canning method of preserving vegetables in vinegar brine. Unlike traditional pickling, which involves boiling jars and sealing them for shelf storage, fridge pickles are made by simply placing veggies in a vinegar-based brine and storing them in the refrigerator.
This method keeps the vegetables extra crisp, fresh, and vibrant. The best part? They’re ready to eat in as little as 24 hours, though the flavor deepens over a few days. It’s pickling made easy—perfect for beginners or anyone who wants homemade pickles without the fuss.
Why Make Pickles at Home?
Homemade fridge pickles are not only fun to make, but they also let you take full control over the ingredients. Store-bought pickles often contain preservatives, artificial colors, or high levels of sodium. By making them at home, you can:
- Adjust the flavor profile to your liking (sweet, sour, spicy, garlicky—you name it!)
- Use organic or locally grown produce
- Avoid additives and reduce sodium
- Get creative with veggie combinations
Plus, it’s an enjoyable way to use up surplus produce before it goes bad. Got extra cucumbers, carrots, or onions? Pickle them!
Benefits of Fridge Pickles vs. Canned Pickles
While both types of pickles have their charm, fridge pickles have several unique advantages:
- Speed: Ready in a day or two—no need to wait weeks.
- Crunch: Fridge pickles retain more of their fresh crunch than canned.
- Ease: No special canning tools, no hot water baths.
- Safety: Less risk of botulism or spoilage due to refrigeration.
However, they do require cold storage and don’t last as long as canned pickles, so they’re best made in small batches.
List of Ingredients You’ll Need
Main Vegetables for Pickling
You can pickle just about any vegetable, but cucumbers are the classic favorite. Here’s a list of popular options:
- Cucumbers: Opt for Kirby or Persian cucumbers for the crunchiest results.
- Carrots: Peeled and sliced into sticks or rounds.
- Red onions: Add color and a punchy tang.
- Cauliflower: Break into small florets.
- Radishes: Thinly sliced for a peppery bite.
- Green beans: Trim the ends before pickling.
- Jalapeños or other chili peppers: Add heat and flavor.
Always choose fresh, firm, and unblemished produce. Organic is ideal since you’re eating the skin.
Essential Pickling Brine Ingredients
Your pickling liquid is what infuses the vegetables with that signature tangy-sweet-spicy flavor. Here’s the basic brine formula:
- Vinegar: White vinegar or apple cider vinegar are the most common. Use 5% acidity for proper pickling.
- Water: Dilutes the vinegar so it’s not overpowering.
- Salt: Use pickling salt or kosher salt. Avoid iodized salt—it can make the brine cloudy.
- Sugar: Balances the acidity. You can adjust or omit to taste.
Basic ratio:
1 cup vinegar + 1 cup water + 1 tbsp salt + 1 tbsp sugar (for 1 pint of vegetables)
Optional Add-Ins for Extra Flavor
Want to take your pickles to the next level? Try adding these flavor boosters:
- Garlic cloves: Whole or sliced.
- Dill: Fresh sprigs or dried dill seed.
- Mustard seeds: Add texture and tang.
- Peppercorns: For a subtle spice.
- Red pepper flakes: For heat.
- Bay leaves: Add an earthy depth.
Mix and match to create your perfect flavor combo.
Tools and Equipment You’ll Need
Recommended Containers and Jars
You don’t need anything fancy, but you do need containers that can withstand cold and seal well. Here are your best options:
- Mason jars: Quart or pint-size jars with tight-fitting lids.
- Glass storage containers: As long as they’re non-reactive and seal well.
- Old pickle jars: Wash thoroughly and reuse.
Avoid metal containers or plastic that may absorb odors.
Kitchen Utensils for Pickling Prep
Have these tools on hand to make the process easier:
- Sharp knife or mandoline slicer: For even, thin cuts.
- Cutting board: Preferably non-wood for easy cleanup.
- Measuring cups/spoons: Accuracy matters in brine.
- Small saucepan: To heat the brine if desired.
- Funnel (optional): Makes jar filling neater.
Keep everything clean and sanitized to ensure your pickles stay fresh and safe.
Step-by-Step Guide to Making Fridge Pickles
Step 1: Prepare Your Vegetables
Wash your vegetables thoroughly. Trim off ends, peel if necessary, and slice them into uniform pieces—this ensures even pickling. For cucumbers, you can slice into spears, rounds, or leave them whole if small. The thinner the slice, the faster they’ll pickle.
Pro tip: Soak cucumbers in ice water for 30 minutes before pickling to enhance crunchiness.
Step 2: Make the Pickling Brine
The brine is the soul of your pickle. It’s where all the flavor magic happens. Once you’ve chosen your veggies and cleaned them up, it’s time to whip up your custom pickling solution.
Start with the basic brine ratio:
- 1 cup white vinegar (or apple cider vinegar)
- 1 cup water
- 1 tablespoon kosher or pickling salt
- 1 tablespoon sugar (optional, adjust for sweeter pickles)
In a small saucepan, combine all the brine ingredients. Stir over medium heat just until the salt and sugar dissolve. There’s no need to bring it to a full boil. Once everything’s dissolved, you can remove it from heat and let it cool slightly before pouring over your veggies.
Want to spice it up? Throw in a few peppercorns, mustard seeds, chili flakes, or garlic cloves to the brine while it heats. These infuse more flavor into the liquid and give your pickles a real personality.
If you’re pickling delicate veggies like cucumbers or radishes and want to preserve their crispness, make sure the brine is just warm—not hot—when pouring it into the jars. Too much heat can soften them.
You can also double or triple the batch depending on how many jars you’re making. Just keep the ratios consistent, and you’re golden.
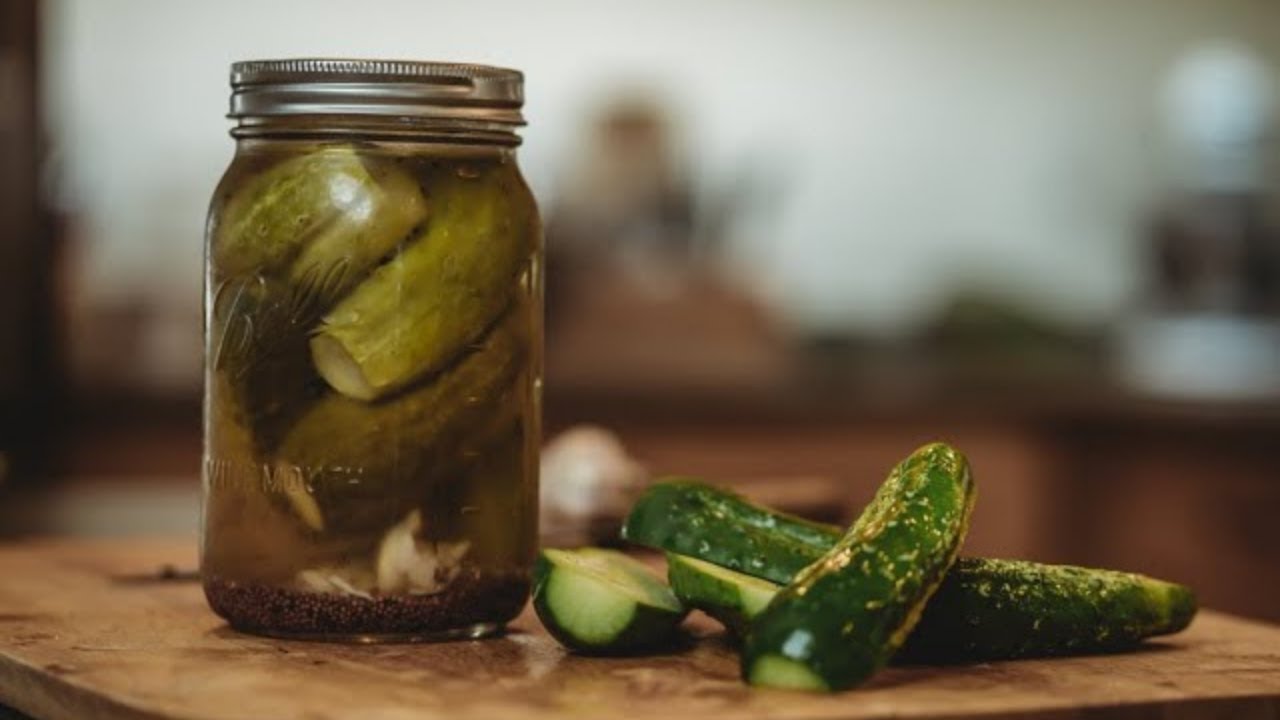
Step 3: Pack the Jars
This is where the fun begins—filling your jars with all the goodness. First, make sure your jars are clean. You don’t have to sterilize them like with canning, but you do want them spotless to avoid any funky bacteria.
Packing tips:
- Add your aromatics first—garlic, dill sprigs, mustard seeds, chili flakes, etc.
- Next, tightly pack in your sliced or whole vegetables. Don’t crush them, but you do want them snug to minimize floating.
- Leave a little space (about ½ inch) at the top of the jar to allow room for the brine.
Layering different veggies in one jar? Go for it! Carrots and cucumbers pair wonderfully together. Just be mindful that denser veggies like carrots may take a bit longer to absorb flavor than cucumbers.
Keep in mind: You want the veggies to be fully submerged in the brine once you add it. This helps prevent spoilage and ensures even pickling.
Step 4: Pour the Brine Over
Now, take your slightly cooled brine and pour it carefully over the vegetables in each jar. Use a ladle and a funnel to avoid messes—this part can get sticky fast!
Make sure the liquid completely covers the vegetables. If anything is sticking out, press it down gently with a clean spoon or add a bit more brine. You can also place a small piece of parchment paper or a fermentation weight on top to keep the veggies submerged if necessary.
Important: Screw on the lids tightly, but you don’t need to over-tighten. Give the jars a gentle shake to help distribute the flavors.
If you’ve made multiple jars with different veggies, label them with the date and type (e.g., “Spicy Dill Cucumbers – 09/28”). Trust us—it helps later when you’re digging through your fridge for a midnight snack.
Step 5: Let Them Cool and Refrigerate
Once your jars are sealed and filled, leave them on the counter to cool to room temperature. This step is crucial—don’t skip it. Putting hot or warm jars directly into the fridge can cause temperature shock and might compromise the texture of your veggies.
After they’ve cooled (usually within an hour), move them into the fridge.
How soon can you eat them?
Technically, fridge pickles are safe to eat after 24 hours. But if you can wait 48–72 hours, the flavors will be much more developed and balanced.
They get even better after a week, so if you’ve got the patience, let them sit. Shake the jars every day or two to redistribute the spices and brine.
And there you have it—fresh, homemade fridge pickles ready to rock your taste buds. No boiling, no sealing, no fuss.
Storage Tips and Shelf Life
How Long Do Fridge Pickles Last?
Fridge pickles may not last forever like canned ones, but they do have a decent shelf life. Generally, if stored properly, they can last between 2 to 3 months in the refrigerator. However, most of the time, they’ll be long gone before then because they’re just that good.
But here’s the thing—fridge pickles don’t “go bad” suddenly. They’ll gradually lose their crunch and flavor, and you may notice a slight change in the brine color or cloudiness. If you ever see:
- Mold forming at the top
- A foul or off-putting smell
- Sliminess on the vegetables
Then it’s time to toss them.
The best practice is to consume them within 4–6 weeks for peak flavor and texture. After that, they’re still safe if stored correctly, but their quality may decline.
Best Practices for Storing Pickles
To make your pickles last as long (and taste as fresh) as possible, follow these simple but essential storage tips:
- Always refrigerate: These are fridge pickles for a reason—they’re not shelf-stable.
- Keep them submerged: Always make sure the veggies stay below the brine line. If they float and stick out, they could spoil faster.
- Use clean utensils: Never use your fingers or a dirty fork to grab a pickle. Always use a clean utensil to avoid introducing bacteria.
- Seal tightly: After every use, close the lid tightly to prevent air exposure and contamination.
- Label your jars: Date each jar so you can track freshness at a glance.
If you’ve made multiple flavors, consider color-coded stickers or labels to identify each type easily.
Customizing Your Fridge Pickles
One of the best parts about making fridge pickles at home is how much room there is for creativity. You’re not stuck with just one flavor—mix it up and try different combinations based on your taste preferences.
Spicy Pickles
If you love a little heat, spicy fridge pickles will be your new favorite snack. Here’s how to fire them up:
- Add sliced jalapeños, habaneros, or serrano peppers directly into the jar.
- Crushed red pepper flakes are another great option.
- A few black peppercorns or a dash of cayenne pepper in the brine adds subtle heat.
Try combining spicy peppers with garlic and dill for a flavor bomb you’ll want on everything—from burgers to tacos.
Let them sit for at least 48 hours so that the heat infuses fully. The longer they sit, the spicier they get.
Sweet Pickles
Craving something on the sweeter side? Sweet pickles are incredibly easy to whip up and are perfect for balancing out spicy or savory meals.
To make sweet pickles:
- Increase the sugar in your brine to 2–3 tablespoons per cup of vinegar.
- Add spices like cloves, cinnamon sticks, or allspice berries.
- Use red onions or bread-and-butter cucumber slices for a naturally sweet base.
These are fantastic on pulled pork sandwiches or eaten right out of the jar.
Garlic-Dill Pickles
The classic combo of garlic and dill is what most people think of when they hear “pickle.” It’s savory, tangy, and full of flavor.
Here’s how to master it:
- Use 2–3 cloves of garlic per jar, smashed or sliced.
- Add fresh dill sprigs or dill seeds (or both!).
- Combine with a basic brine and let it sit at least 2–3 days.
The garlic intensifies the longer it sits. If you’re a garlic lover, this will be your go-to. If you want it milder, remove the garlic after the first few days.
Common Mistakes to Avoid
Even though fridge pickling is super simple, there are a few common mistakes that can mess with your final product. Let’s break them down so you can dodge them from the start.
Overpacking Jars
It’s tempting to squeeze as many veggies as possible into one jar, but this can backfire. Overstuffing leads to:
- Uneven pickling
- Air pockets that spoil veggies
- Reduced flavor absorption
Pro tip: Leave a little wiggle room. Pack veggies snugly but not to the point where you can’t pour in the brine freely. Think of it like packing a suitcase—you want everything in there, but not bursting at the seams.
If you need to make extra jars, do it! You’ll thank yourself later.
Skipping the Cooling Process
This mistake happens often, especially when you’re in a rush. You pour hot brine on your veggies and immediately toss the jar into the fridge. Not a good idea.
Here’s why cooling matters:
- Sudden temperature changes can cause glass jars to crack.
- Warm jars in the fridge can create condensation and affect the pickles’ texture.
- It can compromise flavor development.
Instead, always let your filled jars sit at room temperature for at least 30–60 minutes before chilling them. Your pickles—and your fridge—will thank you.
How to Serve Fridge Pickles
So, your jars are chilled, the flavors have melded beautifully, and you’re ready to dig in. But how do you enjoy these delicious pickles? The possibilities are endless.
As a Side or Garnish
Here are some simple ways to serve fridge pickles on the side:
- With sandwiches or burgers
- On a cheese and charcuterie board
- As a palate cleanser between rich dishes
- As a quick, crunchy snack
Pickled onions or radishes also make fantastic taco toppings or salad enhancers.
In Recipes or on Sandwiches
Get creative by adding pickles into your recipes, not just on the side:
- Chop them up and mix into potato or tuna salad
- Add diced pickles to deviled eggs for a zesty twist
- Use them in grilled cheese or turkey sandwiches
- Mix into slaws for extra crunch
You can even add chopped sweet pickles to relishes or burger sauces for that sweet-tangy hit.
The truth is, fridge pickles can go with almost anything. Once you start experimenting, you’ll want to add them to every meal.
Health Benefits of Pickled Vegetables
Gut Health and Fermentation
Even though fridge pickles aren’t technically fermented like traditional fermented pickles (think sauerkraut or kimchi), they can still be a gut-friendly snack. How? Mainly because they contain natural prebiotics—non-digestible fibers found in vegetables that help feed the good bacteria already in your gut.
Some people also choose to use a small amount of fermented brine from a previous batch to give fridge pickles a probiotic kick. While this isn’t standard, it’s possible to make your fridge pickles more fermentation-forward by incorporating ingredients that encourage natural microbial growth.
So, while you’re not getting a full dose of probiotics from traditional fermentation, fridge pickles still support digestion thanks to:
- High fiber content from the veggies
- Vinegar, which can aid stomach acid production
- Natural hydration due to water-rich vegetables
And the best part? No funky fermentation smells in your kitchen!
Low-Calorie Snacking Option
Let’s talk about cravings. When the munchies hit, it’s easy to reach for chips or sweets. But fridge pickles are a fantastic alternative:
- Low in calories – One or two spears usually clock in at less than 10 calories.
- Fat-free – Unless you pickle in oil (which we’re not doing here).
- Sugar-optional – You control the sweetness.
- Hydrating – Especially with water-rich veggies like cucumbers.
This makes them perfect for:
- Weight loss or calorie-conscious diets
- Diabetics who need to watch sugar intake
- Keto and low-carb lifestyles (just go easy on the sugar)
In short, fridge pickles satisfy your craving for crunch and flavor without ruining your nutrition goals. What’s not to love?
FAQs about Fridge Pickles Recipe
1. Can I reuse pickle brine?
Technically, yes—but with caution. If you’re reusing it for fresh vegetables within a few days, it’s fine. However, the brine may be less potent, and bacterial contamination is a risk. Always bring reused brine to a boil and cool it again before reusing.
2. How do I make my pickles extra crispy?
Use Kirby cucumbers, soak them in ice water for 30 minutes before pickling, and avoid pouring hot brine over them. Also, store your jars toward the back of the fridge where it’s colder.
3. Are fridge pickles safe to eat after 2 months?
Yes—if they’ve been stored properly and show no signs of spoilage (no mold, sliminess, or off smells), they’re generally fine. But for best texture and taste, consume within 4–6 weeks.
4. Can I pickle other vegetables besides cucumbers?
Absolutely. You can pickle onions, carrots, radishes, cauliflower, green beans, beets, jalapeños, and even fruits like watermelon rind or pineapple. Just adjust the slicing and brine ratio to suit the produce.
5. Do I need to sterilize jars for fridge pickles?
No sterilization is needed—just wash your jars with hot, soapy water and rinse thoroughly. Since you’re storing them in the fridge, full canning-style sterilization isn’t required.
Conclusion
There you have it—your complete, step-by-step guide to making crispy, flavorful, homemade fridge pickles that’ll blow store-bought ones out of the water.
Whether you’re a beginner looking to dip your toes into home food preservation or a seasoned kitchen wizard searching for a new project, fridge pickles are a perfect choice. With just a few fresh ingredients, a good vinegar brine, and your trusty fridge, you can craft jars of vibrant, tangy goodness tailored exactly to your taste.
And remember, this isn’t a one-recipe-fits-all situation. Get creative! Try different vegetables, experiment with spices, adjust your brine, and make each jar your own.
Ready to make your first batch? Grab those cucumbers (or radishes, onions, carrots—go wild) and get pickling. Your sandwiches, salads, and snack plates will never be the same.