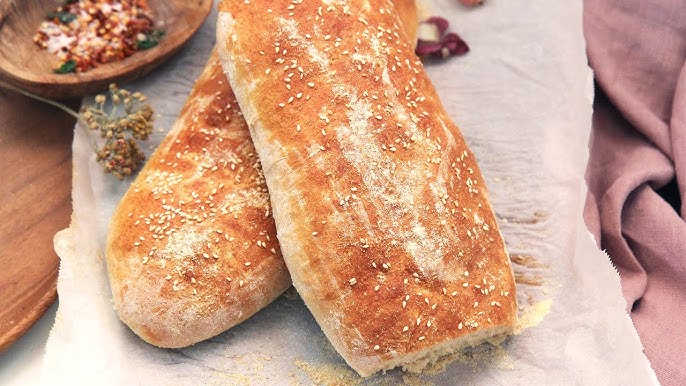
French Bread Recipe: There’s something magical about the smell of freshly baked bread wafting through your kitchen. French bread, with its crispy crust and soft, airy interior, is a staple in many households.
While it might seem intimidating, making authentic French bread at home is easier than you think! Plus, the results are far superior to store-bought loaves.
So, grab your apron, and let’s get started on this exciting bread-making journey!
Ingredients
To make classic French bread, you’ll need just a few basic ingredients:
- Flour: 4 cups of all-purpose or bread flour.
- Water: 1 ¾ cups of warm water (about 110°F or 45°C).
- Salt: 2 teaspoons.
- Yeast: 2 ¼ teaspoons of active dry yeast.
Optional ingredients for variations:
- Olive oil: Adds richness.
- Honey: For a slightly sweet flavor.
- Herbs: Like rosemary or thyme, for a fragrant twist.
Tools You’ll Need
Before you begin, gather these essential tools:
- Mixing bowls.
- Measuring cups and spoons.
- A stand mixer (optional but helpful).
- A bench scraper or sharp knife.
- Parchment paper or a silicone baking mat.
- A baking sheet or bread stone.
Optional tools:
- A proofing basket (banneton) for shaping.
- A bread lame or razor blade for scoring.
- A spray bottle for creating steam in the oven.
Step 1: Preparing the Dough
- Activate the yeast: In a large mixing bowl, combine warm water and yeast. Let it sit for 5–10 minutes until the yeast dissolves and bubbles form. This step ensures the yeast is alive and active.
- Combine the ingredients: Add the flour and salt to the yeast mixture. If using olive oil or honey, add it now.
- Mix until shaggy: Stir the ingredients together with a wooden spoon or your hands until a rough, shaggy dough forms.
- Let it rest: Cover the bowl with a damp cloth and let it rest for 15–20 minutes. This step, called autolyse, helps hydrate the flour and makes kneading easier.
Step 2: Kneading the Dough
- Manual kneading: Transfer the dough onto a floured surface. Use the heel of your hand to push the dough away, fold it back, and repeat. Knead for 8–10 minutes until the dough becomes smooth and elastic.
- Using a stand mixer: Attach the dough hook and knead on medium speed for about 5 minutes. Stop occasionally to scrape the sides.
- Check for readiness: The dough is ready when it passes the “windowpane test.” Stretch a small piece—if it forms a thin, translucent membrane without tearing, you’re good to go.
Step 3: First Rise
- Prepare for proofing: Lightly oil a large bowl. Place the dough inside, turning it to coat the surface with oil to prevent drying.
- Let it rise: Cover the bowl with plastic wrap or a damp towel and place it in a warm, draft-free spot. Let the dough rise until it doubles in size, about 1–2 hours.
- How to check: Poke the dough lightly. If the indentation slowly springs back, it’s ready for the next step.
Step 4: Shaping the Bread
- Divide the dough: If making multiple loaves, divide the dough into equal portions using a bench scraper.
- Shape into loaves: For classic baguettes, roll each portion into a long, cylindrical shape. For boules, gently shape the dough into a round ball.
- Seal the edges: Pinch the seams together to seal and place the dough seam-side down on a baking sheet or proofing basket.
Step 5: Second Rise
- Cover and rest: Cover the shaped dough with a damp cloth or plastic wrap. Let it rise again for 30–45 minutes until puffy.
- Check for readiness: Gently press a finger into the dough. If the indentation remains, it’s ready for the oven.
Step 6: Preparing the Oven
- Preheat the oven: Set your oven to 450°F (230°C). Place a baking stone or an inverted baking sheet in the oven to heat up. This ensures a hot surface for the bread to bake on.
- Create steam: To achieve that iconic French bread crust, you’ll need steam. Place a metal pan (not glass!) at the bottom of the oven. Once the oven is preheated, pour in a cup of hot water to create steam just before putting the bread in.
- Prepare the baking surface: Transfer the parchment paper or silicone mat with the shaped loaves onto the preheated baking stone or sheet.
Step 7: Scoring the Dough
- Why score the dough: Scoring isn’t just for decoration—it allows the bread to expand properly during baking, preventing cracks in undesirable places.
- How to score: Using a bread lame or a sharp razor blade, make shallow, diagonal slashes along the top of the loaf. For baguettes, three to five cuts at a slight angle work best.
- Tips for scoring: Make confident, quick slashes. A hesitant cut can drag the dough and ruin the aesthetic.
Step 8: Baking the Bread
- Place in the oven: Carefully slide the prepared loaves into the oven. Quickly shut the door to keep the steam inside.
- Bake at high heat: Bake the bread at 450°F (230°C) for 20 minutes. If the crust browns too quickly, lower the temperature to 400°F (200°C) for the remaining time.
- Check for doneness: The bread is ready when it sounds hollow when tapped on the bottom, or when an instant-read thermometer inserted into the center reads 200–210°F (93–99°C).
- Optional crust enhancement: For an extra-crispy crust, open the oven door slightly for the last 5 minutes of baking to allow moisture to escape.
Cooling the Bread
- Let it cool completely: Remove the loaves from the oven and transfer them to a wire rack. Allow them to cool for at least 30 minutes before slicing. This helps the bread set and avoids a gummy texture.
- Why cooling is important: Slicing hot bread might be tempting, but it can ruin the texture inside. Be patient—it’s worth the wait!
Tips for Serving and Storing
- Serving fresh: French bread is best enjoyed fresh with butter, jam, or as a side to soups and salads. It also makes a fantastic base for bruschetta or garlic bread.
- Storing leftovers: Wrap the bread in a clean kitchen towel and store it at room temperature for up to 2 days. Avoid sealing it in plastic, which can soften the crust.
- Reviving stale bread: To refresh a day-old loaf, sprinkle it with water and warm it in a 350°F (175°C) oven for 5–10 minutes.
Common Mistakes and Troubleshooting
- Dense bread: This can occur if the dough wasn’t kneaded enough or if the yeast was inactive. Make sure to knead until smooth and let the yeast proof properly.
- Flat loaves: Over-proofing or under-proofing can cause flat bread. Stick to the recommended rising times and check dough readiness using the poke test.
- Burned crust: If the crust darkens too quickly, tent the bread with foil halfway through baking.
- Pale crust: Ensure your oven is hot enough and that steam is present during baking. A lack of steam can result in a dull crust.
FAQs about French Bread Recipe
1. What is French bread?
French bread is a classic type of bread known for its crusty exterior and soft, airy interior. Popular varieties include baguettes and pain de campagne.
2. What ingredients are needed for French bread?
You typically need simple ingredients: flour, water, yeast, salt, and occasionally a small amount of sugar or olive oil for added flavor.
3. How do I achieve a crusty French bread exterior?
Baking at a high temperature and adding steam to your oven can create the iconic crust. Place a tray of water in the oven or mist the bread with water before baking.
4. Can I make French bread without a bread machine?
Yes! French bread is traditionally made by hand or with a stand mixer. Kneading and allowing the dough to rise properly are key steps.
5. How long does French bread take to bake?
Depending on the size, it typically bakes in 20–30 minutes at 375–450°F (190–230°C).
6. How should I store French bread?
To maintain freshness, store French bread in a paper bag for up to two days. For longer storage, freeze it in an airtight bag and reheat before serving.
7. Can I add flavors to French bread?
Yes, you can experiment by adding herbs, cheese, or olives to the dough for a flavorful twist on the classic recipe.
8. Is French bread suitable for sandwiches?
Absolutely! Its sturdy crust and soft crumb make it perfect for sandwiches, garlic bread, or dipping into soups and sauces.
Conclusion
Baking French bread at home might seem like a challenge, but with this step-by-step guide, you’re well-equipped to master the art. The smell of freshly baked bread, the satisfying crunch of the crust, and the soft, airy interior make all the effort worthwhile.
Whether it’s your first loaf or your fiftieth, there’s always room to experiment and perfect your technique. So, roll up your sleeves, and start baking—you won’t regret it!