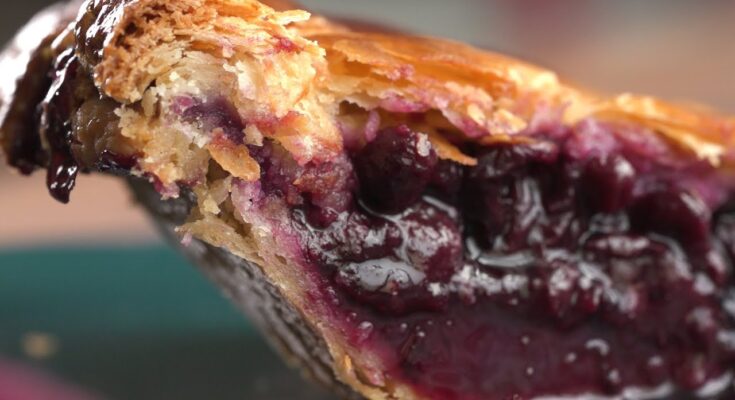
Flaky Pie Crust Recipe: There’s something magical about biting into a perfectly baked pie with a golden, flaky crust. It’s that light, layered texture that holds the filling so gracefully yet crumbles delicately with each bite. But let’s be honest—getting that perfect flaky crust isn’t as easy as it seems. It takes more than just flour and butter. The secret lies in technique, temperature, and timing.
A flaky pie crust differs greatly from its tender or mealy counterparts. Where tender crusts melt in your mouth and mealy crusts are firm enough to stand up to wet fillings like custards, a flaky crust is airy, with visible layers created by fat separating the dough into sheets as it bakes.
This guide is your roadmap to mastering that texture—step by step.
Essential Ingredients for a Flaky Pie Crust
You don’t need a ton of ingredients for a classic flaky pie crust. But each one has a purpose and plays a vital role in getting the right consistency and flavor.
Here’s what you’ll need:
- All-purpose flour – The backbone of the crust; it gives structure.
- Cold unsalted butter – The star of the show. It creates pockets of steam as it melts, forming flaky layers.
- Salt – Enhances the flavor.
- Ice-cold water – Binds everything together without melting the butter.
- (Optional: A touch of sugar) – Adds a hint of sweetness, especially great for dessert pies.
Make sure everything is cold. That’s non-negotiable. Warm ingredients ruin the structure before you even get it into the oven. Butter should be chilled, water should be icy, and even your flour can benefit from a few minutes in the fridge.
Tools You’ll Need Before You Start
Let’s talk gear. While you don’t need to invest in a fancy kitchen setup, a few tools can really make a difference.
Must-have tools:
- Mixing bowl – Preferably large and chilled.
- Pastry cutter or food processor – To cut the butter into the flour.
- Rolling pin – For rolling the dough evenly.
- Plastic wrap – To chill the dough properly.
- Pie dish – Obviously!
Nice-to-haves:
- Pastry mat – Helps keep your surface non-stick and guides you with size.
- Bench scraper – Great for moving and shaping dough.
- Pie weights or beans – For blind baking.
Having your tools ready before you begin keeps your dough cold and your stress levels low. Mise en place (everything in its place) is the name of the game here.
Step-by-Step Instructions for a Perfect Pie Crust
Let’s break it down into actionable, foolproof steps. Follow these, and you’ll be well on your way to flaky pie crust glory.
Step 1: Measure Your Ingredients Accurately
Precision is everything. Scoop and level your flour with a spoon and knife—not straight from the bag. Use a kitchen scale if you have one. For butter, cut it into ½-inch cubes and refrigerate it again after cutting to keep it cold.
Step 2: Cut the Butter into the Flour
This is where the magic starts. Use a pastry cutter, fork, or your hands to incorporate the butter into the flour until it resembles coarse crumbs. You want pea-sized pieces of butter still visible. These will puff up and separate the dough into layers as it bakes.
Step 3: Add Ice Water Gradually
Don’t dump all the water in at once. Add one tablespoon at a time, gently mixing with a fork or your hands. You want the dough to just come together—not be wet or sticky. Too much water equals a tough crust.
Step 4: Form the Dough and Chill It
Once the dough holds together, shape it into a disk, wrap it in plastic wrap, and refrigerate it for at least one hour. This helps the gluten relax and the butter to solidify, leading to flakier results.
Step 5: Roll Out the Dough Correctly
Dust your surface lightly with flour and gently roll from the center outward, rotating frequently. Keep it even and avoid overhandling. You’re aiming for a 12-inch circle about ⅛ inch thick for a standard 9-inch pie plate.
Tips for Achieving Maximum Flakiness
Achieving that Instagram-worthy flaky crust isn’t just about following the steps—it’s about the tiny tricks that make a big difference. These are the pro-level pie secrets that separate a good crust from a legendary one.
Keep Everything Cold: This cannot be stressed enough. Cold ingredients are the secret sauce to a flaky crust. Why? Because when the cold butter melts in the hot oven, it releases steam, which creates those beautiful, airy layers. Warm butter, on the other hand, just seeps into the flour, making your dough dense and greasy. Chill your butter, water, and even your mixing bowl if your kitchen runs warm.
Use Your Hands Strategically: While tools are helpful, sometimes your hands are your best instrument. Just be careful not to overheat the dough. Use your fingertips to mix, as they’re cooler than your palms. Stop mixing once you see small bits of butter in the dough—those are your flake-makers.
Don’t Overwork the Dough: Mix just until everything comes together. Kneading pie dough like bread dough is a recipe for disaster—literally. Overworking it develops gluten, which gives you chewy crust instead of a delicate, crumbly one.
Let the Dough Rest: Resting the dough in the fridge relaxes the gluten and makes it easier to roll out. It also keeps the butter firm, so it does its job once it hits the heat of the oven.
Roll It Once, Roll It Right: Constant rerolling compresses the layers and melts the butter. Aim to roll it once and get it to the right thickness and shape without fuss.
Common Mistakes to Avoid
Even experienced bakers stumble over pie crust. Here are the most common blunders and how to sidestep them:
Overmixing the Dough: This is probably mistake number one. You might think it needs more mixing, but once your dough forms a loose ball, stop. Overmixed dough becomes tough and rubbery.
Using Too Much Water: More water might seem helpful to bring the dough together, but it creates a gummy crust. Add water a tablespoon at a time and stop when it just holds.
Skipping the Chill Time: Rushing the process might save time, but you’ll pay for it in texture. Cold dough bakes better, shapes better, and tastes better. Don’t skip this step.
Not Enough Flour on the Surface While Rolling: Your dough can stick and tear if you skip flouring your rolling surface. But don’t go overboard either, or you’ll end up drying out the dough.
Cutting the Pie Too Soon After Baking: Letting your pie cool for at least two hours helps the filling set and keeps the crust crispy. Cutting too early gives you a soggy base and a runny mess.
Storing and Freezing Pie Dough
Got extra dough? Don’t toss it. Pie dough stores beautifully when handled right.
In the Fridge: Wrap the dough disk tightly in plastic wrap and store it in the fridge for up to 3 days. Let it sit at room temp for 10-15 minutes before rolling to make it more pliable.
In the Freezer: Pie dough can be frozen for up to 3 months. Wrap it in plastic wrap and place in a zip-top freezer bag. When ready to use, thaw it overnight in the fridge—not at room temp. This ensures the butter stays cold and your crust stays flaky.
Pre-Rolled and Frozen: You can even roll the dough out and freeze it flat between sheets of parchment paper. This way, you’re ready to go straight from freezer to pie plate.
Pre-Baking vs. Blind Baking Explained
Ever made a pie and ended up with a soggy bottom? That’s where blind baking comes in.
What is Blind Baking?
Blind baking means partially or fully baking your crust before adding the filling. It’s essential for pies with liquid fillings like custards or when you’re not baking the filling at all (like with cream pies).
When to Blind Bake:
- Cream pies
- Custard pies
- Quiche
- Any pie where the filling cooks faster than the crust
How to Do It:
- Roll out and place your dough in the pie plate.
- Line with parchment paper or foil.
- Fill with pie weights, dry beans, or rice.
- Bake at 375°F (190°C) for 15-20 minutes.
- Remove weights and bake another 5-10 minutes if you need it fully baked.
Doing this gives you a crisp, golden crust every time.
Using This Crust for Sweet vs. Savory Pies
One of the best things about a flaky pie crust is its versatility. Whether you’re whipping up a luscious apple pie or a hearty chicken pot pie, this crust is your go-to. But a few tweaks can help bring out the best in your sweet or savory creations.
For Sweet Pies: When you’re making fruit pies, custard pies, or chocolate silk pie, you might want to add a touch of sugar—about 1 to 2 teaspoons—to your dough. This doesn’t make it overly sweet, but it complements dessert fillings beautifully. You could even experiment by adding a pinch of cinnamon or nutmeg to the dough to match your filling.
For Savory Pies:
Skip the sugar altogether. Instead, consider adding a touch more salt—especially if your filling is rich or cheesy. You can also infuse the dough with herbs like thyme, rosemary, or sage. These subtle flavor enhancements elevate savory pies like quiche, shepherd’s pie, or savory tarts.
Fats and Fillings Matter: Sweet pies often have juicy fillings that can make your crust soggy. To counter this, brush your crust with egg white before baking—it creates a moisture barrier. For savory pies with thicker, denser fillings, blind baking might be less critical, but you’ll still want a crisp base.
Troubleshooting Pie Crust Problems
Even with the best intentions, pie crusts don’t always behave. Here’s how to identify, fix, and prevent the most common crust catastrophes.
Crust is Too Tough: You probably overworked the dough or added too much water. Next time, mix gently and use just enough water to bind. Handle it like you would a delicate flower.
Crust is Crumbly or Falls Apart: This usually means not enough water or too little fat. Add water more slowly next time and be sure your butter is distributed well.
Cracks While Rolling Out: Let the dough rest longer. If it’s too cold and stiff, it’ll crack when rolled. Warm it slightly by leaving it on the counter for 5–10 minutes.
Shrinks in the Oven: This is often caused by not chilling the dough long enough or stretching it into the pie plate. Never stretch the dough—lay it in gently and let it settle into the edges.
Soggy Bottom Crust: Blind baking or brushing the crust with egg white before filling it helps. Also, avoid overly wet fillings and bake your pie on the lowest oven rack to ensure the base crisps up nicely.
Nutritional Information and Substitutes
Classic pie crust isn’t exactly health food, but there are plenty of ways to adapt it without sacrificing too much of that delicious flakiness.
Standard Nutrition (Per Slice, Approx. 1/8 of crust):
- Calories: 170–200
- Fat: 11–13g
- Carbs: 15–17g
- Protein: 2g
Healthier Alternatives:
- Whole wheat flour: Adds fiber and a nuttier flavor, but use half AP flour to maintain texture.
- Butter substitutes: Vegan butter, margarine, or coconut oil can replace dairy butter. Just ensure they’re solid when mixed.
- Less fat: You can reduce the butter slightly, but go too low and you’ll lose flakiness.
- Gluten-free flours: Use a 1:1 gluten-free blend with xanthan gum. Results vary, but it’s doable.
- Low-carb options: Almond or coconut flour crusts work well for keto diets, but these tend to be more crumbly and less flaky.
With these substitutions, experimentation is key. Your crust might not come out exactly like the classic version, but you can still get a tasty and satisfying result.
Creative Variations of Classic Pie Crust
Why stick to the basics when you can get creative? These variations can add a whole new flavor dimension to your favorite pies.
1. Herb-Infused Pie Crust: Mix chopped rosemary, thyme, or sage into your flour before adding butter. Perfect for chicken pot pie or vegetable tarts.
2. Cheese Crust: Add ½ cup of shredded cheddar or parmesan to the flour mixture. This gives a savory depth, especially good with quiche or tomato pie.
3. Sweet and Spiced Crust: Mix in cinnamon, nutmeg, or orange zest to pair with sweet fruit fillings. It smells amazing as it bakes.
4. Nutty Crust: Pulse in some finely ground almonds, pecans, or walnuts. Nut flours create a crumbly, aromatic texture that’s ideal for dessert pies.
5. Buttermilk Crust: Swap ice water for buttermilk for a tangy kick and added tenderness.
Try experimenting with different fats, such as duck fat or lard, for a more traditional or rustic pie experience. These give a rich flavor and incredible texture that butter alone can’t achieve.
Pairing Your Pie Crust with Perfect Fillings
A great pie crust is only half the story—you need a stellar filling to match. Here’s how to pair them like a pro.
Best Fillings for Classic Crust:
- Sweet: Apple, cherry, blueberry, peach, pumpkin, chocolate cream.
- Savory: Chicken pot pie, beef and mushroom, spinach and feta, ham and cheese quiche.
Seasonal Pairing Ideas:
- Spring: Asparagus and goat cheese tart
- Summer: Fresh berry pies or tomato tart
- Fall: Apple or pear pies with cinnamon
- Winter: Root vegetable galette or meat pies
Use in-season ingredients whenever possible. They taste better, are more affordable, and make your pies shine.
FAQs about Flaky Pie Crust Recipe
1. What makes a pie crust flaky?
The flakiness comes from cold fat (like butter or shortening) creating pockets in the dough that expand during baking. Keeping everything cold is key.
2. Can I use all butter for my pie crust?
Yes! All-butter pie crusts offer rich flavor and great flakiness, but they must stay cold to avoid becoming greasy.
3. Why is my pie crust tough instead of tender?
Overmixing or adding too much water can make your crust tough. Mix just until the dough holds together and chill before rolling.
4. How long should I chill the dough?
Chill the dough for at least 30 minutes. This helps relax the gluten and solidify the fat, leading to a flakier crust.
5. Can I freeze pie crust dough?
Absolutely! Wrap it tightly in plastic wrap and freeze for up to 3 months. Thaw in the refrigerator overnight before using.
6. Do I need to blind bake the crust?
Blind baking is necessary for cream or no-bake pies to prevent a soggy bottom. Use pie weights to keep the crust flat.
7. What flour is best for flaky pie crust?
All-purpose flour works best—it balances protein content for both structure and tenderness.
Conclusion
There’s nothing quite like the satisfaction of pulling a homemade pie out of the oven—golden, crisp, and irresistibly flaky. This crust recipe is more than just dough; it’s a canvas for your creativity. Whether you’re filling it with summer peaches or winter squash, this flaky crust brings everything together in the most delicious way.
So go ahead, get your hands a little floury. Once you master the technique, you’ll never settle for store-bought again. The journey to flaky perfection is full of buttery joy, and every bite is worth it.


