Elderberry Syrup Recipe: Elderberry syrup is a natural remedy widely used to boost immunity and fight off colds and flu. Packed with antioxidants, vitamins, and minerals, this syrup has been cherished for generations. The process of making elderberry syrup at home is simple, cost-effective, and customizable.
Not only is this syrup delicious, but it also provides anti-inflammatory, antiviral, and antibacterial properties, making it a staple in natural medicine cabinets.
Let’s dive into the detailed step-by-step guide to creating this powerhouse syrup in your own kitchen.
Ingredients and Tools Required
List of Ingredients:
- 1 cup dried elderberries (or 2 cups fresh elderberries)
- 4 cups of water
- 1 cup raw honey (adjust based on sweetness preference)
- 1 cinnamon stick (optional for flavor)
- 2-3 cloves (optional for spiced flavor)
- 1 teaspoon grated ginger (fresh or powdered)
- 1 tablespoon lemon juice (optional for tartness)
Tools and Equipment Needed:
- Medium saucepan
- Fine mesh strainer or cheesecloth
- Measuring cups and spoons
- Wooden spoon for stirring
- Glass jars or bottles with airtight lids
- Funnel for easy bottling
How To Make Elderberry Syrup – Step by Step Guide
Step 1: Preparing the Elderberries
Washing and Cleaning Elderberries
Before you start, rinse the elderberries thoroughly under cold running water to remove any dirt, stems, or debris. If you’re using dried elderberries, there’s no need to wash them, but make sure they are free from impurities.
Tips for Handling Fresh and Dried Elderberries
- Fresh Elderberries: Remove stems, as they contain toxic compounds that should not be consumed. Use a fork to gently strip the berries from the stems.
- Dried Elderberries: These are easier to handle since they are pre-cleaned. Always check the packaging for freshness before use.
Step 2: Cooking the Elderberries
Boiling Process
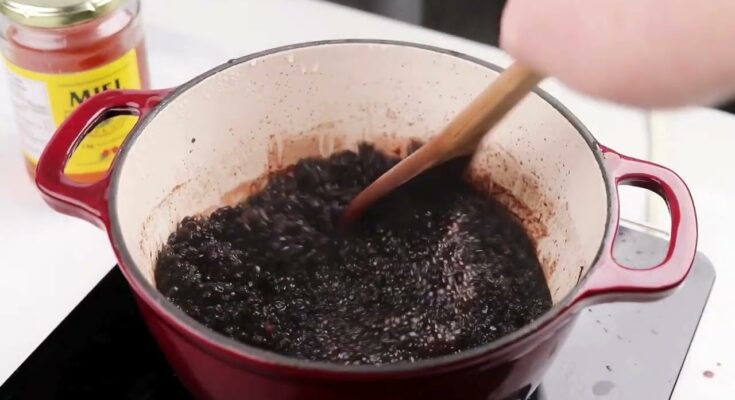
- Add the elderberries and water into a medium saucepan.
- Bring the mixture to a boil over medium-high heat.
- Stir occasionally to ensure even cooking.
Simmering Techniques for Maximum Flavor
- Once boiling, reduce the heat and let it simmer for 45 minutes.
- Cover the saucepan with a lid to prevent water loss while allowing the ingredients to infuse.
- Stir gently and ensure the berries are soft and fully cooked.
Step 3: Straining the Mixture
How to Properly Strain the Syrup
- Remove the saucepan from heat and allow the mixture to cool slightly for easier handling.
- Use a fine mesh strainer or cheesecloth to separate the liquid from the solids.
Removing Seeds and Solids
- Press the berries gently with a spoon to extract as much juice as possible without pushing through any seeds or pulp.
- Discard the leftover pulp or compost it for an eco-friendly solution.
Step 4: Adding Sweeteners and Flavorings
Choosing Honey or Sugar
- Honey: Adds natural sweetness and antibacterial properties. Ideal for medicinal uses.
- Sugar: Better for those who need a vegan option. Adjust the amount for desired sweetness.
Enhancing Flavor with Herbs and Spices
- Add cinnamon sticks, cloves, or ginger during the simmering process for added warmth and complexity.
- Lemon juice can enhance the tanginess, complementing the syrup’s fruity flavor.
Step 5: Cooling and Bottling the Syrup
Cooling Techniques for Preserving Nutrients
- Let the syrup cool completely at room temperature before adding honey. Adding honey to hot syrup can destroy its beneficial enzymes.
Safe Storage Practices
- Pour the cooled syrup into sterilized glass jars or bottles using a funnel.
- Seal the containers tightly and store them in the refrigerator for up to 3 months.
Dosage and Usage Recommendations
Dosage for Adults and Children
Elderberry syrup is generally safe for most people when taken in appropriate doses. However, it’s important to know the right quantity to maximize benefits without overconsumption.
- Adults: Take 1 tablespoon (15 ml) once or twice daily as a preventive measure. Increase to 3–4 tablespoons during illness.
- Children (Over 1 Year): Use 1 teaspoon (5 ml) daily for prevention and 2–3 teaspoons during sickness.
Best Times to Consume Elderberry Syrup
- Morning Boost: Take it first thing in the morning to strengthen immunity throughout the day.
- Before Bedtime: Helps promote restful sleep and overnight healing when battling colds or flu.
- Onset of Symptoms: Start taking elderberry syrup immediately when you feel a cold or flu coming on for faster recovery.
Health Benefits of Elderberry Syrup
Boosting Immunity
Elderberries are packed with antioxidants like vitamin C and flavonoids, which help strengthen the immune system. Regular consumption of elderberry syrup can reduce the risk of catching colds and shorten their duration.
Fighting Cold and Flu Symptoms
Studies show that elderberry extract can reduce the severity and duration of colds and flu. It works by preventing viruses from entering cells and multiplying, giving your body an edge in fighting infections.
Rich in Nutrients
Elderberries are a great source of vitamins A, B, and C, as well as potassium and iron. These nutrients help maintain overall health, promote skin vitality, and improve cardiovascular function.
Customization Ideas
Adding Ginger, Cinnamon, or Cloves
Spices like ginger, cinnamon, and cloves not only add flavor but also bring additional health benefits:
- Ginger: Anti-inflammatory and soothing for sore throats.
- Cinnamon: A natural antimicrobial that supports digestion.
- Cloves: Loaded with antioxidants and known for their antiseptic properties.
Making It Alcohol-Free or Vegan
- Replace honey with maple syrup or agave nectar for a vegan-friendly option.
- Skip alcohol-based preservatives and stick to refrigeration or freezing for storage.
Shelf Life and Storage Tips
Refrigeration and Freezing Options
- Refrigerator Storage: Store in airtight glass containers in the refrigerator for up to 3 months.
- Freezing Syrup: Pour syrup into ice cube trays and freeze for easy, portioned servings. Frozen syrup can last up to 6 months.
Signs of Spoilage to Watch For
- Cloudiness or mold growth indicates spoilage.
- A sour smell or change in taste suggests fermentation and should be discarded immediately.
Potential Side Effects and Precautions
Allergies and Reactions
While rare, some individuals may experience allergic reactions to elderberries. Symptoms include itching, rashes, or digestive upset.
Safety for Pregnant and Nursing Mothers
Consult a healthcare provider before using elderberry syrup during pregnancy or breastfeeding, as research is limited on its safety in these situations.
Important Notes:
- Never consume raw elderberries—they contain cyanogenic glycosides, which can be toxic.
- Always cook elderberries thoroughly to deactivate harmful compounds.
FAQs about Elderberry Syrup Recipe
1. What ingredients are needed for elderberry syrup?
To make elderberry syrup, you typically need dried elderberries, water, honey, and optional spices such as cinnamon, cloves, and ginger for added flavor and benefits.
2. How long does it take to make elderberry syrup?
The process usually takes about 45 minutes to 1 hour. This includes simmering the elderberries and spices in water for about 30 to 45 minutes, straining the mixture, and then mixing in honey.
3. Can I use fresh elderberries instead of dried?
Yes, fresh elderberries can be used instead of dried. Be sure to clean them thoroughly and adjust the quantity, as fresh berries are not as concentrated as dried. Typically, you would double the amount of fresh berries compared to dried.
4. How should elderberry syrup be stored?
Store elderberry syrup in an airtight container in the refrigerator. It can typically last up to two weeks when stored properly. For extended storage, consider freezing the syrup in ice cube trays for easy use later.
5. What are the health benefits of elderberry syrup?
Elderberry syrup is primarily known for its immune-boosting properties. It is rich in antioxidants and vitamins that can help fight inflammation, lessen stress, and protect the heart. Many also use it to help reduce the duration and severity of cold and flu symptoms.
6. Are there any side effects of elderberry syrup?
While elderberry syrup is safe for most people, it can cause allergic reactions in those sensitive to berries. Additionally, uncooked elderberries, leaves, and stems of the plant are toxic and should not be consumed.
Conclusion
Making your own elderberry syrup at home is simple, rewarding, and cost-effective. With the right ingredients and proper steps, you can create a powerful remedy to boost immunity, fight colds, and support overall health. Whether you enjoy it straight, mix it into drinks, or drizzle it over pancakes, this syrup is a delicious addition to your wellness routine.
By following this step-by-step guide, you can confidently prepare elderberry syrup that’s safe, effective, and tailored to your preferences.


