Elderberry Jelly Recipe: If you’ve never made elderberry jelly before, you’re in for a treat. This old-fashioned preserve is not just flavorful—it’s rich in nutrients and has a long history in home kitchens. Elderberries, often hailed for their immune-boosting properties, create a jelly that’s tart, slightly sweet, and undeniably unique. It’s perfect on a warm slice of toast, as a glaze on roasted meats, or even stirred into yogurt.
Making jelly at home may sound intimidating, but once you break it down, it’s actually a fun and rewarding process. This guide will walk you through everything you need—from selecting your elderberries to properly canning your final product. Whether you’re an experienced canner or just starting out, this article will make sure you end up with a beautiful batch of deep purple, delicious elderberry jelly.
So roll up your sleeves, grab some berries (fresh or dried!), and let’s get started.
What is Elderberry Jelly?
Elderberry jelly is a fruit preserve made from the juice of elderberries, sugar, and pectin. Unlike jams that often include chunks of fruit, jellies are made purely from juice, giving them a smooth, clear consistency. Elderberry jelly is often deep purple in color, with a robust, slightly earthy flavor and a hint of tartness.
The taste of elderberry jelly is what sets it apart. It doesn’t overwhelm with sweetness like strawberry or grape jelly might. Instead, it balances natural fruitiness with just enough sugar to enhance its complex, wild flavor. If you’ve ever had wild blueberry preserves, elderberry is like its bolder cousin with an herbal twist.
In folk traditions, elderberries have long been used to make syrups and tinctures. Turning them into jelly brings out their flavor in a whole new way, while still offering some of their health benefits. Homemade elderberry jelly captures the essence of late summer and early fall, making it a pantry staple all year long.
List of Ingredients You’ll Need
Before you begin making your elderberry jelly, you’ll need to gather a few key ingredients. Here’s everything you need:
Main Ingredients:
- 4 cups of elderberry juice (from fresh or dried elderberries)
- 6 cups of granulated sugar
- 1 packet of powdered fruit pectin (or 3 tablespoons of homemade pectin)
- 1/4 cup lemon juice (for acidity and preservation)
Optional Add-Ins:
- Cinnamon stick or ground cinnamon – for a spiced version
- Clove or allspice – for fall-inspired jelly
- Apple juice – for added sweetness and flavor complexity
Fresh vs. Dried Elderberries:
- If using fresh elderberries, you’ll need around 3 to 4 pounds to yield enough juice.
- For dried elderberries, use about 2 cups, rehydrated and simmered.
Pro Tips:
- Avoid elderberries that are green or red; only fully ripe, dark purple berries are safe.
- Use organic sugar if possible for a cleaner, natural taste.
- Always use bottled lemon juice for consistent acidity (especially when canning).
With these ingredients ready, you’re well on your way to making your own batch of delicious elderberry jelly.
Kitchen Tools and Supplies
Now that your ingredients are lined up, let’s talk about the tools. Having the right kitchen equipment can make the process smoother—and safer—especially if you’re canning your jelly for long-term storage.
Basic Kitchen Equipment:
- Large stockpot or saucepan (non-reactive)
- Measuring cups and spoons
- Wooden spoon or silicone spatula
- Fine mesh strainer or cheesecloth
- Large mixing bowl
- Ladle and funnel (for pouring into jars)
Canning Equipment:
- 6–8 half-pint mason jars with lids and bands
- Water bath canner or large deep pot with rack
- Jar lifter and magnetic lid lifter
- Clean towels or paper towels
- Thermometer (optional, for temperature checking)
Sterilizing Your Jars:
Proper sterilization is key to safe home canning. Here’s a quick way to do it:
- Wash jars, lids, and bands in hot, soapy water.
- Place jars in a pot of boiling water for at least 10 minutes.
- Keep jars hot until ready to fill (you can keep them in the warm water or a 200°F oven).
Having your jars hot and ready will prevent cracking when you ladle in your boiling hot jelly.
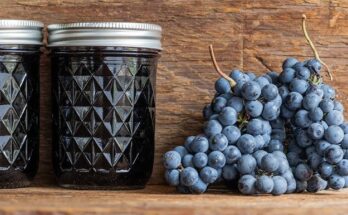
How to Pick the Best Elderberries
Getting the right elderberries is one of the most important steps in making high-quality elderberry jelly. The flavor, color, and even the safety of your jelly depend on the berries you use.
Where to Find Elderberries:
Elderberries grow on the Sambucus plant, which is native to many regions of North America and Europe. They typically ripen in mid-to-late summer, depending on your location. You can:
- Forage locally: Look for elderberry bushes near forest edges, ditches, or hedgerows.
- Buy fresh elderberries at farmers’ markets or specialty produce stores.
- Purchase dried elderberries from health food stores or reputable online retailers.
How to Identify the Right Ones:
- Ripe elderberries are deep purple or black, with no red or green ones mixed in.
- They grow in large umbrella-shaped clusters on shrubs that reach 6–12 feet tall.
- Berries should be soft and juicy, not shriveled or hard.
Harvesting Tips:
- Use scissors or garden shears to cut the clusters cleanly.
- Avoid getting any stems or leaves in your basket—they’re not edible.
- Don’t pick elderberries near busy roads or sprayed areas; they can absorb toxins.
Fresh elderberries spoil quickly, so if you’re not using them right away, refrigerate or freeze them. Frozen elderberries can be used directly in the jelly-making process, just like fresh ones.
Preparing Elderberries
Elderberries need special care before cooking because raw berries—and especially their stems and leaves—contain compounds that can be toxic in large amounts. But don’t worry! With the right prep, they’re perfectly safe and delicious.
Cleaning the Berries:
- Rinse clusters under cool water to remove dust, bugs, or debris.
- Remove berries from the stems. This can be tedious, but it’s necessary.
- Use a fork to gently rake berries off the stems.
- Alternatively, freeze the clusters first. Once frozen, berries can be shaken or rubbed off more easily.
Important Warning:
Never eat elderberries raw. They contain cyanogenic glycosides, which can cause nausea or worse when consumed in quantity. Cooking them neutralizes these compounds, making them safe and healthy.
Pro Tip:
After removing the berries, give them one last rinse. Pick out any lingering stems, leaves, or unripe berries. A clean batch of elderberries will produce a smooth, tasty jelly with no bitter aftertaste.
Making Elderberry Juice
To make elderberry jelly, you need elderberry juice—not whole berries. The juice is the base of your jelly, and extracting it properly is essential for flavor, clarity, and safety.
How to Cook Elderberries for Juice:
- Place cleaned elderberries in a large non-reactive pot (avoid aluminum).
- Add just enough water to barely cover the berries—about 1 cup per 4 cups of berries.
- Bring to a boil, then simmer for 20-30 minutes, mashing the berries occasionally with a potato masher.
- Let the mixture cool slightly before straining.
Straining the Juice:
Use a fine mesh strainer, cheesecloth, or jelly bag to separate the juice from the pulp:
- Line a colander with cheesecloth and place it over a large bowl.
- Pour the berry mixture into the strainer.
- Let gravity do the work—or gently squeeze to speed things up.
Don’t press too hard, or your juice might become cloudy. If you want crystal-clear jelly, let the juice drip slowly overnight in the fridge.
After this step, you should have about 4 cups of beautiful dark elderberry juice ready for jelly-making!
Step-by-Step Elderberry Jelly Recipe
Now, the fun part! Follow these exact steps for perfect elderberry jelly every time.
Step 1: Measure Ingredients Accurately
Measure your ingredients before starting. You’ll need strained elderberry juice, sugar, and powdered or liquid pectin. Accurate measurements are essential—too much or too little sugar or pectin can prevent the jelly from setting properly.
Step 2: Cook the Elderberry Juice
Pour the elderberry juice into a large, heavy-bottomed pot. Heat over medium heat until it begins to simmer. Stir occasionally to prevent scorching. This step warms the juice evenly and prepares it for the setting process.
Step 3: Add Sugar and Pectin
Stir the pectin into the hot juice first, whisking well to avoid lumps. Bring the mixture to a full rolling boil. Once boiling, add the sugar all at once, stirring continuously until fully dissolved. Sugar is necessary not just for sweetness but also for structure and preservation.
Step 4: Boil to Set Point
Return the mixture to a strong rolling boil that cannot be stirred down. Boil for 1–2 minutes (or according to your pectin instructions). Maintain steady heat and constant stirring to ensure even cooking and proper gel formation.
Step 5: Test for Doneness
Remove from heat and test the jelly. Use the spoon test—jelly should sheet off the spoon instead of dripping. Alternatively, place a small amount on a chilled plate; it should wrinkle slightly when pushed. Once set, the jelly is ready for jarring.
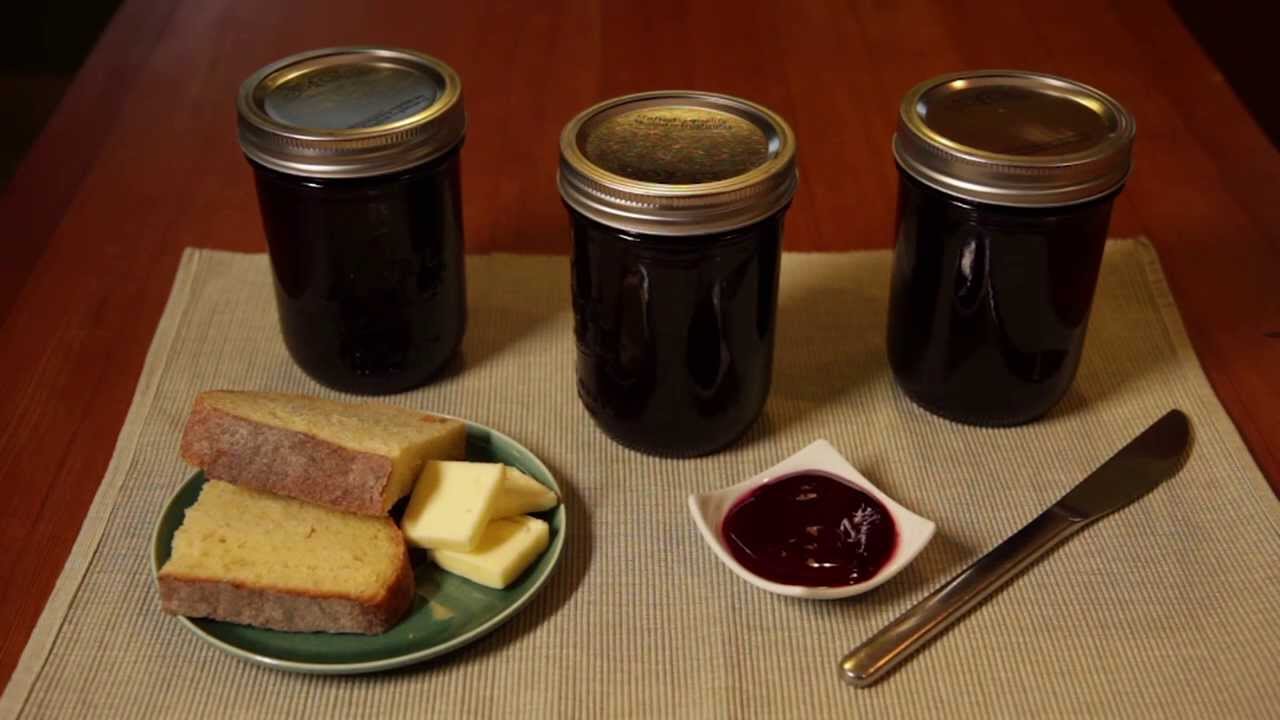
Pour hot jelly into sterilized jars, seal, and cool.
How to Can Elderberry Jelly
Once your jelly has reached the perfect set point, it’s time to can it! Canning not only preserves your jelly for long-term storage but also prevents spoilage. This is where things get serious—but also super satisfying. Imagine opening a jar of your homemade elderberry jelly in the middle of winter… that’s pure joy in a jar.
Step-by-Step Canning Process:
Prepare your jars:
Make sure your sterilized jars are still hot when you fill them. Cold jars plus hot jelly can equal cracked glass!
Fill the jars:
- Using a funnel, ladle the hot jelly into the jars.
- Leave 1/4-inch headspace at the top to allow for expansion during processing.
Remove air bubbles:
- Gently tap the jar or use a plastic spatula to remove air pockets.
- Wipe the rim clean with a damp cloth to ensure a tight seal.
Add lids and bands:
- Place the flat lids on each jar.
- Screw on the bands until they are fingertip-tight (not too tight—you want air to escape during canning).
Process in a water bath:
- Place the jars in a boiling water bath canner. Water should cover jars by at least 1 inch.
- Process for 10 minutes (adjusting for altitude if necessary).
Cool and check seals:
- Remove jars and place them on a towel.
- Let sit undisturbed for 12–24 hours.
- Check the seals by pressing the center of the lids. If they don’t pop up, they’re sealed.
Any jar that didn’t seal properly should be refrigerated and used within a few weeks.
Cooling and Storing Your Jelly
After canning, it’s crucial to let the jars cool and seal properly. Don’t rush this part! How you store your jelly can make or break all your hard work.
Proper Cooling:
- Let jars sit on the counter, away from drafts or direct sunlight.
- Don’t disturb the jars for 12–24 hours. This gives them time to seal and cool gradually.
- Once cooled, label each jar with the date and contents.
Storage Tips:
- Store jars in a cool, dark place like a pantry or cupboard.
- Avoid places that are damp or overly warm (above 75°F), which can spoil the jelly faster.
- Once opened, store the jar in the refrigerator and use it within 3–4 weeks.
Shelf Life:
Properly sealed and stored elderberry jelly can last up to 1 year. Always inspect before use—if you notice mold, a strange smell, or cloudy appearance, discard the jar.
Common Mistakes and Fixes
Even experienced jelly makers can run into issues. Here’s how to troubleshoot the most common elderberry jelly problems:
1. My Jelly Didn’t Set!
This is probably the #1 issue.
Causes:
- Not enough pectin
- Not boiling the mixture long enough
- Incorrect sugar ratio
Fix:
- Reboil the jelly with more pectin (1 tbsp per cup of jelly).
- Add 1–2 tbsp of lemon juice to help the jelly set.
2. My Jelly is Cloudy.
Causes:
- Squeezing the jelly bag too hard
- Using overripe berries
- Stirring too much after adding sugar
Fix:
- It’s safe to eat—just not as pretty. Next time, let the juice drip slowly without squeezing.
3. My Jars Didn’t Seal.
Causes:
- Lids were too tight or too loose
- Rims were dirty
- Insufficient processing time
Fix:
- Reprocess the jars within 24 hours, or refrigerate and use within a few weeks.
Flavor Variations
Want to put your own twist on the classic elderberry jelly? These flavor variations are delicious and super easy to make:
Elderberry-Apple Jelly
- Replace 1 cup of elderberry juice with unsweetened apple juice.
- Adds natural sweetness and mellows the tartness.
Spiced Elderberry Jelly
- Add a cinnamon stick, 2 cloves, or a dash of allspice while simmering the juice.
- Remove spices before adding pectin and sugar.
Elderberry-Vanilla Jelly
- Stir in 1 tsp of vanilla extract after the jelly is removed from heat.
- Adds a warm, creamy note to the rich berry flavor.
These variations make great gifts and are perfect for pairing with cheese, pastries, and roasted meats.
Serving Suggestions
Now that you’ve got jars of fresh elderberry jelly, it’s time to enjoy it! Here are some ideas beyond the standard toast:
Breakfast Favorites:
- Spread on hot buttermilk biscuits or croissants
- Swirl into Greek yogurt or oatmeal
- Drizzle over pancakes or waffles
Savory Pairings:
- Use as a glaze for pork chops or turkey
- Mix with balsamic vinegar for a rich salad dressing
- Serve alongside a cheese board with brie or goat cheese
Dessert Upgrades:
- Fill thumbprint cookies with elderberry jelly
- Layer into a trifle or parfait
- Use as a cake filling or to top cheesecake
Elderberry jelly is surprisingly versatile—so don’t be afraid to get creative!
Health Benefits of Elderberries
Elderberries are more than just tasty—they pack a powerful nutritional punch. Here’s why they’ve been a staple in herbal remedies for centuries:
Key Nutrients:
- Vitamin C – Boosts immune function
- Antioxidants – Help protect cells from damage
- Flavonoids – Reduce inflammation and support heart health
Potential Health Benefits:
- Immune Support: Elderberry syrup is often taken to prevent colds and flu.
- Anti-Inflammatory: Reduces swelling and supports recovery.
- Antiviral Properties: May help fight upper respiratory infections.
Note: While elderberries are beneficial, always cook them before consuming. Raw berries and parts of the plant can be toxic.
FAQs about Elderberry Jelly Recipe
1. Can I make elderberry jelly without pectin?
Yes! You can use high-pectin fruits like apples as a base or simmer the juice longer to reduce and thicken naturally, but the texture may differ.
2. Can I freeze elderberry jelly instead of canning?
Absolutely. Pour into freezer-safe containers, leaving room for expansion. Use within 6 months for best flavor.
3. How long does homemade elderberry jelly last?
If canned properly, up to 1 year in a cool, dark place. Once opened, refrigerate and use within 3–4 weeks.
4. Is elderberry jelly safe for kids?
Yes, once cooked and processed, elderberries are safe. Avoid giving raw elderberries to children.
5. Can I use dried elderberries for jelly?
Yes! Rehydrate them by simmering in water, then strain to create juice. Use the same volume of juice in the recipe.
Conclusion
Making your own elderberry jelly isn’t just a cooking project—it’s an experience. From foraging or sourcing the berries to stirring the bubbling pot on the stove, the entire process connects you to traditional, wholesome kitchen practices.
This jelly isn’t just delicious—it’s also a healthy and meaningful way to preserve the flavor of elderberries throughout the year. Whether you’re spreading it on morning toast, giving it as a gift, or using it in your favorite recipes, elderberry jelly is a pantry staple you’ll want to make again and again.
So next time elderberries are in season, grab a basket, pull out your canner, and make something truly special. Your taste buds—and your immune system—will thank you.