Easy Enchilada Recipe: Looking to whip up a delicious, comforting meal that’s easy, quick, and sure to please everyone at the table? You’re in the right place.
This easy enchilada recipe is a game-changer. Whether you’re new to cooking or a seasoned pro, this step-by-step guide will walk you through making enchiladas that are loaded with flavor, cheesy goodness, and just the right amount of spice.
Let’s get cooking!
What Are Enchiladas?
Enchiladas are a traditional Mexican dish made by rolling corn tortillas around a filling and covering them in a savory sauce. They’re typically baked until bubbly and topped with melted cheese. The best part? You can customize them however you like—think chicken, beef, beans, cheese, or even vegetables.
Why You’ll Love This Easy Enchilada Recipe
- Quick and simple – Perfect for weeknights.
- Totally customizable – Use whatever fillings you like.
- Family favorite – Kids and adults alike dig in without complaints.
- Freezer-friendly – Make a big batch and save some for later.
Ingredients You’ll Need
Here’s what you’ll need to make about 8 enchiladas:
- 8 corn or flour tortillas
- 2 cups cooked, shredded chicken (or ground beef, beans, or your choice)
- 2 cups shredded cheese (cheddar, Monterey Jack, or Mexican blend)
- 1 small onion, chopped
- 1 tablespoon olive oil
- 1 teaspoon garlic powder
- 1 teaspoon cumin
- 1 teaspoon chili powder
- 2 cups enchilada sauce (store-bought or homemade)
- Fresh cilantro, sour cream, sliced avocado for topping (optional)
Step-by-Step Guide to Making Enchiladas
Let’s walk through this recipe one delicious step at a time.
Step 1: Prepare the Filling
In a large skillet, heat olive oil over medium heat. Add chopped onions and sauté for about 2–3 minutes until soft and fragrant. Stir in your protein—shredded chicken or ground beef work great—and sprinkle in the garlic powder, cumin, and chili powder. Mix everything well and cook for another 3–4 minutes.
If you’re going vegetarian, toss in black beans, corn, and diced peppers for a hearty meat-free filling. Once it’s done, remove from heat and set aside.
Step 2: Warm the Tortillas
Cold tortillas crack when you try to roll them. Wrap the tortillas in a damp paper towel and microwave them for about 30 seconds to make them soft and pliable. Alternatively, you can warm them in a skillet over low heat for about 15 seconds per side.
Step 3: Assemble the Enchiladas
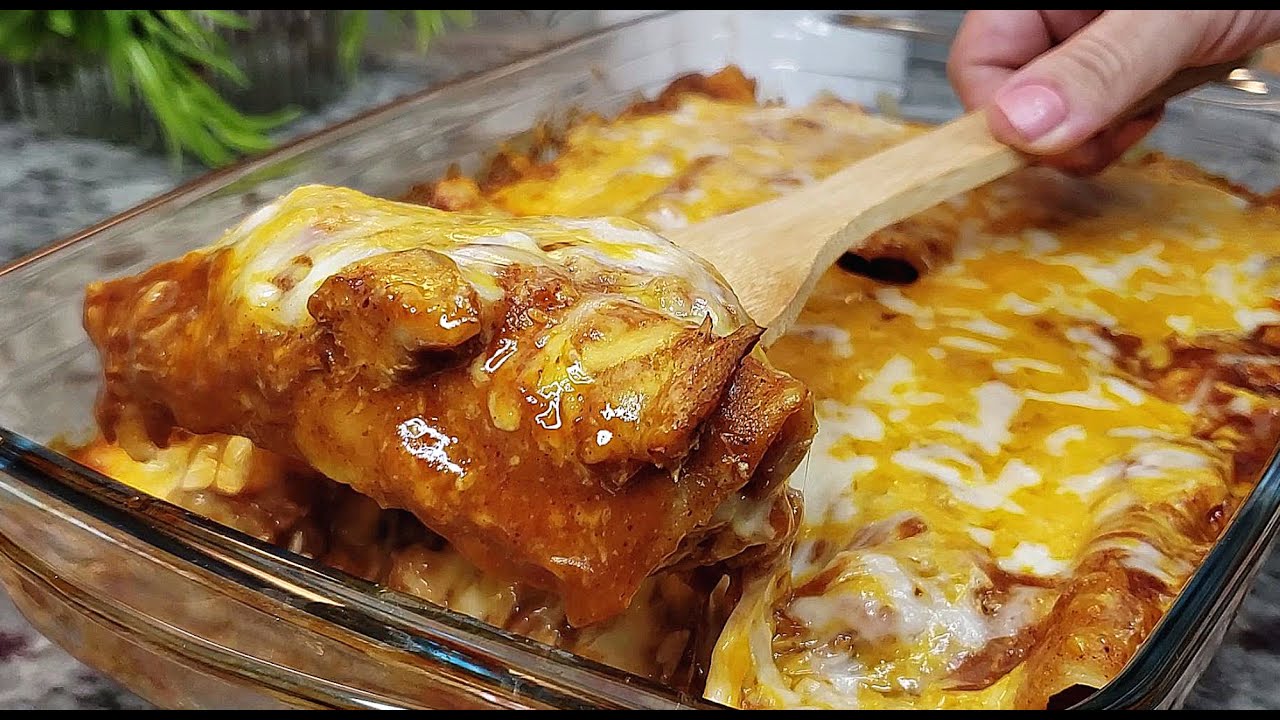
Now for the fun part! Spoon about 2–3 tablespoons of the filling into the center of each tortilla. Sprinkle some shredded cheese over the filling, then roll the tortilla tightly and place it seam-side down in a greased 9×13 inch baking dish.
Repeat until all your enchiladas are snuggled in the dish.
Step 4: Add the Sauce and Cheese
Pour your enchilada sauce evenly over the rolled tortillas. Don’t be shy—you want them nice and saucy. Once they’re well coated, sprinkle the remaining cheese generously over the top.
This is where the magic starts to happen.
Step 5: Bake to Perfection
Preheat your oven to 375°F (190°C). Cover the baking dish with foil and bake for 20 minutes. Then, remove the foil and bake for another 10 minutes until the cheese is melted and bubbling.
Once out of the oven, let your enchiladas rest for about 5 minutes before serving. This helps everything set up nicely.
Tips for the Best Enchiladas Ever
- Use fresh tortillas: Old tortillas tend to crack or fall apart.
- Don’t overfill: It’s tempting, but too much filling makes them hard to roll.
- Cheese it up: More cheese = more deliciousness.
- Add spice if you like: Toss in jalapeños or hot sauce for extra heat.
Serving Suggestions
Pair your enchiladas with:
- Mexican rice
- Refried or black beans
- A simple green salad
- Fresh guacamole and chips
And don’t forget the margaritas!
Make-Ahead and Storage Tips
To Make Ahead: Assemble the enchiladas, cover tightly with foil, and store in the fridge for up to 24 hours before baking.
To Freeze: Wrap tightly and freeze for up to 3 months. When ready to eat, thaw overnight in the fridge and bake as usual.
Leftovers: Store in an airtight container in the fridge for up to 4 days. Reheat in the oven or microwave.
FAQs about Easy Enchilada Recipe
Q1. What type of tortillas should I use for enchiladas?
You can use either corn or flour tortillas. Corn tortillas give a more authentic flavor, while flour tortillas are softer and easier to roll.
Q2. Can I make enchiladas ahead of time?
Yes! You can assemble the enchiladas a day ahead, refrigerate them, and then bake when ready to serve.
Q3. How do I prevent soggy enchiladas?
Lightly frying the tortillas before filling helps create a barrier against the sauce, keeping them from getting too soggy.
Q4. Can I freeze enchiladas?
Absolutely. Assemble them in a freezer-safe dish, cover tightly, and freeze. Bake directly from frozen, adding extra cooking time.
Q5. What fillings work best for enchiladas?
Popular fillings include shredded chicken, ground beef, beans, cheese, or even veggies. Feel free to mix and match.
Q6. What sauce should I use?
Red enchilada sauce is traditional, but green sauce or even homemade tomato-based sauces also work great.
Q7. How long do I bake enchiladas?
Typically, bake at 350°F (175°C) for 20–25 minutes, or until bubbly and heated through.
Q8. Can I make this recipe vegetarian?
Yes, just use beans, cheese, and veggies as your main filling—delicious and hearty!
Q9. What toppings go well with enchiladas?
Try sour cream, chopped cilantro, diced onions, sliced jalapeños, or avocado for added flavor and texture.
Q10. How do I store leftovers?
Keep leftovers in an airtight container in the fridge for up to 3 days. Reheat in the oven or microwave before serving.
Conclusion
That’s it—your go-to easy enchilada recipe! It’s super simple, totally adaptable, and downright delicious. Whether you’re feeding a crowd or just meal-prepping for the week, this dish is always a win. Once you make it, you’ll want to keep it in your regular dinner rotation. Now, go ahead and dig in!