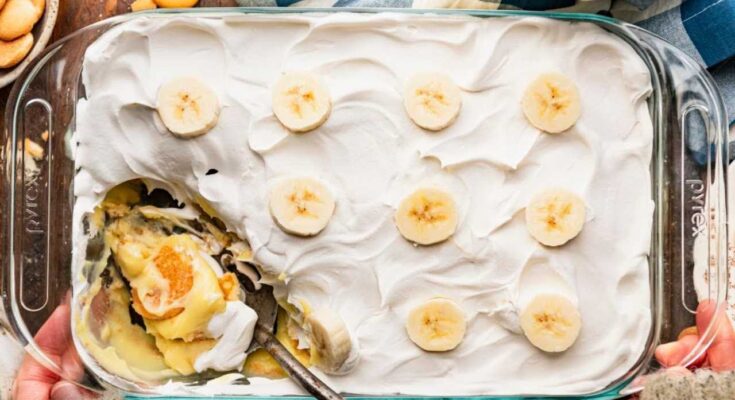
Easy Banana Pudding Recipe: Banana pudding is a timeless dessert that brings comfort and joy to any table. It’s creamy, sweet, and filled with layers of vanilla wafers, bananas, and pudding, making it a favorite for gatherings, holidays, and casual family dinners.
Why is this recipe so popular? For starters, it’s incredibly simple to make, and you don’t need to be a master chef to get it right. Whether you’re preparing it for a party or just treating yourself to something sweet, this banana pudding recipe guarantees satisfaction.
In this step-by-step guide, we’ll walk you through the process of making this delicious dessert from scratch, with tips to customize it to your taste. Ready? Let’s dive in!
Ingredients Needed for Banana Pudding
Essential Ingredients:
- Vanilla Pudding Mix (Instant or Homemade): The heart of the pudding.
- Milk: For mixing the pudding, preferably whole milk for creaminess.
- Sweetened Condensed Milk: Adds extra richness and sweetness.
- Vanilla Wafers (Nilla Wafers): Creates the crunchy layers.
- Fresh Bananas (3-4): The star ingredient—ripe but firm bananas work best.
- Whipped Topping (Cool Whip or Homemade Whipped Cream): To add a fluffy and smooth finish.
Optional Add-ons:
- Cream Cheese: For a richer texture.
- Caramel Drizzle: Adds a sweet twist.
- Chocolate Chips or Shavings: For added flavor and texture.
- Chopped Nuts: Provides crunch for a delightful contrast.
Kitchen Tools Required
Basic Tools:
- Mixing Bowls: For preparing the pudding mixture.
- Whisk: Essential for smooth pudding consistency.
- Spatula: Helps in spreading layers evenly.
- Glass Trifle Dish or Baking Dish: Ideal for layering and presentation.
Helpful Extras:
- Electric Mixer: Speeds up mixing if using homemade whipped cream.
- Plastic Wrap: Keeps the pudding fresh while chilling.
- Spoons or Ladles: For scooping and serving.
How to Make Banana Pudding – Step by Step Guide
Step 1: Preparing the Vanilla Pudding Mixture
The pudding mixture is the foundation of this recipe, and getting it right sets the tone for the entire dessert.
Instant vs Homemade Pudding Options:
- Instant Pudding: Quick and hassle-free, perfect for beginners. Simply combine the mix with cold milk and whisk until smooth. It thickens in just minutes.
- Homemade Pudding: Ideal if you prefer making it from scratch. It involves combining sugar, cornstarch, and egg yolks with milk, cooking until thick, and adding vanilla extract for flavor.
Mixing Instructions:
- Combine the instant pudding mix with 2 cups of cold milk in a large mixing bowl.
- Whisk vigorously for about 2-3 minutes until the pudding thickens.
- Add a can of sweetened condensed milk for extra richness, then fold in 1 cup of whipped topping for a light texture.
- Chill the pudding mixture for 10–15 minutes to firm it up.
Step 2: Layering the Banana Pudding
Now comes the fun part—layering the pudding! This step is where flavors and textures come together beautifully.
Building the Base Layer:
- Start by spreading a thin layer of vanilla pudding at the bottom of your trifle dish. This prevents the wafers from sticking.
- Place a single layer of vanilla wafers on top of the pudding.
Arranging Bananas and Cookies:
- Slice bananas into even rounds, about ¼ inch thick.
- Add a layer of banana slices over the wafers.
- Pour a layer of pudding over the bananas, ensuring even coverage.
- Repeat the layers—wafers, bananas, and pudding—until the dish is full or you run out of ingredients.
Step 3: Adding Cream and Toppings
To make your banana pudding look and taste irresistible, finish it off with a creamy topping.
Whipped Cream Layer:
- Spread a generous layer of whipped cream or Cool Whip over the top layer of pudding.
- Smooth it out with a spatula for a clean finish.
Optional Garnishes:
- Crushed vanilla wafers sprinkled on top for texture.
- Sliced bananas for visual appeal—just dip them in lemon juice to prevent browning.
- Caramel drizzle or chocolate shavings for added decadence.
Step 4: Chilling the Pudding
Chilling allows the flavors to meld together and gives the pudding time to set properly.
How Long Should You Chill It?
- Cover the dish with plastic wrap and refrigerate for at least 4 hours.
- For the best results, let it chill overnight.
Tips for the Perfect Consistency:
- Make sure the pudding is fully set before serving to avoid a runny texture.
- Store it in the coldest part of your fridge for faster setting.
Step 5: Serving the Banana Pudding
Presentation is key, especially for such a visually appealing dessert.
Presentation Ideas:
- Serve in individual dessert cups for parties.
- Add a mint leaf garnish for an elegant touch.
- Layer in mason jars for a fun, portable option.
Portion Sizes:
- Serve in small cups or bowls to control portions, as banana pudding is rich and filling.
Variations of Banana Pudding
Banana pudding is incredibly versatile, making it easy to adapt for different dietary needs or flavor preferences. Here are some creative variations:
1. Classic vs. Modern Twists:
- Classic Style: Stick to the traditional recipe using vanilla wafers, bananas, and pudding. It’s timeless and always a crowd-pleaser.
- Modern Take: Add layers of crushed Oreos, chocolate chips, or caramel sauce to elevate the flavor profile.
2. Vegan and Dairy-Free Options:
- Replace dairy milk with almond, oat, or coconut milk.
- Use vegan vanilla pudding mix and dairy-free whipped topping like CocoWhip.
- Swap out traditional wafers for vegan-friendly cookies.
3. Gluten-Free Version:
- Use gluten-free vanilla wafers or biscuits to make it safe for gluten-intolerant guests.
- Double-check all pudding mixes for hidden gluten ingredients.
4. Low-Sugar and Keto-Friendly Options:
- Substitute sugar-free pudding and sugar-free cookies.
- Sweeten with stevia or monk fruit for fewer carbs.
Tips for the Best Banana Pudding
Perfect banana pudding isn’t just about following the recipe—it’s also about applying a few expert tips to make it extra delicious:
1. Choosing the Right Bananas:
- Pick ripe but firm bananas—they should be yellow with no green spots and minimal browning. Overripe bananas can turn mushy, while underripe bananas might lack sweetness.
2. How to Keep Bananas from Browning:
- Toss sliced bananas in lemon juice or pineapple juice before layering them to prevent oxidation and browning.
- Alternatively, place a thin layer of pudding over bananas to keep air out.
3. Don’t Overmix the Pudding:
- Over-whisking can lead to a thin consistency instead of a creamy texture. Stir until combined, but don’t go overboard.
4. Use Fresh Whipped Cream:
- While Cool Whip works, fresh whipped cream made with heavy cream and sugar adds a richer flavor and fluffier texture.
5. Layer Strategically:
- Make sure every layer is evenly distributed to balance flavors and textures.
Make-Ahead Instructions
Banana pudding tastes even better after resting, making it a great dessert to prepare in advance.
Storage Tips:
- Refrigeration: Store banana pudding in an airtight container or cover tightly with plastic wrap for up to 3 days.
- Avoid Freezing: Freezing is not recommended, as bananas can turn mushy, and pudding can separate.
How to Revive Leftovers:
- If the pudding looks watery, gently stir and add a fresh layer of whipped cream before serving.
Nutritional Information
Banana pudding is a treat, but knowing its nutritional breakdown can help you enjoy it responsibly.
| Nutrient | Amount (Per Serving) |
|---|---|
| Calories | 300–350 kcal |
| Protein | 5–7 g |
| Carbohydrates | 45–50 g |
| Fat | 10–15 g |
| Sugar | 25–30 g |
| Fiber | 2–3 g |
Healthier Alternatives:
- Lower Calories: Replace sweetened condensed milk with low-fat Greek yogurt.
- Boost Protein: Add a scoop of protein powder to the pudding mixture.
- Reduce Sugar: Use a sugar-free pudding mix and unsweetened whipped cream.
Common Mistakes to Avoid
Even a simple recipe like banana pudding can go wrong without proper care. Avoid these pitfalls:
1. Using Overripe Bananas:
- Overripe bananas may turn mushy and release too much liquid, making the pudding watery.
2. Not Allowing Enough Chill Time:
- Rushing the chilling process prevents layers from setting properly, affecting texture.
3. Skipping Lemon Juice on Bananas:
- Oxidation causes bananas to brown quickly, which can make the pudding look unappetizing.
4. Using the Wrong Cookies:
- Stick to sturdy cookies like vanilla wafers or shortbread to avoid soggy layers.
5. Over-Whipping Cream:
- Overbeaten whipped cream can separate and lose its fluffy texture. Whip until soft peaks form.
FAQs about Easy Banana Pudding Recipe
1. What ingredients are needed for an easy banana pudding recipe?
To make a simple banana pudding, you’ll need vanilla instant pudding mix, whole milk, vanilla wafers, ripe bananas, and whipped topping. Optional additions include vanilla extract for enhanced flavor and a sprinkle of cinnamon or nutmeg on top for a spiced touch.
2. How long does it take to prepare banana pudding?
Preparation time is minimal, around 15-20 minutes. However, for best results, allow the pudding to chill in the refrigerator for at least 4 hours before serving to let the flavors meld and the wafers soften.
3. Can banana pudding be made in advance?
Yes, banana pudding is perfect for making ahead. It can be prepared and stored in the refrigerator up to 24 hours in advance. This not only saves time but also enhances the dessert’s flavor and texture.
4. How can I prevent the bananas from browning?
To keep bananas from browning, you can toss them lightly in lemon juice or pineapple juice before adding them to the pudding. These juices contain antioxidants that help prevent oxidation, which causes browning.
5. Are there any variations to traditional banana pudding?
Certainly! For a healthier twist, substitute low-fat milk and a light whipped topping. For a richer flavor, layer the pudding with cream cheese or condensed milk mixed into the pudding blend. You can also experiment with different cookie types, like gingersnaps or chocolate wafers, for a unique twist.
6. How should banana pudding be stored?
Banana pudding should be stored in an airtight container in the refrigerator. It generally keeps well for up to 3 days. Be sure to cover it properly to maintain its freshness and prevent it from absorbing other flavors from the fridge.
Conclusion
Banana pudding is one of those desserts that never goes out of style. Whether you’re hosting a dinner party, attending a potluck, or just craving something sweet, this easy banana pudding recipe will always hit the spot.
With its rich layers of pudding, bananas, and cookies topped with fluffy whipped cream, it’s no wonder this dish is loved by so many. Plus, it’s simple enough for beginners but versatile enough for creative twists.
So go ahead—grab your ingredients and make this heavenly dessert today. Don’t be afraid to experiment with flavors and add your personal touch. After all, cooking should always be fun and delicious!


