Easter Bread Recipe: Easter is more than just colored eggs and chocolate bunnies—it’s also about delicious family traditions. One of the most beloved recipes across cultures is Easter bread, a soft, slightly sweet bread often decorated with symbolic touches like dyed eggs, citrus zest, or sprinkles. This bread doesn’t just fill your home with a heavenly aroma; it also creates lasting memories around the table.
In this guide, you’ll learn how to make Easter bread from scratch with detailed instructions, a complete ingredients list, preparation tips, and foolproof steps to bake the perfect loaf. Whether you’re baking for the first time or continuing a family tradition, this recipe will become a cherished part of your Easter celebration.
What is Easter Bread?
Easter bread is a festive yeast-based bread traditionally enjoyed around Easter time in many countries. It’s usually enriched with eggs, butter, and sugar, making it richer and sweeter than everyday bread. Depending on the region, it may include flavors like citrus zest, anise seeds, or even a braided design topped with colorful sprinkles. Some versions also feature brightly dyed eggs baked right into the bread as a symbol of new life and resurrection.
What makes Easter bread so special is its versatility—it can be enjoyed plain, with butter, or alongside tea and coffee. For many families, baking this bread is a yearly ritual that brings everyone together in the kitchen.
The History and Tradition Behind Easter Bread
The roots of Easter bread stretch back centuries, with each culture adding its own twist. In Italy, Pane di Pasqua is often braided and adorned with eggs, symbolizing rebirth. In Greece, Tsoureki is flavored with mahleb and mastica, giving it a distinct aroma. Eastern European countries prepare Paska, a rich, round loaf sometimes decorated with religious symbols on top.
These traditions aren’t just about food—they’re about faith, family, and celebration. Sharing Easter bread at the holiday table signifies unity, abundance, and joy. No matter which variation you make, each slice carries a piece of cultural heritage.
Why You’ll Love This Recipe
There are many reasons to fall in love with Easter bread:
- It’s fluffy, soft, and slightly sweet, making it the perfect balance between bread and dessert.
- The recipe is adaptable—you can keep it classic or add your own flavor twists.
- Baking it fills your home with a warm, comforting aroma that instantly feels festive.
- It’s a showstopper centerpiece for your Easter table.
If you’ve been looking for a way to elevate your holiday menu, this Easter bread recipe is just the thing.
Ingredients You’ll Need
Basic Ingredients for Easter Bread
Here’s a list of essential ingredients you’ll need for the recipe:
- All-purpose flour (5 cups) – The base of the dough, providing structure.
- Active dry yeast (2 ¼ teaspoons) – Helps the bread rise and become fluffy.
- Granulated sugar (½ cup) – Adds sweetness and helps feed the yeast.
- Warm milk (1 cup, about 110°F) – Activates the yeast and keeps the dough soft.
- Butter (½ cup, softened) – Enriches the dough with flavor and tenderness.
- Eggs (3 large) – Contribute richness, structure, and a golden color.
- Salt (1 teaspoon) – Enhances flavor and balances sweetness.
- Vanilla extract (1 teaspoon) – Adds a warm, sweet aroma.
Optional Ingredients for Extra Flavor
If you want to give your Easter bread a unique twist, try adding:
- Lemon or orange zest – For a bright, citrusy note.
- Anise seeds – Traditional in Italian Easter bread.
- Raisins or dried cranberries – For chewy sweetness.
- Colored sprinkles – To decorate the top after baking.
- Dyed eggs – To nestle in the bread braid before baking.
Tools and Equipment Required
Having the right tools makes the process much smoother. You’ll need:
- Mixing bowls (large and medium)
- Measuring cups and spoons
- Whisk and wooden spoon
- Dough scraper or spatula
- Stand mixer with dough hook (optional, but helpful)
- Baking sheet or round cake pan
- Parchment paper
- Pastry brush (for egg wash)
Preparing for the Recipe
How to Choose the Best Ingredients
The key to a successful Easter bread lies in the quality of your ingredients. Choose fresh, high-quality yeast to ensure your dough rises properly—expired yeast will leave your bread dense and heavy. When selecting flour, go for unbleached all-purpose for the best texture. For butter, unsalted works best, allowing you to control the saltiness of the bread.
Eggs should be fresh and preferably at room temperature, as cold eggs can slow down yeast activity. If you’re adding citrus zest, opt for organic fruit since you’ll be using the outer peel.
Tips for Measuring Ingredients Accurately
Baking is a science, and accuracy matters. Use the scoop and level method for flour—scoop flour into your measuring cup and level it with a knife. Never pack it down, or you’ll end up with too much flour and a dry loaf. For liquids, use a clear measuring cup and check at eye level. When measuring butter, stick to the marked lines on the wrapper or use a kitchen scale for precision.
Prepping Your Workspace Before Baking
Before you begin mixing, set up a clean, organized workspace. Line your baking tray with parchment paper, pre-measure ingredients, and keep your tools nearby. This not only saves time but also ensures you don’t forget any steps. You’ll also want to lightly flour your countertop or use a silicone baking mat for kneading the dough later.
Taking these steps in advance sets you up for a stress-free baking experience.
Step-by-Step Guide to Making Easter Bread
Step 1 – Activating the Yeast
The first and most important step is activating the yeast. Warm your milk to about 110°F (43°C)—warm to the touch but not hot. If it’s too hot, it can kill the yeast; too cold, and the yeast won’t activate. In a small bowl, combine the yeast, a teaspoon of sugar, and the warm milk. Stir gently and let it sit for 5–10 minutes until foamy.
If the mixture doesn’t foam, your yeast may be expired, and you’ll need to start over. Skipping this step could result in bread that doesn’t rise properly.
At this stage, your kitchen should start filling with that subtle, comforting smell of yeast—a sure sign you’re on the right track.
Step 2 – Mixing the Dough
Once your yeast is activated and foamy, it’s time to mix the dough. In a large mixing bowl, whisk together the sugar, eggs, softened butter, vanilla extract, and a pinch of salt until everything is well blended. Then, add the yeast mixture and stir until combined.
Now, begin adding flour one cup at a time. Start with 3 cups and mix with a wooden spoon or stand mixer on low speed. As the dough thickens, gradually add the remaining flour. You should end up with a soft, slightly sticky dough that pulls away from the sides of the bowl but isn’t overly dry.
Mixing is crucial because it evenly distributes ingredients and prepares the dough for kneading. If using a stand mixer with a dough hook, mix for about 5 minutes on medium speed. If mixing by hand, it may take a bit longer—be patient and keep stirring until the dough comes together.
This step is where the magic begins—the aroma of sweetened dough and vanilla already hints at the delicious bread that’s on its way.
Step 3 – Kneading the Dough
Kneading is the heart of bread-making. It develops gluten, which gives bread its structure and chewiness. Lightly flour your work surface and place the dough on it. Using the heels of your hands, push the dough forward, fold it back, and turn it slightly—repeat this motion rhythmically for about 8–10 minutes.
The dough should become smooth, elastic, and slightly tacky to the touch (but not sticky). If it’s too sticky, sprinkle a little more flour as you knead, but avoid adding too much or you’ll end up with dense bread.
If you prefer to use a stand mixer, knead with the dough hook for about 6–7 minutes on medium speed.
To check if your dough is ready, try the “windowpane test”: Stretch a small piece of dough between your fingers. If it stretches thin without tearing and you can see light through it, your dough is perfectly kneaded.
This step requires a bit of muscle, but it’s also therapeutic—you’ll find yourself relaxing into the steady rhythm of kneading while imagining that golden loaf baking in the oven.
Step 4 – First Rise of the Dough
After kneading, place the dough into a lightly greased bowl and cover it with a clean kitchen towel or plastic wrap. Leave it in a warm, draft-free spot to rise until it doubles in size—this usually takes 1 to 1.5 hours.
The rising process, also known as fermentation, is when yeast feeds on the sugars in the dough, releasing carbon dioxide and causing the dough to expand. During this time, the bread develops flavor and texture.
A pro tip: If your kitchen is cold, preheat your oven to the lowest setting for 2–3 minutes, then turn it off. Place your covered dough inside the oven with the light on—this creates the perfect warm environment for rising.
When the dough has doubled, gently press your finger into it. If the indentation remains, the dough has risen enough. If it springs back, let it rest a little longer.
This stage is all about patience—but trust me, the reward is worth the wait.
Step 5 – Shaping the Easter Bread
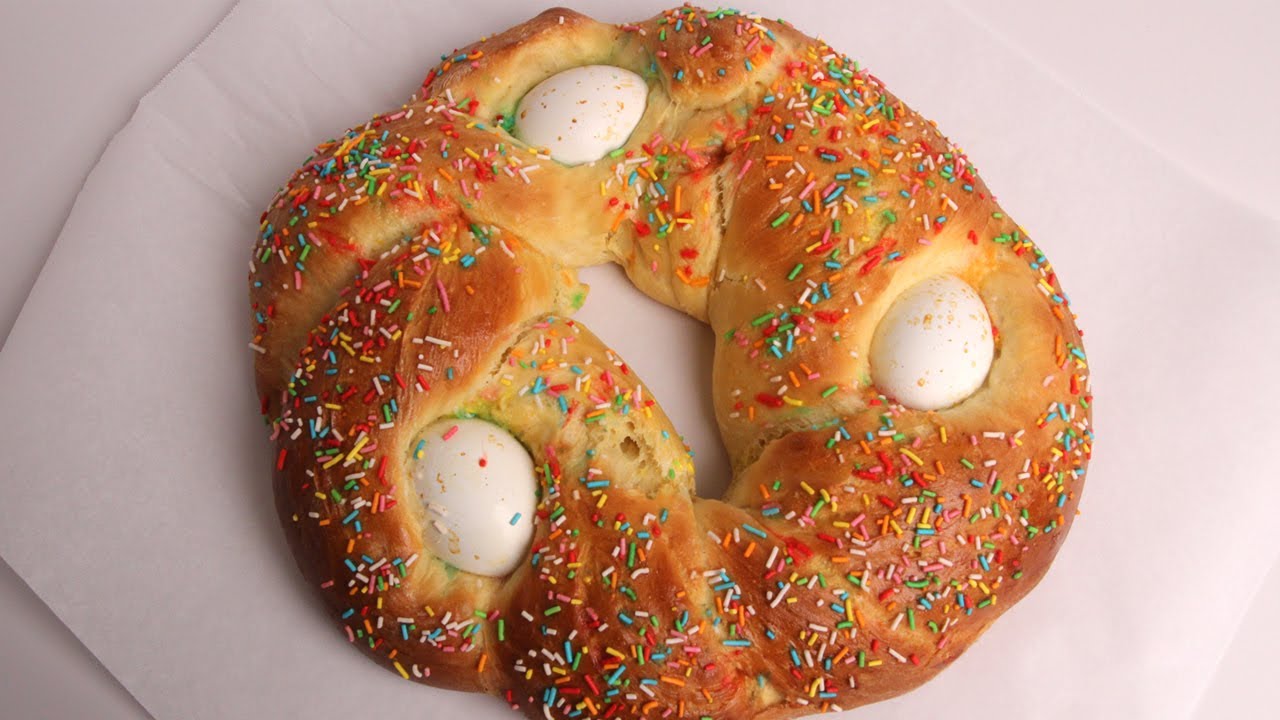
Now comes the fun part—shaping your dough into the iconic Easter bread form. Punch down the risen dough to release excess air, then divide it into three equal parts. Roll each portion into long ropes about 16 inches in length.
Place the ropes side by side on a parchment-lined baking sheet. Pinch the top ends together and braid them loosely, tucking the ends under when finished. If you want to include dyed Easter eggs, gently nestle them into the braid at this stage. Don’t worry—they’ll bake right along with the bread without cracking.
If you’d like a round loaf, simply twist the braid into a circle and pinch the ends together. This gives a festive wreath-like appearance, perfect for a holiday centerpiece.
The shaping is symbolic too—the braids often represent unity and togetherness, which fits beautifully with Easter’s themes of family and celebration.
Step 6 – Second Rise and Decoration
Once shaped, cover your bread lightly with a towel and let it rise again for about 30–45 minutes. This second rise is shorter but just as important, giving the dough time to relax and puff up before baking.
While the bread rises, prepare your egg wash by whisking together one egg with a tablespoon of water. Brush this gently over the surface of the bread—it gives the loaf a glossy golden finish when baked. At this stage, you can also add festive decorations like:
- Sprinkles – For a colorful, playful touch.
- Sesame seeds or sliced almonds – For a nutty crunch.
- Sugar crystals – For sparkle and sweetness.
If you’ve added dyed eggs into the braid, the egg wash will make the surrounding dough shine, creating a stunning presentation.
This step transforms your dough from plain to beautiful, making it a showstopper centerpiece for your Easter table.
Step 7 – Baking the Bread
Preheat your oven to 350°F (175°C) while your dough finishes its second rise. Once ready, place the baking sheet in the center rack of the oven and bake for 30–35 minutes, or until the bread turns a rich golden brown. The aroma at this point will be irresistible—warm, sweet, and buttery.
To check if it’s done, gently tap the bottom of the loaf; it should sound hollow. Alternatively, insert a food thermometer into the center—the internal temperature should read 190°F (88°C).
If your bread browns too quickly, cover it loosely with aluminum foil for the last 10 minutes of baking. This keeps the crust from burning while allowing the inside to cook through.
Once baked, remove the bread from the oven and transfer it to a wire rack to cool. Resist the urge to slice immediately—letting it cool helps the crumb set properly.
The result? A soft, pillowy loaf with a slightly sweet flavor and golden crust that looks as festive as it tastes.
Step 8 – Cooling and Serving
Cooling is an often-overlooked but essential step. Allow your Easter bread to cool for at least 30 minutes before slicing. Cutting into it too soon can cause the bread to become gummy inside.
When ready to serve, slice into thick pieces and place them on a festive platter. Easter bread can be enjoyed in many ways:
- Spread with butter or jam for a simple treat.
- Paired with coffee or tea for breakfast.
- Served as part of the Easter feast alongside ham, eggs, or cheese.
- Toasted lightly with a drizzle of honey for a sweet snack.
For presentation, you can place the braided bread in the center of your Easter table with dyed eggs arranged around it. Not only does it taste divine, but it also becomes a centerpiece that sparks conversation and admiration.
Variations of Easter Bread
Every culture has its own version of Easter bread, each with unique flavors and symbolism. Here are some popular variations:
Italian Easter Bread (Pane di Pasqua)
This version is often braided and decorated with colored eggs nestled into the dough before baking. It’s slightly sweet and sometimes topped with sprinkles. The bread is usually flavored with citrus zest, giving it a light, refreshing taste.
Greek Tsoureki
Greek Easter bread, called Tsoureki, is flavored with unique spices like mahleb (from cherry pits) and mastic (a resin from the mastic tree). It’s soft, slightly chewy, and rich in flavor. Traditionally, it’s decorated with red-dyed eggs that symbolize the blood of Christ.
Eastern European Paska
In Ukraine and Poland, Paska is a round loaf, often decorated with crosses, braids, or floral patterns made of dough. It’s rich, buttery, and sometimes includes raisins. This bread is usually blessed in church before being shared at the Easter meal.
Other Variations
- Russian Kulich – Tall, cylindrical bread often topped with white icing and sprinkles.
- Spanish Mona de Pascua – Sweet bread decorated with eggs and sometimes chocolate.
- Portuguese Folar da Páscoa – Flavored with cinnamon and fennel, with whole eggs baked inside.
These variations prove that Easter bread is more than just food—it’s a symbol of cultural identity and tradition.
Serving Suggestions
Easter bread is versatile and can be served in many delicious ways. Here are a few ideas:
How to Serve Easter Bread at Family Gatherings
- Slice and serve warm with butter, jam, or Nutella.
- Pair with savory dishes like roasted ham, lamb, or cheese.
- Create a festive bread basket with slices of Easter bread, hot cross buns, and other holiday treats.
Pairing Ideas with Beverages and Meals
- Perfect with a morning cup of coffee or cappuccino.
- Serve with tea for an afternoon treat.
- Pair with sweet dessert wine or liqueur for an elegant finish to Easter dinner.
Because of its sweet and rich flavor, Easter bread can easily transition from breakfast to dessert, making it one of the most versatile holiday foods.
Storage and Reheating Tips
To make sure your Easter bread stays fresh and delicious, follow these storage tips:
How to Store Easter Bread Properly
- Wrap the cooled bread in plastic wrap or foil and store at room temperature for up to 3 days.
- For longer storage, keep it in the refrigerator, but note that refrigeration may dry it out.
Best Ways to Reheat Without Losing Flavor
- Oven Method: Wrap in foil and warm at 300°F (150°C) for 10 minutes.
- Microwave Method: Wrap a slice in a damp paper towel and heat for 15–20 seconds.
- Toasting: Slice and toast lightly, then top with butter or honey.
You can also freeze Easter bread for up to 2 months. Slice it before freezing so you can take out individual pieces as needed.
Common Mistakes to Avoid
Even experienced bakers can run into challenges when making Easter bread. Here are some mistakes to watch out for:
Overmixing or Overkneading the Dough
While kneading develops gluten, too much can make your bread tough instead of soft. Knead until the dough is elastic, but don’t overdo it.
Incorrect Rising Time
Cutting the rising time short will leave you with dense bread. On the other hand, letting the dough rise too long can cause it to collapse. Aim for the dough to double in size, no more, no less.
Baking at the Wrong Temperature
If your oven runs hot or cold, it can ruin your bread. Always preheat and, if possible, use an oven thermometer to ensure accuracy.
By avoiding these pitfalls, you’ll set yourself up for success and end up with a loaf that’s fluffy, golden, and delicious.
Healthier Alternatives
For those who want to enjoy Easter bread without feeling guilty, there are plenty of ways to make the recipe healthier while keeping it delicious.
Using Whole Wheat Flour
Replace half (or all) of the all-purpose flour with whole wheat flour. This adds fiber, vitamins, and a nutty flavor. Keep in mind that whole wheat flour absorbs more liquid, so you may need to add an extra splash of warm milk to maintain a soft dough.
Sugar-Free or Low-Sugar Options
You can cut down the sugar without losing sweetness. Try these swaps:
- Use honey or maple syrup instead of granulated sugar.
- Add dried fruits like raisins, cranberries, or chopped dates for natural sweetness.
- Use a sugar substitute such as stevia or monk fruit (adjust amounts based on brand).
These changes make Easter bread lighter and more suitable for health-conscious families, without sacrificing taste.
FAQs about Easter Bread Recipe
Q1: Can I make Easter bread without a stand mixer?
Yes! A stand mixer makes kneading easier, but you can absolutely knead by hand. It just takes a little more time and effort—about 8–10 minutes of kneading until the dough becomes smooth and elastic.
Q2: How do I keep dyed eggs from cracking in the oven?
Make sure your eggs are at room temperature before placing them in the dough. Cold eggs crack easily when exposed to heat. Nestle them gently in the braid and bake as usual.
Q3: Can I prepare the dough the night before?
Definitely. After the first rise, punch down the dough, cover tightly with plastic wrap, and refrigerate overnight. The next day, shape it, let it rise again, and bake fresh.
Q4: Why is my Easter bread dense instead of fluffy?
This usually happens if the yeast was inactive or the rising times were too short. Always check that your yeast foams properly when activated and allow the dough to double in size before shaping.
Q5: Can I freeze Easter bread?
Yes! Wrap the cooled bread tightly in foil or plastic wrap and freeze for up to 2 months. For convenience, slice it before freezing so you can reheat single portions when needed.
Conclusion
Easter bread is more than just a recipe—it’s a tradition that brings family and friends together around the table. From its soft, pillowy texture to its golden, festive braids, this bread is both a feast for the eyes and the taste buds. Whether you stick to the classic Italian style, try the Greek Tsoureki, or create your own version, each loaf carries with it the joy and warmth of Easter celebrations.
With this step-by-step guide, you now have everything you need to bake your own Easter bread from scratch. From choosing the best ingredients to kneading, shaping, and decorating, every detail has been covered to help you succeed.
So this Easter, don’t just settle for store-bought treats—fill your home with the sweet aroma of freshly baked Easter bread. It’s a gift of love, tradition, and flavor that your family will look forward to year after year.