Dutch Oven Bread Recipe: There’s something undeniably magical about pulling a crusty, golden loaf of bread out of the oven—especially when you’ve made it from scratch. If you’re aiming for bakery-quality bread right in your kitchen, learning how to bake Dutch oven bread is your golden ticket. It’s rustic, it’s simple, and it requires just a handful of ingredients. Whether you’re a baking novice or a seasoned pro, this guide will walk you through every step of making the perfect loaf in a Dutch oven.
Why Bake Bread in a Dutch Oven?
So, why is everyone raving about Dutch oven bread lately? The answer lies in the science of heat and steam. A Dutch oven acts like a mini professional bread oven, trapping moisture that evaporates from the dough during baking. This moisture turns into steam, which helps the bread rise beautifully and form that irresistible crispy crust.
Plus, Dutch ovens heat evenly and retain that heat better than almost any other home kitchen tool. This gives your bread a solid burst of heat when it first goes in—often called “oven spring”—that makes for a lofty, airy interior. Think artisan loaves with bubbly, open crumbs and perfectly blistered crusts. That’s the magic of Dutch oven bread.
The Charm of Homemade Bread
Baking bread at home isn’t just about filling your kitchen with mouthwatering aromas—although that’s definitely a bonus. It’s about slowing down, working with your hands, and reconnecting with something fundamental. With each step, from mixing to baking, you’re engaging in a process that’s centuries old.
And when you finally slice into that warm loaf, you’re rewarded with a deep sense of satisfaction and pride. Trust me, once you bake your first Dutch oven bread, there’s no going back to store-bought.
Ingredients Needed
Basic Ingredients for Dutch Oven Bread
You’ll be amazed at how few ingredients you actually need to make a fantastic loaf. At its core, Dutch oven bread only requires:
- 3 1/4 cups (400g) all-purpose or bread flour
- 1 1/2 cups (360ml) warm water (about 100°F/38°C)
- 2 tsp (10g) salt
- 1/2 tsp (2g) instant yeast
That’s it. No fancy additives or obscure flours. The magic happens in the technique, not the ingredient list. With these humble staples, you’ll be amazed at the flavor and texture you can coax out of your oven.
Optional Add-ins for Flavor and Texture
Once you’ve mastered the basic recipe, it’s time to get creative. Try adding:
- Chopped fresh herbs like rosemary, thyme, or chives
- Minced garlic or roasted garlic cloves
- Grated cheese such as cheddar or Parmesan
- Nuts and seeds like sunflower, sesame, or flax
- Dried fruits like cranberries, raisins, or figs
- Olives or sun-dried tomatoes for a Mediterranean twist
The combinations are endless. Just be sure not to overload your dough—keep add-ins to about 1 to 1 ½ cups total to maintain structure.
Tools and Equipment Required
Choosing the Right Dutch Oven
Not all Dutch ovens are created equal. You’ll want one that is:
- Heavy and thick-walled to retain and evenly distribute heat
- Lidded to trap steam effectively
- Oven-safe up to at least 450°F (230°C)
Most people use enameled cast iron Dutch ovens, which are perfect for this kind of baking. A 5- to 6-quart size is ideal for a standard loaf.
Make sure the lid fits tightly—steam retention is key here. If your lid doesn’t seal well, you can create a temporary seal using foil.
Other Essential Baking Tools
You don’t need a ton of gadgets, but a few tools can make your bread-baking journey smoother:
- Mixing bowl: A large one to give your dough space to rise.
- Wooden spoon or dough whisk: For easy mixing.
- Bench scraper: Helps shape dough without sticking.
- Parchment paper: Makes transferring dough into the Dutch oven a breeze.
- Kitchen towel: For covering your dough during proofing.
- Digital kitchen scale: For precise ingredient measurements.
- Instant-read thermometer: To check if the bread is done (should read around 200–210°F internally).
Getting equipped properly sets you up for success right from the start.
Step-by-Step Guide to Making Dutch Oven Bread
Step 1 – Mixing the Dough
Start by combining your flour, salt, and yeast in a large bowl. Slowly pour in the warm water while stirring with a wooden spoon or dough whisk. The mixture will look shaggy and sticky—don’t worry, that’s exactly what you want.
Once the ingredients are roughly combined, use your hands to gently bring it all together into a loose dough ball. There’s no need to knead! This is a no-knead recipe, relying on time and fermentation instead of elbow grease.
Cover the bowl with a kitchen towel or plastic wrap and let it rest at room temperature for 12–18 hours. This long fermentation gives the bread its depth of flavor and chewiness. Overnight is perfect—just mix it before bed and bake it the next day.
Step 2 – First Rise (Bulk Fermentation)
After your dough has rested for 12 to 18 hours, it should have doubled in size and be dotted with bubbles. This is a sign that fermentation has worked its magic. The dough will be wobbly, airy, and still quite sticky—exactly what you want.
At this stage, gently turn the dough out onto a well-floured surface. You don’t need to punch it down or handle it roughly. Instead, use a bench scraper or floured hands to fold the dough over itself a few times. This gentle folding helps develop the gluten without deflating all that precious gas built up during fermentation.
Let the dough rest for about 15 minutes after folding. This gives it time to relax, making the next step—shaping—much easier.
Step 3 – Shaping the Dough
Shaping your dough is all about creating surface tension. With lightly floured hands, pull the edges of the dough towards the center and then flip it over so the seam side is down. Gently pull the dough against the counter to create a taut surface. You want a smooth, round ball.
Place the shaped dough onto a piece of parchment paper. This makes it super easy to transfer into the hot Dutch oven later. Cover it with a kitchen towel and let it rest again.
If you’re using a banneton (proofing basket), lightly dust it with flour and place your dough inside, seam-side up. Cover and let it proof for the final rise.
Step 4 – Final Proof
The final proof can take anywhere from 45 minutes to 1.5 hours, depending on your room temperature. You’re looking for the dough to puff up noticeably but not double in size. If you gently poke it with a finger and it springs back slowly, it’s ready.
During the final 30 minutes of this proof, place your Dutch oven into your regular oven and preheat both to 450°F (230°C). Preheating the Dutch oven ensures it’s scorching hot and ready to work its magic when the dough hits it.
When you’re ready to bake, carefully remove the hot Dutch oven from the oven. Using the parchment paper, lift your dough and lower it into the pot. You can score the top with a sharp knife or razor blade to control the way it expands—this also gives that artisan look.
Step 5 – Baking the Bread
Cover the Dutch oven with its lid and place it in the oven. Bake for 30 minutes covered, then remove the lid and bake for another 15–20 minutes. This second part of baking without the lid allows the crust to become deeply golden and crispy.
You’ll know the bread is done when it’s a deep brown color and sounds hollow when tapped on the bottom. For accuracy, check with a thermometer—the internal temperature should be around 200°F (93°C).
Carefully lift the bread out using the parchment paper and let it cool completely on a wire rack. Yes, it’s hard to wait, but cutting too soon can ruin the texture. Give it at least an hour to cool so the inside sets properly.
Tips for Perfect Dutch Oven Bread
Common Mistakes to Avoid
Even though this recipe is beginner-friendly, a few pitfalls can trip you up if you’re not careful:
- Too much flour: This is the most common mistake. Sticky dough is good—don’t over-flour or you’ll end up with a dense loaf.
- Not preheating the Dutch oven: You need that hot environment for oven spring. Always preheat!
- Cutting too soon: Let the bread cool completely before slicing. Cutting early makes it gummy.
- Wrong yeast: Use instant yeast or active dry yeast (bloomed in water first). Fresh yeast needs different ratios.
- Skipping the final proof: The second rise is crucial for an airy crumb. Don’t rush it.
Avoiding these issues will put you on the fast track to crusty, golden loaves every time.
Tricks for a Crispy Crust
Who doesn’t love a crunchy crust that shatters when you bite into it? Here’s how to level up your crust game:
- Use steam: That’s the Dutch oven’s job, but it helps to mist your dough with water just before baking too.
- Leave the lid off longer: If your crust is too soft, try baking the last 20 minutes with the lid completely off.
- Cool with airflow: Let your bread cool on a wire rack so air can circulate and keep the crust crisp.
- Avoid plastic storage: If you store your bread in plastic, it’ll go soft. Use paper or linen bags instead.
With a few small tweaks, you can create bakery-worthy bread with a shattering crust and tender crumb.
Storing and Serving Your Bread
Best Ways to Store Fresh Bread
After putting so much love into your homemade loaf, the last thing you want is for it to go stale too quickly. Proper storage helps keep your Dutch oven bread fresh and delicious for as long as possible.
Here’s what to do:
- Let it cool completely: Before storing, make sure your bread is 100% cool. Trapped steam will cause the crust to go soggy.
- Store in a bread bag or linen towel: Cloth allows the bread to breathe, preserving the crust. Paper bags also work well for short-term storage (1–2 days).
- Avoid plastic if possible: While plastic bags keep moisture in, they also soften the crust. If you must use plastic, consider toasting slices later to revive the crunch.
- Freeze for long-term storage: Slice the bread before freezing so you can toast slices straight from the freezer. Wrap it tightly in foil and place in a freezer bag—good for up to 3 months.
If stored properly, your loaf will stay good at room temperature for up to 4–5 days, although it’s best eaten within the first couple of days.
Creative Serving Ideas
Now that you’ve baked this beautiful loaf, let’s talk about all the delicious ways to serve it.
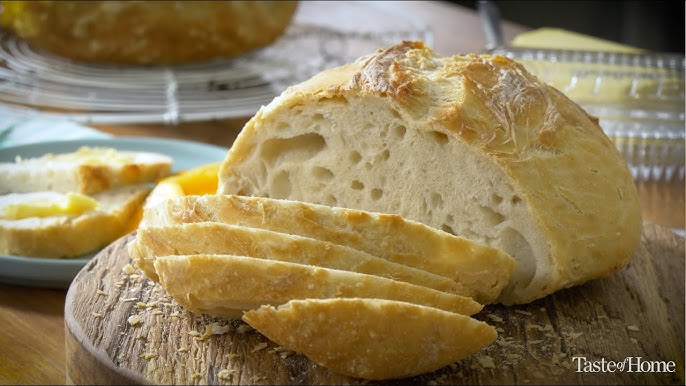
- Classic with butter: You can’t go wrong with fresh bread and high-quality butter—maybe even a sprinkle of sea salt.
- Avocado toast: Top with smashed avocado, chili flakes, and a squeeze of lemon.
- Bruschetta: Toasted slices with tomatoes, basil, garlic, and olive oil—chef’s kiss!
- Soup companion: This bread is perfect for dunking into tomato soup, chowders, or stews.
- French toast: Use slightly stale bread for rich, custardy French toast.
- Paninis or grilled cheese: That sturdy crust holds up beautifully to melting cheese and fillings.
Dutch oven bread is incredibly versatile, whether you’re serving it fresh or using it in recipes. Plus, that rustic appearance makes it a showstopper at any dinner table.
FAQs about Dutch Oven Bread Recipe
1. Can I use whole wheat flour for Dutch oven bread?
Yes, but start by replacing only 25–50% of the white flour with whole wheat. Whole wheat absorbs more water and can result in a denser loaf if used alone.
2. What size Dutch oven is best for bread?
A 5 to 6-quart Dutch oven is ideal for most standard bread recipes. It allows room for the loaf to expand without overflowing.
3. Do I need to preheat the Dutch oven every time?
Absolutely! Preheating helps create that essential oven spring and crispy crust by delivering a blast of heat right when the dough hits the pot.
4. Can I bake this bread without parchment paper?
Yes, but parchment makes it easier. If skipping it, make sure to generously flour or oil the Dutch oven to prevent sticking.
5. How do I know when the bread is fully baked?
The crust should be deep golden brown and sound hollow when tapped. For accuracy, use a thermometer—fully baked bread will register around 200–210°F in the center.
Conclusion
With a reliable Dutch oven and a little patience, you don’t need to be a professional baker to achieve incredible results. This bread fits beautifully into everyday life—perfect for breakfast toast, hearty sandwiches, or simply enjoyed warm with butter. The journey may be slow, but the reward is oh-so worth it.
So what are you waiting for? Dust off your Dutch oven and start baking!


