Dutch Baby Pancake Recipe: Ever watched a pancake puff up like a golden cloud in the oven? That’s the magic of a Dutch Baby pancake. This show-stopping breakfast treat is a cross between a pancake, a crepe, and a popover. Originating in German-American kitchens, the Dutch Baby isn’t Dutch at all—it’s believed to be derived from the German word “Deutsch,” which means German. Over time, the term evolved, and today, this puffy delight has become a staple at weekend brunch tables around the world.
What sets the Dutch Baby apart is its dramatic rise in the oven, creating lofty, crisped edges and a custardy center. Served straight from a hot skillet and topped with fruit, powdered sugar, or maple syrup, it brings an element of theater to your morning. Unlike traditional pancakes that require flipping, the Dutch Baby is baked, making it incredibly easy and mess-free. Plus, the flavor profile is versatile—it can be sweet or savory, depending on your cravings.
In this guide, you’ll learn how to master the Dutch Baby step by step. Whether you’re new to baking or a weekend brunch connoisseur, you’ll find this recipe straightforward and foolproof. Get ready to impress your guests or simply treat yourself to a cozy breakfast that feels gourmet but takes minimal effort.
Ingredients Needed
Before diving into the cooking process, let’s break down the ingredients. The beauty of the Dutch Baby lies in its simplicity. You likely have everything you need already sitting in your pantry or fridge.
Essential Ingredients:
- 3 large eggs – room temperature is best
- ½ cup all-purpose flour – gives the structure
- ½ cup milk – whole milk is ideal, but you can use alternatives
- 1 tablespoon sugar – optional, adds a hint of sweetness
- ½ teaspoon vanilla extract – optional but highly recommended
- ¼ teaspoon salt – to balance flavors
- 2 tablespoons unsalted butter – for the skillet
These basic ingredients combine to create a batter that’s thin and pourable, which helps achieve the signature puff.
Optional Add-ins and Toppings:
- Fresh berries – strawberries, blueberries, or raspberries
- Powdered sugar – classic and simple topping
- Lemon juice – a splash over powdered sugar adds tang
- Maple syrup or honey – for sweetness
- Whipped cream – why not go all out?
- Savory twist: cheese, herbs, bacon – mix it up!
Customizing your Dutch Baby is half the fun. Keep it classic or get creative with what you have on hand.
Tools and Equipment Required
No fancy gadgets required here, but a few key pieces of equipment can make all the difference in the texture and puffiness of your Dutch Baby.
Kitchen Tools:
- Mixing bowl – for whisking or mixing the batter
- Whisk or blender – hand-whisk for a rustic feel or blender for silky-smooth batter
- Measuring cups and spoons – precision matters!
Oven-Safe Skillet:
- The star of the show is an oven-safe skillet, preferably cast iron. A 10-inch skillet works perfectly. It heats evenly and retains heat, which is essential for the batter to rise quickly and dramatically when it hits the hot surface.
If you don’t have cast iron, use any heavy, oven-proof pan—but avoid nonstick pans with plastic handles. Heat is crucial, and you’ll be cranking that oven up to high temps.
Step-by-Step Instructions
Here’s the fun part—cooking! Follow these steps closely, and you’ll be rewarded with a fluffy, golden Dutch Baby that looks as good as it tastes.
Step 1: Preheat Your Oven and Pan
Start by preheating your oven to 425°F (220°C). This is non-negotiable. A hot oven ensures the pancake puffs up correctly.
Place your skillet in the oven while it preheats. This is a crucial step. The pan needs to be piping hot before you pour in the batter—this shock of heat is what creates that gorgeous rise and those delicious crispy edges.
Don’t skip this. If your pan isn’t hot enough, your Dutch Baby may turn out flat and disappointing.
Step 2: Make the Batter
While the oven is heating up, it’s time to mix your batter. The key here is smoothness and aeration.
Method 1: Whisk by Hand
- Crack 3 large eggs into a bowl.
- Add flour, milk, sugar, vanilla, and salt.
- Whisk until completely smooth and lump-free.
Method 2: Use a Blender
- Simply blend all the ingredients for 20–30 seconds until smooth.
Using a blender creates a lighter batter, which can help with puffiness. But whisking by hand adds a rustic, homemade charm that’s just as tasty.
Let the batter rest for about 10 minutes if you have time. This allows the flour to fully hydrate and helps the pancake rise better.
Step 3: Melt Butter and Pour Batter
Once your oven is fully preheated and your skillet is scorching hot, it’s go time.
Carefully remove the skillet using oven mitts—remember, it’s extremely hot. Add the 2 tablespoons of unsalted butter directly to the skillet. Swirl it around immediately, allowing it to melt and coat the entire surface, including up the sides. This step prevents sticking and adds a rich, nutty flavor to your pancake.
Now, pour your prepared batter into the hot, buttery skillet. You’ll hear it sizzle—music to your ears. Don’t stir it; just let it settle naturally into an even layer. The combination of hot butter and hot pan starts the puffing process even before you return it to the oven.
Step 4: Bake the Dutch Baby
Place the skillet back in the oven and bake for 18 to 22 minutes. Resist the temptation to open the oven door while it bakes—that blast of cool air can interrupt the rise.
During this time, the Dutch Baby will begin to puff dramatically, especially around the edges. The center will remain a bit flatter and custardy, which is exactly what you want. You’ll know it’s done when it’s golden brown and beautifully puffed.
Remember, the pancake will deflate a bit after it comes out of the oven. That’s totally normal, so don’t panic. It’s part of the charm and doesn’t affect the taste.
Step 5: Serve Immediately
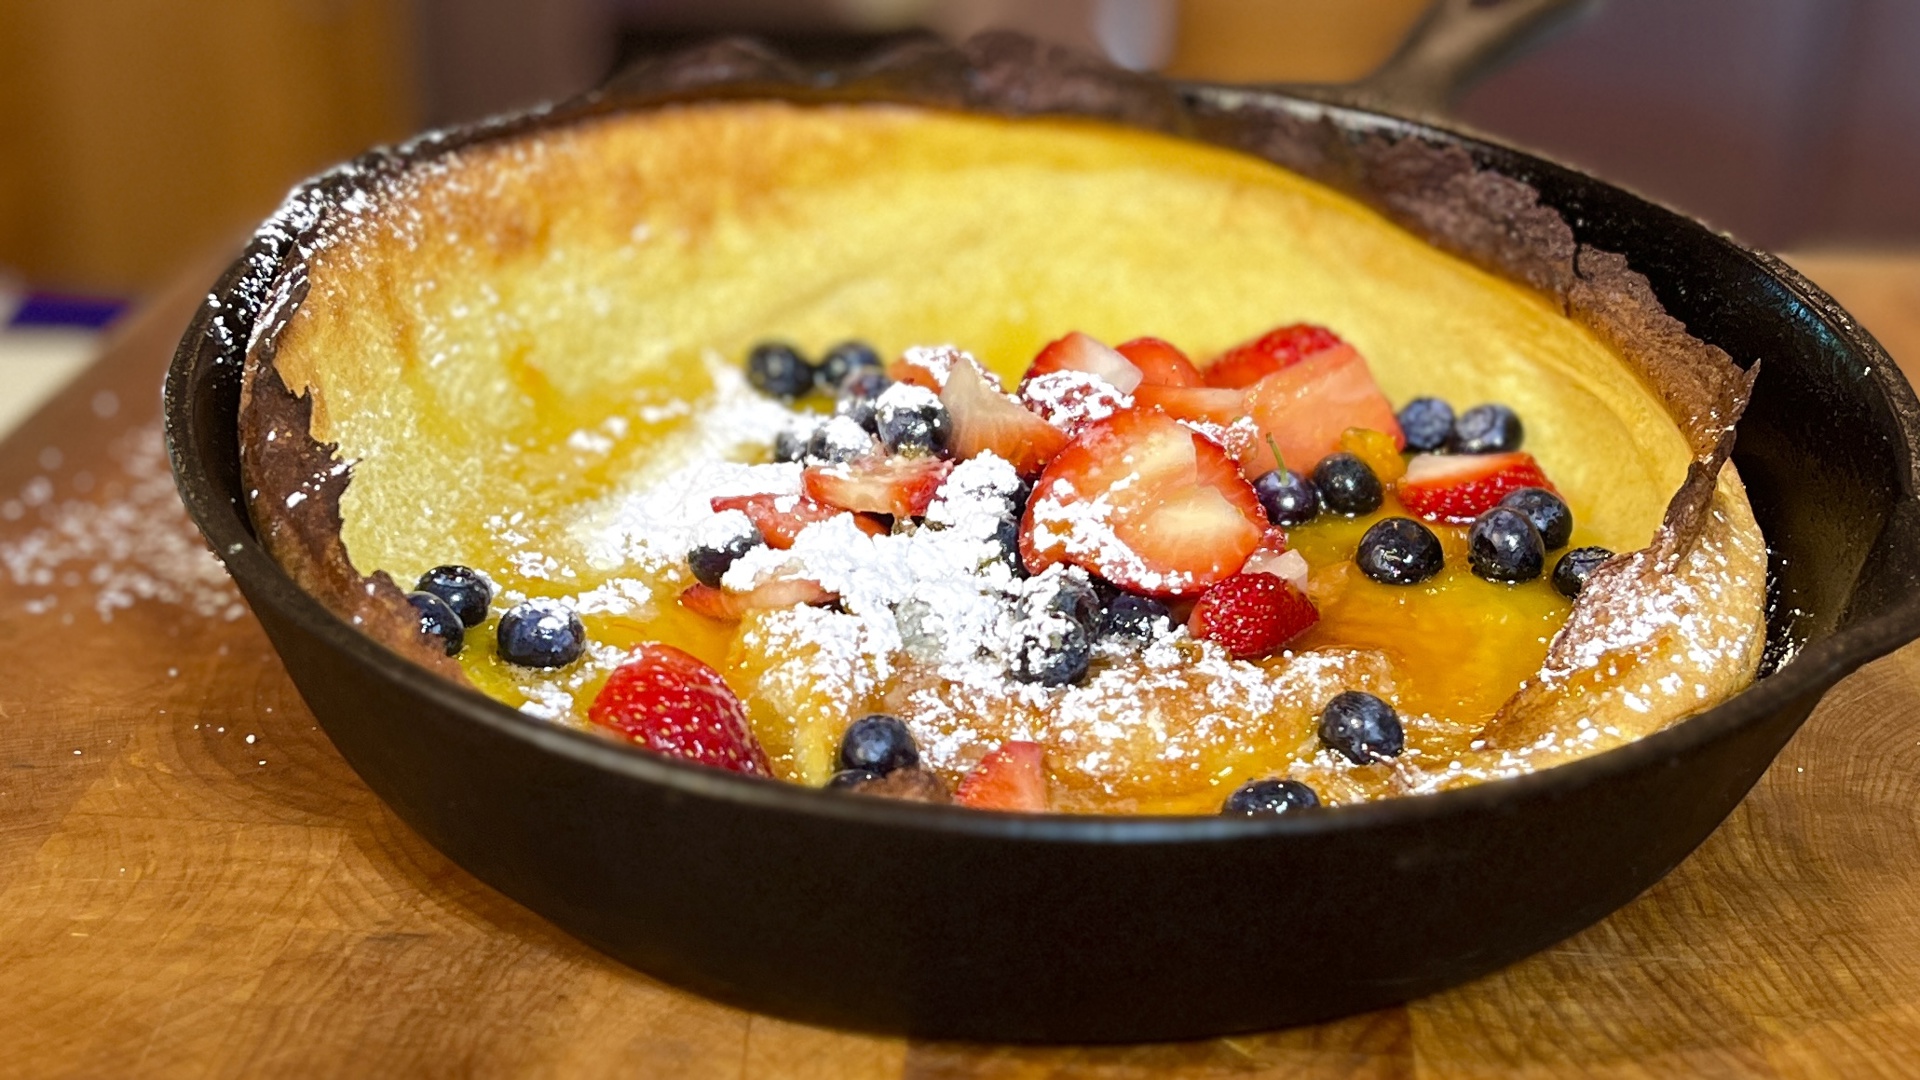
The Dutch Baby is at its best right out of the oven. The edges are crispy, the center is soft, and the butter gives it a rich, irresistible flavor. Don’t wait—it begins to deflate as it cools.
Top it with a generous dusting of powdered sugar. Add a squeeze of lemon juice for a sweet-tart balance. Toss on some fresh berries or a drizzle of maple syrup. Want to turn it into a dessert? Add a scoop of vanilla ice cream and chocolate sauce. The possibilities are endless.
Cut into wedges and serve directly from the skillet for a rustic, eye-catching presentation. Pair it with a hot cup of coffee or a mimosa, and you’ve got yourself the ultimate brunch.
Tips for the Perfect Dutch Baby
Getting a Dutch Baby right isn’t hard, but a few key tips can take your pancake from good to unforgettable.
1. Use Room Temperature Ingredients
Cold eggs and milk can hinder the rise. Let them sit out for about 30 minutes before mixing. If you’re short on time, soak the eggs in warm water for 5 minutes and microwave the milk for about 15 seconds.
2. Preheat Everything
Don’t skip the skillet preheat. That shock of heat is what causes the batter to rise rapidly. Think of it like a popover—it needs that blast of heat to lift and puff.
3. Don’t Overmix the Batter
If you’re whisking by hand, stop as soon as everything is smooth. Overmixing can toughen the pancake and affect its texture.
4. Let the Batter Rest
Even 5–10 minutes of rest can make a big difference. It allows the gluten to relax and the flour to absorb the liquids, resulting in a more tender pancake.
5. Serve Fast
A Dutch Baby is not the kind of dish you prepare and let sit. It’s meant to be eaten hot, fresh, and fluffy. As it cools, it settles and loses that dramatic puff.
Flavor Variations and Toppings
Here’s where you can get creative. The base Dutch Baby is a blank canvas just waiting for your favorite flavors.
Sweet Variations
- Cinnamon Apple: Sauté apple slices in butter and cinnamon, then pour the batter on top before baking.
- Berry Bliss: Add fresh or frozen berries to the batter before baking. Blueberries and raspberries work beautifully.
- Chocolate Chip: Sprinkle mini chocolate chips over the batter right before baking.
- Nutella and Banana: After baking, slather with Nutella and top with banana slices.
Savory Variations
- Herb & Cheese: Mix in chopped chives, thyme, and shredded Gruyère or cheddar cheese into the batter.
- Smoked Salmon & Cream Cheese: Bake plain, then top with cream cheese, smoked salmon, capers, and dill.
- Bacon & Spinach: Sauté spinach and bacon bits, stir into the batter before baking.
Topping Ideas
- Whipped cream
- Yogurt and granola
- Lemon curd
- Jam or preserves
- Sliced almonds or crushed pistachios
With so many possibilities, you can enjoy a different Dutch Baby every weekend and never get bored.
Nutritional Information
While the Dutch Baby is undeniably delicious, it’s also helpful to understand what you’re putting on your plate—especially if you’re mindful of your diet. The good news? This pancake can be surprisingly balanced depending on your ingredients and portion size.
Basic Nutritional Breakdown (per serving, based on 4 servings):
- Calories: ~200–250
- Carbohydrates: ~20g
- Protein: ~7g
- Fat: ~12g
- Sugar: ~4g (without toppings)
This assumes a basic recipe using whole milk and no added sugar toppings. If you go heavy on syrups, chocolate, or whipped cream, the sugar and calorie count can rise quickly. On the flip side, if you opt for fruit toppings and moderate your butter usage, it can be a satisfying treat that doesn’t completely wreck your macros.
Making it Healthier:
- Use whole wheat flour or almond flour for a fiber boost.
- Swap whole milk for almond, oat, or skim milk.
- Skip the sugar or use honey or maple syrup in moderation.
- Add fruit instead of syrups for natural sweetness and vitamins.
You can also turn it into a high-protein breakfast by adding a scoop of vanilla protein powder to the batter and serving with Greek yogurt and berries.
Serving Suggestions
The Dutch Baby is the ultimate multitasker—it can be breakfast, brunch, or dessert, depending on what you serve it with. It’s also perfect for sharing, making it a social centerpiece at your table.
Best Pairings:
- Coffee: A strong black coffee or latte cuts through the richness of the pancake.
- Tea: Earl Grey or a fruit-forward herbal tea balances sweet versions.
- Mimosas or Bellinis: Add sparkle to your brunch.
- Fresh Juice: Orange, grapefruit, or even a green juice works beautifully.
Serving Ideas:
- Cut into wedges and serve with a side of scrambled eggs or bacon for a complete meal.
- Serve mini versions in small cast iron pans or ramekins for individual servings at brunch.
- Add a scoop of ice cream and a drizzle of caramel for an easy, impressive dessert.
No matter how you serve it, presentation counts. A light dusting of powdered sugar or fresh herbs (for savory versions) instantly upgrades your dish from simple to Instagram-worthy.
Storing and Reheating
Let’s be honest: the Dutch Baby is best enjoyed fresh. That said, leftovers happen—and you can definitely save them with a little know-how.
Storing:
- Let the pancake cool completely.
- Wrap tightly in foil or plastic wrap, or place in an airtight container.
- Store in the fridge for up to 2 days.
Reheating:
- Preheat your oven to 350°F (175°C).
- Place the Dutch Baby on a baking sheet and cover loosely with foil.
- Bake for 8–10 minutes, or until warmed through.
You can also reheat it in the microwave for about 30–45 seconds, but this may soften the crispy edges. If you’re short on time, it still works—just not as delightfully crispy.
Freezing:
- Freeze individual slices wrapped in parchment and foil.
- Store in a freezer-safe bag for up to a month.
- Reheat in the oven directly from frozen at 375°F for about 15 minutes.
It’s always better fresh, but these tips will help you avoid wasting those golden leftovers.
FAQs about Dutch Baby Pancake Recipe
1. Can I make it gluten-free?
Yes! Substitute all-purpose flour with a gluten-free blend or almond flour. Just ensure your flour mix includes a binder like xanthan gum for best texture.
2. Why didn’t mine puff up?
Several reasons:
- Your oven or pan wasn’t hot enough.
- Cold ingredients were used.
- You overmixed the batter or didn’t let it rest.
- Your skillet wasn’t the right type or size.
Stick to the guide above and you’ll get that magical rise.
3. Can I make it ahead of time?
You can make the batter a day in advance and store it in the fridge. Give it a good stir or blend before using. Just remember: bake right before serving for best results.
4. What’s the difference between a Dutch Baby and a crepe?
A crepe is thin and cooked on a stovetop, while a Dutch Baby is thick, puffed, and baked in the oven. Crepes don’t rise; Dutch Babies puff dramatically in a hot oven.
5. Can I use a blender for the batter?
Absolutely. In fact, a blender often results in a smoother batter and better puff. Just blend all ingredients for about 20–30 seconds.
Conclusion
The Dutch Baby pancake is a culinary showpiece that’s surprisingly simple to master. Whether you’re making breakfast for your family, hosting brunch with friends, or just treating yourself to something cozy and special, this pancake delivers on flavor, presentation, and ease. With just a few ingredients, a hot skillet, and a little kitchen magic, you can create a dish that’s equal parts rustic charm and elegant indulgence. Experiment with flavors, explore toppings, and make it your own. Trust me—you’ll want to make it again and again.


