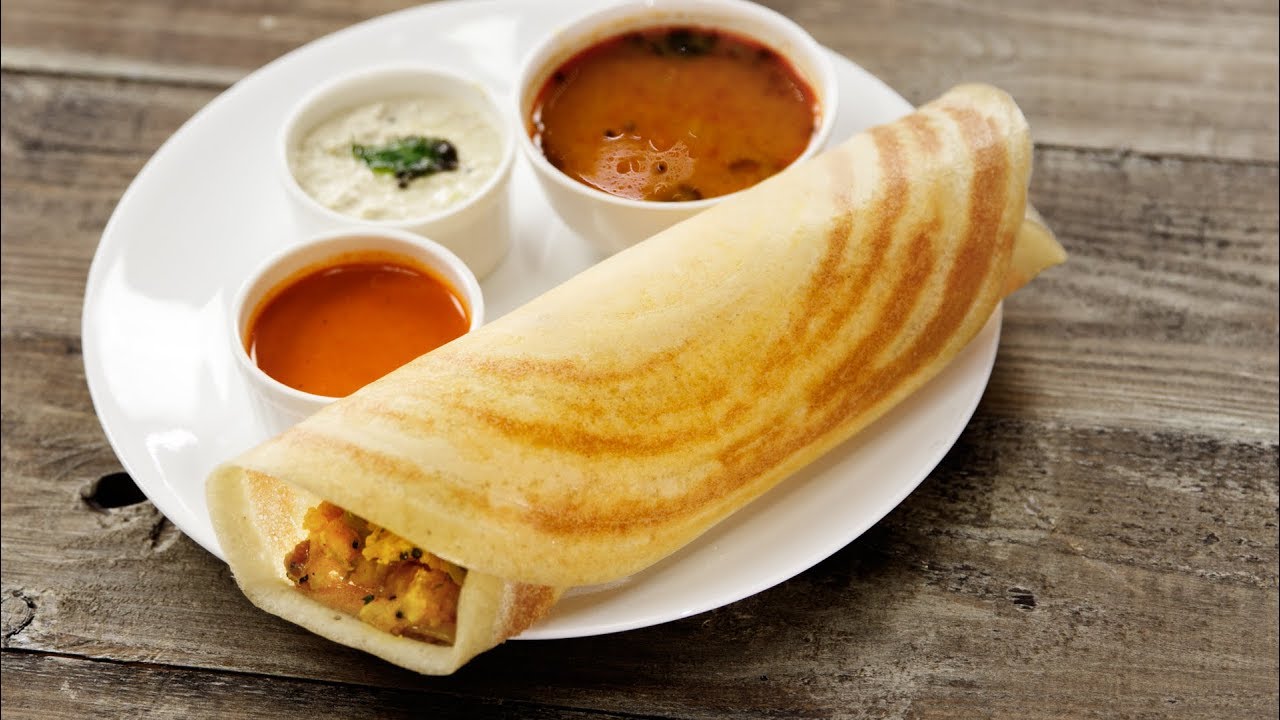
Dosa Batter Recipe: Dosa batter is the foundation of one of South India’s most iconic dishes—the dosa. A dosa is a thin, crispy pancake made primarily from a fermented batter of rice and lentils. Think of it as the Indian cousin of a crepe, but with a unique tangy flavor and a crunchy texture. The magic of dosa lies not only in its taste but also in its versatility. With the same batter, you can prepare crispy dosas, soft dosas, and even fluffy idlis. The fermentation process gives dosa batter its distinct aroma, slight sourness, and lightness, which makes dosas irresistibly crisp yet airy.
Unlike pancakes or flatbreads that rely on baking powder or yeast, dosa batter ferments naturally through beneficial bacteria. This makes it not only flavorful but also gut-friendly. It’s fascinating how simple grains and lentils, when soaked, ground, and fermented, transform into something so delightful. If you’ve ever wondered why dosas taste so authentic at restaurants, it all begins with the batter. And yes, you can recreate the same magic at home with the right steps and patience.
Why Homemade Batter is Better than Store-Bought
Sure, you can easily grab a packet of ready-made dosa batter from your local Indian store. But ask any dosa enthusiast, and they’ll tell you—nothing beats the freshness of homemade batter. Store-bought versions often contain preservatives to extend shelf life, which can slightly alter the flavor and texture. Homemade batter, on the other hand, is free from additives and allows you to control the ingredient quality, proportions, and fermentation time.
Another big advantage of making dosa batter at home is customization. Do you like your dosa extra crispy? Add a little more rice. Prefer it softer and spongier? Adjust the urad dal (black gram) ratio. Plus, when you make your own batter, you can experiment with healthier versions, like incorporating millet or brown rice. Beyond the health benefits, there’s something deeply satisfying about watching your batter ferment overnight and transform into a fluffy, airy mixture ready to hit the pan.
Homemade dosa batter is also more economical in the long run. With just a few pantry staples—rice, lentils, and water—you can make a large batch that lasts for days. So, while store-bought batter is convenient, the homemade version wins hands down in terms of freshness, nutrition, and flexibility.
The Importance of Fermentation in Dosa Batter
Fermentation is the secret ingredient behind every successful dosa. Without it, your batter will be flat, dense, and flavorless. Fermentation naturally introduces beneficial bacteria (mainly lactic acid bacteria) into the batter, giving it that characteristic tang and lightness. Think of fermentation as nature’s way of adding both taste and health benefits.
The process works like this: soaked rice and lentils are ground into a smooth paste. Left in a warm place for 8 to 12 hours, the naturally present microbes multiply, producing carbon dioxide and acids. This makes the batter airy and slightly sour, which directly translates to crispier dosas and fluffier idlis. It’s also worth noting that fermentation breaks down some of the starch and proteins in rice and lentils, making them easier to digest. In fact, dosa is often considered a probiotic-rich food because of this natural fermentation.
Temperature and time play crucial roles here. Too cold, and your batter won’t ferment properly. Too hot, and it might over-ferment, leading to an overly sour taste. That’s why mastering fermentation is key to perfecting dosa batter. Once you get it right, you’ll notice how your dosas come out beautifully golden, crisp, and full of flavor.
Ingredients You’ll Need
Core Ingredients for Classic Dosa Batter
To make a traditional South Indian dosa batter, you need just three core ingredients:
- Rice – The backbone of the batter. Raw rice or parboiled rice (also called idli rice) is most commonly used. Rice gives dosa its crispiness.
- Urad Dal (Black Gram Lentils) – This small but mighty ingredient is what gives dosa its softness and helps the batter ferment. The fluffy texture of the dosa largely depends on urad dal.
- Water – Needed for soaking, grinding, and achieving the right consistency.
That’s it! Just three ingredients, but they must be used in the right proportion. The most common ratio is 3:1 (rice to urad dal), though some people use 4:1 for extra crispiness.
Optional Ingredients for Enhanced Flavor
While the classic dosa batter needs only rice, urad dal, and water, a few optional ingredients can elevate both flavor and fermentation:
- Fenugreek Seeds (Methi) – Just a teaspoon added while soaking helps in better fermentation and gives a slight golden color to dosas.
- Flattened Rice (Poha) – A handful of poha makes the dosa softer and adds a hint of sweetness.
- Chana Dal – Some add a tablespoon for added crunch.
- Salt – Usually added after fermentation to prevent it from slowing down the process.
These optional ingredients aren’t mandatory, but they can make a big difference if you want restaurant-style dosas at home.
Ingredient Ratios and Why They Matter
The ratio of rice to urad dal is the most crucial aspect of dosa batter. Too much rice, and your dosas will turn out hard. Too much urad dal, and they’ll be too soft without crispiness. The golden ratio is 3:1, which balances crispness with a slight fluffiness.
If you’re aiming for:
- Crispy dosas → Go for a 4:1 ratio.
- Softer dosas → Stick with a 3:1 ratio or even 2.5:1.
- Idlis and dosas using the same batter → A 3:1 ratio works best.
Remember, it’s not just about the ratio. The quality of rice and lentils, how well you soak them, and how finely you grind them also affect the final outcome.
Best Type of Rice and Lentils to Use
Not all rice and lentils are created equal when it comes to dosa batter. Here’s what works best:
- Rice: Idli rice (parboiled rice) is the top choice. If unavailable, you can use raw rice or a combination of both. Avoid basmati rice, as it won’t give the right texture.
- Urad Dal: Always use whole urad dal (with skin removed) instead of split ones for best results. Whole urad ferments better and gives more volume.
- Fenugreek Seeds: While optional, they aid fermentation, especially in colder climates.
By choosing the right type of rice and lentils, you set yourself up for success before even starting the process.
Step-by-Step Guide to Making Dosa Batter
Step 1: Measuring the Ingredients
The first step in making dosa batter is all about getting the proportions right. For a family of four, you’ll typically need:
- 3 cups rice (idli rice or a mix of raw and parboiled rice)
- 1 cup urad dal
- 1 teaspoon fenugreek seeds
- 2 tablespoons poha (optional)
Precise measurement ensures consistency. If you eyeball the amounts, you might end up with batter that’s either too runny or too dense. Think of this step as laying the foundation of a house—everything else depends on it.
Step 2: Washing and Soaking Rice and Lentils
Once you’ve measured your ingredients, the next step is washing and soaking them. This may sound like a minor task, but it’s absolutely crucial for achieving a smooth batter and proper fermentation.
Start by rinsing the rice and urad dal separately in plenty of water. Wash them about 3–4 times until the water runs clear. This helps remove excess starch, dust, and impurities. Skipping this step can make your batter sticky and heavy.
Now, soak the rice, urad dal, and fenugreek seeds in separate bowls. Why separate? Because urad dal needs less soaking time than rice. Rice typically soaks for at least 4–6 hours, while urad dal requires only 2–3 hours. Soaking softens the grains, making it easier to grind them into a silky batter later.
If you’re using poha, soak it for just 15–20 minutes before grinding. Unlike rice and dal, poha softens very quickly.
Here’s a simple soaking schedule:
- Rice + Fenugreek → 6 hours
- Urad Dal → 3 hours
- Poha → 20 minutes
A little patience here goes a long way. Proper soaking ensures that your grinder won’t overheat and that the batter ferments beautifully. Think of this stage as “prepping the canvas” before painting—without it, you won’t get the perfect results.
Step 3: Grinding the Batter to Perfect Consistency
Grinding is where the magic begins. Traditionally, dosa batter was ground using a heavy stone grinder, which gave it an incredibly smooth texture. Today, most of us rely on wet grinders or high-powered blenders, both of which can do a great job if used correctly.
Start with urad dal. Drain the soaked dal and fenugreek seeds, then grind them with just enough water to form a light, fluffy paste. The goal here is not just smoothness but aeration. A properly ground urad dal batter should double in volume and feel almost like whipped cream.
Next, grind the rice. Drain it and grind with a little water until you get a slightly grainy texture. Unlike urad dal, the rice paste should not be ultra-smooth—it should retain a faint coarseness, as this gives the dosa its characteristic crunch.
Finally, combine both batters in a large bowl. Add the soaked poha at this stage if you’re using it. Mix everything together with your clean hands rather than a spoon. Why hands? Because the natural warmth from your skin helps kick-start fermentation, and it also ensures the batter is well-aerated.
Consistency matters. Your batter should be thick yet pourable, something like pancake batter. Too thick, and it won’t ferment well. Too thin, and it won’t hold together on the pan.
Step 4: Fermentation Process Explained
This step is where the transformation truly happens. After grinding, cover the bowl of batter and leave it to ferment in a warm spot. In tropical regions, 8–10 hours is usually enough. In colder climates, it may take 12–16 hours or more.
During fermentation, wild yeast and lactic acid bacteria multiply, releasing carbon dioxide and creating tiny air bubbles in the batter. This is what gives your dosas that irresistible lightness.
Here are some tips for successful fermentation:
- Keep the bowl in a warm, draft-free place. An oven with the light turned on works beautifully.
- Avoid adding salt before fermentation. Salt slows down microbial activity. Add it only after the batter has risen.
- Use a large enough bowl. The batter will expand, and if the bowl is too small, it may overflow.
You’ll know fermentation has worked when:
- The batter has doubled in volume.
- It smells slightly sour but pleasant.
- Tiny bubbles appear when you stir it.
If your batter hasn’t fermented after 12–14 hours, don’t panic. Sometimes weather conditions or water quality can slow it down. In such cases, keep it for a few more hours, or move it to a warmer spot.
Step 5: Checking Batter Readiness Before Cooking
Before you rush to make dosas, it’s important to check whether your batter is ready. A simple test is to scoop a spoonful and drop it into a bowl of water. If the batter floats, it’s fermented well and is ready for use. If it sinks, it either hasn’t fermented enough or is too watery.
At this stage, add salt to taste and gently mix the batter without over-stirring. Over-mixing can deflate the air bubbles, making the dosas less crispy.
Your dosa batter should now have:
- A fluffy, airy texture
- A slight tangy aroma
- A consistency that pours easily without being watery
Once it passes the test, you’re all set to make golden, crispy dosas. But before we dive into cooking, let’s talk about how to ferment in tricky climates and how to store your batter for longer use.
Tips for Perfect Fermentation
How to Ferment in Cold Weather
One of the biggest challenges when making dosa batter outside tropical regions is fermentation during colder months. Since fermentation relies heavily on warmth, batter can easily stay flat if the environment isn’t favorable. But don’t worry—there are a few tried-and-true hacks to help.
First, try the oven light method. Place your batter bowl in the oven and keep the oven light switched on (but not the heat). The gentle warmth will create a cozy environment for the bacteria to thrive. Another trick is using an Instant Pot on yogurt mode, which maintains just the right temperature for fermentation.
If you don’t have those appliances, wrap your batter bowl in a thick towel or blanket and keep it in the warmest corner of your kitchen. Some people even keep the bowl near a heater or hot water cylinder. Just remember—too much heat can over-ferment the batter, so keep it mildly warm, not hot.
Adding a teaspoon of fenugreek seeds while soaking can also help, as they naturally aid fermentation. With these adjustments, even the coldest winters won’t stop you from enjoying crispy dosas.
Common Fermentation Mistakes to Avoid
Many beginners struggle with dosa batter fermentation because of avoidable mistakes. One of the most common errors is adding salt before fermentation. Salt hinders microbial growth, so always add it afterward.
Another mistake is grinding with hot water. While it may speed up soaking, hot water kills beneficial microbes, ruining the fermentation process. Always use cool or room-temperature water while grinding.
Some people also cover the batter too tightly. Fermentation needs airflow, so avoid sealing it airtight. Instead, loosely cover it with a lid or cloth to allow gases to escape.
Lastly, overfilling the bowl is a common slip-up. Since the batter doubles in size, it needs enough space to rise. If you fill the bowl to the brim, it will spill over, creating a mess. A large, deep bowl is always best.
Signs of Properly Fermented Batter
Knowing whether your batter has fermented properly can be tricky, but a few signs make it easy to judge. First, look for a rise in volume—a well-fermented batter will usually double in size. Second, give it a gentle stir. You should see tiny bubbles throughout, almost like a fizzy drink.
The smell is another giveaway. Properly fermented batter should have a pleasant, slightly sour aroma. If it smells too sharp or pungent, it’s likely over-fermented. On the other hand, if it smells raw, it needs more time.
The final test is the water float test. Drop a spoonful of batter into a bowl of water. If it floats, the fermentation worked perfectly. If it sinks, it may still need more time—or the consistency might be off.
With practice, you’ll be able to recognize a perfectly fermented batter at first glance, setting the stage for flawless dosas.
Storing and Using Dosa Batter
How to Store Batter in the Refrigerator
Once your batter is fermented and ready, you might not want to use all of it immediately. The good news is dosa batter stores very well in the refrigerator. Simply transfer it to an airtight container and refrigerate. Stored this way, it will stay fresh for about 4–5 days.
Before using refrigerated batter, always bring it to room temperature. Cold batter straight from the fridge won’t spread evenly on the pan, leading to thick, uneven dosas. Stir it gently to revive the texture, and if it feels too thick, add a splash of water.
If you’re storing for multiple days, it’s a good idea to divide the batter into smaller containers. This way, you only open what you need, keeping the rest fresh.
Freezing Options for Long-Term Use
If you’ve made a large batch of dosa batter, freezing is a smart option. Pour the fermented batter into freezer-safe containers or zip-lock bags. When you want to use it, thaw overnight in the fridge and bring it to room temperature before cooking.
Frozen batter lasts for up to 1 month without losing its flavor. However, once thawed, it’s best to use it within 2–3 days. Keep in mind that freezing may slightly affect fermentation bubbles, so dosas might be a touch less airy. To fix this, add a teaspoon of rice flour or semolina to revive the crispiness.
How to Revive Batter That Has Gone Flat
Sometimes, stored batter can lose its fluffiness or go slightly sour. Don’t throw it away—there are easy fixes. If the batter has become too sour, add a tablespoon of rice flour or semolina before cooking. This balances the taste and gives extra crispiness.
If the batter looks flat and lifeless, whisk it well before use. A vigorous stir helps reintroduce air into the mixture. You can also add a small spoon of baking soda just before making dosas. While this isn’t traditional, it does give an instant lift and ensures the dosa spreads well on the pan.
With these tricks, you can make sure not a single drop of your dosa batter goes to waste.
Making Crispy Dosas from Batter
Preheating the Pan the Right Way
A well-fermented batter won’t matter if your pan isn’t prepped properly. The key to perfect dosas lies in a hot, but not smoking, pan. Whether you use a cast-iron skillet or a nonstick tawa, make sure it’s evenly heated before pouring the batter.
To check if it’s ready, sprinkle a few drops of water on the pan. If they sizzle and evaporate instantly, you’re good to go. Wipe the pan with a cut onion dipped in oil before spreading the first dosa. This creates a nonstick layer and ensures smooth spreading.
Avoid pouring batter onto a pan that’s too hot—it will clump instantly. If it’s too cool, the dosa won’t crisp up. Getting this balance right is half the battle.
Spreading Batter for Thin and Crispy Dosas
Now comes the fun part—spreading the dosa. Pour a ladleful of batter in the center of the pan, then quickly spread it outward in a spiral motion using the back of the ladle. The faster and smoother your motion, the thinner and crisper the dosa will be.
For restaurant-style crispiness, don’t overload the pan with batter. A thin layer cooks better and gives that signature golden-brown crunch. Once spread, drizzle a few drops of oil or ghee around the edges. This not only enhances flavor but also helps the dosa release easily.
Patience is key. Resist the urge to flip the dosa immediately. Let it cook until the edges turn golden and start lifting off the pan. Only then should you fold or roll it.
Cooking Dosa Without Sticking
One of the most common frustrations is dosa batter sticking to the pan. This usually happens if the pan isn’t seasoned properly or if the batter is too cold. To prevent this, always bring the batter to room temperature before use.
For cast-iron pans, seasoning is essential. Rub a little oil onto the surface and heat it well before making dosas. After cooking each dosa, lightly wipe the pan with an oiled cloth or onion slice to maintain the nonstick effect.
If you’re using nonstick cookware, avoid overheating, as this damages the coating and causes sticking. With the right prep and practice, you’ll be flipping out golden, paper-thin dosas effortlessly.
Variations of Dosa Batter
Instant Dosa Batter Options
Sometimes, you just don’t have the time to soak, grind, and ferment batter for hours. That’s where instant dosa batter recipes save the day. With a few pantry staples, you can whip up dosa batter in under 30 minutes.
The most popular shortcut is rava dosa, which uses semolina (rava), rice flour, and all-purpose flour mixed with yogurt and water. This batter doesn’t need fermentation—just let it rest for 20–30 minutes before cooking. The result is a lacy, crispy dosa that pairs beautifully with chutney.
Another instant version is oats dosa, made by grinding oats with rice flour, semolina, and spices. It’s quick, healthy, and great for busy mornings.
While these instant options don’t deliver the exact tangy flavor of fermented dosa, they’re perfect for when you’re short on time but still craving a crunchy, golden dosa.
Millet and Brown Rice Dosa Batter
For those looking to make their diet healthier, millet and brown rice are excellent alternatives to traditional white rice. Not only are they nutrient-dense, but they also add a nutty flavor and chewy texture to the dosa.
To make millet dosa, simply replace rice with foxtail millet, pearl millet, or finger millet. Keep the same ratio of millet to urad dal (3:1). Brown rice can also be used in place of white rice, though it requires a longer soaking time—about 8–10 hours.
These variations are packed with fiber, iron, and minerals, making them a wholesome breakfast or dinner option. If you want to enjoy dosa without the guilt of refined carbs, this is the way to go.
Gluten-Free Dosa Batter Choices
Traditional dosa batter is naturally gluten-free since it’s made from rice and lentils. But if you’re looking for alternatives due to allergies or dietary restrictions, you can experiment with other gluten-free grains like quinoa, buckwheat, or amaranth.
Quinoa dosa batter, for example, ferments beautifully and produces dosas that are both light and protein-rich. Buckwheat dosas, popular during fasting days in India, have a distinct earthy flavor and crisp texture.
The best part? These gluten-free versions are just as delicious as the classic ones and are suitable for everyone at the table, whether they’re gluten-intolerant or not.
Health Benefits of Dosa Batter
Nutritional Value of Rice and Lentils
The humble dosa may look like a light, crispy pancake, but it’s actually packed with nutrition. Rice provides carbohydrates for energy, while urad dal (black gram) is rich in protein, iron, and dietary fiber. Together, they form a balanced meal that fuels your body and keeps you full longer.
Rice also contributes essential B vitamins, while lentils add minerals like magnesium, potassium, and calcium. This combination makes dosa batter not just tasty, but also highly nourishing.
If you enhance the batter with millets, oats, or brown rice, you’re adding even more nutrients, making dosa a wholesome and versatile meal option.
Probiotics from Fermentation
One of the biggest health benefits of dosa comes from its fermentation process. When rice and lentils ferment, they develop beneficial bacteria—similar to what you find in yogurt and other probiotic foods.
These probiotics improve digestion, boost gut health, and even support immunity. They also break down anti-nutrients like phytic acid found in grains, which makes it easier for your body to absorb vitamins and minerals.
In simple words, fermented dosa batter is not just food—it’s medicine for your gut.
Why Dosa is a Healthy Breakfast Option
If you’re tired of heavy, greasy breakfasts, dosa is a perfect alternative. It’s light on the stomach, yet filling enough to keep you going for hours. Since it’s cooked with minimal oil, it’s far healthier than fried snacks.
Pairing dosa with protein-rich sambar and fiber-packed chutneys turns it into a complete meal. The balance of carbs, protein, and probiotics makes it a power-packed breakfast that fuels both body and mind.
Whether you’re on a weight-loss journey or just looking for a balanced diet, dosa ticks all the boxes for a healthy, delicious breakfast.
Common Mistakes and Troubleshooting
Batter Not Fermenting Properly
A flat, lifeless batter is the most common complaint among beginners. If your batter isn’t fermenting, the issue could be with the temperature, water, or grinding process.
To fix this:
- Keep the batter in a warm spot or inside the oven with just the light turned on.
- Use non-chlorinated water, since chlorine can kill the natural bacteria needed for fermentation.
- Make sure you ground urad dal fluffy and airy—this is crucial for fermentation.
If all else fails, add a spoon of yogurt or a pinch of baking soda to kick-start the process.
Batter Too Runny or Too Thick
Consistency is everything when it comes to dosa batter. If your batter is too runny, the dosas won’t hold shape and will tear. If it’s too thick, they’ll be dense and chewy.
The fix is simple:
- For runny batter, add a spoon of rice flour or semolina to thicken it.
- For thick batter, stir in a little water until you reach pancake-like consistency.
Always adjust gradually—it’s easier to thin down thick batter than to fix runny batter.
Dosas Not Turning Crispy
If your dosas are turning out soft instead of crispy, the issue could be with either the ratio or the pan temperature. Too much urad dal in the batter will make dosas spongy rather than crisp. Stick to the 3:1 ratio of rice to dal for balance.
Also, check your pan. A dosa requires medium-high heat. If the pan is too cool, the dosa will stay soft. If it’s too hot, the batter won’t spread properly. Finding the right heat level is key.
Another tip is to avoid using too much oil. A few drops around the edges are enough. Too much oil will make the dosa soggy instead of crisp.
Serving Suggestions for Dosas
Classic Chutneys to Pair With Dosa
No dosa is complete without chutney. The most popular pairing is coconut chutney, made with fresh coconut, green chilies, and roasted chana dal. For a spicy kick, tomato chutney is a great option. Mint-coriander chutney adds a refreshing flavor.
Each chutney offers a different taste, and having two or three varieties on the side makes your dosa experience even more enjoyable.
Sambar and Other Side Dishes
If chutneys are the appetizers, sambar is the main star. This tangy, spicy lentil soup loaded with vegetables is the traditional companion to dosa. Its hearty flavor balances the lightness of dosa perfectly.
Other popular sides include potato masala (for masala dosa), rasam, or even simple podis (spiced lentil powders mixed with ghee). Together, they turn dosa from a snack into a full, satisfying meal.
Innovative Dosa Filling Ideas
While the classic masala dosa is timeless, modern kitchens love experimenting with fillings. From paneer bhurji to mushroom stir-fry, from scrambled eggs to cheese and spinach, the possibilities are endless.
Some creative options include:
- Paneer and capsicum stuffing
- Cheese and corn dosa (a kids’ favorite)
- Keema (minced meat) dosa for a protein boost
- Avocado and spicy chutney for a fusion twist
These variations prove that dosa is more than just a traditional dish—it’s a canvas for culinary creativity.
FAQs about Dosa Batter Recipe
1. How long can dosa batter be stored?
Fresh dosa batter lasts 4–5 days in the refrigerator and up to 1 month in the freezer.
2. Can I make dosa batter without urad dal?
Yes, but the texture will change. You can substitute urad dal with moong dal or skip it entirely for instant dosa versions.
3. Why does my dosa batter smell sour?
It’s likely over-fermented. Use less fermentation time next time or refrigerate earlier.
4. How do I make dosa without fermentation?
Use instant recipes like rava dosa or oats dosa, which require no fermentation.
5. Can I use the same batter for idlis and dosas?
Yes! A 3:1 rice-to-urad dal ratio works for both. The difference lies in consistency—idli batter is slightly thicker, while dosa batter is more spreadable.
Conclusion
Dosa batter may look simple, but behind it lies an art that combines patience, precision, and practice. From soaking and grinding to fermentation and storage, every step plays a vital role in creating the perfect dosa. With the right tips and tricks, anyone can master this recipe at home.
Whether you like your dosa plain, stuffed, or with innovative twists, it all starts with a well-made batter. Once you perfect it, you’ll find endless joy in serving crisp, golden dosas that taste just as good as those from a South Indian restaurant—if not better.