Dog Cookie Recipe: Let’s be honest, our furry companions deserve the best, right? And what better way to show love than by whipping up some homemade dog cookies just for them! Making dog treats at home is more than just a fun kitchen project—it’s a health-conscious choice that puts you in control of what goes into your pup’s tummy.
You’ve probably glanced at the ingredients list on store-bought treats and scratched your head at the endless chemical-sounding names. When you make dog cookies at home, you dodge preservatives, artificial flavors, and questionable fillers. Instead, you get to use real, wholesome ingredients that you can pronounce and trust.
Homemade treats also let you personalize your pup’s snacks based on their unique dietary needs. Whether your dog has allergies, sensitivities, or just a picky palate, you can tailor the recipe to suit them perfectly. Plus, there’s something incredibly rewarding about seeing your dog light up with joy after tasting a cookie you made just for them.
And hey, it’s cheaper in the long run too. A batch of cookies made with pantry staples can save you from constantly splurging on expensive gourmet dog treats. So yes, making dog cookies at home is not just a trend—it’s a lifestyle upgrade for both you and your pup!
Benefits of Homemade Dog Treats
Homemade dog treats come with a boatload of benefits—some you may not have even considered. First off, let’s talk quality control. You know exactly what’s going into the recipe. There’s no guesswork, no sketchy additives, and definitely no weird by-products. It’s clean, nutritious food from your kitchen to their bowl.
Secondly, these treats can be a powerful tool in your training arsenal. Need to reinforce good behavior? Want to teach a new trick? Dogs respond incredibly well to treats—especially ones that taste amazing. A homemade cookie, full of peanut butter or sweet potato, is way more enticing than a bland, store-bought biscuit.
Additionally, baking your own dog cookies allows you to bond with your dog in an unexpected way. Sure, they’re not helping in the kitchen (unless you count taste-testing), but they’re part of the process. They see, smell, and eventually taste the love baked into every bite.
And let’s not forget those with specific health issues. Dogs with conditions like diabetes, obesity, or kidney problems need customized diets. Homemade treats make it easier to monitor and maintain their health. You can adjust calories, avoid allergens, and sneak in supplements like omega-3s or glucosamine.
Finally, it’s just plain fun. There’s joy in rolling dough, using bone-shaped cookie cutters, and watching your pup enjoy the fruits of your labor. It’s therapeutic, engaging, and full of tail-wagging results.
Understanding Your Dog’s Dietary Needs
Common Allergies in Dogs
Before you dive headfirst into baking, it’s essential to know your dog’s dietary do’s and don’ts. Just like us, dogs can have allergies—and they can range from mildly irritating to downright dangerous.
Common allergens include wheat, dairy, chicken, and even beef. If you’ve noticed your dog scratching a lot, having digestion issues, or developing skin rashes, it could be due to food allergies. Some dogs are sensitive to grains, while others might not tolerate certain proteins.
The key is observation and, if needed, a quick vet consultation. Your vet can help identify allergens through elimination diets or even specialized allergy testing. Once you know what to avoid, baking becomes a whole lot easier.
Substituting ingredients is super easy once you’ve got the allergy facts down. For example, if your dog is allergic to wheat, you can use oat flour or coconut flour. If dairy is an issue, coconut oil or unsweetened applesauce makes a great replacement for butter.
The takeaway? Know your dog’s food sensitivities and plan accordingly. Their health and happiness depend on it.
Ingredients to Avoid
Not everything in your kitchen is safe for your four-legged friend. In fact, some common human foods are downright toxic to dogs. So before you get too creative with your cookie recipe, here’s a list of big no-no ingredients:
- Chocolate: Extremely toxic, even in small amounts.
- Xylitol: This artificial sweetener is deadly for dogs.
- Onions and Garlic: Harmful to red blood cells and can lead to anemia.
- Raisins and Grapes: Even a few can cause kidney failure.
- Macadamia Nuts: Known to cause weakness, vomiting, and tremors.
- Nutmeg: Can cause seizures and nervous system issues.
- Too Much Salt or Sugar: Dogs don’t need added sugar or high sodium levels.
Even if an ingredient seems harmless, double-check it. Your dog’s safety is priority number one. Stick with simple, vet-approved foods like peanut butter (xylitol-free), oats, pumpkin, and sweet potato. Those are safe bets that still taste amazing.
Choosing the Right Ingredients
Safe and Nutritious Options
When it comes to making dog cookies, the ingredient list is your playground—but only if you know what’s safe. Your goal is to combine flavor and nutrition without compromising on safety. Here’s a rundown of safe, dog-friendly ingredients that are also packed with benefits:
- Peanut Butter (unsweetened, xylitol-free): A favorite among dogs, it’s a great source of healthy fats and protein.
- Pumpkin Puree: Rich in fiber and excellent for digestion. Make sure it’s plain pumpkin, not the spiced pie filling.
- Sweet Potatoes: High in fiber, vitamins A and C, and a natural sweetener dogs love.
- Oats and Oat Flour: Gentle on the stomach and a great alternative for dogs allergic to wheat.
- Bananas: Full of potassium and fiber, and they add natural sweetness.
- Carrots and Apples (seedless): Crunchy, sweet, and full of vitamins.
- Coconut Oil: Good for skin, coat, and digestion.
- Eggs: Excellent source of protein and helps bind ingredients.
Think of these as your core building blocks. Each ingredient plays a role—whether it’s flavor, texture, or nutrition. And when used in the right combinations, they result in tasty, healthy treats your pup will drool over.
Organic vs. Store-Bought Ingredients
Now, let’s talk quality. Is organic really better? The answer depends on your priorities. Organic ingredients tend to be free from pesticides, hormones, and genetically modified organisms. That’s a big plus if you’re trying to keep your dog’s diet as natural as possible.
But store-bought doesn’t always mean unhealthy. The trick is reading labels carefully. Look for ingredients that are whole, minimally processed, and free from additives or preservatives. If you’re on a budget, it’s okay to mix and match—use organic for key ingredients like peanut butter or eggs and go store-brand for others like oats or pumpkin.
Remember: balance is key. Choose ingredients that offer both nutrition and taste, and you’ll have a recipe that’s healthy, affordable, and tail-waggingly delicious.
Essential Tools and Equipment
Kitchen Tools You’ll Need
You don’t need a commercial bakery setup to whip up dog cookies. In fact, most of the tools are probably already in your kitchen. Here’s your basic equipment checklist:
- Mixing Bowls: One for dry ingredients, one for wet.
- Measuring Cups and Spoons: Accuracy is important for texture and baking consistency.
- Rolling Pin: For flattening your dough to even thickness.
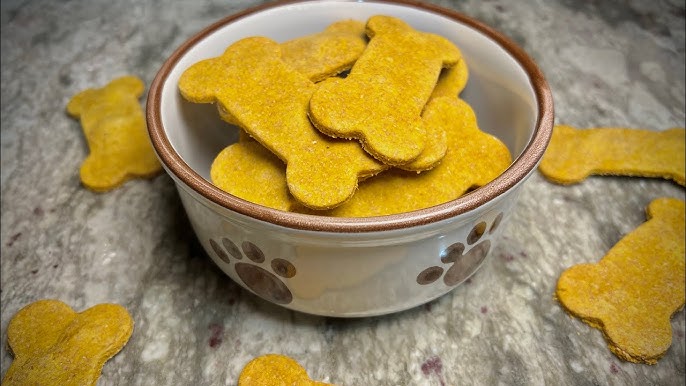
- Cookie Cutters: Go classic with bone shapes or get creative!
- Baking Sheet: Preferably non-stick or lined with parchment paper.
- Spatula or Dough Scraper: Helps transfer cookies to the baking sheet.
- Cooling Rack: Let cookies cool evenly and completely.
Having the right tools not only makes the process smoother but also more enjoyable. And let’s be real, there’s something oddly satisfying about rolling out dough and cutting little bone-shaped biscuits.
Tips for Efficient Preparation
Want to make the process even easier? Here are a few pro tips:
- Pre-measure ingredients before you start mixing. It saves time and avoids last-minute scrambles.
- Use parchment paper for easy clean-up and to prevent cookies from sticking.
- Chill your dough if it gets too sticky—10 to 15 minutes in the fridge works wonders.
- Use a scoop if you’re not using cutters. It’s fast, consistent, and fuss-free.
- Double your batch and freeze half the dough for future baking sessions.
Efficient prep means you spend less time stressing and more time enjoying the process—and of course, sharing treats with your best furry friend.
Step-by-Step Dog Cookie Recipe
Ingredients List
Let’s get down to business. Here’s a simple, delicious dog cookie recipe that works for most pups and is totally customizable:
- 2 cups oat flour (or whole wheat if your dog isn’t allergic)
- 1/2 cup natural peanut butter (make sure it’s xylitol-free)
- 1/2 cup pumpkin puree or mashed sweet potato
- 1 egg
- 1/4 cup water (adjust as needed for dough consistency)
Optional Add-ins:
- 1 tbsp flaxseed for extra fiber
- 1 tbsp coconut oil for coat health
- A pinch of cinnamon for a flavor twist
Mixing and Prepping the Dough
Start by preheating your oven to 350°F (175°C). In a large mixing bowl, combine the oat flour, flaxseed, and any dry ingredients. In a separate bowl, whisk together the egg, peanut butter, and pumpkin until smooth.
Slowly mix the wet ingredients into the dry, stirring until a dough forms. If it’s too dry, add a little water. If it’s too wet, sprinkle in more flour. The goal is a firm but pliable dough—like playdough, but more delicious (to your dog at least).
Dust your counter with a bit of flour and roll out the dough to about 1/4 inch thick. Use cookie cutters or a knife to shape your cookies however you like.
Shaping and Baking
Once you’ve got your shapes, place them on a parchment-lined baking sheet, leaving a little space between each one. Pop them into the oven for 20–25 minutes or until they’re golden brown and slightly crispy around the edges.
The smell? Heavenly. Don’t be surprised if your pup starts circling the kitchen like a little shark.
Cooling and Storing
After baking, let the cookies cool on a wire rack. This step is crucial because storing warm cookies can lead to moisture build-up and mold.
Once cooled, store them in an airtight container. They’ll keep for up to a week at room temperature or up to a month in the fridge. For longer shelf life, freeze them in zip-lock bags—just thaw before serving.
Customizing Your Dog Cookies
Flavor Variations
Just like us, dogs have flavor preferences. Some love peanut butter, others go wild for sweet potatoes or meat flavors. The beauty of homemade dog cookies is that you can easily tailor each batch to suit your dog’s taste buds. Here are some popular flavor twists to spice things up:
- Cheesy Bites: Add 1/2 cup of shredded cheddar cheese for a savory kick.
- Meaty Morsels: Mix in a few tablespoons of finely chopped cooked chicken or beef.
- Apple Cinnamon Delights: Grate a fresh apple (no seeds) and a pinch of cinnamon for a sweet and fruity variation.
- Banana Bliss: Mash in one ripe banana for a naturally sweet and creamy cookie.
- Herbal Boost: Add a sprinkle of parsley or mint for fresh breath and added nutrients.
The key to flavoring is moderation. Stick to small quantities of safe, natural ingredients. Always test new variations with a small batch first to make sure your dog likes and tolerates the new flavors. Once you find their favorite combo, you’ll be baking like a gourmet dog chef in no time.
Adding Supplements or Medication
If your pup takes supplements or occasional medication, why not sneak them into a treat? It’s a win-win—no more fighting to hide pills in cheese or meat, and your dog gets a delicious reward.
Some common supplements to consider:
- Glucosamine and chondroitin: Great for joint health, especially in older dogs.
- Fish oil or flaxseed oil: Promotes a shiny coat and healthy skin.
- Probiotics: Supports gut health and digestion.
You can mix these into the dough (check dosage with your vet) or press a capsule into each cookie before baking. Just be sure the medication or supplement is heat-stable—some may lose effectiveness when baked, in which case adding them post-bake or using a no-bake recipe might be a better route.
Homemade dog cookies aren’t just treats—they can be a delivery system for your dog’s daily wellness!
Storage Tips for Homemade Dog Treats
How Long Do They Last?
Unlike store-bought treats loaded with preservatives, homemade dog cookies have a shorter shelf life—but that’s a good thing! It means they’re fresh, natural, and free of harmful chemicals. Here’s a general guideline:
- Room temperature: Lasts 5 to 7 days in an airtight container.
- Refrigerator: Stays fresh for up to 3 weeks.
- Freezer: Can be stored for up to 3 months.
Always check for mold or off smells before giving your pup a treat. If in doubt, toss it out. Dogs might have tough stomachs, but bad food can still cause issues like vomiting or diarrhea.
Best Storage Methods
Proper storage ensures your cookies stay fresh, crunchy, and safe to eat. Here are some tried-and-true methods:
- Glass jars or metal tins: Great for keeping cookies crispy at room temperature.
- Airtight plastic containers: Ideal for fridge storage—just make sure they’re truly sealed.
- Freezer-safe bags or containers: Perfect for long-term storage. Portion cookies before freezing so you only thaw what you need.
If you’re making large batches, consider labeling your containers with the date they were made. It’s a simple step that helps track freshness and rotate stock. Trust me, your pup won’t mind getting a treat that’s a week or two old—as long as it’s still crunchy and delicious!
Safety Tips When Making Dog Treats
Food Safety for Dogs
Making treats at home puts you in charge of cleanliness and safety, but it also means you’ve got to stay vigilant. A few basic food safety rules go a long way:
- Wash hands thoroughly before and after handling ingredients.
- Clean utensils and surfaces to prevent cross-contamination.
- Use fresh ingredients—check expiration dates and discard anything questionable.
- Avoid raw meat or eggs unless you’re certain of their safety.
Also, resist the urge to share treats with your pup while baking, especially before they’re cooked. Uncooked dough, especially with raw egg or flour, can harbor bacteria that are harmful to both humans and dogs.
Portion Control
Even healthy treats can add up, especially for small dogs. Overfeeding can lead to weight gain, digestive issues, and even nutrient imbalances. Keep your treats small—about the size of a coin or a small biscuit—and adjust the serving based on your dog’s size and activity level.
Here’s a general guide:
- Small dogs (under 20 lbs): 1–2 small cookies per day
- Medium dogs (20–50 lbs): 2–4 cookies per day
- Large dogs (50+ lbs): 3–5 cookies per day
Moderation is key. Treats should never make up more than 10% of your dog’s daily caloric intake. When in doubt, consult your vet for portion recommendations tailored to your dog’s needs.
Fun Ideas for Serving Dog Cookies
Celebrating Dog Birthdays
Your dog’s birthday (or gotcha day) is the perfect excuse to go all out. Why not throw them a little paw-ty? Decorate a dog-safe cake with some homemade cookies, add a few balloons, and invite your pup’s furry friends over for a snack-fest.
You can even personalize the cookies with your dog’s name using letter stamps or shape them into hearts, stars, or bones. It’s a fun way to make your pup feel extra special on their big day.
Training with Treats
Homemade cookies are excellent training tools. Dogs respond incredibly well to positive reinforcement, and a tasty treat is often the best motivation. Break cookies into smaller pieces for training sessions to avoid overfeeding.
Use them to:
- Reinforce good behavior
- Teach new tricks
- Encourage crate training or socialization
Just be sure to reward immediately after the desired action so your dog associates the cookie with their good behavior. Training becomes fun and rewarding for both of you!
FAQs about Dog Cookie Recipe
1. Can I freeze homemade dog cookies?
Yes! Store them in airtight freezer bags and they’ll stay fresh for up to 3 months. Just thaw a few at a time as needed.
2. How often should I give my dog these cookies?
That depends on their size and diet. Generally, 1–5 small cookies a day is safe. Just make sure treats don’t exceed 10% of their daily calories.
3. Are these cookies suitable for puppies?
Yes, as long as the ingredients are safe and age-appropriate. Always introduce new foods slowly and consult your vet if unsure.
4. Can I substitute ingredients?
Absolutely. You can swap out flours, proteins, and even sweeteners as long as they’re dog-safe. Just maintain the right dough consistency.
5. How do I know if my dog is allergic?
Watch for signs like itching, vomiting, or diarrhea after eating new treats. If you suspect an allergy, stop feeding the cookies and talk to your vet.
Conclusion
Making dog cookies at home isn’t just a fun hobby—it’s a heartfelt way to care for your furry best friend. From selecting the safest, most nutritious ingredients to customizing flavors and serving up love in every bite, homemade treats offer benefits that store-bought snacks just can’t match.
Whether you’re baking for your pup’s birthday, training, or just want to spoil them with something wholesome, this step-by-step guide gives you everything you need. And once you see the joy in their eyes (and maybe a few tail wags), you’ll know it was worth every minute in the kitchen.