Divinity Candy Recipe: Divinity candy is one of those classic, old-fashioned sweets that feels like a warm hug from grandma’s kitchen. It’s soft yet firm, fluffy yet dense—a little bite of heaven, as the name suggests. This melt-in-your-mouth treat is traditionally a holiday favorite in the South, especially around Christmas, but it’s delicious year-round. Imagine a cloud made of sugar with a gentle hint of vanilla and the crunch of pecans. That’s divinity for you.
The texture is truly something else. It’s similar to nougat or marshmallow but drier and a bit crumbly once set. If you’ve never tried it before, you’re in for a treat. But here’s the thing: making divinity candy isn’t as easy as mixing sugar and water. It’s a delicate process that requires patience, precision, and the right weather. Yep—humidity can actually ruin your candy. Don’t worry though; we’ll guide you through every step to make sure your batch turns out, well, divine.
History of Divinity Candy
Divinity candy has deep roots in American culinary history, particularly in Southern kitchens. While the exact origin is a bit foggy, the treat rose to popularity in the early 20th century, around the 1910s and 1920s, when corn syrup became widely available. It started appearing in cookbooks and church fundraiser booklets as a holiday staple.
The name “Divinity” supposedly came from someone tasting the candy for the first time and declaring, “It’s divine!” And honestly, once you try it, you’ll understand why the name stuck. Back then, it was a symbol of hospitality and celebration, often made in big batches and shared among neighbors during the festive season.
Over the years, variations popped up—some people added cherries, others mixed in coconut or chocolate—but the base recipe remained largely unchanged. Making divinity became a sort of rite of passage for home cooks, and today, it holds a nostalgic place in many hearts, bringing back memories of cozy kitchens and family gatherings.
Ingredients You’ll Need
Alright, let’s get down to business. Making divinity candy doesn’t require a long shopping list, but you do need the right ingredients—and quality matters here.
Essential Ingredients:
- 2 ½ cups granulated sugar – White sugar works best; avoid brown sugar as it alters the texture.
- ½ cup light corn syrup – This helps prevent the sugar from crystallizing.
- ½ cup water – For dissolving the sugar.
- 2 large egg whites – Room temperature eggs whip better and give more volume.
- 1 tsp pure vanilla extract – Adds that cozy, sweet aroma and flavor.
- ½ cup chopped pecans (optional) – For crunch and a nutty twist.
- Pinch of salt – Balances the sweetness.
Optional Add-ins:
- Food coloring – A few drops can make it festive.
- Almond or peppermint extract – Swap out or combine with vanilla for a different flavor.
- Chopped candied cherries – A colorful and sweet addition.
Always use fresh eggs and high-quality vanilla. Since the flavor of divinity is fairly simple, each ingredient really stands out. No room for shortcuts here!
Equipment Required
Before you start cooking, let’s make sure your kitchen is stocked with the right tools. Divinity is fussy, so having the correct equipment makes a huge difference.
Must-Have Tools:
- Candy thermometer – Absolutely essential. Divinity needs precise temperature control.
- Stand mixer or hand mixer – You’ll be beating the mixture for several minutes.
- Heavy-bottom saucepan – Prevents scorching the sugar mixture.
- Rubber spatula – For folding in nuts or flavorings.
- Measuring cups and spoons – Precision is key.
- Parchment paper or wax paper – For dropping the candy to cool.
- Cookie scoop or teaspoons – Helps create uniform pieces.
Nice-to-Have:
- Silicone baking mat – A reusable alternative to parchment.
- Cooling rack – Helps air circulate around the candy.
Try to have everything ready before you start. Divinity moves fast once it reaches the final stages, and you won’t have time to fumble for tools mid-process.
Preparation Tips Before You Start
You wouldn’t jump into a marathon without stretching first, right? Same goes for candy making. Prepping your space and ingredients ahead of time can be the difference between heavenly divinity and a sugary mess.
Here’s what you need to do:
- Check the weather. Divinity does NOT like humidity. Pick a dry day if possible. Moisture in the air can prevent the candy from setting properly.
- Separate the eggs while cold, but let the whites come to room temp. They whip better that way.
- Lay out parchment paper on your counter or cookie sheet. Once the mixture is ready, you have to move quickly.
- Calibrate your thermometer. A faulty candy thermometer can destroy your batch. Boil water and check it reads 212°F (100°C).
- Measure everything ahead. Once the sugar mixture hits 260°F, there’s no time to measure or prep.
Pro tip: Don’t double the recipe on your first try. Divinity is sensitive, and larger batches can be hard to control.
The Science Behind Divinity
Making divinity is like conducting a sweet little chemistry experiment in your kitchen. At its core, divinity is about controlling sugar crystals and incorporating air at just the right moment to create that fluffy, yet firm texture. But here’s the catch—everything from humidity to your timing can affect the outcome.
Sugar Stage Matters: The sugar syrup needs to reach the hard-ball stage—around 260°F (127°C). This is crucial. If it’s undercooked, your candy will be too soft or runny. If it goes beyond, you’ll end up with something dry and crumbly. A candy thermometer is your best friend here—don’t guess!
Egg Whites & Air: Egg whites are whipped into soft peaks to introduce air, which gives the candy its lightness. When the hot sugar syrup is added to the egg whites (while beating), it essentially cooks the eggs, stabilizing the structure. Timing is everything—you can’t let the syrup cool even slightly or it won’t blend properly.
Humidity is the Villain: Ever heard someone say, “Don’t make candy on a rainy day”? That’s especially true for divinity. Humid air introduces moisture into the candy, making it sticky and preventing it from setting. Aim for a dry day or run a dehumidifier if needed.
Why Beat It Like Crazy?
After combining syrup and egg whites, you beat the mixture until it loses its gloss and holds shape. This is when magic happens—the candy becomes thick and opaque. Beat too little and it won’t set; beat too much and it’ll get crumbly. It’s a delicate balance.
Understanding the science behind divinity helps you avoid frustration. Treat it less like a recipe and more like an art form that rewards attention to detail.
Step-by-Step Divinity Candy Recipe
Now, the fun (and slightly intense) part—making your own divinity candy. Follow these steps carefully and you’ll be biting into sugary clouds in no time.
Step 1: Mixing the Sugar and Corn Syrup
Start by combining granulated sugar, light corn syrup, and water in a heavy saucepan. Stir gently just until the sugar is moistened. Avoid overmixing—this helps prevent sugar crystals from forming later. Place the pan over medium heat and let the mixture begin to warm.
Step 2: Cooking to the Right Temperature
Attach a candy thermometer to the side of the pot. Allow the mixture to boil without stirring. Cook until it reaches 250°F to 260°F, known as the hard-ball stage. This temperature is crucial for the candy to set properly.
Step 3: Beating Egg Whites to Soft Peaks
While the syrup cooks, beat egg whites in a clean mixing bowl until soft peaks form. They should hold their shape but still look glossy and slightly droopy at the tip.
Step 4: Combining Syrup and Egg Whites
Once the syrup reaches the correct temperature, remove it from the heat. With the mixer running on medium speed, slowly pour the hot syrup in a thin stream into the egg whites. Pouring slowly prevents the eggs from scrambling and helps create divinity’s signature airy texture.
Step 5: Beating to Stiff Peaks
After all the syrup is added, increase the mixer speed. Beat the mixture until it becomes thick, glossy, and holds stiff peaks. This may take 5–10 minutes depending on your mixer and humidity levels.
Step 6: Adding Vanilla and Optional Nuts
Stir in vanilla extract for flavor. If you like, fold in chopped pecans or walnuts. Nuts add a classic crunch and balance the sweetness beautifully.
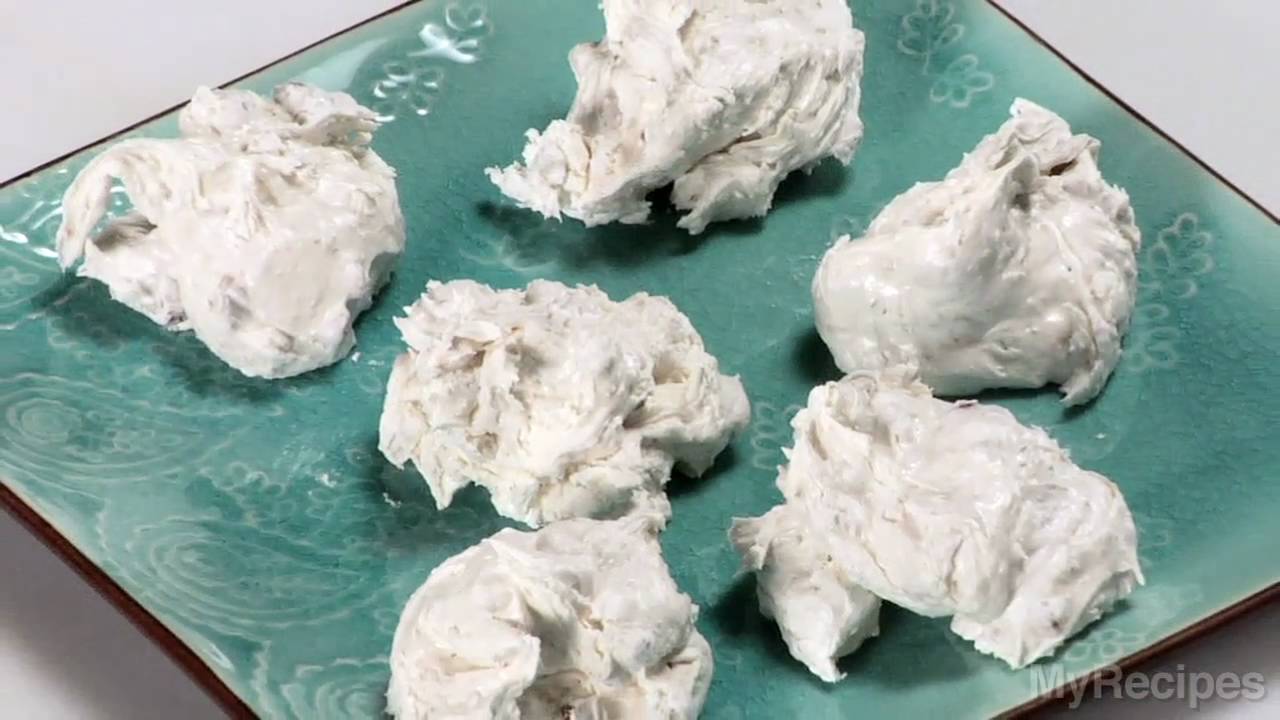
Step 7: Dropping onto Parchment and Cooling
Using two spoons, drop mounds of the candy onto parchment or wax paper. Let them sit at room temperature until fully set—usually about an hour. Once firm, enjoy your fluffy, melt-in-your-mouth divinity candy!
Troubleshooting Common Mistakes
Even seasoned candy makers have had a divinity fail now and then. It’s a tricky recipe, but most mistakes can be traced back to a few key issues. Here’s what might go wrong and how to fix it:
1. Too Runny
- Possible cause: Syrup undercooked or mixture underbeaten.
- Fix: Make sure to cook the sugar to exactly 260°F and beat the mixture until it’s thick and matte. Don’t try to “eyeball it”—use that candy thermometer.
2. Too Dry or Crumbly
- Possible cause: Overcooked syrup or overbeaten mixture.
- Fix: Beat only until it just holds its shape. Also, avoid letting the syrup go beyond 260°F.
3. Candy Won’t Set
- Possible cause: High humidity or not beating enough.
- Fix: Choose a dry day and don’t skimp on the final beating. If it’s humid, consider running a dehumidifier or air conditioner.
4. Grainy Texture
- Possible cause: Sugar crystals formed during cooking.
- Fix: Don’t stir the syrup after it starts boiling, and wash down the pot sides with a damp brush.
5. Sticky Surface
- Possible cause: Humidity again.
- Fix: Store in airtight containers with wax paper between layers. Avoid refrigeration.
Divinity isn’t a forgiving candy, but once you master it, you’ll feel like a kitchen magician.
Flavor Variations to Try
Once you’ve mastered the classic divinity, it’s time to have some fun with it. The basic recipe is like a blank canvas—it welcomes creativity. Whether you’re adding a splash of color, a new flavor, or a twist of texture, there are countless ways to make this traditional treat feel brand new.
1. Chocolate Divinity
Craving a little cocoa in your candy? Mix in 2 tablespoons of unsweetened cocoa powder during the final beat for a rich chocolate version. Or melt 1/4 cup of semi-sweet chocolate chips and swirl them in just before dropping the candy onto parchment. It adds depth and looks gorgeous too!
2. Peppermint Twist
For a cool, festive flair, replace vanilla with ½ teaspoon of peppermint extract. Then fold in crushed peppermint candies or swirl in a couple drops of red food coloring to make them look like mini candy canes. This version is a hit during the holidays!
3. Cherry-Almond Delight
Swap vanilla for almond extract and add chopped maraschino cherries. The slight tartness from the cherries balances the sweetness beautifully, and they add a lovely pop of color.
4. Coconut Dream
Fold in sweetened shredded coconut along with the nuts—or instead of nuts—for a tropical vibe. Toast the coconut for extra texture and a nuttier flavor.
5. Citrus Sunshine
Add zest of one orange or lemon and a touch of citrus extract for a bright, fresh twist. This version is light and perfect for spring or summer treats.
The key to successful variations is not to overwhelm the candy’s structure. Keep add-ins small and quantities modest. You want to enhance, not overpower.
Storing and Preserving Divinity
Divinity is delicate. While it sets firm, it’s highly sensitive to moisture, air, and temperature. To keep your candy tasting divine for days—or even weeks—proper storage is essential.
Short-Term Storage:
- Store at room temperature in an airtight container.
- Place wax paper between layers to prevent sticking.
- Keep in a cool, dry place away from direct sunlight and heat sources.
- Avoid the fridge—humidity can make it sticky and ruin the texture.
Divinity will stay fresh for up to two weeks if stored properly. Over time, it may dry out slightly but still remain tasty.
Long-Term Storage (Freezing):
While not ideal, divinity can be frozen if you take precautions:
- Wrap pieces individually in wax paper and then place them in a zip-top freezer bag or airtight container.
- Remove as much air as possible before sealing.
- Freeze for up to 2 months.
- To thaw, place at room temperature in the container—do not unwrap until fully thawed to prevent condensation.
Keep in mind, freezing may slightly alter the texture, but if you’re making big batches for gifting or parties, it’s a lifesaver.
How to Gift Divinity Candy
Divinity candy makes an excellent homemade gift—especially around the holidays. Its old-fashioned charm and delightful sweetness leave a lasting impression. Here’s how to turn your batch into beautiful, thoughtful presents.
Packaging Ideas:
- Decorative tins lined with wax or parchment paper
- Clear cellophane bags tied with ribbon and a personalized tag
- Glass jars with a handwritten recipe attached
- Mini bakery boxes for individual servings
Add a label with the name, ingredients, and a “best by” date for an extra polished touch.
Perfect Occasions for Giving:
- Christmas and other holidays
- Baby showers or bridal showers
- Birthdays for candy lovers
- Housewarming gifts
- Teacher appreciation or thank-you gestures
Pair it with other homemade treats like fudge or cookies for a full dessert box. Trust us, this sweet little candy turns into a heartfelt surprise with just a bit of presentation magic.
Nutrition Facts
Let’s be honest—divinity candy is a treat, not a health food. But if you’re curious about what’s in each bite, here’s a general idea of the nutritional breakdown per piece (assuming a batch yields 36 pieces):
| Nutrient | Per Piece |
|---|---|
| Calories | 90–110 kcal |
| Total Fat | 2–4 g |
| Saturated Fat | 0.5–1 g |
| Cholesterol | 0 mg |
| Sodium | 10–20 mg |
| Total Carbohydrates | 20–24 g |
| Sugars | 19–23 g |
| Protein | <1 g |
These values can change depending on add-ins like nuts, chocolate, or dried fruit.
Healthier Swaps (Optional):
- Use organic sugar or coconut sugar (though it may alter the color and taste)
- Substitute honey or maple syrup for corn syrup (texture may vary)
- Try using aquafaba (chickpea water) instead of egg whites for a vegan version
Still, divinity is best enjoyed as an occasional indulgence—because life’s too short to skip dessert.
Divinity Candy vs. Other Confections
If you’re wondering how divinity compares to other old-school candies, here’s a quick breakdown:
| Candy | Texture | Ingredients | Flavor Profile |
|---|---|---|---|
| Divinity | Airy, fluffy, firm | Sugar, egg whites, corn syrup | Light vanilla, sweet |
| Fudge | Creamy, dense | Sugar, milk, chocolate, butter | Rich, chocolatey, smooth |
| Nougat | Chewy, sticky | Sugar, egg whites, nuts | Nutty, sweet, sometimes fruity |
| Marshmallow | Soft, spongy | Sugar, gelatin, corn syrup | Mild, sweet |
Divinity stands out with its melt-in-your-mouth consistency and whipped sugar texture. It’s less chewy than nougat, lighter than fudge, and more crumbly than marshmallow. It’s truly one-of-a-kind.
FAQs about Divinity Candy Recipe
1. Can I make divinity without a candy thermometer?
Technically yes, but it’s risky. You’d need to test for the hard-ball stage by dropping syrup into cold water. A thermometer gives better accuracy and consistency.
2. Why did my divinity come out sticky?
Most likely, it’s due to humidity or under-beating. Make sure you beat until it loses gloss and holds shape, and always store in an airtight container.
3. Can I make divinity in a humid climate?
It’s tough. Try running a dehumidifier or wait for a drier day. Candy making and moisture just don’t mix well.
4. How long does homemade divinity last?
Stored properly at room temperature, it lasts up to two weeks. For longer storage, freeze it with care.
5. Can I make divinity without nuts?
Absolutely! Nuts are optional. You can leave them out or replace them with coconut, dried fruit, or even chocolate chips.
Final Thoughts
Making divinity candy is both an art and a science—and it’s absolutely worth mastering. From whipping egg whites to dropping that final sugary scoop, the process is a joyful mix of precision and tradition. While it can be a bit finicky, especially for first-timers, once you get the hang of it, you’ll want to make it again and again.
Whether you’re honoring a family recipe, gifting homemade treats, or just exploring vintage confections, divinity candy delivers big on charm and flavor. With patience, practice, and maybe a weather check before you start, you’ll have a tray full of sweet, cloud-like perfection that’s sure to wow your friends and family.
So, gather your ingredients, fire up that mixer, and get ready to make something truly divine.


