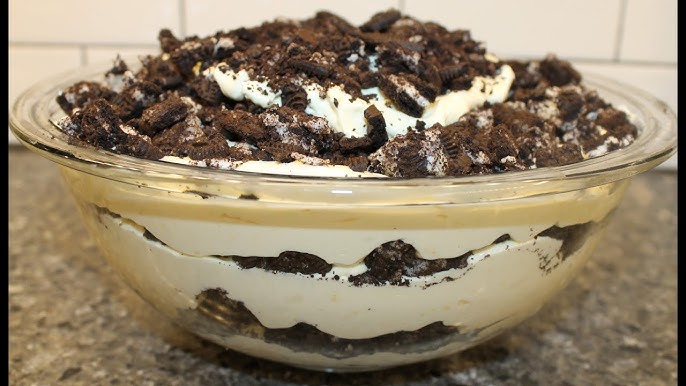
Dirt Pudding Recipe: Dirt pudding, also known as “Dirt Cake,” is a fun, creamy, and chocolatey dessert that’s perfect for all occasions. Its playful appearance mimics garden soil, making it especially popular for children’s parties, Halloween, and themed events. The best part? It’s incredibly easy to make and doesn’t require any baking!
Whether you’re a seasoned baker or someone trying desserts for the first time, this recipe guarantees a no-fail, crowd-pleasing treat.
The combination of silky pudding, crunchy cookie crumbs, and gummy worms creates a visually appealing and delicious dessert that everyone will love.
Ingredients Needed
Main Ingredients:
- 1 package of Oreo cookies (14–16 ounces) – Crushed to resemble dirt.
- 2 packs of instant chocolate pudding mix (3.9 ounces each) – Adds creamy chocolate flavor.
- 4 cups of cold milk – For preparing the pudding base.
- 1 tub of Cool Whip (8 ounces) – Adds a light and fluffy texture.
- 1 block of cream cheese (8 ounces) – Softened for creaminess.
- 1 cup of powdered sugar – For a hint of sweetness.
- 1 teaspoon vanilla extract – Enhances flavor.
Optional Add-ons for Creativity:
- Gummy worms – Perfect for a playful “dirt” garden look.
- Candy rocks – Adds extra decoration for realism.
- Sprinkles – Great for festive touches.
- Edible flowers – Elegant and fun for parties.
- Chopped nuts – Adds crunch and texture.
Kitchen Tools Required
Essential Tools:
- Mixing Bowls – For preparing pudding and cream cheese mixtures.
- Electric Mixer – To blend ingredients smoothly.
- Plastic Ziplock Bag or Food Processor – For crushing Oreos.
- Spatula – For even spreading.
- Serving Cups or Trifle Bowl – Presentation purposes.
Optional Tools for Decoration:
- Piping Bag – For decorative layers.
- Mini Shovels or Garden Tools – Fun serving utensils for themed presentations.
- Cupcake Liners – For individual servings.
Step-by-Step Instructions
Step 1: Prepare the Pudding Base
- In a large mixing bowl, whisk together the pudding mix and milk until thick and smooth.
- Allow it to set for 5–10 minutes in the refrigerator while preparing other components.
Step 2: Make the Cream Mixture
- Beat the softened cream cheese and powdered sugar until smooth and fluffy.
- Gently fold in the Cool Whip and mix until fully incorporated.
Step 3: Combine the Mixtures
- Slowly fold the pudding mixture into the cream cheese and Cool Whip blend.
- Stir gently until everything is evenly combined. This ensures a light and airy texture.
Step 4: Crush the Cookies
- Place Oreos in a ziplock bag and crush them using a rolling pin, or pulse in a food processor until crumbly.
- Save some larger chunks for added texture if desired.
Step 5: Layer the Dessert
- Begin with a layer of crushed Oreos at the bottom of your serving dish.
- Add a thick layer of the pudding mixture.
- Repeat the layering process until the dish is full, ending with crushed Oreos on top for the “dirt” effect.
- Insert gummy worms or other decorations between layers and on top for added fun.
Creative Variations of Dirt Pudding
Themed Ideas for Parties
- Halloween Graveyard Dirt Cake – Add edible tombstones and bones.
- Flower Pot Design – Use flower pots as serving dishes and edible flowers as decorations.
- Beach-Themed Cups – Replace Oreos with crushed graham crackers for a sandy effect.
Different Flavor Combinations
- Vanilla Dirt Pudding – Use vanilla pudding instead of chocolate for a lighter twist.
- Peanut Butter Bliss – Add layers of peanut butter or peanut butter cups.
- Mint Chocolate – Add mint extract and green food coloring for a fresh look and taste.
Serving Suggestions
Dirt pudding isn’t just a treat; it’s an experience! Whether you’re serving it at a party or making it for a casual family dessert, presentation matters. Here’s how to serve it creatively:
Creative Serving Ideas
- Individual Cups or Mason Jars – Serve the pudding in clear cups or small jars to showcase the layers. Add gummy worms crawling out for a fun look.
- Flower Pots – Use small, clean flower pots for a garden-themed presentation. Stick in a fake flower or edible plant for added effect.
- Trifle Bowl – Create dramatic, layered visuals in a large, clear bowl for big gatherings.
Portion Sizes and Tips
- Kids’ Portions – Small cups (4–6 oz) are usually sufficient for kids.
- Adult Portions – Larger bowls or servings for those with a sweet tooth.
- Themed Decorations – Add edible flowers, candy bugs, or mini shovels as scoops to match the occasion.
Storage and Make-Ahead Tips
Refrigeration Guidelines
- Store dirt pudding in an airtight container in the refrigerator.
- It stays fresh for 2–3 days, but the cookies may soften over time, so consume it quickly for the best texture.
Freezing and Defrosting Recommendations
- Freezing is not recommended, as it can alter the pudding’s creamy texture.
- If freezing is necessary, freeze without the cookie layer and add it fresh when serving. Thaw in the fridge overnight before eating.
Make-Ahead Preparation
- Prepare the pudding base and cream layers up to 24 hours in advance.
- Assemble the layers right before serving to maintain the cookie crunch.
Common Mistakes to Avoid
Even simple recipes can go wrong if you’re not careful. Avoid these common pitfalls to make the perfect dirt pudding:
- Overmixing the Cream Base – Overmixing can make the pudding too thin, affecting the texture. Fold ingredients gently for fluffiness.
- Not Crushing Cookies Properly – Too large chunks may not create the desired “dirt” effect, while over-crushing could turn them powdery. Aim for medium crumbs.
- Overloading with Decorations – Too many gummy worms or toppings can overpower the pudding’s flavor. Stick to a balanced presentation.
- Skipping Refrigeration – Chilling the pudding before serving enhances flavors and texture, so don’t rush this step.
- Serving Immediately After Assembly – Let the pudding chill for at least 30 minutes to help the layers set properly.
Healthier Alternatives for Dirt Pudding
Want to enjoy this dessert guilt-free? Try these healthier swaps:
Low-Fat Ingredients
- Use low-fat cream cheese and fat-free Cool Whip to cut calories.
- Opt for sugar-free pudding mix for a lower-sugar version.
Vegan and Dairy-Free Variations
- Replace regular pudding with plant-based pudding made from almond, coconut, or oat milk.
- Use dairy-free cream cheese and vegan whipped topping for similar texture and taste.
Gluten-Free Options
- Swap Oreos with gluten-free chocolate sandwich cookies.
- Check all ingredient labels to ensure they are gluten-free.
Natural Sweeteners
- Replace powdered sugar with maple syrup or honey for a less-processed option.
Fun Facts About Dirt Pudding
- Origin Story – Dirt pudding originated in the United States as a playful dessert idea, particularly for children’s parties.
- Nicknames – It’s often called “Dirt Cake” or “Worms in Dirt,” reflecting its appearance.
- Perfect for Kids’ Parties – Its hands-on decoration process makes it a hit among kids who can help create their own versions.
- Popularity in Holidays – It’s a go-to treat for Halloween and garden-themed birthday parties.
- Not Just Chocolate – Variations with vanilla, strawberry, and even butterscotch pudding have gained popularity.
FAQs about Dirt Pudding Recipe
What is dirt pudding?
Dirt pudding is a fun and simple no-bake dessert that typically features layers of crushed Oreo cookies and a creamy mixture made from cream cheese, vanilla pudding, and whipped topping. It’s popular at kids’ parties and family gatherings due to its playful appearance, often decorated with gummy worms to mimic real dirt.
What ingredients do I need for dirt pudding?
To make classic dirt pudding, you’ll need Oreo cookies (or any chocolate sandwich cookies), vanilla instant pudding mix, milk, cream cheese, butter, powdered sugar, and whipped topping. Optional garnishes include gummy worms or other candy to enhance the “dirt” theme.
How do I make dirt pudding?
Begin by crushing the cookies into crumbs, set aside. Mix the pudding with milk according to package instructions. In a separate bowl, blend softened cream cheese, butter, and powdered sugar until smooth. Fold in the whipped topping, then gently combine with the pudding mixture. Layer the cookie crumbs and pudding mixture in a serving dish, starting and ending with crumbs. Chill before serving.
Can dirt pudding be made in advance?
Yes, dirt pudding tastes even better when made a day ahead, allowing the flavors to meld together. Keep it refrigerated until ready to serve.
Is there a way to make dirt pudding healthier?
For a healthier version, substitute low-fat cream cheese, sugar-free pudding, and low-fat milk. You can also use a light whipped topping or make your own with less sugar.
How should dirt pudding be stored?
Store dirt pudding in the refrigerator, covered, to maintain freshness. It’s best consumed within 2-3 days.
Can I freeze dirt pudding?
Freezing is not recommended as the texture of the cream mixture may change, and the cookie layer could become soggy upon thawing.
Final Thoughts
Dirt pudding is more than just a dessert—it’s a fun, creative experience that brings out the child in everyone. Whether you’re preparing it for a kid’s birthday party, Halloween bash, or just craving a sweet treat, this recipe is guaranteed to impress.
Its versatility allows you to experiment with flavors, decorations, and themes, making it suitable for any occasion. Plus, it’s quick, easy, and requires no baking—perfect for beginners and busy parents.
So gather your ingredients, get creative with decorations, and enjoy making (and eating) this delightful dessert. Your family and friends will love it!


