Dirt Dessert Recipe: If you’re looking for a no-bake treat that’s fun, nostalgic, and absolutely delicious, then dirt dessert is your answer.
Packed with layers of creamy pudding, fluffy whipped topping, and crushed cookies, this dessert is as delightful to make as it is to eat.
Let’s dig into this gooey, chocolatey treat with our easy-to-follow guide.
What Is Dirt Dessert?
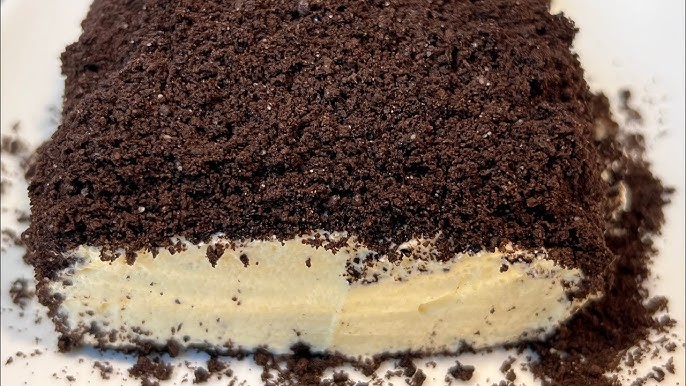
Dirt dessert, sometimes called “dirt pudding,” is a layered sweet treat made primarily of crushed chocolate sandwich cookies (like Oreos), chocolate pudding, and a whipped cream or cream cheese mixture. Often garnished with gummy worms, it mimics the look of soil—hence the name “dirt.” But don’t let the name fool you; it’s incredibly rich, smooth, and sweet. It’s also a kid favorite at birthday parties, BBQs, or Halloween gatherings thanks to its fun, messy appearance.
Why Everyone Loves It
Why is dirt dessert such a hit? For starters, it’s incredibly simple to make. No baking required. You just mix, layer, and chill. Second, it’s customizable. Whether you’re adding gummy worms, making it in cups, jars, or a large dish, you can tweak it to match the occasion. Lastly, it strikes the perfect balance between creamy and crunchy, making it a crowd-pleaser for all ages.
Ingredients You’ll Need
For the Creamy Layer
To achieve that delicious creamy base, you’ll need:
- 1 package (8 oz) of cream cheese, softened
- 1/4 cup of butter, softened
- 1 cup powdered sugar
- 2 packages (3.4 oz each) of instant chocolate pudding
- 3 cups of cold milk
- 1 container (12 oz) of whipped topping (like Cool Whip)
These ingredients combine into a rich, velvety filling that forms the heart of your dirt dessert.
For the Cookie Crumble “Dirt”
- 1 package (14.3 oz) of chocolate sandwich cookies (like Oreos)
These cookies are the “dirt” part. You’ll crush them up into fine crumbs—either in a food processor or by hand using a plastic bag and rolling pin.
Fun Optional Add-ins
Want to make it even more fun or themed? Try adding:
- Gummy worms
- Mini chocolate chips
- Crushed candy bars (Snickers or Reese’s work great)
- Sprinkles or colored sugar for holidays
These toppings can make your dirt dessert a showstopper at any party.
Essential Kitchen Tools
Before diving into prep, make sure you’ve got:
- Large mixing bowls
- Electric mixer or hand whisk
- Rubber spatula
- Food processor or resealable bag and rolling pin
- 9×13 inch baking dish or dessert cups
- Measuring cups and spoons
Having everything prepped and ready helps streamline the process and makes clean-up easier.
Step-by-Step Instructions
Step 1 – Crushing the Oreos
Start by making the base layer—the “dirt.” Use a food processor to crush the cookies into fine crumbs. If you don’t have a food processor, place the cookies in a large resealable plastic bag, seal it, and crush them with a rolling pin or heavy jar. You want a fine, even texture with some chunks for added crunch. Set the crumbs aside in a bowl.
Step 2 – Preparing the Pudding Mixture
In a medium bowl, whisk together the chocolate pudding mix and cold milk for about 2 minutes until it thickens. Let it sit for 5 minutes to set properly. This will be part of your middle layer, giving the dessert a rich chocolate flavor.
Step 3 – Making the Cream Cheese Mixture
In a large bowl, beat the softened cream cheese and butter until smooth and fluffy. Gradually mix in the powdered sugar until fully incorporated. Then, gently fold in the whipped topping. Once that’s smooth, fold in the prepared pudding mixture. The result is a creamy, mousse-like texture that’s light yet decadent.
Step 4 – Layering It All Together
Now the fun part—layering! In a 9×13 inch dish or individual cups:
- Start with a layer of crushed cookies.
- Add a thick layer of the creamy pudding mixture.
- Repeat the layers until you run out, finishing with a top layer of cookie crumbs.
- Add gummy worms or any fun toppings on the very top.
This layered effect gives it the signature “dirt” look and makes each spoonful extra satisfying.
Step 5 – Chilling Before Serving
Cover the dish with plastic wrap and refrigerate for at least 2–3 hours. This helps everything firm up and the flavors to meld together. For best results, chill overnight.
Creative Variations of Dirt Dessert
Dirt dessert is already a fan favorite, but the best part? You can easily tweak it to suit different flavors, seasons, or party themes. Here are a few popular variations:
- Peanut Butter Dirt Dessert: Swap out the chocolate pudding for peanut butter pudding or add a layer of creamy peanut butter between the pudding and cookie layers.
- Mint Oreo Dirt Dessert: Use mint-flavored Oreos and add a drop of peppermint extract to the cream cheese mixture for a cool, refreshing twist.
- Strawberry Dirt Dessert: Replace chocolate pudding with strawberry pudding and use golden Oreos. Top with fresh strawberries or strawberry gummies for a fruity version.
- Halloween-Themed Dirt Dessert: Add candy pumpkins, gummy spiders, or Halloween sprinkles for a spooky effect. You can also use green or orange-colored whipped topping for a festive touch.
- Christmas Dirt Dessert: Use peppermint candies, red and green sprinkles, and white chocolate chips to create a holiday-themed dessert.
These simple tweaks can turn a classic recipe into a personalized treat that fits any occasion.
Serving Tips and Presentation Ideas
Presentation matters, especially for fun desserts like this. Here are some creative ideas for serving dirt dessert:
- In Clear Cups: Layer the dessert in individual clear plastic cups for easy serving. This is perfect for parties and makes cleanup a breeze.
- In a Flower Pot: For a whimsical presentation, serve your dirt dessert in a clean, unused flower pot. Stick a few fake flowers on top and use a new, clean trowel or spoon to serve.
- In Mason Jars: Layer the dessert in small mason jars for a rustic, Instagram-worthy presentation. Tie a ribbon around the jar for extra charm.
- Use Edible Toppers: Add candy rocks, edible flowers, or shaped chocolates on top to elevate the visual appeal.
- Serve with Fun Spoons: Colorful plastic or themed spoons (like garden shovels) can make serving dirt dessert even more fun.
Presentation can transform this humble dessert into the star of the show, so don’t hold back on creativity!
How to Store and Preserve Dirt Dessert
One of the many great things about dirt dessert is how well it holds up. Here’s how to store it properly:
- Refrigerator: Keep any leftovers covered in the fridge. It will stay fresh for up to 3–4 days. The flavors continue to blend, and it often tastes even better the next day.
- Freezing: While not ideal due to the whipped topping and pudding, you can freeze dirt dessert. If you do, freeze it in an airtight container for up to a month. Thaw in the fridge before serving.
- Transporting: If you’re taking it to a potluck or picnic, keep it in a cooler or insulated bag to ensure it stays chilled.
Always keep it cold to maintain the texture and flavor. It’s not a fan of heat, and neither are the dairy-based ingredients inside.
Common Mistakes to Avoid
Even with such a simple recipe, a few small errors can impact the final result. Here are common pitfalls to avoid:
- Not Softening the Cream Cheese: Cold cream cheese will result in a lumpy mixture. Make sure it’s fully softened for that smooth, creamy texture.
- Using Cook-and-Serve Pudding: Stick to instant pudding. The cook-and-serve version won’t set the same way and can ruin the texture.
- Skipping the Chill Time: Letting it sit in the fridge allows the layers to set properly and meld the flavors. Skipping this step will leave your dessert runny.
- Overmixing the Whipped Topping: Gently fold the whipped topping in. Overmixing will deflate it, and you’ll lose that light, airy texture.
- Adding Gummy Worms Too Soon: If you add the worms before chilling, they can get soggy. Add them right before serving for the best texture and appearance.
Being aware of these mistakes helps ensure a perfect dessert every single time.
Healthier Alternatives
Craving dirt dessert but watching your diet? Don’t worry—you can still enjoy a lighter version without sacrificing flavor. Here are a few swaps to make your dirt dessert a bit healthier:
- Low-Fat Dairy Options: Use reduced-fat cream cheese, skim milk, and light whipped topping. These substitutions cut down on fat and calories without altering the taste too much.
- Sugar-Free Pudding Mix: Swap the regular pudding with a sugar-free version to reduce your sugar intake.
- Whole Wheat or Organic Cookies: While traditional Oreos are classic, you can opt for organic or whole wheat versions of chocolate sandwich cookies for a slightly healthier touch.
- Natural Sweeteners: Replace powdered sugar with stevia or monk fruit sweetener for fewer calories.
- Add Fresh Fruits: Toss in chopped strawberries, bananas, or blueberries between the layers for added nutrients and natural sweetness.
While it’s still a dessert, these tweaks make it more diet-friendly and guilt-free. It’s all about balance—enjoy the treat, just in a way that suits your lifestyle.
Gluten-Free and Vegan Options
For those with dietary restrictions, dirt dessert can still be part of the menu. Here’s how to make it gluten-free or vegan:
Gluten-Free Version
- Cookies: Use certified gluten-free chocolate sandwich cookies.
- Pudding: Double-check the pudding mix to ensure it’s gluten-free (most instant mixes are, but it’s good to be sure).
- Cross-Contamination: Make sure your kitchen tools and prep space are free from gluten contamination if you’re cooking for someone with Celiac disease.
Vegan Version
- Dairy-Free Pudding: Choose plant-based pudding made with almond, oat, or soy milk.
- Vegan Cream Cheese and Butter: Brands like Miyoko’s or Earth Balance offer great dairy-free alternatives.
- Whipped Topping: Use coconut-based or almond-based whipped toppings (like So Delicious CocoWhip).
- Cookies: Opt for vegan chocolate cookies. Some versions of Oreos are technically vegan, but double-check ingredients to avoid any animal by-products.
Creating a dessert that everyone can enjoy, regardless of dietary needs, is easier than ever with today’s ingredient alternatives.
Fun Facts About Dirt Dessert
Did you know dirt dessert has a fascinating backstory and quirky presence in pop culture? Here are some fun facts:
- It Originated in the Midwest: Dirt pudding became popular in the American Midwest, often served at church gatherings and family potlucks.
- It’s a Halloween Favorite: The dirt-and-worms presentation makes it a go-to Halloween party treat.
- Kid-Friendly Origins: It was originally created as a fun way to involve kids in the kitchen—easy, safe, and no baking needed.
- There’s a Gourmet Version: Upscale restaurants have reinvented dirt dessert using chocolate mousse, edible soil (made from cookie crumbs and nuts), and artisan candies.
- It’s Been Around for Decades: Dirt dessert became a household name in the 1980s and 1990s, thanks to its presence in community cookbooks and children’s parties.
These facts add a layer of nostalgia and charm to an already beloved dessert.
FAQs about Dirt Dessert Recipe
Q1: Can I make dirt dessert the night before?
Yes! In fact, making it ahead of time is recommended. It gives the dessert time to set and the flavors to meld beautifully.
Q2: How long can dirt dessert sit out?
No more than two hours at room temperature. It contains dairy, so it’s best kept chilled until ready to serve.
Q3: Can I use homemade pudding instead of instant?
Absolutely! Just make sure it’s fully cooled and set before using it in the layers.
Q4: What are some non-candy toppings for dirt dessert?
Try shredded coconut (dyed green to look like grass), mini marshmallows, or even chopped nuts for a crunchy contrast.
Q5: Can kids help make this dessert?
Definitely! It’s one of the easiest, safest, and most fun desserts to make with kids. Let them crush cookies or layer the pudding for a hands-on treat.
Conclusion
There’s something uniquely satisfying about dirt dessert—it’s easy to make, endlessly customizable, and guaranteed to bring smiles. Whether you’re crafting it for a kids’ party, a picnic, or just craving something indulgent, this recipe delivers every time. The combination of creamy pudding, fluffy topping, and crunchy cookie layers is a textural dream, and the whimsical presentation is always a hit. Plus, with so many ways to adapt it—whether healthier, vegan, or themed—you’ll never run out of excuses to make it. So grab your mixing bowls and get a little messy; dirt dessert is calling your name!


