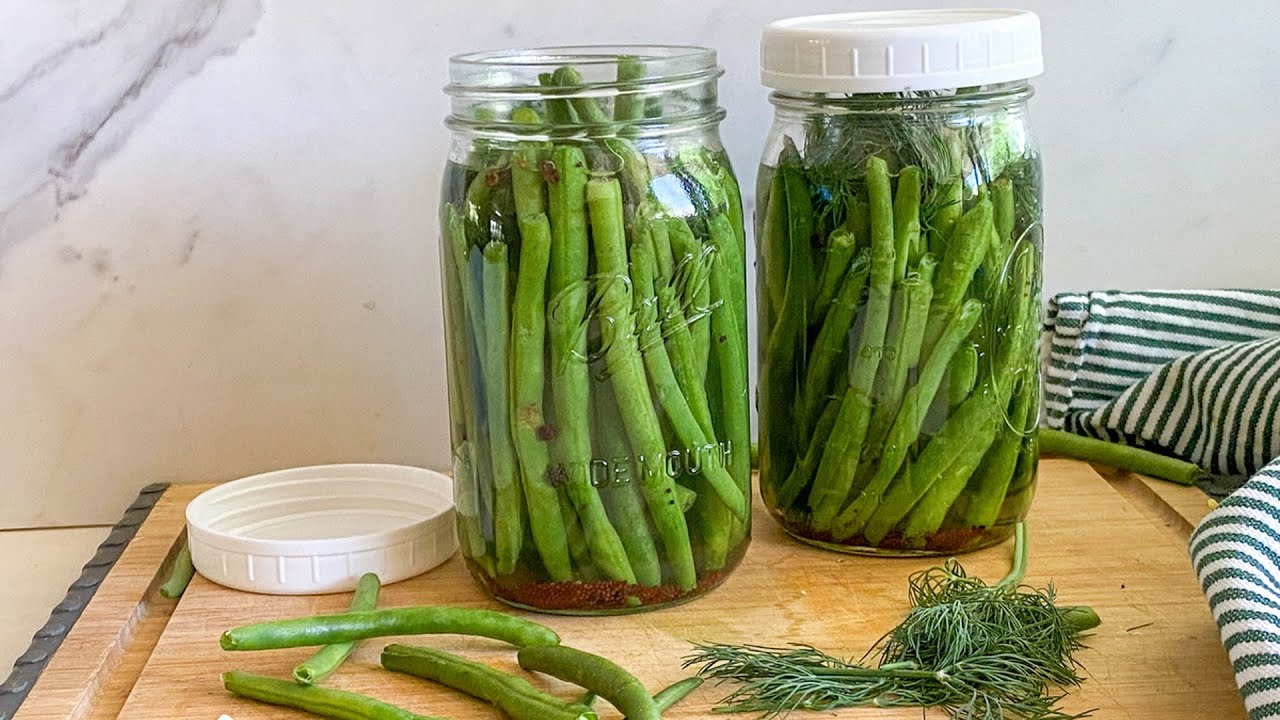
Dilly Beans Recipe: Dilly beans are crisp green beans preserved in a bold, tangy brine flavored with fresh dill, garlic, vinegar, and pickling spices. They are one of the easiest and most rewarding pickled vegetables to make at home because they deliver strong flavor, excellent crunch, and long-lasting convenience. We can serve them as a snack straight from the jar, add them to relish trays, pair them with grilled meats, or use them as a punchy garnish for sandwiches, salads, and savory platters.
What makes a great dilly beans recipe stand out is balance. We want the beans to stay firm, the brine to taste bright but not harsh, the dill to come through clearly, and the garlic to deepen the flavor without overpowering it. When prepared properly, dilly beans become crisp, aromatic, and intensely satisfying.
This guide covers the exact ingredients, the method, and the small details that help produce the best possible batch.
Ingredients You’ll Need
To make a classic batch of dilly beans, we need fresh, firm ingredients and a reliable pickling liquid.
For the Beans
- 1 1/2 to 2 pounds fresh green beans
- 2 to 3 fresh dill sprigs per jar
- 4 to 6 garlic cloves, peeled
- 1 teaspoon red pepper flakes per jar if we want heat
- 1 teaspoon mustard seeds per jar
- 1/2 teaspoon black peppercorns per jar
For the Brine
- 2 1/2 cups white vinegar
- 2 1/2 cups water
- 1/4 cup pickling salt
These quantities work well for about 4 pint jars, depending on how tightly we pack the beans.
Choosing the Best Green Beans for Dilly Beans
The quality of the beans determines the final texture. We want fresh, slender, snap-ready green beans with no wrinkles, soft spots, or blemishes. Thick or mature beans can turn stringy and may not pickle as evenly. The best beans break cleanly when bent and feel firm from end to end.
When possible, we should use beans on the same day we buy or harvest them. Fresher beans retain more crunch, which is one of the most important qualities in a strong dilly beans recipe.
We also want to trim the beans so they fit neatly into the jars. Uniform length improves appearance, helps with packing, and ensures all the beans stay submerged in the brine.
Why Dill, Garlic, and Vinegar Matter
Each core ingredient has a specific role.
Dill provides the signature herbal character that makes dilly beans distinct from standard pickled beans. Fresh dill gives the cleanest flavor, though dill seed can work in smaller amounts.
Garlic adds savory depth and makes the brine taste fuller. A modest amount is enough to build flavor without masking the brightness of the vinegar and dill.
Vinegar creates the sharp, tangy foundation. White vinegar is the classic choice because it is clean, strong, and neutral in color, allowing the green beans and dill to remain visually appealing.
The result is a preserved vegetable that tastes bold, refreshing, and well-rounded.
Preparing the Green Beans Properly
Before we start packing jars, we need to prepare the beans carefully.
First, we rinse the beans thoroughly under cold running water. Then we trim both ends, or at least the stem ends, depending on preference. After trimming, we measure the beans against the jars and cut them to fit with about 1/2 inch of headspace at the top.
That small detail matters. Beans that are too tall can interfere with sealing, while beans that are too short may float and shift more easily.
Once trimmed, we set the beans aside and prepare the jars and brine.
How to Prepare the Jars
Clean jars are essential for a clean result. We wash the jars, lids, and bands thoroughly in hot soapy water and rinse well. If we are making shelf-stable canned dilly beans, we should also follow proper sterilizing and canning procedures.
The jars should be warm before filling so they are ready for the hot brine. This also reduces the chance of temperature shock.
Into each jar, we add:
- Fresh dill sprigs
- Garlic cloves
- Mustard seeds
- Black peppercorns
- Red pepper flakes if using
Then we pack the trimmed green beans in vertically. A tight pack is ideal because it keeps the beans upright and helps them stay crisp.
Making the Pickling Brine
The brine is simple but must be measured correctly.
In a medium saucepan, we combine:
- 2 1/2 cups white vinegar
- 2 1/2 cups water
- 1/4 cup pickling salt
We bring the mixture to a gentle boil, stirring until the salt dissolves completely. The hot brine should taste assertive because the beans will absorb and soften the intensity over time.
We do not reduce the vinegar ratio carelessly. The acidity is important for both flavor and preservation. A balanced brine creates tangy beans that stay bright and flavorful without tasting flat.
Step-by-Step Guide to Making Dilly Beans
Step 1 – Wash and Trim the Beans
Rinse the green beans very well and trim them to fit your pint jars neatly. Keep them uniform in length for the best appearance and easiest packing.
Step 2 – Prepare the Jars
Wash the jars, lids, and rings thoroughly. Keep the jars warm and ready for filling.
Step 3 – Add the Flavor Base
Place dill sprigs, garlic, mustard seeds, black peppercorns, and optional red pepper flakes into each jar. This creates a well-seasoned base that flavors the beans from the bottom up.
Step 4 – Pack the Beans Tightly
Stand the green beans upright in the jars. Pack them closely, but do not crush them. A snug fit helps the beans stay in place and gives the finished jars a clean, professional look.
Step 5 – Heat the Brine
Combine vinegar, water, and pickling salt in a saucepan. Bring the mixture to a boil and stir until the salt dissolves.
Step 6 – Pour the Hot Brine
Carefully pour the hot brine into each jar, covering the beans fully while leaving about 1/2 inch headspace at the top.
Step 7 – Remove Air Bubbles
Slide a nonmetallic utensil along the inside edge of each jar to release trapped air. Add more brine if needed to keep the beans fully covered.
Step 8 – Wipe and Seal
Wipe the jar rims clean with a damp cloth, apply the lids, and screw on the bands until fingertip tight.
Step 9 – Process if Canning
If we want shelf-stable jars, process them in a boiling water bath according to safe canning standards for pickled beans. If we are making refrigerator dilly beans, let the jars cool and refrigerate them.
Step 10 – Let the Flavor Develop
For the best taste, we allow the beans to sit for at least one to two weeks before opening. This gives the dill, garlic, and brine time to penetrate the beans fully.
How to Keep Dilly Beans Crisp
Crunch is a major quality marker in a successful dilly beans recipe. To preserve texture, we should always begin with very fresh beans and avoid overcooking them. Since the beans are not pre-boiled in this method, they keep more of their natural structure.
A few important habits help:
- Use freshly harvested or very fresh store-bought beans
- Do not use overgrown beans
- Pack jars tightly
- Use the correct vinegar-to-water balance
- Avoid overprocessing during canning
Crisp beans deliver the most satisfying bite and make the final product feel vibrant rather than limp.
Flavor Variations for Dilly Beans
One reason this recipe remains popular is that it is easy to customize while keeping the same reliable method.
Spicy Dilly Beans
Add more red pepper flakes or a small hot pepper to each jar for a stronger kick.
Garlic-Forward Dilly Beans
Increase the garlic by one or two cloves per jar for a more robust savory flavor.
Extra-Herby Dilly Beans
Use additional dill sprigs or a pinch of dill seed for a stronger herbal finish.
Bold Pickling Spice Version
Add coriander seeds or a small amount of classic pickling spice to deepen complexity.
Each variation can work well as long as the core brine ratio remains consistent.
How Long Dilly Beans Need to Sit Before Eating
Although it is tempting to open a jar immediately, the best flavor develops with time. Refrigerator dilly beans usually taste much better after 48 hours, and even better after one full week. Canned dilly beans improve further after two weeks because the vinegar, garlic, dill, and spices have more time to infuse the beans.
This resting period transforms the beans from simple pickled vegetables into a fully seasoned, flavorful preserve.
Best Ways to Serve Dilly Beans
A well-made jar of dilly beans is versatile. We can serve them in several ways:
- As a snack straight from the jar
- On a charcuterie or relish board
- Alongside barbecue, grilled chicken, or roasted meats
- Chopped into potato salad or pasta salad
- As a garnish for sandwiches and burgers
- Paired with cheese, crackers, and cured meats
They bring acidity, crunch, and herbal sharpness to rich foods, which is why they work so well on entertaining platters and summer tables.
Common Mistakes to Avoid
Even a simple dilly beans recipe can go wrong if basic details are ignored.
Using Old Beans
Older beans lose crunch and can taste dull after pickling.
Packing Too Loosely
Loose beans float more easily and may pickle unevenly.
Weak Brine
Too much water reduces flavor and can affect preservation quality.
Skipping the Resting Time
Freshly packed beans need time to absorb flavor. Opening too soon leads to a less developed result.
Overprocessing
Too much heat can soften the beans and reduce the crisp texture that makes dilly beans appealing.
Avoiding these mistakes helps produce jars that look better, taste sharper, and store more reliably.
Storage Tips for Dilly Beans
For refrigerator dilly beans, keep the jars chilled and use them within several weeks for the best texture and flavor.
For properly canned dilly beans, store sealed jars in a cool, dark place. Once opened, refrigerate and use promptly.
Always check jars before serving. The brine should remain clear to slightly tinted by herbs and spices, and the beans should smell pleasantly tangy, garlicky, and fresh.
Why This Dilly Beans Recipe Works
This recipe works because it keeps the method focused and the flavor profile classic. The vinegar provides clean brightness, the dill gives the signature character, the garlic adds depth, and the beans remain the star. The proportions are balanced, the steps are practical, and the final result is crisp, tangy, and versatile.
A dependable dilly beans recipe should be easy enough to repeat, strong enough in flavor to stand out, and flexible enough to adapt to personal taste. This version does exactly that. With good beans, a proper brine, and careful packing, we get jars that look attractive, taste bold, and deliver the satisfying crunch that makes dilly beans a lasting favorite.
FAQs about Dilly Beans Recipe
1. What are dilly beans?
Dilly beans are pickled green beans flavored with dill, garlic, and spices. They are crisp, tangy, and often served as a snack, garnish, or side.
2. What ingredients are usually used in dilly beans?
The main ingredients are fresh green beans, vinegar, water, salt, dill, and garlic. Some recipes also include mustard seeds, peppercorns, or red pepper flakes.
3. Do dilly beans need to be canned?
Not always. They can be made as quick refrigerator pickles or processed for longer shelf storage using proper canning methods.
4. How do we keep dilly beans crisp?
Use very fresh green beans and avoid overcooking them. Packing them tightly and following the recipe carefully also helps keep their crunch.
5. How long do dilly beans take to pickle?
Refrigerator dilly beans usually need at least 24 hours to develop flavor, but they taste even better after a few days.
6. Are dilly beans spicy?
They are usually mild, but they can be made spicy by adding chili flakes or hot peppers. The heat level is easy to adjust.
7. What can we serve with dilly beans?
Dilly beans are great on charcuterie boards, in sandwiches, alongside grilled meats, or enjoyed straight from the jar as a snack.
8. How should dilly beans be stored?
Store refrigerator dilly beans in the fridge and use them within a few weeks. Properly canned dilly beans can last much longer when sealed and stored correctly.
Final Thoughts
When we want a homemade pickle that is easy to prepare, deeply flavorful, and useful in many meals, dilly beans are one of the best choices. They require simple ingredients, reward careful preparation, and offer a bright, savory finish that improves with time. With the right green beans, fresh dill, garlic, and a properly balanced brine, we can make a batch that tastes fresh, crisp, and professionally crafted.
A strong dilly beans recipe is not complicated. It is precise, clean, and confident. When we follow that approach, the result is a jar full of bold flavor and satisfying texture that deserves a permanent place in the kitchen.