Dill Pickles Recipe: Making dill pickles at home is one of those satisfying kitchen adventures that never gets old. Not only do they taste better than most store-bought versions, but the process of pickling is also a form of culinary art and preservation that dates back centuries. There’s something rustic and rewarding about packing fresh cucumbers into jars and transforming them into crisp, tangy pickles.
Why Make Your Own Pickles?
Let’s be honest—store-bought pickles often fall flat. They can be too sour, too salty, or just plain mushy. When you make your own dill pickles, you get to control everything from the crunch level to the spice blend. Plus, it’s cheaper in the long run. Buying cucumbers in bulk at the farmer’s market and turning them into jars of pickles is not only economical, but it’s also a great way to cut down on waste.
Also, the taste is unbeatable. The freshness of homemade brine, the aromatic kick of garlic and dill, and the satisfying snap when you bite into a homemade pickle? Yeah, it doesn’t get better than that.
Health Benefits of Dill Pickles
Pickles aren’t just tasty—they’re good for you, too! Fermented pickles are packed with probiotics that support gut health. Even quick pickles (non-fermented) have benefits like being low in calories and rich in vitamins like A and K. Plus, they’re an excellent way to boost hydration and electrolytes due to their sodium content—perfect for a post-workout snack.
Ingredients You’ll Need
Before diving into the pickling process, let’s take stock of what you need. Fortunately, you don’t need a fancy grocery list. Most ingredients are pantry staples or easy to find.
Basic Ingredients
Here’s the core list of ingredients to make classic dill pickles:
- Fresh cucumbers (preferably pickling cucumbers)
- Fresh dill (sprigs or seeds)
- Garlic cloves
- White vinegar (or apple cider vinegar)
- Water
- Kosher salt (non-iodized for clean brine)
- Mustard seeds
- Peppercorns
These form the foundation of that traditional dill pickle flavor we all know and love.
Optional Add-ins for Extra Flavor
Want to elevate your pickles? Toss in a few of these:
- Red chili flakes (for heat)
- Bay leaves (adds earthiness)
- Coriander seeds (bright and citrusy)
- Sliced onions (adds sweetness and complexity)
- Sugar (balances the acidity if desired)
Customizing your flavor profile is part of the fun, so don’t be afraid to experiment a bit.
Equipment Checklist
You don’t need a fully-equipped canning kitchen to start pickling, but having the right tools makes everything smoother.
Must-Have Kitchen Tools
- Mason jars (pint or quart-sized)
- Saucepan (for boiling brine)
- Funnel (helps with clean filling)
- Tongs or jar lifter (especially if you’re doing hot water canning)
- A ladle
These tools are easy to find and reusable, so it’s a one-time investment for countless pickle batches.
Sterilizing Your Jars Properly
Clean jars are crucial. You don’t want any bacteria ruining your beautiful pickles. Sterilize your jars by boiling them in water for at least 10 minutes or running them through a dishwasher cycle on high heat without detergent. Always use new lids or ensure used ones have no rust or deformities.
Step-by-Step Guide to Making Dill Pickles
Let’s get to the heart of the matter. Follow these steps, and you’ll be crunching into delicious dill pickles in no time.
Step 1: Choose the Right Cucumbers
Pickling cucumbers are ideal because they’re smaller, have thinner skins, and hold up well in brine. Look for firm, unblemished cucumbers—about 4–6 inches long. Avoid overripe or soft cucumbers, as they can turn mushy.
Wash them thoroughly and trim off the blossom ends (those harbor enzymes that can soften pickles). You can leave them whole, halve them, or slice them into spears or chips depending on your jar size and preference.
Step 2: Prepare the Brine
In a saucepan, combine:
- 2 cups water
- 1 cup vinegar
- 1 tablespoon kosher salt
Bring it to a boil, stirring to dissolve the salt completely. You can scale this up depending on how many jars you’re making.
Once done, remove from heat and let it cool slightly while you prep your jars.
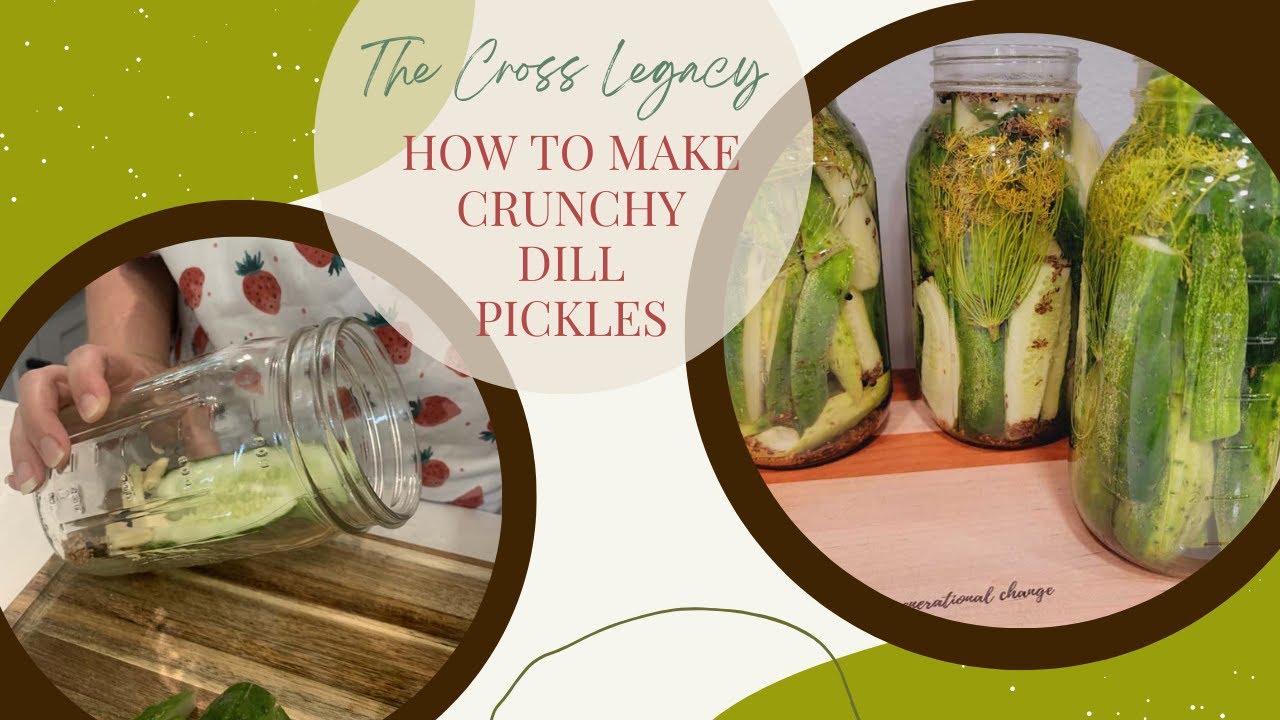
Step 3: Pack the Jars
Start with a layer of fresh dill and garlic cloves at the bottom. Then, tightly pack the cucumbers into the jars. Don’t worry if it’s a tight squeeze—just don’t crush them. Add mustard seeds, peppercorns, and any other spices you’re using.
The tighter you pack the cucumbers, the less likely they’ll float and get soft.
Step 4: Add Spices and Brine
Now comes the flavor magic. Once your cucumbers and dry spices are in the jars, pour the hot (but not boiling) brine over them. Use a funnel for a clean pour and leave about 1/2 inch of headspace at the top of the jar.
You want to make sure all cucumbers are fully submerged. If they’re peeking out, press them down with a clean spoon or add a little more brine. Air pockets are not your friend—use a butter knife or chopstick to release any bubbles by sliding it down the inside edge of the jar.
At this stage, your jars should already be looking like little works of culinary art—vibrant green cucumbers floating among herbs and spices.
Step 5: Seal and Store
Once packed and filled, it’s time to seal your jars. Wipe the rims with a clean cloth to ensure a tight seal, then screw on the lids.
If you’re making refrigerator pickles (a super easy and popular method), you don’t need to process them. Just let the jars cool to room temperature, then pop them into the fridge. They’ll need to sit for at least 48 hours to start developing flavor, but trust me—they get better with time. A week is ideal.
If you’re into long-term storage, you can process the jars in a boiling water bath for 10 minutes. That’ll make them shelf-stable for up to a year.
Storing and Fermenting Your Pickles
This part often confuses first-timers—do you ferment, or do you quick-pickle? Let’s break it down.
Refrigerator vs. Canning Method
- Refrigerator pickles are super easy. They don’t require fancy canning equipment, and they’re usually ready in just a few days. However, they need to stay in the fridge and have a shorter shelf life (about 2-3 months).
- Canned pickles, on the other hand, are shelf-stable. You use a hot water bath to seal the jars. They last up to a year in a cool, dark pantry, but the process takes a bit longer and requires careful sterilization.
Your choice depends on your lifestyle. If you’re a pickle-a-week kind of person, the fridge method is perfect. If you want to stock up for winter or gift them to friends, go with canning.
How Long Do They Last?
- Refrigerator Pickles: Best within 2–3 months. They’re at their crunchiest and most flavorful within the first month.
- Canned Pickles: Can last 12 months unopened. Once opened, treat them like fridge pickles.
Remember: Always label your jars with the date. And if a jar smells funky or the brine is slimy, toss it out. Better safe than sorry!
Serving Suggestions and Pairings
Now for the fun part—how to eat them! Dill pickles are incredibly versatile. They bring a pop of acidity and crunch that can elevate any dish.
Here are a few of my favorite ways to enjoy them:
- Burgers & Sandwiches: Classic pairing. Stack slices on your favorite deli sandwiches or juicy grilled burgers.
- Charcuterie Boards: Pickles balance out the richness of meats and cheeses. Try them with salami, cheddar, or pâté.
- Tuna or Egg Salad: Chop up pickles and mix them into your favorite salad for extra tang and texture.
- Bloody Mary Garnish: Skewer a spear and drop it into your brunch cocktail—game changer.
- Snack Attack: Just grab a spear straight from the jar and crunch away. They’re low-cal and super satisfying.
Honestly, they’re good with almost anything. Once you have them on hand, you’ll start finding excuses to use them in every meal.
Troubleshooting Common Issues
Even the best of us run into pickle problems. Here’s how to fix the most common ones:
Why Are My Pickles Mushy?
This is the most common complaint—and it’s a bummer when it happens. Mushy pickles usually mean one of the following:
- Wrong cucumbers: Use pickling cucumbers, not salad cucumbers.
- Too much heat: Don’t pour boiling brine directly over cucumbers. Let it cool slightly first.
- Blossom ends not removed: That tiny end contains enzymes that cause softening—trim it!
- Storage issues: Don’t over-process your jars in boiling water or store them in warm areas.
If you follow the steps we’ve laid out, your pickles should stay satisfyingly crisp.
What If the Brine Is Cloudy?
Cloudy brine can be alarming, but it’s not always bad.
- Fermented pickles: A cloudy brine is normal and a sign of healthy fermentation.
- Quick pickles: If your non-fermented brine is cloudy, it might be due to minerals in your water or impurities in the vinegar or salt. Always use distilled water and pure, non-iodized salt.
However, if your brine smells off, has mold, or the pickles are slimy, toss the batch. Trust your senses—they’re your best tool in the kitchen.
FAQs about Dill Pickles Recipe
1. How long do homemade dill pickles last?
Homemade dill pickles can last for up to 2 months when stored in the refrigerator in a tightly sealed jar. Always use clean utensils to avoid contamination.
2. Can I use dried dill instead of fresh dill?
Yes, you can substitute dried dill for fresh. Use about 1 teaspoon of dried dill for every tablespoon of fresh dill.
3. Do dill pickles need to be refrigerated?
If you’re making quick refrigerator pickles, then yes—refrigeration is necessary. For canned pickles processed in a water bath, refrigeration isn’t required until the jar is opened.
4. How long should dill pickles sit before eating?
For best flavor, let your pickles sit for at least 24–48 hours. However, waiting 1 week will give a more intense, developed flavor.
5. Can I reuse the pickle brine?
It’s not recommended to reuse the brine for canning or preserving, but you can reuse it once to make quick refrigerator pickles. Always boil it first and add fresh vegetables.
6. What type of cucumbers is best for dill pickles?
Pickling cucumbers like Kirby or gherkin cucumbers are ideal. They are small, firm, and have fewer seeds, making them perfect for crunchy pickles.
7. Why are my pickles soft and not crunchy?
Soft pickles can result from using overripe cucumbers or not trimming the blossom end. Always use fresh, firm cucumbers and cut off the blossom tip.
8. Are dill pickles healthy?
Yes, dill pickles are low in calories and contain beneficial probiotics if fermented. However, they can be high in sodium, so enjoy them in moderation.
Conclusion
From prepping fresh cucumbers to pouring in that perfectly balanced brine, each step adds to the overall flavor and texture of the final product. Whether you prefer them spicy, garlicky, or simply classic with fresh dill, the beauty of homemade pickles lies in the customization.
Plus, pickling is a tradition that connects us to past generations—people who preserved food not just out of necessity but also with pride. Today, we get to carry that tradition forward, enjoying the blend of convenience and creativity in every jar we seal.
So next time you’re at the market, grab a handful of cucumbers and give this recipe a try. Your sandwiches, burgers, and snack plates will thank you. And once you’ve had your first bite of your homemade dill pickles, don’t be surprised if you’re hooked for life.