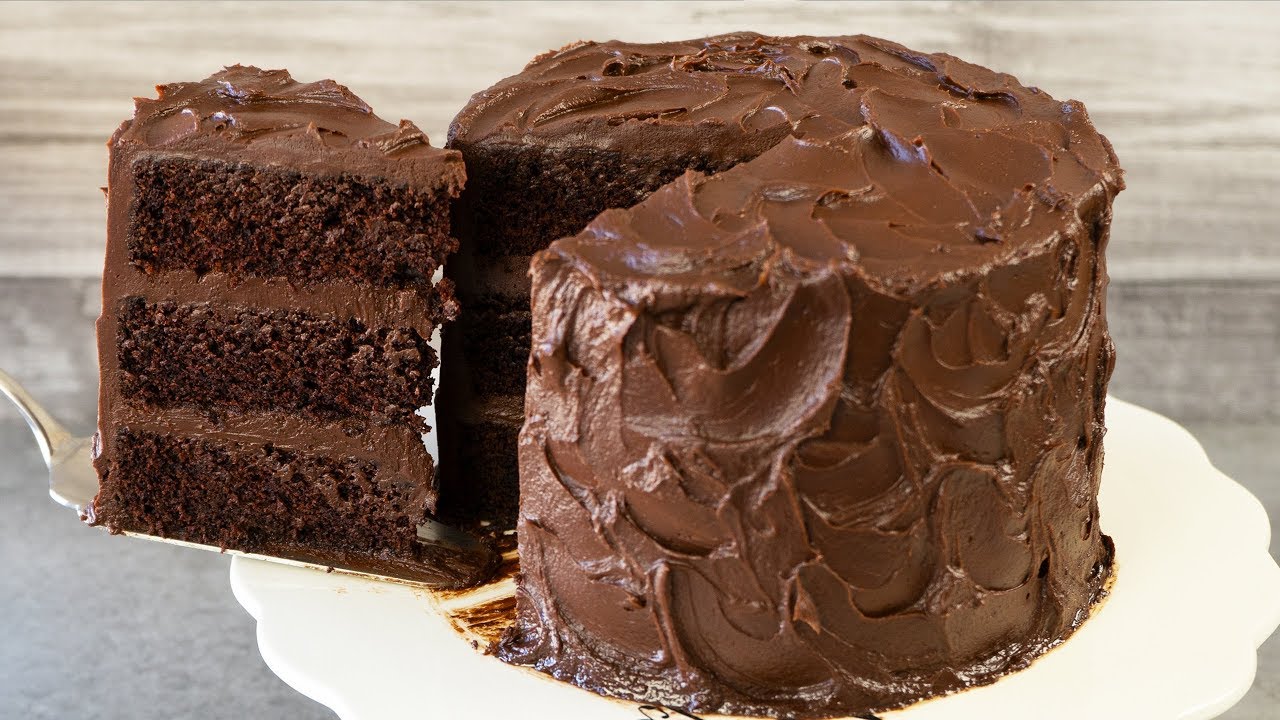
Devil’s Food Cake Recipe: Devil’s Food Cake is not your average chocolate cake—it’s richer, darker, and more decadent. Known for its deep, bold flavor and ultra-moist texture, this cake is the rebellious sibling to the classic angel food cake. While angel food cake is light and airy, devil’s food cake dives headfirst into indulgence, with cocoa and coffee enhancing its rich chocolate profile.
The cake earned its name in the early 20th century, a time when desserts were often given playful names. This particular creation was deemed “sinfully delicious,” hence the devilish name. Its intense chocolate flavor comes from a combination of cocoa powder and sometimes melted chocolate, and it’s traditionally made with baking soda which creates a more open crumb and lighter texture compared to denser chocolate cakes.
Whether you’re baking for a birthday, a celebration, or just to satisfy a chocolate craving, devil’s food cake is the perfect choice to impress guests or treat yourself to something truly heavenly.
Why You’ll Love This Recipe
There’s no shortage of chocolate cake recipes out there, but this devil’s food cake stands out for several reasons:
- Intense Chocolate Flavor: Thanks to a generous helping of unsweetened cocoa powder and optional brewed coffee, every bite packs a deep cocoa punch.
- Moist Texture: The secret lies in using boiling water or hot coffee to “bloom” the cocoa, releasing its flavor and helping create that signature moist crumb.
- Simple Ingredients: You don’t need anything fancy. Most of the ingredients are pantry staples.
- Versatility: You can easily turn this into cupcakes, a layer cake, or even a sheet cake.
- Crowd-Pleaser: This cake has that wow factor. Everyone will think you spent hours perfecting it—but with this guide, it’ll be easier than you imagine.
Ingredients You’ll Need
Dry Ingredients
Let’s break down the dry ingredients that form the base of this rich, indulgent dessert. Each plays a crucial role:
- All-Purpose Flour (2 cups) – This provides structure to your cake. Make sure to spoon and level your flour instead of scooping to avoid a dense cake.
- Unsweetened Cocoa Powder (¾ cup) – Opt for natural cocoa powder for that deep, bittersweet chocolate flavor.
- Baking Soda (1½ teaspoons) – This reacts with the acidic ingredients (like cocoa and buttermilk) to give the cake a light texture.
- Baking Powder (½ teaspoon) – Used for additional lift and softness.
- Salt (1 teaspoon) – Enhances all the other flavors and balances the sweetness.
- Granulated Sugar (2 cups) – Don’t skimp on sugar; it sweetens and tenderizes the crumb.
- Optional: Espresso Powder (1 teaspoon) – Intensifies the chocolate flavor without making the cake taste like coffee.
Pro Tip: Sift all the dry ingredients together to avoid lumps and ensure even distribution. This simple step makes a big difference.
Wet Ingredients
Here’s where the moisture and richness come in. These ingredients combine with the dry mix to create a silky-smooth batter:
- Unsalted Butter (½ cup, room temperature) – Adds flavor and richness. Always use room temperature butter for easier creaming.
- Vegetable Oil (½ cup) – Keeps the cake ultra moist.
- Eggs (2 large) – Bind everything together and contribute to structure.
- Buttermilk (1 cup) – The acidity helps tenderize the gluten and gives the cake a slight tang.
- Vanilla Extract (2 teaspoons) – Enhances all the chocolatey goodness.
- Boiling Water or Hot Coffee (1 cup) – This is crucial. Hot liquid “blooms” the cocoa powder, unlocking its full depth of flavor.
Why Coffee? If you choose coffee over water, it won’t make the cake taste like coffee—it just boosts the chocolate notes. Highly recommended!
Optional Add-ins and Garnishes
These aren’t required, but they can take your devil’s food cake to the next level:
- Chocolate Chips or Chunks – Stir into the batter for melty chocolate pockets.
- Chopped Nuts – Pecans or walnuts add crunch.
- Fresh Berries – Perfect garnish for serving.
- Shaved Chocolate or Sprinkles – For decoration.
- Sea Salt Flakes – A touch on top adds contrast and sophistication.
Having all your ingredients pre-measured and ready (mise en place) makes baking much smoother and stress-free.
Kitchen Tools and Equipment
Baking Essentials
Let’s talk tools. You don’t need a commercial kitchen to make a flawless devil’s food cake, but having the right equipment helps:
- Two 9-inch Round Cake Pans – Standard for a layer cake. Make sure they’re nonstick or greased well.
- Mixing Bowls (Large and Medium) – You’ll need at least two to separate dry and wet ingredients.
- Rubber Spatula – For scraping the bowl clean—don’t waste that precious batter.
- Cooling Rack – Essential to cool your cakes evenly without getting soggy bottoms.
Measuring Tools
Accuracy is key in baking. Use:
- Dry Measuring Cups – For flour, sugar, and cocoa.
- Liquid Measuring Cup – For buttermilk, coffee, and oil.
- Measuring Spoons – For smaller quantities like vanilla and salt.
Investing in a kitchen scale for ultimate accuracy is never a bad idea.
Mixing Tools
- Electric Mixer or Stand Mixer – Creaming butter and sugar is a breeze with one of these.
- Whisk – For mixing dry ingredients or smoothing out batter.
- Sifter or Fine Mesh Strainer – Use this for cocoa and flour to avoid lumps.
With everything laid out and ready to go, you’re now fully equipped for success.
Preparing to Bake
Preheating the Oven
Never underestimate this step. Preheating ensures your cake starts baking at the right temperature, which is vital for proper rise and texture. Set your oven to 350°F (175°C) and allow it to fully heat up. Use an oven thermometer if possible—many ovens run hotter or cooler than their setting.
Preparing the Cake Pans
Grease your pans thoroughly using butter or nonstick spray, then line the bottom with parchment paper rounds. This guarantees easy release and a beautiful cake surface.
Here’s a quick checklist:
- Grease the sides and bottom
- Line bottom with parchment
- Lightly dust with cocoa powder instead of flour to maintain chocolate color
Step-by-Step Guide to Making Devil’s Food Cake
Step 1 – Mixing the Dry Ingredients
This might seem like a basic step, but it’s the foundation of your entire cake—don’t skip the precision here.
Start by grabbing a large mixing bowl. Sift in the all-purpose flour, unsweetened cocoa powder, baking soda, baking powder, salt, and espresso powder if using. Sifting is not just a fancy baking ritual—it genuinely makes your dry ingredients lighter and helps them incorporate better. No one likes a cake with bitter cocoa lumps hiding inside.
Once sifted, use a whisk to stir everything together until the mixture is even in color and texture. The goal is to make sure that every scoop of your dry mix contains all the ingredients in the same proportion. That ensures consistent rise and flavor throughout your cake.
Pro Tip: If you want a more intense chocolate flavor, use Dutch-processed cocoa—but only if you’re adjusting your leavening (since Dutch cocoa is neutral, while natural cocoa is acidic).
Set this bowl aside and prepare for the wet mixture.
Step 2 – Creaming Butter and Sugar
This is the magic moment where your cake gets its lightness and volume. Grab your stand mixer or hand mixer and beat together the unsalted butter and granulated sugar on medium-high speed.
You’re looking for the mixture to become light, fluffy, and almost pale in color. This process usually takes about 4 to 5 minutes—don’t rush it. The creaming creates little air pockets in the butter, which will expand during baking and help your cake rise beautifully.
If your butter is too cold, it won’t cream properly. And if it’s too soft (almost melted), it’ll turn greasy instead of fluffy. Room temperature means slightly cool to the touch but soft enough to leave an indent when pressed.
Once the butter and sugar are well-creamed, it’s time to move to the next step.
Step 3 – Adding Eggs and Vanilla
With the mixer still running, crack in your eggs, one at a time. Beat well after each addition to ensure it fully emulsifies with the butter and sugar mixture.
This step helps stabilize your batter. Eggs act as binders and add structure, richness, and moisture.
After the eggs are mixed in, add the vanilla extract. Use a good-quality pure vanilla—not imitation. It adds depth and rounds out the bitterness of the cocoa. Think of it as the background note that enhances the chocolate flavor.
Once everything is combined, your wet mixture should look glossy and creamy, almost like chocolate frosting in the making.
Step 4 – Combining Wet and Dry Mixtures
Now it’s time to marry the wet and dry ingredients—but with a little patience. Don’t dump it all in at once.
Here’s the method:
- Add ⅓ of the dry mixture into the wet mixture.
- Mix on low speed until just incorporated.
- Add ½ of the buttermilk and mix again.
- Repeat with another third of the dry mix, the rest of the buttermilk, and finish with the last third of the dry ingredients.
This alternating process helps keep the batter smooth and prevents overmixing. Overworking your batter can lead to a dense, tough cake. We want rich and tender, not chewy and dry.
Scrape down the sides of the bowl as you go to make sure everything is fully mixed. By now, your batter will be thick, creamy, and slightly sticky.
Step 5 – Adding Boiling Water or Coffee
Now comes the game-changer. Slowly pour in 1 cup of boiling water or hot brewed coffee into the batter, mixing on low speed. Be careful—it will be very hot.
At first, your batter will look thin and almost too runny. Don’t panic—this is normal. The hot liquid activates the cocoa powder, deepening its flavor and enhancing the texture of the final cake. If you’re using coffee, it won’t make the cake taste like coffee. Instead, it works in the background to intensify the chocolate flavor.
Mix until just combined. Don’t overdo it. The batter will be smooth, dark, and pourable—almost like a rich chocolate sauce.
Pro Tip: If you want an extra kick, you can stir in a splash of dark rum or bourbon at this stage. Just 1 tablespoon adds a subtle warmth.
Step 6 – Pouring the Batter and Baking
Divide the batter evenly between your two prepared cake pans. Use a kitchen scale for precision if you want perfectly even layers (recommended if you’re going for a professional finish).
Tap the pans lightly on the counter to release any air bubbles. Place them in the center rack of your preheated oven at 350°F (175°C).
Bake for 30–35 minutes, or until a toothpick inserted into the center comes out clean or with just a few moist crumbs attached. Avoid opening the oven too early or too often—it can cause the cake to collapse in the center.
Once done, the tops should be slightly domed and spring back when lightly touched.
Remove the pans from the oven and set them on a cooling rack for the next step.
Cooling and Removing from Pans
Proper Cooling Time
Patience is key here. Let your cakes cool in their pans for 10 to 15 minutes before attempting to remove them. This helps them firm up a bit and prevents them from falling apart.
After that, run a knife around the edges to loosen them. Turn the cakes out onto a wire rack and let them cool completely—at least 1 hour. If you try to frost a warm cake, the frosting will melt into a sad, slippery mess.
To speed things up, you can place the cooled cakes in the refrigerator for 15–20 minutes before assembling. This also makes them easier to handle when layering.
Tips for Easy Removal
- Always use parchment paper on the bottom of the pans—it’s a lifesaver.
- If the cake is stubborn, place a damp towel around the pan for 5 minutes. It creates steam that loosens the cake.
- Use a cooling rack to avoid soggy bottoms.
Once the layers are cool, it’s time to move on to the most fun part—frosting!
Making the Frosting
Classic Chocolate Buttercream
If there’s a soulmate for devil’s food cake, it’s got to be chocolate buttercream frosting. Rich, smooth, and creamy, this frosting balances the bold cocoa flavor of the cake without overpowering it. Let’s break down the perfect recipe.
Ingredients:
- Unsalted Butter (1 cup, softened)
- Unsweetened Cocoa Powder (¾ cup)
- Powdered Sugar (3½ to 4 cups)
- Heavy Cream or Milk (¼ to ½ cup)
- Vanilla Extract (2 teaspoons)
- A pinch of salt
Instructions:
- Cream the Butter – Beat the butter on high speed for 3–4 minutes until pale and fluffy.
- Add Cocoa Powder – Mix in the cocoa powder until smooth.
- Add Sugar & Cream Alternately – Gradually beat in the powdered sugar, alternating with the cream to achieve the desired consistency.
- Flavor Boost – Add vanilla extract and a pinch of salt to balance the sweetness.
The result? A silky frosting that spreads easily and holds up beautifully on layer cakes. You can also pipe it for cupcakes or add decorative swirls on top.
Pro Tip: Want a deeper chocolate flavor? Add 4 oz of melted dark chocolate after mixing in the sugar.
Alternate Frosting Options
While chocolate buttercream is the classic choice, devil’s food cake is a blank canvas for creativity. Here are a few frosting variations to consider:
- Cream Cheese Frosting – For a tangy twist that cuts through the richness.
- Mocha Frosting – Add instant espresso powder to the buttercream for a mocha kick.
- Whipped Ganache – Just heavy cream and chocolate melted together, then whipped into a thick mousse.
- Peanut Butter Frosting – A salty-sweet contrast that works surprisingly well.
- Salted Caramel Buttercream – Decadent and sophisticated.
Each of these frostings pairs wonderfully with devil’s food cake. Choose based on your taste or occasion, and don’t be afraid to mix it up!
Assembling the Cake
Layering Techniques
Here’s where your masterpiece comes together. You’ve baked perfect layers and whipped up luscious frosting—now let’s assemble like a pro.
Step-by-Step Assembly:
- Trim the Layers – If your cake layers are domed, use a serrated knife to level them off for stability.
- Bottom Layer Down – Place the first layer on a cake stand or plate. Apply a dollop of frosting underneath to anchor it.
- Add Frosting – Spread an even layer of frosting using an offset spatula. Aim for about ½ inch thick.
- Top Layer On – Gently place the second layer on top, upside-down for a flat surface.
- Apply Crumb Coat – This thin layer of frosting locks in crumbs. Chill the cake for 15–30 minutes after applying.
Taking your time during this step ensures clean layers and a flawless final presentation. Don’t worry if it’s not bakery-perfect—your cake will still taste divine!
Crumb Coating and Final Frosting
A crumb coat is a thin, base layer of frosting that seals in the loose crumbs so they don’t ruin your final finish. Spread a very thin layer of frosting over the entire cake using a flat spatula. Don’t worry about making it perfect—this is your undercoat.
Once crumb-coated, place the cake in the fridge for 20–30 minutes to set. Then apply the final layer of frosting, smoothing the sides and top using a bench scraper or offset spatula.
Decorating Tip: Spin the cake on a turntable as you frost it to get a smooth finish. You can also use a hot spatula (dip it in warm water and wipe dry) to smooth out any imperfections.
Now your cake is ready for the fun part—decorations!
Decorating Ideas
Simple vs Elegant Presentation
Your decorating style depends on the occasion—and your mood!
- Simple & Rustic: Swirls of buttercream, chocolate shavings, or a dusting of cocoa powder.
- Elegant & Formal: Smooth sides with piped borders, edible gold leaf, or chocolate curls.
- Playful & Fun: Sprinkles, chocolate chips, or candies on top.
Whatever look you choose, keep in mind that devil’s food cake is a stunner even with minimal dressing up.
Garnish Options
- Fresh Berries – Strawberries, raspberries, or cherries add a burst of freshness and color.
- Chocolate Ganache Drip – For a luxurious finish, drip ganache down the sides.
- Crushed Nuts – Adds crunch and visual contrast.
- Mini Marshmallows or Chocolate Chips – Perfect for a s’mores-themed cake.
- Powdered Sugar Dusting – Use a stencil for patterns or lettering.
Your creativity is the limit here. If you’re making this for a birthday or special event, personalize it with a cake topper or fondant decorations.
Serving Suggestions
Pairing with Drinks or Desserts
This cake is indulgent, so pairing it with lighter or complementary flavors creates a balanced dessert experience.
Drink Pairings:
- Cold Milk – A classic combo that never fails.
- Espresso or Coffee – Enhances the chocolate flavor.
- Red Wine – A bold red like Zinfandel or Cabernet pairs beautifully.
- Hot Chocolate – For the ultimate chocolate lover’s dream.
Dessert Pairings:
- Vanilla Ice Cream – A scoop on the side adds a creamy contrast.
- Whipped Cream – Light and airy, it cuts through the richness.
- Fruit Compote – A drizzle of raspberry or cherry sauce adds tartness.
Portion Sizes
This rich cake goes a long way. A 9-inch, two-layer cake yields 12 to 16 slices, depending on how generous you are.
For parties or events, consider pre-slicing and placing on plates to make serving easier.
Want smaller servings? Try baking the batter as cupcakes instead—same great flavor, bite-sized fun.
Storage Instructions
Room Temperature or Fridge?
Once your masterpiece is baked, frosted, and served, you might wonder how best to store any leftovers—if there are any!
Devil’s food cake can be stored at room temperature for up to 2 days, as long as it’s covered tightly. A cake dome or airtight container works perfectly. The key is to keep the air out, which helps maintain moisture and prevents the frosting from drying out.
However, if your kitchen is particularly warm or humid, you should move it to the refrigerator after the first day. Refrigeration will extend its freshness for up to 5 days, but the cake should be brought back to room temperature before serving. Cold cake tends to be firmer and less flavorful.
Pro Tip: If the cake has cream cheese or whipped cream-based frosting, refrigeration is a must from the start.
Freezing Tips
Devil’s food cake freezes beautifully—whether it’s fully assembled or just the layers.
To Freeze Unfrosted Layers:
- Let layers cool completely.
- Wrap each tightly in plastic wrap, then a layer of foil.
- Store in a freezer-safe bag or container for up to 3 months.
To Freeze Frosted Cake:
- Chill the cake first to firm up the frosting.
- Wrap the entire cake in plastic wrap and then foil.
- Label with the date and freeze for up to 2 months.
When ready to serve, thaw overnight in the fridge and bring to room temperature before slicing.
Freezing individual slices is also a smart move—perfect for portion control and spontaneous dessert cravings.
Tips and Tricks for Best Results
Common Mistakes to Avoid
Even experienced bakers can trip up with devil’s food cake. Here are the most common pitfalls—and how to avoid them:
- Overmixing the batter – Leads to a dense, tough cake. Mix just until the ingredients are combined.
- Incorrect oven temperature – Always preheat and use an oven thermometer if possible.
- Skipping the sifting step – Results in lumpy batter and uneven texture.
- Not using boiling water/coffee – Essential for blooming the cocoa and deepening the flavor.
- Uneven cake layers – Use a kitchen scale to divide batter evenly and trim domed tops before layering.
Secret Pro Tips
Want to level up your baking game? Try these expert tricks:
- Add mayo – Yes, a spoonful of mayonnaise (which is just eggs and oil) makes the cake extra moist.
- Use brown sugar – Swap out a ½ cup of white sugar for brown for a hint of caramel richness.
- Chill your cake before slicing – Cold cake slices cleaner and neater.
- Use cake flour – For a finer, softer crumb (reduce by 2 tablespoons per cup if substituting from all-purpose).
- Sprinkle chocolate chips on top before baking – They melt into the batter and add fudgy richness.
These simple additions and tweaks can elevate your cake from great to unforgettable.
Variations of Devil’s Food Cake
Cupcake Version
Don’t want a full cake? No problem! This batter makes fantastic cupcakes.
Here’s how:
- Line a muffin tin with cupcake liners.
- Fill each liner 2/3 full with batter.
- Bake at 350°F (175°C) for 18–22 minutes or until a toothpick comes out clean.
This recipe yields about 24 cupcakes, depending on size. They’re perfect for parties, potlucks, or anytime you want chocolatey joy in a bite-sized treat.
Top with swirls of frosting, sprinkles, or even a drizzle of ganache.
Gluten-Free or Vegan Options
With a few substitutions, even those with dietary restrictions can enjoy this luscious cake.
Gluten-Free:
- Replace all-purpose flour with a gluten-free flour blend (like Bob’s Red Mill 1:1).
- Add 1 tsp xanthan gum if not already in your flour mix.
Vegan:
- Swap eggs with flax eggs (1 tbsp flaxseed meal + 3 tbsp water = 1 egg).
- Use non-dairy milk like almond or oat in place of buttermilk (add 1 tbsp vinegar or lemon juice to mimic acidity).
- Replace butter with vegan butter or coconut oil.
Even with these changes, the cake stays rich, moist, and totally delicious. Nobody will even miss the original ingredients!
Nutritional Information
Calorie Breakdown
Let’s face it—devil’s food cake is indulgent. But it’s always good to know what you’re biting into.
Approximate nutrition per slice (1 of 12):
| Component | Amount |
|---|---|
| Calories | 450–500 |
| Total Fat | 24g |
| Saturated Fat | 10g |
| Carbohydrates | 60g |
| Sugars | 40g |
| Protein | 5g |
| Fiber | 3g |
| Sodium | 350mg |
These numbers can vary based on your frosting choice and exact ingredients. But hey—it’s cake. Treat yourself once in a while!
Ingredients’ Nutritional Profile
Cocoa Powder – Rich in antioxidants, may boost mood and heart health.
Buttermilk – Adds calcium and tangy flavor, plus it’s easier to digest than regular milk for some.
Eggs – A good source of protein, fat, and vitamins.
Butter – Brings richness but should be enjoyed in moderation.
Sugar – Adds sweetness, of course, but also moisture and structure to the cake.
Balance your slice with a healthy meal, and you’ve got yourself a guilt-free dessert experience.
FAQs about Devil’s Food Cake Recipe
1. Can I make this cake ahead of time?
Absolutely! You can bake the cake layers up to two days in advance. Wrap them tightly and store at room temperature or in the fridge. You can also freeze them for longer storage.
2. What’s the difference between chocolate cake and devil’s food cake?
Devil’s food cake is darker, richer, and often more moist than regular chocolate cake. It uses more cocoa and sometimes hot coffee or boiling water to deepen the flavor.
3. How do I keep the cake moist?
Don’t overbake it, and use ingredients like buttermilk, oil, or even mayo to lock in moisture. Storing the cake in an airtight container also helps prevent drying out.
4. Can I use oil instead of butter?
Yes! Using oil will make the cake even more moist, though you might lose a bit of buttery flavor. Vegetable or canola oil works best.
5. How long does devil’s food cake last?
At room temperature, about 2 days. In the fridge, up to 5 days. Freeze for up to 3 months—just be sure to wrap it well.
Conclusion
Devil’s food cake is more than just a dessert—it’s a chocolate lover’s dream come true. From its deep, velvety texture to its bold cocoa flavor, every bite is a celebration of indulgence. This step-by-step guide gave you everything you need to confidently bake this classic cake at home—from ingredients to assembly, frosting to finishing touches.
Whether you’re baking for a birthday, a special occasion, or just because you crave something sweet and chocolatey, this cake delivers every single time. And remember, you don’t have to be a pro baker to create something amazing. With the right ingredients, tools, and a bit of love, you’ll have a showstopping dessert that’ll wow every guest.
So go ahead—preheat that oven, whip out your spatula, and let the magic begin. You deserve this slice of heaven.