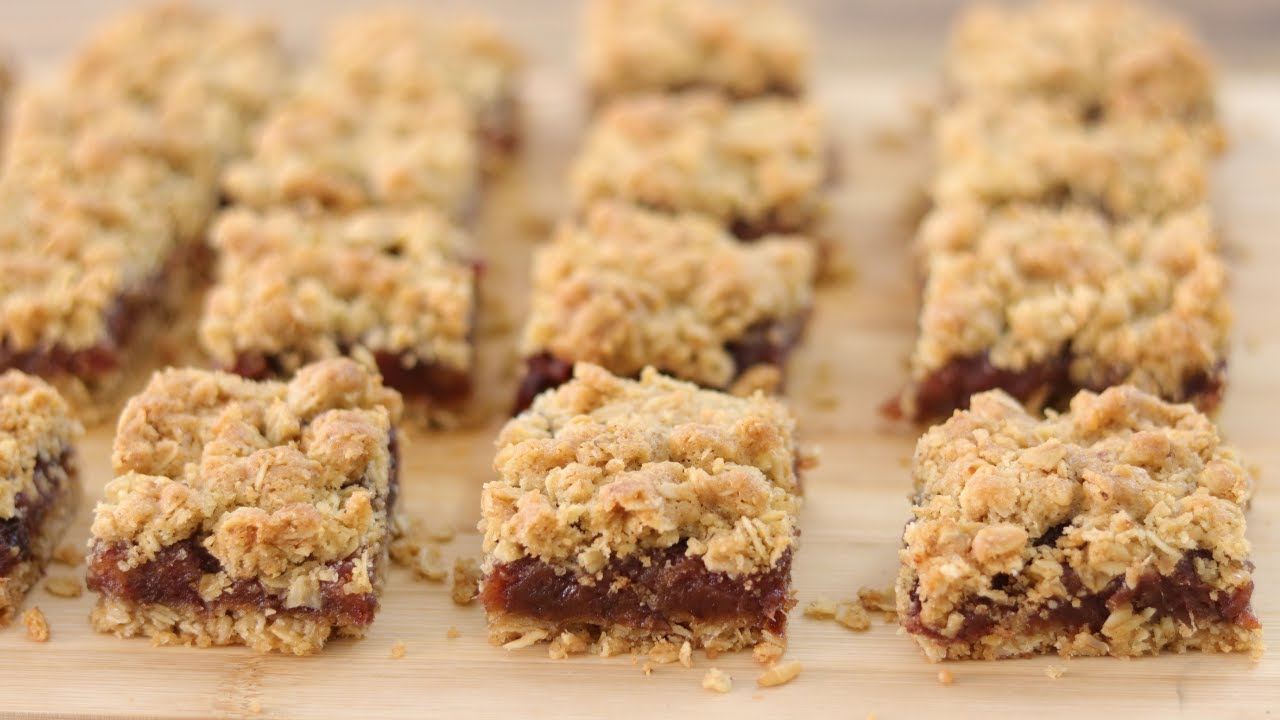
Date Bars Recipe: There’s something charmingly nostalgic about date bars. They’re the kind of sweet that brings back memories of grandma’s kitchen, the scent of oats and caramelized fruit wafting through the air. What makes date bars so special is their simplicity – wholesome ingredients, natural sweetness, and an unmatched chewy, crumbly texture that’s both satisfying and guilt-free. Unlike overly sugary confections, date bars hit that perfect balance: rich enough to be indulgent, but made from ingredients you can pronounce.
Another reason they’ve stood the test of time is their natural ingredient profile. Dates are a powerhouse fruit, full of fiber, minerals, and natural sugars that make them perfect for baking. Paired with oats, butter, and a few pantry staples, the result is a delightful bar that feels rustic yet refined.
So whether you’re a seasoned baker or a newbie in the kitchen, this recipe is easy to follow and yields professional-quality results. And once you taste a warm, freshly baked date bar, you’ll understand why this humble dessert has become a classic.
Ingredients You’ll Need
Core Ingredients for the Crust and Crumble
Creating the perfect date bar starts with the right base – a chewy, buttery crust that doubles as the crumble topping. Here’s what you’ll need for that delicious oat mixture:
- Rolled oats (2 cups): These give the bars their chewy texture. Don’t substitute with instant oats—they’ll turn mushy.
- All-purpose flour (1 cup): Helps bind everything together while giving a slightly crisp structure.
- Brown sugar (¾ cup): Adds moisture and that deep caramel note we all love.
- Baking soda (½ tsp): Helps the crust stay light and not overly dense.
- Salt (¼ tsp): A pinch of salt brings out the natural sweetness and balances flavors.
- Unsalted butter (1 cup, melted): This binds the crust, gives flavor, and ensures golden crispiness.
This combo creates a rustic, hearty foundation that’s subtly sweet and wonderfully crumbly. It’s the secret behind the bar’s satisfying bite.
The Star – Sweet and Sticky Date Filling
The filling is where the magic happens—rich, sticky, and naturally sweet. Here’s what you’ll need:
- Pitted dates (2½ cups, chopped): Medjool or Deglet Noor varieties work best.
- Water (1 cup): To soften and simmer the dates into a paste.
- Vanilla extract (1 tsp): Adds warmth and depth.
- Lemon juice (1 tbsp, optional): Balances out the sweetness and enhances flavor.
Simmering dates in water until they break down into a thick, jam-like consistency transforms them into a luxurious filling that holds the bars together beautifully.
Optional Add-Ins and Flavor Boosters
Want to take your bars to the next level? Add some of these:
- Chopped walnuts or pecans (½ cup): Adds crunch and a nutty flavor.
- Cinnamon or nutmeg (½ tsp): Adds warmth and depth.
- Orange zest (1 tsp): For a citrusy twist that pairs beautifully with dates.
These extras can be added to either the crust or the filling, depending on your flavor preferences. Customize it your way—these bars are incredibly forgiving and versatile.
Kitchen Tools Required
Basic Equipment List
You don’t need fancy gadgets to make date bars. Here’s a simple checklist:
- Mixing bowls (2): One for the crust/crumble and another for the date filling.
- Saucepan: To simmer the dates into a paste.
- Spatula or wooden spoon: For stirring the filling and combining ingredients.
- Measuring cups and spoons: Accuracy matters when baking.
- 9×13 inch baking pan: The perfect size for evenly thick bars.
- Parchment paper or non-stick spray: Prevents sticking and makes for easy cleanup.
Even if you’re working with a minimal kitchen setup, these basic tools are all you need for a bakery-worthy batch.
Helpful Additions for Easy Prep
While not required, these tools can make your baking life a lot easier:
- Food processor: For quickly chopping dates or creating an even crumble.
- Offset spatula: Helps spread the filling evenly without tearing the crust.
- Cooling rack: Allows air to circulate and prevents soggy bottoms.
These extras can speed things up and ensure your bars look as good as they taste. But don’t stress if you don’t have them—this recipe is designed to work with the basics.
Prepping Before You Start
Measuring and Organizing Ingredients
Prepping is where the magic of a smooth baking session begins. You don’t want to be halfway through and realize your butter is still in the fridge or you’re out of brown sugar. Before you start:
- Measure all ingredients and place them in small bowls.
- Chop dates in advance—they’re sticky, so a sharp knife or food processor helps.
- Let your butter melt and cool slightly so it blends easily.
- Pre-chop any optional add-ins like nuts or zest.
This makes the whole process faster and more enjoyable.
Preheating and Pan Preparation
- Preheat your oven to 350°F (175°C).
- Line your baking pan with parchment paper (leave some overhang to lift bars easily).
- Grease the paper and sides for added non-stick insurance.
Taking these steps upfront means you can move seamlessly from one stage to the next without scrambling. Think of it like setting the stage before a performance—your baking experience will go off without a hitch.
Step-by-Step Guide to Making Date Bars
Step 1 – Making the Date Filling
Start with the heart of the recipe: the date filling. This luscious, naturally sweet layer adds the signature richness that makes date bars irresistible.
Here’s how to do it:
- Add chopped dates and water to a saucepan.
- Simmer on medium heat for 10–12 minutes, stirring frequently until the dates soften and begin to break down.
- Use a fork or potato masher to mash the dates into a thick, spreadable paste.
- Stir in vanilla extract and optional lemon juice. Simmer for 2 more minutes.
- Remove from heat and let it cool slightly.
The result? A sweet, sticky filling with hints of caramel and a smooth, jammy consistency that holds its shape between the layers.
Step 2 – Preparing the Oatmeal Crust
Now that your filling is ready and cooling, it’s time to focus on the crust – the sturdy, flavorful foundation of your bars. What’s great is that the same mixture works for both the base and the topping.
Steps to make the crust:
- In a large mixing bowl, combine the rolled oats, flour, brown sugar, baking soda, and salt.
- Pour in the melted butter, and mix until the mixture resembles wet sand or a loose crumble. You can use your hands to gently work it through if needed.
- Reserve about 1 to 1½ cups of the mixture for the top layer and set it aside.
- Press the remaining mixture evenly into the bottom of your prepared baking pan. Use the bottom of a measuring cup or glass to flatten and compact it slightly—this helps it hold together after baking.
The result should be an even layer of buttery oat goodness that forms a slightly firm base without being too dry or crumbly. Getting this part right sets the tone for the entire dessert.
Step 3 – Assembling the Layers
Assembly is where your bars start coming together like a puzzle—except this one smells amazing.
Here’s what you do:
- Once the crust is pressed in, spread the date filling evenly over it using a spatula. Take your time to make sure it reaches every edge and corner.
- After the filling is smoothed out, sprinkle the reserved oat mixture over the top, distributing it evenly. Gently press down just enough to help it adhere—don’t flatten it too much; you want a crumbly top texture.
- For extra crunch, you can add a sprinkle of chopped nuts or a dusting of cinnamon over the top layer.
This layering step is crucial. You want every bite to deliver that irresistible contrast of chewy filling and crispy topping.
Step 4 – Baking to Golden Perfection
Now comes the best part—getting that golden, toasty finish that makes date bars look and taste heavenly.
Baking instructions:
- Place the assembled pan into your preheated 350°F (175°C) oven.
- Bake for 30 to 35 minutes, or until the top is golden brown and slightly crisp.
- Keep an eye on the edges—they should turn a light golden hue and smell buttery and nutty.
- Once baked, remove the pan from the oven and place it on a wire rack.
Important tip: Let the bars cool completely in the pan. This is key to getting clean slices. If you cut while it’s still warm, the filling may ooze and the bars could fall apart.
While the aroma might tempt you to dive in right away, the cooling time is essential for letting everything firm up properly.
Step 5 – Cooling and Slicing Like a Pro
Patience is a virtue, especially when it comes to cutting the perfect bar. Here’s how to slice like a pro:
- Allow the pan to cool at room temperature for at least 1 hour. For best results, refrigerate it for 30 minutes after cooling.
- Once cool, use the parchment paper overhang to lift the entire slab out of the pan and onto a cutting board.
- Use a sharp knife or serrated blade for cleaner cuts. Wipe the blade between slices to prevent sticking.
- Cut into your desired size—small squares for snacks or larger rectangles for dessert servings.
The end result? Neat, delicious bars with clean layers and that irresistible contrast of crumbly, chewy, and gooey all in one bite.
Tips for Perfect Date Bars Every Time
Common Mistakes to Avoid
Even though date bars are relatively easy to make, a few missteps can throw off your results. Here are some pitfalls to steer clear of:
- Using instant oats: These break down too much and make the crust mushy. Always stick with old-fashioned rolled oats.
- Skipping the cooling time: Impatience leads to messy slices. Always let the bars cool fully.
- Under-cooking the filling: If your dates aren’t cooked down properly, the filling will be chunky and won’t hold together well.
- Too little butter in the crust: The butter acts as the glue; without enough, the crust crumbles apart.
- Overbaking: While a golden top is good, too long in the oven dries out the base and hardens the topping.
Expert Tips for Texture and Flavor
Want to level up your date bars? Here’s what the pros do:
- Add a pinch of salt to the date filling – it enhances the natural sweetness.
- Use a combination of white and brown sugar in the crust for complexity.
- Toast the oats or nuts beforehand to deepen their flavor.
- Use parchment with overhangs on both sides for an easy lift-and-slice technique.
These small touches make a huge difference. You’ll end up with date bars that not only taste amazing but look like they came straight from a bakery.
Variations of the Classic Date Bar
Nutty Date Bars
Love a little crunch in your chewy dessert? Nutty date bars are the answer. By adding nuts to the crust or the filling—or both—you elevate the texture and flavor of traditional date bars.
Best nuts to use:
- Walnuts: Their slight bitterness pairs beautifully with sweet dates.
- Pecans: Buttery and rich, perfect for a more indulgent bite.
- Almonds: Add a firm crunch and a subtle nutty note.
- Hazelnuts or cashews: For a more exotic twist.
How to add them:
- Chop finely and mix into the crust and crumble.
- Fold into the date filling once it’s cooked and cooled slightly.
- Sprinkle on top before baking for a decorative, crunchy finish.
You can even toast the nuts beforehand to boost their aroma. Just a few minutes in a dry skillet will do the trick. Whether you mix them in or layer them on top, nuts bring contrast and richness that turns a simple bar into a gourmet treat.
Vegan or Gluten-Free Alternatives
Don’t let dietary restrictions keep you from enjoying these date bars. With a few smart swaps, you can make them vegan, gluten-free, or both—without sacrificing flavor or texture.
For vegan date bars:
- Use vegan butter or coconut oil instead of dairy-based butter.
- Double-check your sugar (some white sugars are processed with bone char—opt for organic or vegan-certified).
- Add ground flaxseed (1 tbsp + 2.5 tbsp water) if you want to boost the structure a little more.
For gluten-free date bars:
- Substitute all-purpose flour with a gluten-free flour blend (look for 1-to-1 baking blends).
- Make sure oats are certified gluten-free, as cross-contamination is common.
Pro tip: Coconut flour can dry out the crust, so if you’re using it, reduce the quantity slightly and increase the butter or oil to keep it moist.
These alternatives are easy to implement and can be prepped with common ingredients from your local health food store. Now everyone at the table—regardless of dietary needs—can enjoy a bite of this wholesome dessert.
How to Store Date Bars
Short-Term Storage
One of the best things about date bars is that they store like a dream. Whether you’re making a batch for the week or want to plan ahead for a party, proper storage keeps them fresh and delicious.
For short-term storage:
- Allow the bars to cool completely.
- Place them in an airtight container, using parchment paper between layers to prevent sticking.
- Store at room temperature for up to 3 days.
Want them to last a bit longer?
- Keep them in the fridge for up to a week. The cold helps maintain their chewy texture and keeps the filling firm.
Just remember to bring them to room temp before serving so the flavors shine through.
Freezing and Long-Term Storage Tips
Making a big batch? Date bars freeze beautifully. Here’s how:
- Cut the bars into squares once fully cooled.
- Wrap each square in plastic wrap or parchment paper individually.
- Place them all in a zip-top freezer bag or airtight container.
- Label with the date and store in the freezer for up to 3 months.
To thaw:
- Place on the counter for 30 minutes to an hour.
- Or microwave for 10–15 seconds for a quick treat.
They’ll taste just as fresh and chewy as the day you baked them. This makes date bars a perfect make-ahead snack or dessert to keep on hand for surprise guests or busy mornings.
Serving Suggestions
Ideal Pairings (Coffee, Ice Cream, etc.)
Date bars can be enjoyed on their own—but pairing them with the right drink or topping takes them from snack to showstopper.
Top pairings:
- Coffee or espresso: The rich, slightly bitter notes cut through the sweetness beautifully.
- Vanilla ice cream: A warm bar served with a cold scoop is dessert magic.
- Chai or black tea: Spices like cardamom and cinnamon enhance the filling’s natural flavors.
- Greek yogurt: A high-protein, creamy addition for a balanced breakfast option.
You can even drizzle a little warm caramel sauce or a dusting of powdered sugar over the top before serving to make it feel extra fancy.
Presentation Tips for Guests
Planning to serve your bars at a party, brunch, or potluck? Here’s how to make them shine:
- Cut bars into uniform squares or rectangles for a clean, professional look.
- Arrange them on a tiered serving platter or wooden cutting board for a rustic presentation.
- Garnish with a few whole dates, sprigs of mint, or a light sprinkle of cinnamon.
- If serving warm, use small dessert plates with a dollop of ice cream or whipped cream on the side.
With these tips, your humble date bars can easily become the star of the dessert table.
Health Benefits of Dates
Nutritional Value
Dates aren’t just delicious—they’re incredibly nutritious too. These naturally sweet fruits are packed with essential vitamins, minerals, and fiber, making them a smart addition to your dessert game.
Here’s a quick breakdown of what you get in just a handful of dates:
- Fiber: Helps improve digestion, keeps you full, and supports gut health.
- Potassium: Great for heart health and maintaining proper muscle function.
- Magnesium and Iron: Boost energy levels and support strong bones.
- Natural sugars (glucose, fructose, sucrose): Provide a clean, steady energy boost without the crash that comes from refined sugar.
- Vitamin B6 and antioxidants: Aid brain function and help reduce inflammation.
The best part? They deliver all of this in a form that feels like a treat. So, by using dates in your bars, you’re sneaking in some serious nutrition while still satisfying that sweet tooth.
Why Dates Make a Smart Sweetener
Dates are nature’s candy—but unlike refined sugar, they come with built-in nutrients. When you use them in recipes like these bars, you’re cutting down on processed ingredients while still keeping that indulgent flavor.
Here’s why dates are a healthier sweetener choice:
- Low glycemic index: They don’t spike your blood sugar as rapidly as processed sugar.
- Rich in natural fiber: Helps slow down sugar absorption and supports digestion.
- No empty calories: Every bite delivers more than just sweetness—it’s packed with nutritional value.
Swapping sugar for dates in baking is a great step toward cleaner eating. In fact, many people use date paste as a direct sugar substitute in muffins, cakes, smoothies, and more. It’s a small change that makes a big impact, especially when you’re trying to eat a little healthier without sacrificing flavor.
FAQs about Date Bars Recipe
Can I use other fruits instead of dates?
Yes, you can substitute dates with dried figs, apricots, or prunes, but keep in mind the flavor and texture will change. Dates are uniquely sticky and naturally sweet, which helps bind the filling and add rich depth. If using other dried fruits, you may need to add sweeteners or thickeners like cornstarch or honey.
How long do homemade date bars last?
At room temperature, they last about 3 days in an airtight container. If refrigerated, they can stay fresh for up to 7 days. For long-term storage, freeze them individually wrapped for up to 3 months.
Can I use steel-cut oats in this recipe?
No, steel-cut oats won’t work well here. They’re too tough and chewy for date bars and won’t blend into the crust properly. Stick with old-fashioned rolled oats for the best texture.
Do I need to soak the dates first?
If your dates are dry or very firm, soaking them in warm water for 10–15 minutes before cooking will help soften them. This ensures a smoother, creamier filling. However, if your dates are soft and sticky (like Medjool), no soaking is necessary.
Can I make date bars without butter?
Absolutely! You can use coconut oil, vegan butter, or even nut butters (like almond or peanut butter) for a slightly different taste and texture. Just be sure to maintain the same fat ratio for the best results.
Conclusion
Date bars are one of those desserts that never go out of style—and for good reason. They’re simple, naturally sweet, satisfyingly chewy, and endlessly adaptable. Whether you’re baking them for a potluck, prepping a healthy snack, or treating yourself to a homemade dessert, they hit all the right notes.
With wholesome ingredients like oats and dates, plus the freedom to customize with nuts, spices, or even dietary tweaks, you’re in total control of how indulgent (or healthy) your bars are. And the best part? They store well, freeze beautifully, and taste even better the next day.
Once you’ve made them once, you’ll wonder why you ever bought packaged snacks in the first place. So go ahead—preheat that oven, chop those dates, and get ready to enjoy a batch of delicious, homemade date bars that will keep everyone coming back for more.