Dal Tadka Recipe: Dal Tadka is one of the most beloved comfort foods in Indian households. Whether you’re enjoying it with plain steamed rice, jeera rice, or hot phulkas, the taste of creamy dal combined with aromatic spices is truly irresistible.
This dish isn’t just about nourishment—it’s a wholesome blend of protein-packed lentils and the magic of Indian tempering, making it both healthy and flavorful. The best part? Dal Tadka is super simple to make, and once you master it, you’ll find yourself cooking it again and again.
In this guide, I’ll walk you through everything from the ingredients you’ll need to the exact step-by-step process, so even beginners can make this restaurant-style Dal Tadka at home with ease.
Introduction to Dal Tadka
Dal Tadka is a traditional North Indian dish prepared using lentils (mostly toor dal, also called pigeon pea lentils) that are cooked until soft and creamy, then tempered with a flavorful mixture of ghee, garlic, onions, tomatoes, and spices. The term “tadka” or “tempering” refers to the technique of frying spices in hot oil or ghee to release their aroma and flavor, which is then poured over the dal.
This dish is popular across India, but its variations differ from region to region. In Punjab, for instance, it’s often rich and heavy with ghee and butter, while in South India, you might find a tangy touch with curry leaves and mustard seeds. Restaurants typically make Dal Tadka slightly smoky by infusing it with burnt charcoal (a method called dhungar), giving it that irresistible aroma.
But what makes Dal Tadka so popular? It’s simple, nutritious, and comforting. Lentils are packed with protein, making this dish an ideal choice for vegetarians and anyone seeking a balanced diet. Plus, with just a handful of spices, you can transform plain dal into something extraordinary.
Whether you’re an experienced cook or a complete beginner, Dal Tadka is a must-have recipe in your kitchen repertoire. Not only does it pair perfectly with rice, but it also goes beautifully with naan, paratha, or even as a side with biryani.
Ingredients You’ll Need
Getting the ingredients right is the first step toward making a perfect Dal Tadka. The beauty of this dish is that it uses pantry-friendly staples that are easy to find in any Indian kitchen. Let’s break it down:
Essential Ingredients for Dal
- Toor Dal (Pigeon Pea Lentils) – 1 cup (washed and soaked for at least 20 minutes)
- Water – 3 to 4 cups (depending on how thick you want the dal)
- Turmeric Powder – ½ teaspoon
- Salt – to taste
Ingredients for Tempering (Tadka)
- Ghee (Clarified Butter) – 2 tablespoons (you can also use oil, but ghee gives the best flavor)
- Cumin Seeds – 1 teaspoon
- Mustard Seeds – ½ teaspoon (optional but adds a nice touch)
- Garlic – 4 to 5 cloves (finely chopped or sliced)
- Onion – 1 medium (finely chopped)
- Tomato – 1 medium (finely chopped)
- Green Chilies – 1 to 2 (slit lengthwise)
- Red Chili Powder – ½ teaspoon
- Coriander Powder – 1 teaspoon
- Garam Masala – ½ teaspoon
- Dry Red Chilies – 2 (for extra heat and aroma)
- Curry Leaves – 6 to 7 (optional but enhances the flavor)
Optional Add-ons for Flavor
- Kasuri Methi (Dried Fenugreek Leaves) – 1 teaspoon (for that restaurant-style taste)
- Fresh Cream or Butter – for a richer texture
- Fresh Coriander Leaves – for garnishing
- Charcoal (for Dhungar Method) – if you want that smoky restaurant flavor
Pro Tip: Always try to use fresh ghee for the tadka—it elevates the dish instantly.
Kitchen Tools and Preparation Tips
Before you start cooking, it’s important to have the right tools ready. Cooking Dal Tadka doesn’t require fancy equipment, but a few essentials will make your process smooth.
Utensils You’ll Need
- Pressure Cooker or Instant Pot – to cook the dal quickly and evenly. If you don’t have one, a regular pot works too, but it will take longer.
- Small Frying Pan (Tadka Pan) – specifically for tempering the spices.
- Ladle – to mix and serve.
- Chopping Board and Knife – for prepping onions, garlic, tomatoes, and chilies.
Preparation Before Cooking
- Wash the dal thoroughly under running water until the water runs clear. This removes excess starch and prevents the dal from becoming too sticky.
- Soak the dal for at least 20–30 minutes before cooking. This reduces cooking time and ensures the dal turns soft and creamy.
- Chop all your onions, garlic, and tomatoes before you start cooking to avoid rushing later.
- Keep all your spices handy—having them measured out and ready makes cooking stress-free.
When you have everything prepped and ready, the actual cooking becomes much easier and enjoyable.
Step-by-Step Guide to Cooking Dal Tadka
Now let’s dive into the actual cooking process. Follow these steps carefully, and you’ll get restaurant-style Dal Tadka right in your kitchen.
Step 1: Washing and Soaking Dal
Start by rinsing 1 cup of toor dal under running water. Wash it 3–4 times until the water becomes clear. Soak it for about 20–30 minutes. This not only helps the dal cook faster but also makes it creamier in texture.
Step 2: Cooking the Dal
In a pressure cooker, add the soaked dal along with 3 cups of water, ½ teaspoon turmeric, and salt to taste. Close the lid and cook for 3–4 whistles. If you’re using an Instant Pot, pressure cook on high for 8–10 minutes.
Once done, let the pressure release naturally. Open the lid and mash the dal slightly with the back of a spoon for a creamy consistency. If it feels too thick, add a little hot water to adjust.
Step 3: Preparing the Tadka (Tempering)
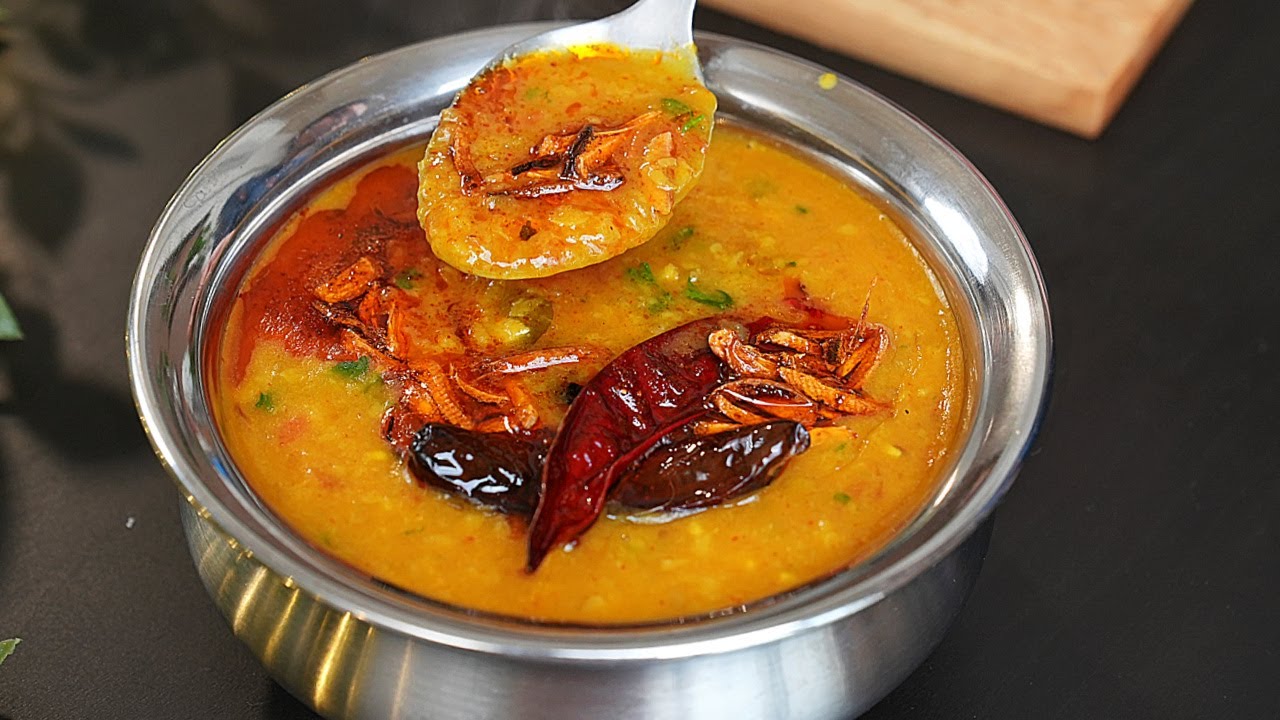
In a small tadka pan, heat 2 tablespoons of ghee. Add cumin seeds and let them splutter. Next, add mustard seeds, garlic, and dry red chilies. Fry until the garlic turns golden. Then add onions, green chilies, and curry leaves. Sauté until the onions turn golden brown. Finally, add chopped tomatoes, red chili powder, coriander powder, and garam masala. Cook until the tomatoes soften and the oil separates from the mixture.
Step 4: Combining Dal and Tadka
Pour this sizzling tadka directly over the cooked dal. The aroma at this stage will be irresistible. Mix gently to combine.
Step 5: Garnishing and Serving
Top it off with fresh coriander leaves, and if you like, a dollop of butter or cream for richness. Serve hot with steamed rice or roti.
Tips for Perfect Dal Tadka Every Time
- Always soak your dal before cooking—it makes a huge difference in texture.
- Use ghee instead of oil for the tadka—it gives the dish its authentic flavor.
- Don’t overcook the garlic in the tempering; it should be golden, not burnt.
- Adjust the consistency of the dal as per your liking—some prefer it thick, others a little soupy.
- For restaurant-style smokiness, place a small piece of hot charcoal in a bowl, put it inside the dal pot, pour a teaspoon of ghee over it, and cover with a lid for 2–3 minutes. This will give your dal a smoky dhaba-style flavor.
Variations of Dal Tadka
Dal Tadka is a versatile dish, and depending on the region or personal preference, it can be tweaked in many ways. The base idea remains the same—cooked dal finished with tempering—but the ingredients in the tadka and even the dal used may differ. Let’s look at some popular variations:
Punjabi Dal Tadka
This version is rich and hearty, often prepared with a mix of toor dal and chana dal (split Bengal gram). It’s cooked with plenty of ghee, onions, tomatoes, and finished with butter or cream. Smoky flavors using the dhungar method are a hallmark of this variation.
South Indian Style Dal Tadka
In South India, the tadka usually includes curry leaves, mustard seeds, dried red chilies, and a touch of tamarind for tanginess. Sometimes, moong dal is used instead of toor dal, making the dish lighter and easier to digest.
Mixed Dal Tadka
A restaurant favorite, this variation combines multiple dals like toor dal, moong dal, masoor dal, and urad dal. The mix of flavors and textures gives the dal a unique richness, making it stand out.
Vegan Dal Tadka
For those avoiding dairy, simply replace ghee with vegetable oil or coconut oil. You can also use vegan butter for richness. The flavors remain equally delightful without compromising authenticity.
Spicy Dhaba-Style Dal Tadka
This variation is typically spicier, with extra chilies, ginger, and garlic. Dhaba-style dal is often cooked with a smoky, bold tadka, making it perfect for those who love fiery flavors.
Health Benefits of Dal Tadka
Dal Tadka isn’t just about taste—it’s also packed with nutrition. Lentils are a staple in Indian households because they provide essential nutrients, are affordable, and are versatile in cooking. Here’s why Dal Tadka is as healthy as it is delicious:
Rich in Protein
Dal, especially toor dal, is an excellent source of plant-based protein, making it ideal for vegetarians. Pairing it with rice or roti creates a complete protein meal.
High in Fiber
Lentils are naturally high in dietary fiber, which helps regulate digestion, keeps you full for longer, and supports a healthy gut.
Packed with Vitamins and Minerals
Dal provides iron, potassium, folate, and magnesium—all of which are crucial for maintaining energy, heart health, and overall immunity.
Low in Fat, High in Flavor
Despite its richness in taste, Dal Tadka can be made with minimal oil or ghee. This makes it a guilt-free, wholesome dish that fits perfectly into a balanced diet.
Diabetic-Friendly
Dal has a low glycemic index, meaning it helps regulate blood sugar levels. Combined with the right spices, Dal Tadka becomes a diabetic-friendly meal option.
Simply put, Dal Tadka is one of those rare dishes that strike the perfect balance between flavor and nutrition.
Serving Suggestions for Dal Tadka
Dal Tadka is a complete meal in itself when paired with the right side. Here are some classic ways to enjoy it:
With Rice
The most popular pairing is with plain steamed basmati rice. You can also serve it with jeera rice (cumin-flavored rice) or ghee rice for added aroma.
With Indian Breads
Dal Tadka goes wonderfully with phulkas, chapati, naan, paratha, or even stuffed kulchas. The combination is comforting and filling.
As a Side Dish
You can also serve Dal Tadka as a side dish with biryani, pulao, or even with a full North Indian thali. Its comforting flavors balance the richness of other dishes.
With Salad and Pickles
Pairing dal with a crunchy onion salad, cucumber raita, or tangy mango pickle elevates the entire meal experience.
Fusion Ideas
Leftover dal can be repurposed into dal soup, dal khichdi, or even used as a base for pasta sauces with an Indian twist. The possibilities are endless!
Common Mistakes to Avoid While Cooking Dal Tadka
Even though Dal Tadka is a straightforward recipe, a few mistakes can ruin its taste or texture. Avoid these pitfalls:
1. Not Washing and Soaking the Dal Properly
Skipping this step often leads to uneven cooking. Washing also removes excess starch that can make the dal sticky.
2. Using Too Much or Too Little Water
The consistency of dal is important—it should neither be too watery nor too thick. Start with 3 cups of water and adjust later as needed.
3. Overcooking or Undercooking the Dal
Undercooked dal feels hard, while overcooked dal turns mushy. Cook until it’s soft but still has some structure before mashing.
4. Burning the Tadka
The tempering should be golden and aromatic, not burnt. Burnt garlic or spices can ruin the flavor of the entire dish.
5. Ignoring Seasoning Adjustments
Always taste and adjust salt and spice levels before serving. Dal absorbs flavors, so check it after mixing in the tadka.
Pro Tips for Restaurant-Style Dal Tadka
Want to replicate the flavors of your favorite restaurant at home? Here are some expert tips:
- Use a Mix of Dals – Combine toor dal, moong dal, and masoor dal for a richer, layered flavor.
- Add Kasuri Methi – Crushed dried fenugreek leaves give dal that restaurant-like aroma.
- Use Fresh Ghee – Never compromise on the quality of ghee; it’s the soul of the dish.
- Smoky Dhungar Method – For an authentic restaurant touch, use the charcoal smoking technique.
- Finish with Butter or Cream – Adding just a little at the end makes the dal silky and luxurious.
By keeping these tricks in mind, you’ll have everyone asking for second helpings!
How to Store and Reheat Dal Tadka
Dal Tadka is one of those dishes that tastes even better the next day because the spices have more time to blend with the dal. But storing and reheating it properly is key to maintaining freshness and flavor.
Storing Dal Tadka
- Refrigeration: Allow the dal to cool down completely before transferring it to an airtight container. Store it in the refrigerator for up to 3 days.
- Freezing: If you want to store it for longer, you can freeze Dal Tadka. Portion it into freezer-safe containers and it will stay good for 2–3 months. When you want to use it, thaw it in the fridge overnight.
Reheating Dal Tadka
- On the Stove: Transfer the dal to a pan, add a little water to adjust consistency, and reheat on low-medium heat while stirring occasionally.
- In the Microwave: Place the dal in a microwave-safe bowl, cover loosely, and heat for 2–3 minutes, stirring once halfway.
- Reviving Flavors: If you feel the dal has lost its freshness after storage, make a small fresh tadka of garlic and cumin in ghee and add it before serving. This instantly revives the taste.
Pro Tip: Avoid reheating the dal multiple times. Instead, take out only the portion you need to keep the rest fresh.
Dal Tadka vs Dal Fry: What’s the Difference?
Many people confuse Dal Tadka with Dal Fry, but the two dishes, though similar, are prepared slightly differently. Let’s clear up the confusion:
| Feature | Dal Tadka | Dal Fry |
|---|---|---|
| Cooking Method | Dal is cooked plain with turmeric and salt, then tempered with spices. | Dal is cooked with onions, tomatoes, and spices directly before adding a tadka. |
| Flavor Profile | Simple, homely, with a distinct smoky touch when tempered. | Richer, more robust, slightly heavier. |
| Texture | Creamy but lighter, depending on how much water is added. | Thicker and spiced with sautéed onion-tomato base. |
| Restaurant Popularity | A signature dish in almost every restaurant menu. | Equally popular but often considered richer. |
Both are delicious, but Dal Tadka is preferred for everyday meals because of its simplicity, while Dal Fry is more indulgent and often enjoyed at restaurants.
Dal Tadka for Beginners: A Quick Recap
If you’re new to cooking, here’s a simplified version of the recipe you can quickly follow:
- Wash and soak 1 cup of toor dal.
- Pressure cook it with turmeric, salt, and water until soft.
- Prepare tadka with ghee, cumin, garlic, onions, tomatoes, and spices.
- Pour the tadka over the dal, mix, and garnish with coriander leaves.
- Serve hot with rice or roti.
It’s that easy! Once you master this, you can experiment with variations and even try restaurant-style techniques.
Why You’ll Love Making Dal Tadka at Home
There’s something incredibly satisfying about cooking Dal Tadka at home. Here’s why you’ll love it:
- Healthier than Restaurant Versions: You control the amount of ghee, salt, and spices.
- Budget-Friendly: Lentils are inexpensive, and the dish requires only basic pantry ingredients.
- Customizable: Adjust spice levels, add veggies, or make it vegan—it always tastes amazing.
- Comfort Food Vibes: It’s the ultimate dish for rainy days, cozy dinners, or when you need something soothing.
- Crowd-Pleaser: Whether it’s family dinners or get-togethers, Dal Tadka always wins hearts.
Cooking this dish at home is more than just about food—it’s about the joy of creating something flavorful, nourishing, and comforting from scratch.
FAQs about Dal Tadka Recipe
1. Can I make Dal Tadka without a pressure cooker?
Yes, you can cook dal in a regular pot, but it will take longer (about 40–45 minutes). Just ensure you add enough water and stir occasionally.
2. Which dal is best for Dal Tadka?
Traditionally, toor dal (pigeon pea lentils) is used, but you can also use moong dal, masoor dal, or a mix for richer flavor.
3. Can I make Dal Tadka vegan?
Absolutely! Simply replace ghee with oil or vegan butter, and you’ll still have a delicious dal.
4. How do I make my Dal Tadka taste like restaurant-style?
Use the dhungar (charcoal smoking) method and finish with a dollop of butter or cream. Also, adding kasuri methi enhances the flavor.
5. What should I serve with Dal Tadka?
The classic pairing is steamed rice or jeera rice, but it also tastes great with chapati, naan, or paratha.
Conclusion
Dal Tadka is not just a recipe—it’s a bowl of comfort, tradition, and flavor that has been loved for generations. From its simple preparation to its rich, smoky aroma, it proves that the best dishes are often the most humble ones. With this step-by-step guide, you can now recreate restaurant-style Dal Tadka in your kitchen effortlessly. Whether you’re cooking it for yourself, your family, or guests, this dish will never disappoint.
So, grab your lentils, heat up some ghee, and let the magic of tadka transform your meal into a flavorful feast.


