Cucumber Pickle Recipe: Pickles are one of those magical things that can elevate almost any meal. Whether you’re snacking, topping a sandwich, or serving up a side at a summer BBQ, homemade cucumber pickles are a must-try. If you’ve never pickled before, don’t worry—this guide will walk you through everything, step by step. By the end, you’ll have crisp, flavorful pickles made right in your kitchen.
Let’s dive in.
Why Homemade Pickles are Worth It
Sure, store-bought pickles are convenient. But here’s the thing—they rarely match the freshness, crunch, or customizable flavor of homemade ones. When you make pickles at home, you’re in control. You get to choose the ingredients, tweak the flavor, and skip the preservatives.
Plus, it’s oddly satisfying. There’s something about seeing jars of pickles lined up in your fridge or pantry that makes you feel like a kitchen boss. And if you’re growing your own cucumbers? Even better. Homemade pickles are also cheaper in the long run, especially if you’re using seasonal produce or bulk buying.
Types of Cucumbers Ideal for Pickling
Kirby Cucumbers
Kirby cucumbers are the most popular pick for pickling—and for good reason. They’re small, firm, and have fewer seeds. Their thick skin helps them stay crunchy even after brining.
English Cucumbers
English cucumbers are long and slender with thin skin. They’re not typically used for pickling due to their high water content, but you can use them for quick pickles or refrigerator versions. Just expect a softer texture.
Essential Equipment for Pickling
Before you start, gather the basic tools you’ll need:
- Mason jars with lids and bands (pint or quart size)
- A large pot (for sterilizing and boiling)
- Tongs or jar lifter
- Cutting board and knife
- Measuring cups and spoons
- Saucepan (for the brine)
- Optional: Canning funnel and bubble remover spatula
If you’re planning to make shelf-stable pickles, you’ll also need a water bath canner or a large stockpot deep enough to submerge jars.
List of Ingredients You’ll Need
Main Ingredients
Here’s what you need for a classic garlic-dill cucumber pickle:
- 8-10 small cucumbers (Kirby recommended)
- 4 cups water
- 2 cups white vinegar (5% acidity)
- 2 tablespoons pickling salt or kosher salt
- 4-6 cloves garlic (peeled)
- 2 tablespoons dill seeds or a few fresh dill sprigs
- 1 teaspoon black peppercorns
- 1 teaspoon mustard seeds
Optional Add-ins for Extra Flavor
- Red pepper flakes (for heat)
- Sliced onion
- Bay leaves
- Whole coriander seeds
- Sugar (for sweet pickles)
These ingredients can be adjusted to your flavor preferences. Don’t be afraid to experiment—just keep the vinegar-to-water ratio to maintain safety and shelf-life.
How to Prepare Cucumbers for Pickling
Washing and Cutting
First, wash your cucumbers thoroughly under cold water to remove dirt. Trim the blossom ends (they contain enzymes that can make pickles soft). You can slice them into spears, chips, or leave them whole—it’s up to you.
Soaking in Ice Water
To help your cucumbers stay crisp, soak them in an ice water bath for at least 1-2 hours before pickling. It’s not required, but it makes a noticeable difference in texture.
Sterilizing Jars for Safe Storage
Sterilizing your jars is a step you don’t want to skip. It helps prevent bacteria and extends the shelf life of your pickles.
Here’s how:
- Wash jars and lids in hot soapy water.
- Place jars in a large pot of boiling water for 10 minutes.
- Boil the lids and bands for 5 minutes (but don’t reuse lids from old jars).
- Let them air-dry on a clean towel.
If you’re making refrigerator pickles, you can skip the boiling step and just use clean, hot water–rinsed jars.
Step-by-Step Guide to Making Cucumber Pickles
Step 1: Preparing the Brine
In a saucepan, combine water, vinegar, and salt. Bring the mixture to a boil, stirring until the salt is fully dissolved. This is your base brine. You can also toss in spices like mustard seeds or peppercorns during this step to infuse more flavor.
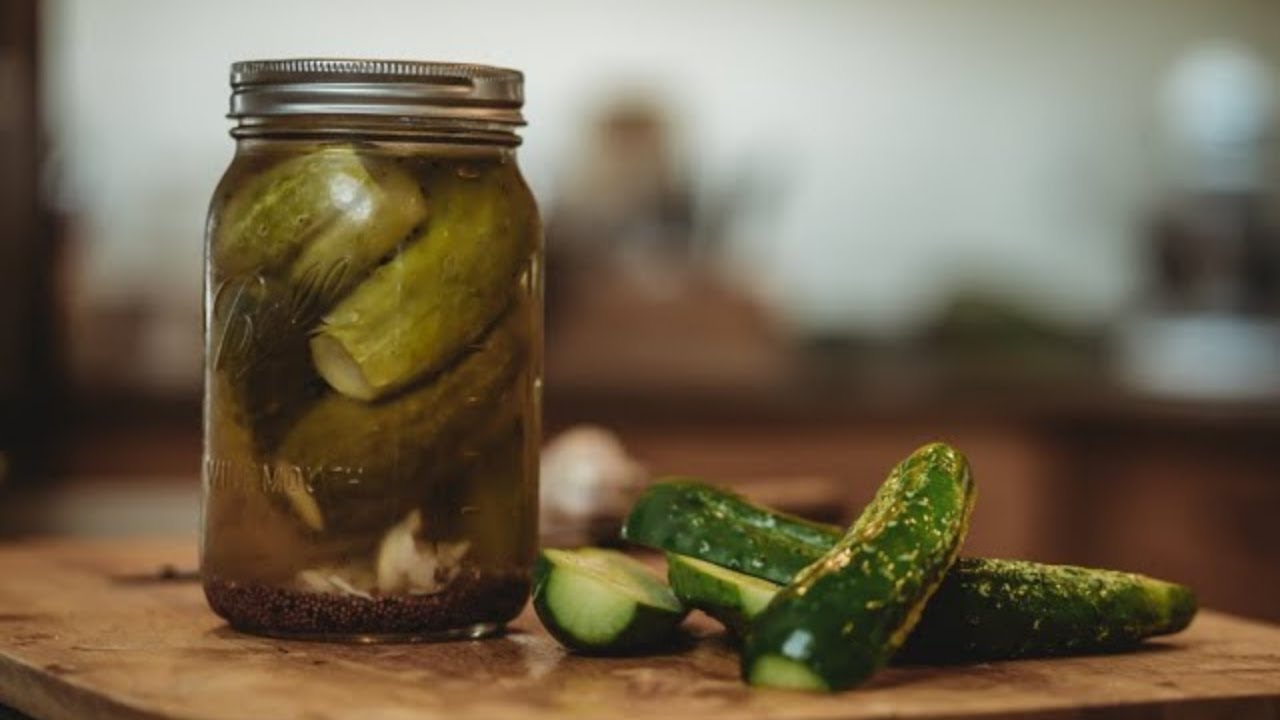
Step 2: Packing the Jars
Place garlic cloves, dill, and any spices at the bottom of each jar. Then pack in the cucumber slices tightly. Make sure to leave about half an inch of space at the top of each jar.
Step 3: Adding the Brine
Pour the hot brine into each jar, covering the cucumbers completely. Use a bubble remover or a clean knife to remove air pockets by running it along the inside of the jar. Wipe the rims clean with a damp cloth.
Step 4: Sealing the Jars
Place the lids on the jars and screw the bands until fingertip tight. If you’re doing refrigerator pickles, that’s it—let them cool, then pop them into the fridge.
Step 5: Processing (for Shelf-Stable Pickles)
If you want shelf-stable pickles, you’ll need to process the jars in a boiling water bath for 10 minutes. Then remove and let them sit undisturbed for 24 hours. You’ll hear a satisfying pop when the lids seal.
Refrigerator vs. Canned Pickles
There are two main paths you can take with your homemade cucumber pickles: refrigerator or canned. Both are delicious, but they serve different purposes depending on how long you want to store them and how much effort you’re willing to put in.
Refrigerator Pickles are the easiest and quickest. You don’t need to process them in a water bath; just pop them in the fridge after adding the hot brine. They’re usually ready to eat within 24–48 hours and can last up to 2 months when refrigerated. These pickles tend to have a brighter flavor and crunchier bite because they aren’t exposed to long heat.
Canned Pickles, on the other hand, are processed in a boiling water bath, which gives them a longer shelf life—up to a year if stored properly. This method is great if you’re making large batches or want to enjoy pickles year-round without using fridge space. However, the texture might be slightly softer than refrigerator pickles due to the boiling process.
So which one should you go for? If you’re new to pickling or just want a quick batch, start with refrigerator pickles. If you’re up for preserving a garden harvest or stocking your pantry, go the canning route.
How Long Before You Can Eat the Pickles?
Patience is part of the pickling game. While you can technically eat your pickles a few hours after making them, they’re best when given time to absorb all the flavors. For refrigerator pickles, wait at least 24 to 48 hours before tasting. For canned pickles, let them sit for 1 to 2 weeks to reach peak flavor.
This waiting period allows the cucumbers to fully absorb the brine and spices, giving you that classic tangy, bold pickle taste. The longer they sit (within reason), the more intense and developed the flavors become.
And here’s a tip: Always label your jars with the date they were made. That way, you’ll know exactly when they’re ready—and how long they’ve been sitting.
Tips for Crunchy Pickles Every Time
Crunch is king when it comes to pickles. Nobody wants a soggy cucumber, so here are some expert tips to keep your pickles crisp and satisfying:
- Use fresh, firm cucumbers – The fresher your cucumbers, the crunchier your pickles. Avoid any that feel soft or have blemishes.
- Soak cucumbers in ice water before pickling – This simple step firms them up beautifully.
- Trim the blossom ends – The blossom end contains enzymes that can cause soft pickles. Just slice off about 1/8 inch.
- Use pickling salt – Table salt often contains anti-caking agents that can cloud your brine and affect texture.
- Add tannins – A grape leaf, bay leaf, or even a black tea bag added to the jar can help maintain crunchiness due to their natural tannins.
- Don’t overprocess – If canning, stick to the recommended time. Over-boiling the jars can soften the pickles.
Follow these, and you’ll be rewarded with that satisfying snap every time you bite into one.
Common Mistakes to Avoid
Making pickles might seem straightforward, but there are a few common mistakes that can mess with your results. Here’s what to watch out for:
- Using the wrong salt – Always use pickling or kosher salt. Iodized table salt can turn your brine cloudy and affect flavor.
- Skipping sterilization – Dirty jars can introduce bacteria and ruin your batch.
- Overpacking jars – Cramming too many cucumbers into a jar can prevent even brine coverage.
- Incorrect vinegar strength – Make sure you use vinegar with 5% acidity for proper preservation.
- Not trimming blossom ends – This one’s easy to forget, but it really affects the texture.
- Using overripe cucumbers – They’ll go mushy fast. Stick to small, firm, fresh cucumbers.
- Not removing air bubbles – Trapped air can interfere with sealing and storage.
Avoid these pitfalls, and you’ll set yourself up for pickle perfection.
Flavor Variations to Try
Once you master the basic dill pickle, it’s time to have some fun with flavors. Here are a few ways to switch things up:
Spicy Pickles
Add sliced jalapeños, chili flakes, or even whole dried chilies to the jar. You can also toss in a bit of cayenne pepper into the brine. Spicy pickles go great on burgers, tacos, or straight out of the jar.
Sweet Pickles
For a sweeter version, add 1/2 to 3/4 cup of sugar to your brine mixture. You can also add cinnamon sticks, allspice, or cloves for extra warmth. These pickles are perfect with fried chicken or as a tangy snack.
Garlic-Dill Pickles
Add 2–3 garlic cloves and fresh dill sprigs to each jar. Crushed black peppercorns and mustard seeds pair well here too. These are the classic deli-style pickles everyone loves.
Get creative! You can even add things like horseradish, fennel seeds, or ginger for a unique twist.
How to Store and Shelf Life
How long your pickles last depends on how you store them.
Refrigerator Pickles
- Storage: Keep in a clean jar, tightly sealed, in the fridge.
- Shelf Life: Up to 2 months, though the texture may soften over time.
Canned Pickles
- Storage: Store in a cool, dark place like a pantry.
- Shelf Life: Up to 1 year if properly sealed and stored.
Once opened, both types should be refrigerated and eaten within a few weeks. Always check for signs of spoilage like cloudy brine (for canned pickles), off smells, or mushy cucumbers.
Serving Ideas and Pairings
Cucumber pickles are more than a side—they’re a game-changer for so many dishes. Here are a few fun ways to use them:
- On Burgers & Sandwiches: Adds the perfect tang and crunch.
- In Salads: Chop them up and toss them into potato salad or pasta salad.
- With BBQ: The acid cuts through the richness of smoked meats.
- On Cheese Boards: A delicious contrast to creamy cheeses and cured meats.
- As a Snack: Grab a spear straight from the jar for a low-calorie snack.
They also make great gifts! Dress up your jars with a cute label and ribbon, and you’ve got a homemade treat anyone would appreciate.
FAQs about Cucumber Pickle Recipe
1. Can I use table salt instead of pickling salt?
It’s best not to. Table salt contains additives that can cloud the brine and affect flavor. Stick to pickling or kosher salt for the best results.
2. How do I know if my pickles have gone bad?
Check for mold, a foul odor, slimy texture, or fizzing. If anything seems off, it’s safest to throw the jar away.
3. Do I have to use vinegar?
Yes. Vinegar is essential for pickling—it provides the acidity that preserves the cucumbers and gives pickles their signature tang.
4. Can I reuse the brine?
It’s not recommended. Used brine loses its acidity and can harbor bacteria. Always make a fresh batch when pickling.
5. Why are my pickles soft and not crunchy?
Common causes include using overripe cucumbers, skipping the ice water soak, not trimming the blossom end, or over-processing during canning.
Conclusion
Making cucumber pickles at home is easier than you might think—and way more rewarding. With just a few simple ingredients and tools, you can create jars of crunchy, flavorful pickles tailored exactly to your taste. Whether you like them spicy, sweet, or classic dill, there’s a version for everyone. Plus, the satisfaction of popping open a jar of your own homemade pickles? Nothing beats it.
So grab those cucumbers, roll up your sleeves, and start pickling. Your future self (and your taste buds) will thank you.


