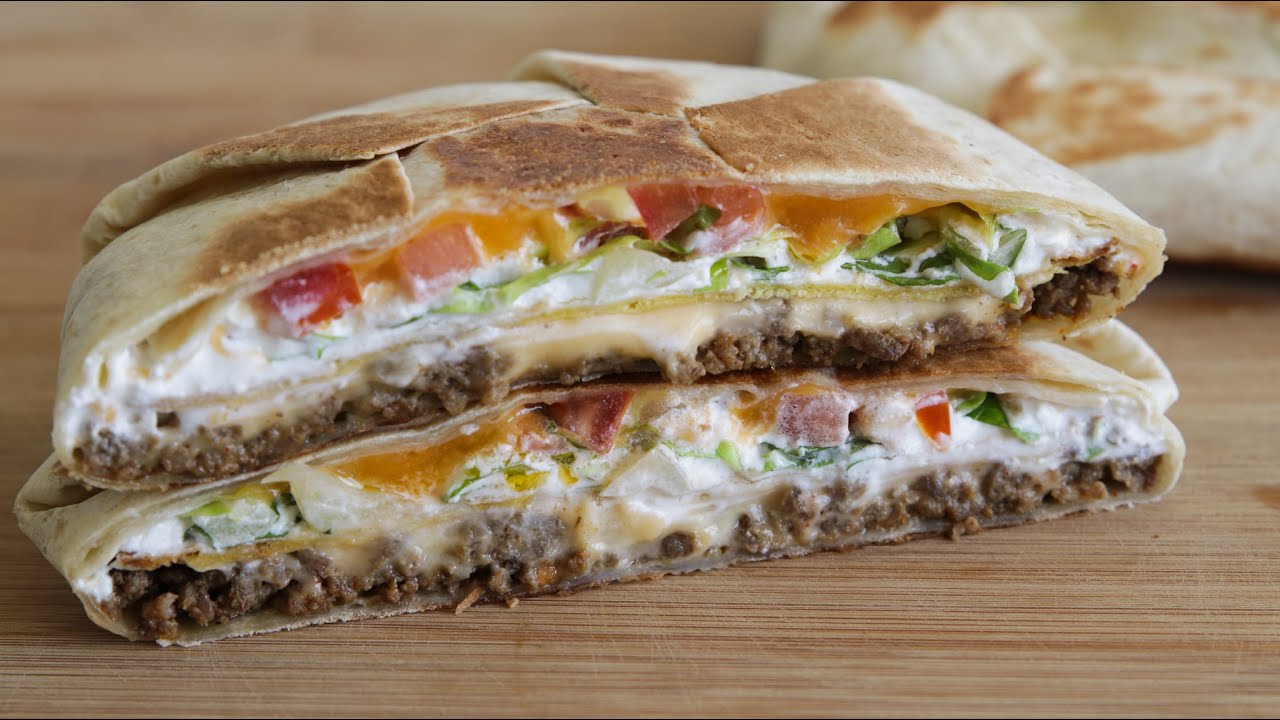
Crunchwrap Recipe: If you’ve ever been to Taco Bell, chances are you’ve heard of the famous Crunchwrap Supreme. It’s that giant tortilla stuffed with layers of seasoned beef, cheese, lettuce, tomatoes, sour cream, and a crunchy tostada shell right in the middle. Imagine a burrito, a taco, and a quesadilla all having a food baby—that’s the Crunchwrap! It’s crispy on the outside, soft and cheesy on the inside, and gives you that satisfying crunch with every bite.
But here’s the good news—you don’t need a fast-food run to enjoy one. Making a homemade Crunchwrap is not only easy but also much healthier because you control what goes inside. You can customize it with your favorite proteins, sauces, and veggies. Whether you want it cheesy, spicy, meaty, or totally vegetarian, this recipe has got you covered.
So, let’s dive into how you can make the ultimate Crunchwrap at home, step by step.
Ingredients You’ll Need for the Perfect Crunchwrap
One of the best things about Crunchwraps is how flexible they are. You don’t need fancy ingredients; most of them are pantry staples or things you already buy for tacos or burritos.
Core Ingredients
- Large flour tortillas (the biggest ones you can find, usually 10–12 inches)
- Ground beef (or chicken, turkey, or plant-based crumbles)
- Taco seasoning (store-bought or homemade)
- Tostada shells (for the “crunch” layer)
- Shredded cheese (cheddar, Monterey Jack, or a blend)
- Sour cream
- Lettuce, chopped
- Tomatoes, diced
Optional Add-Ons and Variations
- Guacamole or sliced avocado
- Jalapeños for extra spice
- Hot sauce or salsa
- Refried beans or black beans
- Onions, grilled or raw
Best Substitutions for Dietary Needs
- Gluten-free option: Use gluten-free tortillas.
- Low-carb: Swap the tortilla for a low-carb wrap.
- Vegan: Use dairy-free cheese, vegan sour cream, and plant-based protein.
Having all these ingredients laid out before you start makes the process a lot smoother.
Kitchen Tools Required
To make this recipe at home, you don’t need professional chef gear—just some basic kitchen essentials.
Essential Cooking Equipment
- A large skillet or pan for cooking the meat
- A spatula for stirring and flipping
- A knife and cutting board for prepping veggies
- A large nonstick skillet or griddle for toasting the crunchwrap
Handy Extras That Make It Easier
- A taco press (optional, for a uniform crunchwrap fold)
- A cheese grater (if using block cheese)
- A food storage container for prepped veggies and toppings
Pro tip: A heavy skillet or even a flat plate pressed down while toasting will help keep your Crunchwrap sealed and crispy.
Preparing the Ingredients Before Cooking
Preparation is everything when it comes to making a Crunchwrap. Since you’ll be layering ingredients quickly, it’s better to have everything ready in advance.
Prepping the Meat (Beef, Chicken, or Veggie)
Start by browning your ground beef (or chicken/turkey/vegan substitute) in a skillet. Once it’s fully cooked, drain excess grease and mix in taco seasoning with a little water. Let it simmer until the seasoning is absorbed and the meat is flavorful.
Getting the Vegetables Ready
- Wash and chop your lettuce finely.
- Dice fresh tomatoes into small cubes.
- If using onions, slice them thin.
- For extra flavor, grill your onions and peppers before adding them.
Prepping the Cheese and Tortillas
Grate your cheese ahead of time. Warm your tortillas slightly in the microwave or skillet—this makes them softer and easier to fold without tearing.
By now, your kitchen should smell like taco night, and everything should be ready for assembly.
Step-by-Step Guide to Making a Crunchwrap
Now comes the fun part—actually building your Crunchwrap!
Step 1 – Cook and Season the Meat
Follow the prep instructions above, making sure your meat is well seasoned. A good Crunchwrap starts with flavorful protein.
Step 2 – Prepare the Crunchy Layer
Place a tostada shell in the center of your tortilla. If you can’t find tostadas, you can use a crunchy taco shell or even bake your own mini corn tortillas until crisp.
Step 3 – Layer the Ingredients
The classic Crunchwrap order is:
- Large tortilla
- Seasoned meat
- Nacho cheese or shredded cheese
- Tostada shell (crunchy layer)
- Sour cream
- Lettuce and tomatoes
- Extra cheese or toppings
Step 4 – Fold the Crunchwrap Properly
This step is crucial. Start folding from the edge of the tortilla inward, working in a circular motion until all sides are folded and it looks like a giant hexagon. If your tortilla is too small, cut an extra piece from another tortilla and place it in the middle to “seal the gap.”
Step 5 – Toast or Grill for Perfection
Place your folded Crunchwrap seam-side down in a heated skillet. Cook for 2–3 minutes until golden brown, then flip and cook the other side. The goal is a crispy outside that holds everything together.
Boom! You’ve just made your very own Crunchwrap.
Tips for the Best Crunchwrap Every Time
Making a Crunchwrap isn’t hard, but there are a few tricks that will help you level up your game. Think of it like building a house—if the foundation isn’t solid, the whole thing falls apart. Same goes for your Crunchwrap.
Achieving the Perfect Fold
The fold is what separates a successful Crunchwrap from a tortilla disaster. Always start with a large tortilla—the bigger, the better. When folding, make sure each section overlaps slightly with the next. This helps lock everything in place and prevents fillings from spilling out. If your tortilla isn’t big enough to cover, you can patch it by placing a smaller tortilla piece on top before folding.
Another trick? Warm your tortillas. Cold tortillas crack and tear when folded, but warm ones bend easily. Microwave them for 10–15 seconds or heat them in a skillet briefly before you start wrapping.
Keeping the Wrap Crispy
A soggy Crunchwrap is nobody’s dream meal. To keep it crispy, always toast the wrap in a dry skillet or on a griddle. Use medium heat so it cooks evenly without burning. Press it down gently with a spatula or another skillet to ensure the folds stay sealed.
For extra crunch, some people even butter or lightly oil the outside of the tortilla before toasting—it adds a golden finish and a delicious crisp texture.
Variations of the Crunchwrap
One of the best things about this recipe is how versatile it is. You can swap out ingredients and completely change the flavor profile while still keeping that iconic Crunchwrap structure.
Breakfast Crunchwrap
Start your day right with a breakfast version. Instead of taco meat, cook some scrambled eggs with breakfast sausage or bacon. Add shredded cheese, a hash brown patty as the crunchy layer, and top it off with salsa or hot sauce. It’s basically a portable breakfast burrito with extra crunch.
Vegetarian Crunchwrap
For a meat-free option, skip the beef and use black beans, refried beans, or sautéed veggies like bell peppers, mushrooms, and onions. Add guacamole or extra cheese for richness. You won’t even miss the meat—it’s that good!
Spicy Crunchwrap Version
If you love heat, this version is for you. Use spicy taco seasoning for the meat, add jalapeños, and drizzle with hot sauce before folding. You can even sprinkle in crushed Flamin’ Hot Cheetos for an unexpected fiery crunch.
The beauty of Crunchwraps is that you can adapt them endlessly. No matter your taste, there’s a Crunchwrap variation out there with your name on it.
Common Mistakes to Avoid
Even though making a Crunchwrap is pretty straightforward, there are a few common mistakes that can ruin the experience. Let’s make sure you don’t fall into these traps.
Overfilling the Crunchwrap
It’s tempting to pile on the ingredients, but resist the urge. Overstuffing makes it impossible to fold properly and usually results in the filling spilling out while cooking. The key is balance—enough filling to be flavorful but not so much that it bursts open.
Not Toasting Properly
If you don’t toast your Crunchwrap long enough, the folds won’t seal, and the wrap may fall apart. On the flip side, if you toast on high heat, the outside burns before the inside gets warm. The sweet spot is medium heat for 2–3 minutes per side. That way, you get a golden, crispy outside and melty, warm insides.
By avoiding these simple mistakes, you’ll end up with a Crunchwrap that looks and tastes like it came straight from a restaurant.
Serving Suggestions
A Crunchwrap is already a meal in itself, but let’s be real—it’s always better with some tasty sides.
Perfect Side Dishes
- Mexican rice or cilantro-lime rice
- Refried beans or black beans
- Corn on the cob with chili-lime seasoning
- Loaded nachos for a party-style meal
Best Sauces and Dips
- Salsa (mild, medium, or spicy depending on your preference)
- Guacamole for creaminess
- Pico de gallo for freshness
- Queso dip for extra cheesiness
- Chipotle mayo or hot sauce for a spicy kick
Serving your Crunchwrap with these sides turns a simple snack into a full-on feast.
Storing and Reheating the Crunchwrap
Sometimes you make too many Crunchwraps (although let’s be honest, leftovers don’t usually last long). Here’s how to store and reheat them properly.
Storing in the Fridge
Wrap leftover Crunchwraps tightly in foil or plastic wrap and store them in the refrigerator. They’ll stay fresh for up to 3 days.
Best Ways to Reheat Without Losing Crunch
- Skillet Method (Best Option): Heat a dry skillet over medium heat, place the Crunchwrap seam-side down, and cook for 3–4 minutes per side until hot and crispy.
- Oven Method: Preheat your oven to 375°F (190°C). Place the Crunchwrap on a baking sheet and warm it for about 10 minutes.
- Air Fryer Method: This is quick and keeps things crispy. Air fry at 350°F (175°C) for 5–6 minutes.
- Microwave Method (Least Recommended): It works, but you’ll lose the crunch. If you must, microwave in 30-second bursts until warm.
This way, your leftover Crunchwraps taste almost as good as when they were freshly made.
Crunchwrap vs. Tacos and Burritos
If you’ve ever wondered how a Crunchwrap stacks up against tacos and burritos, you’re not alone. They all share similar ingredients—tortillas, meat, cheese, and toppings—but the way they’re put together makes a big difference.
Key Differences
- Tacos: Usually small and handheld, tacos are all about simplicity. They come in either a crunchy corn shell or a soft flour tortilla, filled with meat, cheese, lettuce, and salsa. While they’re tasty, they can get messy, especially if the shell cracks or fillings spill out.
- Burritos: Bigger than tacos, burritos use a large flour tortilla wrapped around rice, beans, meat, and toppings. They’re filling and portable, but they don’t have that signature crunch.
- Crunchwrap: Think of it as the best of both worlds. It’s large like a burrito, has multiple layers like a quesadilla, and features a crunchy tostada shell inside. Plus, the unique folding method seals everything in, making it neat and less messy to eat.
Why Crunchwrap is More Fun
The Crunchwrap isn’t just about taste—it’s about texture. Each bite gives you soft tortilla, gooey cheese, fresh veggies, and that satisfying crunch. It feels like a party in your mouth, which is why so many people prefer it over tacos and burritos. On top of that, it looks impressive and Instagram-worthy, making it a fun dish to show off when cooking at home.
Nutritional Breakdown of a Homemade Crunchwrap
While the fast-food version is delicious, it’s not exactly the healthiest choice. Luckily, making a Crunchwrap at home lets you control the ingredients and portion sizes.
Calories and Macronutrients (Approximate for One Homemade Crunchwrap)
- Calories: 550–650
- Protein: 25–30g
- Carbs: 55–65g
- Fat: 25–30g
- Fiber: 6–8g
This will vary depending on whether you use beef, chicken, or a vegetarian filling, as well as how much cheese and sour cream you add.
Making It Healthier
- Use lean protein like ground turkey or chicken instead of beef.
- Swap sour cream for Greek yogurt to cut down on fat but keep creaminess.
- Add more veggies such as peppers, spinach, or mushrooms for extra fiber and nutrients.
- Choose whole wheat or low-carb tortillas for a healthier wrap.
- Bake instead of fry if you’re making your own tostada shells.
With these tweaks, you can enjoy your Crunchwrap guilt-free and even make it part of a balanced weekly meal plan.
FAQs about Crunchwrap Recipe
Q1: Can I make a Crunchwrap without tostada shells?
Yes! You can use crunchy tortilla chips, baked corn tortillas, or even pita chips as a substitute. The key is adding something crispy in the middle.
Q2: Can I meal prep Crunchwraps in advance?
Absolutely. You can assemble them ahead of time, wrap them in foil, and store in the fridge. Just don’t toast them until you’re ready to eat, so they don’t get soggy.
Q3: What’s the best cheese to use?
Cheddar and Monterey Jack are classic, but you can use mozzarella for a stretchier texture or pepper jack for a spicy kick.
Q4: Can I freeze Crunchwraps?
Yes, you can freeze them individually wrapped in foil or freezer bags. Reheat in an oven or air fryer for best results.
Q5: Why does my Crunchwrap fall apart?
Usually, it’s because the tortilla is too small or overstuffed. Always use the biggest tortilla you can find, warm it before folding, and don’t overload with fillings.
Conclusion
The Crunchwrap is more than just a copycat fast-food recipe—it’s a fun, customizable, and delicious meal you can whip up right in your kitchen. Whether you go classic with seasoned beef, adventurous with a spicy version, or wholesome with a veggie-packed wrap, the Crunchwrap delivers bold flavors and amazing textures in every bite.
What makes it even better is the control you get when making it at home. You decide how cheesy, crunchy, or healthy you want it to be. Plus, once you master the folding technique, you’ll impress your friends and family with a restaurant-quality dish that’s both tasty and portable.
So next time you’re craving something satisfying, skip the drive-thru and make your own Crunchwrap. Trust me—it’s worth it.