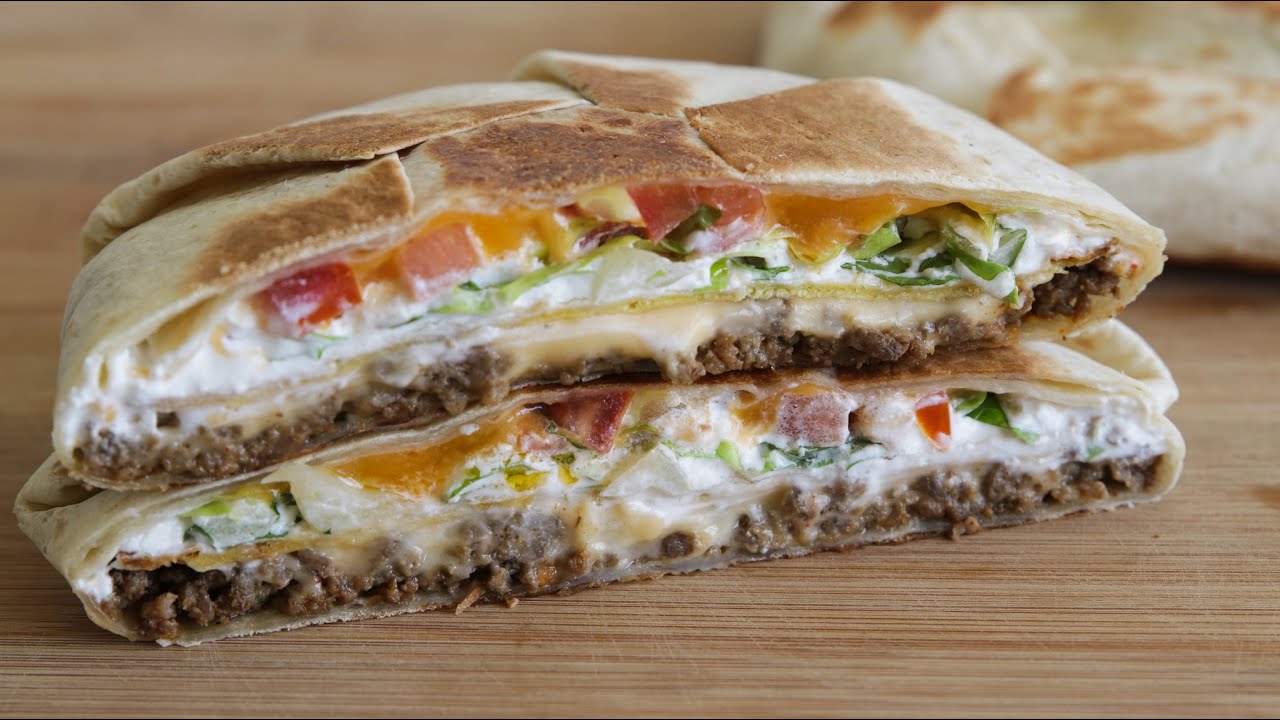
Crunch Wrap Supreme Recipe: If you’ve ever been to Taco Bell, chances are you’ve heard of their iconic Crunchwrap Supreme. This delicious fast-food favorite is a genius fusion of textures and flavors: a soft, oversized tortilla wrapped around seasoned beef, nacho cheese, a crisp tostada shell, lettuce, tomatoes, sour cream, and shredded cheese – all grilled to golden, crispy perfection. What makes the Crunchwrap stand out isn’t just its bold flavor, but the satisfying crunch you get in every bite. Now, imagine bringing that same magic into your kitchen!
The great news is that making a Crunchwrap Supreme at home isn’t as complicated as it seems. In fact, once you break it down into steps, you’ll find it’s a breeze to whip up, and you’ll have full control over the ingredients. Whether you’re craving that Taco Bell hit or looking to create a healthier, customized version, this homemade Crunchwrap will become your new go-to meal.
Why You’ll Love This Homemade Version
Why settle for drive-thru when you can recreate the Crunchwrap Supreme at home? Here’s why this homemade version is a total game-changer:
- Customizable: Whether you’re a meat lover, vegetarian, or spice enthusiast, you can tweak every layer to your liking.
- Healthier: By controlling the ingredients, you can cut down on sodium, fats, or calories.
- Budget-friendly: Making it at home saves money, especially when feeding a group.
- Fun to make: Assembling the layers and folding the wrap is surprisingly satisfying and a great family activity.
- Perfect for any meal: While it’s often thought of as lunch or dinner, with a few swaps, it makes a killer breakfast too!
Once you try making your own Crunchwrap, you’ll wonder why you didn’t start sooner.
Ingredients Needed
Main Components
Here’s everything you’ll need to make one large, classic Crunchwrap Supreme (scale up as needed):
- 1 large burrito-size flour tortilla (10-inch)
- 1 small tostada shell (or a crispy corn tortilla)
- ½ cup seasoned ground beef
- ¼ cup nacho cheese sauce
- ¼ cup shredded lettuce
- ¼ cup diced tomatoes
- ¼ cup shredded cheddar cheese (or Mexican blend)
- 2 tablespoons sour cream
- Butter or oil (for toasting the wrap)
For the ground beef seasoning, you’ll want:
- ½ lb ground beef
- 1 tsp chili powder
- ½ tsp paprika
- ½ tsp garlic powder
- ½ tsp onion powder
- Salt and pepper to taste
- Splash of water (to help mix the spices)
Recommended Substitutes and Add-ons
Want to spice things up or go meatless? Here are some excellent alternatives and bonus ingredients:
- Protein swaps: Try ground turkey, shredded chicken, or black beans for a vegetarian take.
- Tostada alternatives: Use a crunchy tortilla chip layer or make your own baked crispy tortillas.
- Cheese options: Pepper jack for heat, mozzarella for meltiness, or vegan cheese if dairy-free.
- Veggie boosters: Add jalapeños, avocado slices, or sautéed bell peppers for extra texture.
- Sauce upgrades: Swap sour cream for Greek yogurt, or drizzle in some chipotle mayo or hot sauce.
The beauty of the Crunchwrap is in the layering – mix and match ingredients to suit your cravings!
Kitchen Tools You’ll Need
Basic Tools Required
You don’t need a lot of fancy kitchen gear for this recipe, but here’s what you’ll definitely need:
- A large skillet or non-stick frying pan
- Spatula (for flipping)
- Mixing bowl (for seasoning the beef)
- Knife and cutting board
- Measuring cups/spoons
Optional Tools for Easier Cooking
These tools aren’t must-haves, but they can definitely make your Crunchwrap-making life easier:
- Panini press or grill pan: For an evenly crispy exterior.
- Tortilla warmer or microwave: To make tortillas more pliable.
- Circular cookie cutter: To trim smaller tortillas if you’re doubling layers.
Step-by-Step Cooking Instructions
Step 1 – Preparing the Ingredients
Start by getting everything chopped, cooked, and ready to go. Dice your tomatoes, shred the lettuce, and get your cheese and sour cream set out. Heat the nacho cheese sauce gently until it’s pourable. If using store-bought tostadas, make sure they’re intact – we need that crunch!
Now, cook the ground beef. In a skillet over medium heat, brown the beef until it’s fully cooked, then drain excess fat. Sprinkle in the seasoning spices along with a splash of water and stir until it’s fully coated and simmered down to a thick, flavorful mixture.
By prepping all your ingredients first, you’ll have a smoother assembly process later.
Step 2 – Cooking the Ground Beef
This step’s simple but key to flavor. Brown the beef thoroughly and season generously. Here’s how:
- Heat a skillet over medium heat.
- Add ground beef, break it up with a spatula, and cook until browned.
- Drain any excess grease.
- Stir in chili powder, garlic powder, paprika, onion powder, salt, pepper, and a bit of water.
- Cook for 2–3 more minutes until well combined and saucy.
Let the seasoned beef sit while you prep the rest – the flavors deepen as it rests.
Step 3 – Assembling the Crunchwrap
Now comes the fun part—building your Crunchwrap layer by layer. Think of it like assembling a mini edible fortress.
- Start with the large tortilla – Lay it flat on a clean surface or large plate.
- Spoon the seasoned beef into the center in a compact circle.
- Drizzle nacho cheese sauce generously over the meat.
- Place the tostada shell directly on top of the cheese and beef layer.
- Spread sour cream over the tostada (use the back of a spoon for even coverage).
- Top with shredded lettuce and diced tomatoes.
- Add a final sprinkle of shredded cheese to act as a glue when melting.
Here’s the key: fold the tortilla over the center in overlapping sections, working in a circular motion. You’re creating a hexagon-like shape. If the tortilla doesn’t cover the center fully, place a small piece of extra tortilla (cut from another wrap) in the middle before folding. This patchwork will help seal everything inside.
Once wrapped, gently press down to flatten it slightly. You’re now ready to toast this beauty.
Step 4 – Toasting to Golden Perfection
Toasting is what turns a pile of ingredients into a true Crunchwrap. It locks in all the layers, crisps up the outside, and gives you that irresistible crunch.
- Heat a clean skillet over medium heat. Add a small amount of butter or a light drizzle of oil.
- Place the Crunchwrap seam-side down into the skillet. This seals the edges shut as it cooks.
- Cook for 3–4 minutes until the bottom is golden brown and crispy.
- Flip carefully with a spatula and toast the other side for another 3–4 minutes.
- Remove from heat and let it rest for a minute before slicing.
You’ll end up with a crispy, warm, oozy Crunchwrap that tastes just like—or even better than—the original. The contrast between the melty cheese, creamy sour cream, crunchy shell, and fresh veggies is unreal.
Tips and Tricks for the Best Crunchwrap
How to Keep the Wrap Crispy
The biggest challenge with homemade Crunchwraps is keeping that outer shell crisp and crunchy without burning or going soggy. Here’s how to master it:
- Don’t overfill: It’s tempting to load it up, but too much filling will prevent it from sealing and crisping properly.
- Cook over medium heat: Too high and it’ll burn before the cheese melts; too low and you’ll end up with a soggy wrap.
- Use a lid: If your cheese isn’t melting quickly enough, briefly cover the pan with a lid to steam the inside while maintaining a crispy base.
- Avoid watery fillings: Tomatoes and lettuce release moisture. Pat them dry before adding, or place them higher in the layer stack.
- Press with a spatula: While toasting, gently press down for even browning.
Making It Healthier or Spicier
Want to make a guilt-free or spicier version of the Crunchwrap Supreme? Totally doable. Here are some ideas:
Healthier Swaps:
- Use whole-wheat or low-carb tortillas.
- Swap ground beef for lean turkey or black beans.
- Replace sour cream with Greek yogurt.
- Bake in the oven at 400°F for 10–12 minutes instead of frying.
Spicy Upgrades:
- Add sliced jalapeños or hot sauce inside.
- Use spicy nacho cheese or pepper jack.
- Season the meat with cayenne or red chili flakes.
One of the biggest perks of the homemade Crunchwrap is making it exactly how you like it. Whether you’re going low-cal, vegetarian, or extra spicy, the possibilities are endless.
FAQs about Crunch Wrap Supreme Recipe
1. What is a Crunch Wrap Supreme?
A Crunch Wrap Supreme is a popular Tex-Mex wrap inspired by Taco Bell. It features a seasoned beef filling, nacho cheese, crunchy tostada shell, sour cream, lettuce, tomatoes, and shredded cheese—folded in a large tortilla and grilled to crispy perfection.
2. Can I make it vegetarian?
Yes! Simply swap the ground beef for black beans, refried beans, or a plant-based meat alternative. You can also load up on grilled veggies like peppers, onions, and mushrooms.
3. What kind of tortilla should I use?
Use a large burrito-size flour tortilla (about 10 inches) to hold all your fillings and allow for easy folding. A smaller tortilla can also be used as a patch for the center if needed.
4. How do I keep the tostada shell crispy?
Make sure to place the tostada in the center and cook the Crunch Wrap seam-side down first. Avoid overfilling to prevent sogginess and ensure a crunchy bite.
5. Can I meal prep Crunch Wraps?
Yes! Assemble ahead of time and store them in the fridge. When ready to eat, grill or toast them in a skillet until hot and crispy.
6. Are Crunch Wraps freezer-friendly?
They can be frozen, but the texture of fresh vegetables and the tostada shell may be affected. For best results, freeze without the lettuce and tomato, then add them fresh after reheating.
7. What are the best sauces for Crunch Wraps?
Classic options include sour cream, nacho cheese, guacamole, or spicy chipotle mayo. You can also add hot sauce or salsa for extra flavor.
Conclusion
The Crunchwrap Supreme is more than just a tasty meal—it’s an experience. From the crisp crunch of the tostada to the warm, gooey center, every bite is a flavor bomb. Best of all, making it at home gives you creative freedom and total control over the ingredients. It’s the perfect recipe for Taco Tuesday, casual dinner parties, or just when you’re craving something hearty and delicious.
So next time the drive-thru tempts you, remember: you can make an even better version right in your own kitchen, and it only takes about 30 minutes from start to finish. Once you master the method, you’ll want to try all sorts of fun variations and share the love with family and friends.