Crispy Smashed Potatoes Recipe: There’s something about crispy smashed potatoes that feels like a hug on a plate. They’re golden, crunchy on the outside, yet fluffy and buttery inside. The best part? You don’t need fancy ingredients or special tools to make them — just a handful of potatoes, some oil, and your favorite seasonings. Whether served as a side for steak, chicken, or enjoyed on their own with dipping sauce, these potatoes always steal the spotlight.
Imagine biting into a potato that shatters with crispiness, then melts into tender, fluffy goodness. That’s the magic of smashed potatoes — they combine the comfort of mashed potatoes with the crunch of fries. Once you make them at home, you’ll never go back to plain roasted potatoes again.
These potatoes are also incredibly versatile. You can keep them classic with olive oil and salt or go bold with garlic butter, Parmesan, or even spicy paprika. And if you’re cooking for a crowd, they’re a total winner — everyone loves them, and they reheat beautifully.
Let’s get into the delicious details and make these crispy, golden beauties right in your kitchen.
What Makes Smashed Potatoes Different from Mashed Potatoes?
At first glance, “smashed” and “mashed” might sound the same — but the difference lies in texture and technique. Mashed potatoes are smooth and creamy, made by whipping boiled potatoes with butter, milk, or cream until they’re soft and fluffy. Smashed potatoes, on the other hand, are rustic and crispy. Instead of being mashed into a puree, they’re gently flattened and roasted, giving you the best of both worlds — a tender inside with a crispy, crackly exterior.
Think of smashed potatoes as the love child of mashed potatoes and French fries. You boil them first to get that soft interior, then smash them to expose more surface area. That extra surface is what crisps up beautifully in the oven. And here’s the secret: the more craggy and uneven the smashed potato, the crispier it becomes.
They’re also easier to make than mashed potatoes — no need for mixers or cream. Just boil, smash, season, and bake. Whether you serve them as a snack, appetizer, or side dish, they always come out golden and addictive.
Why You’ll Love This Recipe
If you’re looking for a potato recipe that’s foolproof, delicious, and crowd-approved, this is it. Here’s why people can’t get enough of crispy smashed potatoes:
- Crispy Perfection: Every bite has that satisfying crunch.
- Simple Ingredients: You probably already have everything in your pantry.
- Customizable: Add herbs, cheese, or spices to make it your own.
- Perfect for Any Meal: Great with breakfast eggs, lunch salads, or dinner mains.
- Easy Prep: Minimal effort for maximum flavor.
Plus, these potatoes are naturally gluten-free and vegetarian, so they fit into many diets. You can even make them vegan-friendly by skipping the cheese or using vegan butter.
Once you master this recipe, you’ll find yourself making it again and again — it’s that good.
List of Ingredients You’ll Need
Main Ingredients
- Baby potatoes or small Yukon Golds – about 2 lbs (900g)
- Olive oil – 3 to 4 tablespoons
- Salt – to taste (sea salt works great)
- Black pepper – freshly ground for best flavor
- Garlic powder – ½ teaspoon (optional but recommended)
Optional Add-ons and Variations
- Parmesan cheese – ¼ cup grated, for extra crispiness
- Fresh herbs – parsley, rosemary, or thyme
- Butter – for added richness
- Paprika or chili flakes – for a spicy kick
- Lemon zest – for a fresh, tangy flavor
- Dipping sauces – sour cream, garlic aioli, or ketchup
Each ingredient plays a role in creating that perfect balance of crisp and flavor. Olive oil helps crisp the edges, while the seasoning enhances the natural potato taste. If you’re feeling creative, try experimenting — for instance, add garlic butter during baking for an extra layer of flavor.
Kitchen Tools You’ll Need
Before diving into the cooking process, let’s make sure you’ve got the right tools. Luckily, this recipe doesn’t require anything fancy — just your basic kitchen gear:
- Large pot – for boiling potatoes
- Baking sheet – for roasting
- Parchment paper or foil – to prevent sticking
- Potato masher or glass – to smash the potatoes
- Tongs or spatula – for flipping
- Basting brush – to evenly coat with oil
Having these ready makes the whole process smooth and mess-free. Trust me, once you’ve got your setup organized, this recipe is a breeze.
Choosing the Best Potatoes for Smashed Potatoes
The type of potato you choose can make or break your smashed potatoes. The best options are baby potatoes, Yukon Golds, or small red potatoes. These varieties have the perfect balance of starch and moisture, which means they get fluffy inside and crisp outside.
Avoid large, starchy potatoes like Russets for this recipe—they tend to fall apart when smashed. The smaller ones hold their shape better and cook more evenly.
If you can, pick potatoes that are all about the same size. That way, they’ll boil evenly, and you won’t end up with some undercooked or overcooked ones.
Want that extra golden crust? Try using duck fat or clarified butter instead of regular oil. It adds an incredible depth of flavor that makes these potatoes absolutely irresistible.
Step-by-Step Guide to Making Crispy Smashed Potatoes
Now that your ingredients and tools are ready, it’s time for the fun part—making your crispy smashed potatoes! This process is simple and satisfying, and once you’ve done it once, it’ll become your go-to side dish. Follow these easy steps carefully for the crispiest results possible.
Step 1: Preheat and Prep
Start by preheating your oven to 425°F (220°C). A hot oven is the secret to perfectly crispy potatoes, so make sure it’s fully heated before baking.
While the oven is heating, line a baking sheet with parchment paper or aluminum foil to prevent sticking. You can also lightly coat it with olive oil or cooking spray for extra insurance against sticking.
Next, wash the potatoes thoroughly. Since we’re keeping the skin on for that rustic crunch and extra flavor, scrub off any dirt. If you’re using baby potatoes, you don’t need to peel them.
Pat the potatoes dry with a clean kitchen towel. Removing excess water ensures they’ll crisp up nicely in the oven later on.
Step 2: Boil the Potatoes
Place your clean potatoes in a large pot and cover them with cold water. Add a generous pinch of salt—this helps season the potatoes from the inside out.
Bring the pot to a boil, then reduce the heat slightly and let them simmer for about 15–20 minutes, or until they’re fork-tender. You should be able to poke a fork through easily without the potato falling apart.
Once done, drain the potatoes carefully and let them cool slightly for about 5 minutes. You want them to be warm but not too hot to handle.
This boiling step is crucial—it softens the potatoes and ensures they cook evenly later. Think of it as giving your potatoes a head start before they hit the oven.
Step 3: Smash the Potatoes
Now comes the most satisfying part—the smashing!
Arrange the boiled potatoes on your prepared baking sheet, leaving some space between each one. Using the bottom of a glass, mug, or potato masher, gently press down on each potato until it flattens to about ½ inch thick.
Don’t worry if the edges crack or crumble—that’s actually a good thing! Those rough, uneven surfaces will turn into extra crispy bits when roasted.
If any potatoes break apart too much, just push them back together with your fingers. They’ll still crisp up beautifully in the oven.
Take a moment to admire your smashed potatoes—they’re already looking delicious!
Step 4: Season for Flavor
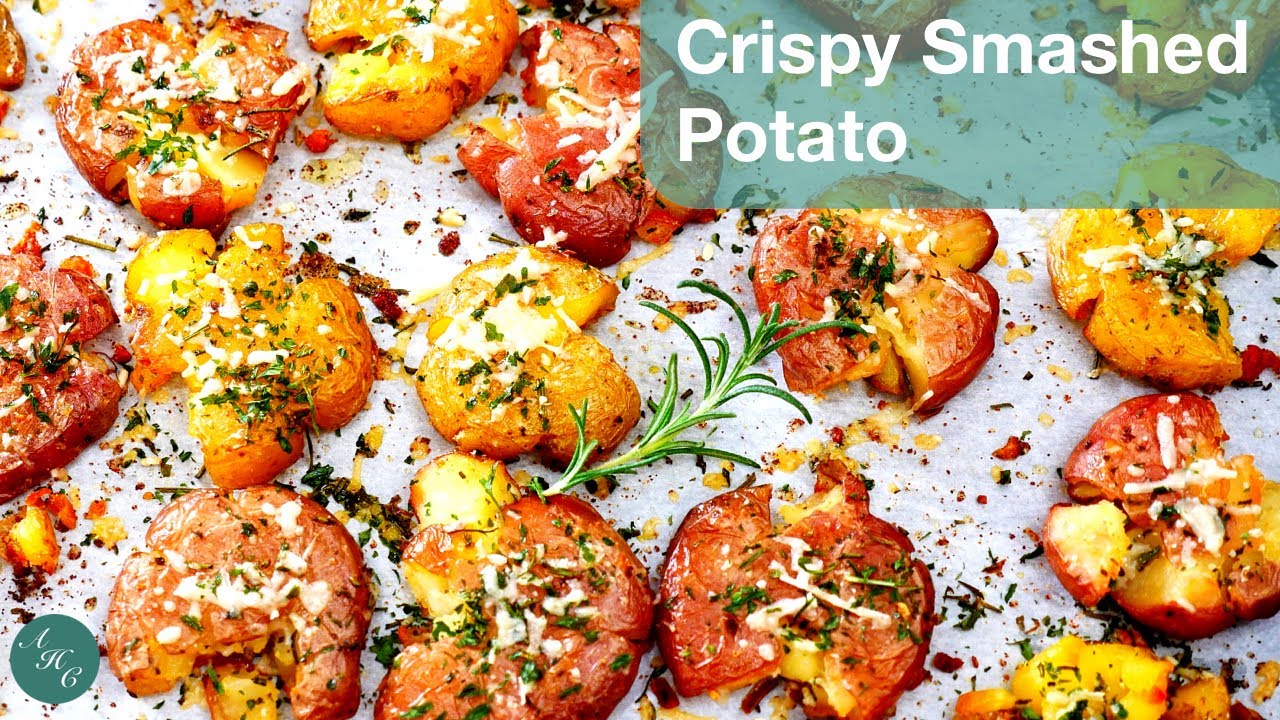
Once all the potatoes are smashed, it’s time to season them generously. Brush or drizzle olive oil over each one, making sure the tops and edges are well coated. The oil is what gives them that irresistible golden crunch.
Next, sprinkle with salt, black pepper, and garlic powder. For an aromatic touch, add paprika, rosemary, or thyme.
If you love cheesy flavors, this is also when you can sprinkle grated Parmesan cheese on top. It melts into a crispy, salty crust that’s hard to resist.
Take your time here—seasoning evenly ensures every bite bursts with flavor.
Step 5: Roast to Crispy Perfection
Slide the baking sheet into your preheated oven and roast for 25–30 minutes, flipping the potatoes halfway through. This helps them crisp up evenly on both sides.
You’ll know they’re ready when the edges are deep golden brown and super crispy. Keep an eye on them toward the end—every oven is a bit different, and you don’t want them to burn.
When you pull them out, your kitchen will be filled with the mouthwatering aroma of roasted garlic and potatoes.
If you want an extra crunch, you can broil them for 2–3 minutes at the end. Just stay close by—they can go from crispy to burnt in seconds!
Step 6: Add Final Touches
Now for the finishing touches. As soon as they’re out of the oven, you can brush them lightly with melted butter or garlic butter for an extra layer of flavor.
Sprinkle with freshly chopped parsley or chives for color and freshness. A squeeze of lemon juice over the top can also add a zesty brightness that cuts through the richness.
And that’s it — your crispy smashed potatoes are ready to devour! Serve them hot, straight from the oven, for the best texture and taste.
Chef’s Tips for Perfectly Crispy Potatoes
Even simple recipes can go from good to great with a few expert tips. Here are some pro tricks to ensure your smashed potatoes come out perfectly every single time:
- Don’t skip drying. Moisture is the enemy of crispiness. Always dry the potatoes thoroughly after boiling.
- Use high heat. Roasting at 425°F or higher gives you that golden crust.
- Space them out. Crowding the baking sheet traps steam and prevents crisping.
- Oil generously. Olive oil not only adds flavor but helps the surface get crispy.
- Flip halfway. Turning the potatoes ensures even browning.
- Add cheese near the end. Parmesan or cheddar should go on in the last 10 minutes so it melts without burning.
- Try different fats. Duck fat or clarified butter gives a luxurious crisp and deeper flavor.
Follow these tips, and you’ll get restaurant-quality potatoes every time.
Flavor Variations to Try
One of the best things about smashed potatoes is how versatile they are. Once you’ve mastered the base recipe, you can get creative with flavors! Here are some ideas to inspire you:
- Garlic Butter Smashed Potatoes: Mix melted butter with minced garlic and brush over the potatoes before roasting.
- Cheesy Parmesan Style: Sprinkle shredded cheddar or Parmesan cheese during the last 10 minutes of baking.
- Spicy Kick: Add smoked paprika, chili flakes, or Cajun seasoning.
- Herb Infusion: Use a mix of rosemary, thyme, and parsley for a herby aroma.
- Lemon & Dill: Add lemon zest and chopped dill for a refreshing twist.
- Bacon Lovers’ Dream: Sprinkle crispy bacon bits and drizzle with ranch dressing.
Each variation gives your smashed potatoes a new personality—so don’t be afraid to experiment!
What to Serve with Crispy Smashed Potatoes
Crispy smashed potatoes are delicious enough to stand on their own, but they also pair beautifully with a wide variety of dishes. Their crunchy texture and rich flavor make them a perfect match for both hearty main courses and light meals.
If you’re serving them for dinner, try pairing them with grilled steak, roast chicken, or pan-seared salmon. The crispiness of the potatoes contrasts perfectly with juicy meats and adds that comforting side everyone loves. They also make an excellent base for breakfast — top them with fried eggs, avocado, or smoked salmon for a filling, energizing start to your day.
For a vegetarian meal, combine them with a fresh garden salad, roasted vegetables, or creamy dips like garlic aioli, tzatziki, or sour cream and chives. You can even make them the star of a party platter, served alongside sliders or barbecue skewers.
Basically, they fit into any meal — brunch, lunch, or dinner. Once you make them, you’ll start thinking of endless excuses to add them to your menu.
Common Mistakes and How to Avoid Them
Even though crispy smashed potatoes are simple to make, there are a few common pitfalls that can lead to soggy or uneven results. Here’s what to watch out for:
- Not boiling long enough: If the potatoes aren’t tender before smashing, they’ll break apart or cook unevenly in the oven. Always check with a fork.
- Skipping the drying step: Water prevents the edges from crisping. Always pat dry after boiling.
- Overcrowding the pan: When potatoes are too close together, they steam instead of roast. Give them space to breathe.
- Not enough oil: You don’t need to drench them, but a light, even coat of oil is essential for that golden crunch.
- Too low oven temperature: Baking at low heat results in soft, pale potatoes. Stick to 425°F or higher.
- Smashing too thin: While it’s tempting to flatten them completely, aim for about ½ inch thickness for the best texture.
- Forgetting to flip: Flipping halfway ensures both sides get crisp.
Avoid these mistakes, and you’ll master the art of crispy smashed potatoes in no time.
How to Store and Reheat Smashed Potatoes
If you have leftovers (though it’s rare with how good these are!), you can easily store and reheat them without losing that crispiness.
To store:
- Let the potatoes cool completely before transferring them to an airtight container.
- Store them in the refrigerator for up to 3–4 days.
To reheat:
- The best way is to place them on a baking sheet and reheat in the oven at 400°F (200°C) for 10–15 minutes until hot and crisp again.
- Avoid microwaving, as it makes them soft and soggy.
You can also freeze smashed potatoes! Simply let them cool, arrange them on a baking sheet in a single layer, and freeze for an hour. Then transfer to a freezer-safe bag. When ready to eat, bake straight from frozen at 425°F for 20–25 minutes.
Nutritional Value and Health Benefits
While smashed potatoes feel indulgent, they’re actually quite wholesome when made with olive oil and minimal additives. Here’s a general nutritional breakdown per serving (without cheese or butter):
| Nutrient | Amount (approx.) |
|---|---|
| Calories | 180 kcal |
| Carbohydrates | 30g |
| Protein | 4g |
| Fat | 6g |
| Fiber | 3g |
| Sodium | 200mg |
| Vitamin C | 20% DV |
| Potassium | 15% DV |
Potatoes are naturally rich in vitamin C, B6, and potassium, which support immune function and heart health. Using olive oil instead of butter keeps the fats healthy, while the crispy baking method reduces the need for frying.
Want to make them even lighter? Use air fryer settings or reduce oil by half — they’ll still come out golden and crunchy!
FAQs about Crispy Smashed Potatoes Recipe
1. Can I make smashed potatoes ahead of time?
Yes! You can boil and smash the potatoes ahead of time. Just refrigerate them, then brush with oil and roast when you’re ready to serve.
2. Can I use an air fryer for this recipe?
Absolutely! Air fry the smashed potatoes at 400°F (200°C) for 15–20 minutes, flipping halfway for even crisping.
3. What type of potatoes are best for smashing?
Baby Yukon Golds or small red potatoes work best because they hold their shape and have a creamy texture inside.
4. How do I keep them from sticking to the pan?
Use parchment paper or a light coating of oil on the baking sheet. This helps them release easily after roasting.
5. Can I add cheese or toppings before baking?
Yes! Adding Parmesan, cheddar, or even crumbled bacon during the last few minutes of baking enhances flavor and texture.
Conclusion
There you have it — the ultimate crispy smashed potatoes recipe, step by step! With just a few basic ingredients and simple steps, you can create a side dish that’s bursting with flavor, texture, and satisfaction.
Whether you’re serving them at a family dinner, brunch with friends, or just craving something deliciously crispy, these potatoes deliver every single time. They’re golden on the outside, soft on the inside, and seasoned to perfection — everything a great potato dish should be.
Cooking them is almost therapeutic — the boiling, smashing, and roasting process feels rewarding, especially when you hear that satisfying crunch as you take your first bite. So grab those potatoes and get started — your new favorite comfort food awaits!