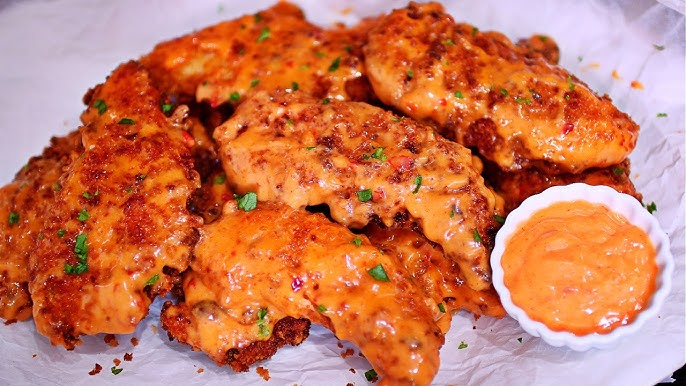
Crispy Chicken Tenders Recipe: There’s just something universally satisfying about biting into a hot, crunchy, perfectly seasoned chicken tender. Whether you’re making them for game day, a family dinner, or just because you’re craving something irresistibly good, crispy chicken tenders are the kind of comfort food that never disappoints. They’re crunchy on the outside, juicy on the inside, and easy enough for anyone to whip up at home—no culinary degree needed.
What makes these tenders better than the fast food version? You control the seasoning, the crisp factor, and the quality of the meat. Want them spicy? Done. Extra crunchy? Absolutely. Gluten-free? We’ve got a solution for that, too. Whether you’re cooking for picky kids or adults with gourmet tastes, this recipe hits the mark every time.
In this detailed guide, we’ll walk you through every step to make crispy chicken tenders that taste like a pro made them. You’ll get a breakdown of all the ingredients, essential tips and tricks, and even healthier alternatives if you’re trying to lighten things up. Let’s get cooking!
Ingredients You’ll Need
You don’t need anything fancy to make restaurant-worthy chicken tenders at home. Most of the ingredients are pantry staples or easily found at any grocery store. Here’s everything you need, broken down by category so you don’t miss a thing.
Main Ingredients
- Chicken Tenders: You can buy pre-cut chicken tenders, but boneless, skinless chicken breasts sliced into strips work just as well. Aim for uniform thickness for even cooking.
- All-Purpose Flour: This creates the first layer of the crispy coating and helps the egg adhere better.
- Eggs: Beaten eggs act as the binding agent between the flour and breadcrumbs.
- Breadcrumbs or Panko: Regular breadcrumbs work fine, but if you want that next-level crunch, go with panko. They’re lighter, crispier, and deliver restaurant-style results.
Seasonings and Spices
Don’t just rely on salt and pepper. Seasoning is what takes these chicken tenders from bland to brilliant.
- Salt & Black Pepper: Essential for flavoring each layer.
- Garlic Powder: Adds a rich depth of flavor.
- Onion Powder: Enhances the savory profile.
- Paprika: Offers a smoky note and beautiful color.
- Cayenne Pepper: Optional, but great for those who like a spicy kick.
- Italian Seasoning: A blend of herbs that pairs beautifully with the breadcrumbs.
Tip: Season every layer—flour, egg, and breadcrumbs—for maximum flavor!
For Frying
Your choice of oil matters. Go for something with a high smoke point:
- Vegetable Oil: Cheap, neutral in flavor, and great for frying.
- Canola Oil: Another budget-friendly option.
- Peanut Oil: Ideal for deep frying and adds a subtle nutty flavor.
You’ll need enough oil to submerge the tenders halfway if pan-frying or fully if deep frying.
Optional Add-ons
Want to take things up a notch? Try adding:
- Buttermilk: Marinating your chicken in buttermilk for a few hours makes it extra tender and flavorful.
- Hot Sauce: Mix it into the buttermilk for spicy tenders.
- Parmesan Cheese: Add to your breadcrumbs for an umami punch.
- Fresh Herbs: Like thyme or parsley mixed into the breadcrumb coating.
Tools and Equipment Required
You don’t need a fancy kitchen to make amazing chicken tenders, but a few tools will make the process easier and safer:
- Frying Pan or Deep Fryer: A cast iron skillet or deep fryer is ideal, but any heavy-bottomed pan will do.
- Mixing Bowls: You’ll need at least three—one each for the flour, eggs, and breadcrumbs.
- Tongs or Slotted Spoon: For flipping and removing tenders from hot oil.
- Meat Thermometer: Optional but recommended. Internal temp should reach 165°F (74°C).
- Paper Towels and Cooling Rack: Helps drain excess oil and keep that crust crispy.
These tools streamline the cooking process and help ensure safety, especially when working with hot oil.
Preparing the Chicken
Before you start coating and frying, you need to prep the chicken properly. It’s not the most glamorous step, but it’s crucial for getting juicy, evenly cooked tenders every time.
Cleaning and Slicing the Chicken
- Trim the Fat: Use a sharp knife to remove any visible fat or sinew.
- Slice Evenly: If using chicken breasts, slice them into strips about 1 inch wide and 3–4 inches long.
- Pat Dry: Use paper towels to blot away moisture. Dry chicken holds onto the coating better and prevents splattering during frying.
Uniform strips ensure that every piece cooks at the same rate. No one wants to bite into a piece that’s crispy outside and raw inside.
Optional: Marinating the Chicken in Buttermilk
This step is optional—but highly recommended if you have time.
- Why Buttermilk? It tenderizes the chicken while adding a subtle tangy flavor.
- How Long? Anywhere from 30 minutes to 24 hours in the fridge.
- Add Flavor Boosters: Toss in garlic powder, hot sauce, or a little mustard for extra zip.
Marinated chicken turns out juicier and more flavorful. It also helps the coating stick better—an all-around win.
Step-by-Step Guide to Making Crispy Chicken Tenders
Let’s dive into the core of this recipe—the actual cooking process. It’s easy to follow and results in those golden, crunchy chicken tenders you’re craving. Grab your ingredients, and let’s get started!
Step 1: Set Up Your Dredging Station
Setting up a proper dredging station is key for smooth and mess-free cooking. You’ll need three shallow bowls or dishes—line them up in a row for a seamless workflow.
- Bowl 1 – Flour Mixture: Add flour, salt, pepper, paprika, garlic powder, and onion powder.
- Bowl 2 – Egg Wash: Beat 2–3 eggs with a splash of water or milk.
- Bowl 3 – Breadcrumbs or Panko: Mix with additional seasoning and optional parmesan cheese for extra crunch.
Pro Tip: Use one hand for dry ingredients and the other for wet. This helps avoid “club fingers” (you know, when your hands get caked with batter).
This station setup creates layers of flavor and ensures your coating sticks and crisps up perfectly.
Step 2: Coat the Chicken Properly
This is where the magic starts. Follow this triple-dip method for maximum crunch:
- First, dip the chicken strip into the seasoned flour. Shake off the excess.
- Then, dunk it into the egg wash, ensuring it’s fully coated.
- Finally, press it into the breadcrumbs, making sure every inch is covered.
Optional Step: For ultra-crispy tenders, repeat the egg and breadcrumb dip—this double coat adds an extra crunch layer!
Place the coated chicken tenders on a wire rack or plate while the oil heats up. Letting them rest for 5–10 minutes before frying helps the coating adhere better and crisp up beautifully.
Step 3: Preheat Oil to the Right Temperature
Now, let’s talk oil. The temperature should be between 350°F to 375°F (175°C to 190°C). Too cool and your tenders absorb oil and turn soggy. Too hot and they burn before cooking through.
- Use a thermometer for precision.
- No thermometer? Drop in a breadcrumb—if it sizzles and floats, the oil’s ready.
Frying Pan Tip: Use a deep, heavy-bottomed skillet or Dutch oven and fill it with about 2 inches of oil. Avoid overcrowding the pan. Fry in small batches to maintain oil temperature.
Maintaining the right oil temp ensures that crispy, golden perfection every single time.
Step 4: Fry Until Golden Brown and Crispy
This is the part everyone loves—watching those tenders transform into golden, crunchy bites of joy.
- Gently lower each tender into the hot oil.
- Cook for 3–4 minutes per side, or until golden brown.
- Use tongs to flip halfway through for even browning.
They’re done when the crust is crispy and deep golden and the internal temperature hits 165°F (74°C). Don’t guess—cut one open if you’re unsure. Juices should run clear, and there should be no pink in the center.
Important: Keep a close eye on the oil temp between batches. Let it recover to the right temperature before frying the next round.
Step 5: Drain and Rest the Chicken Tenders
Once cooked, remove the tenders and place them on a wire rack set over a baking sheet. This keeps the crust intact and prevents sogginess.
Avoid placing directly on paper towels, which can trap steam and soften the crust. Let them rest for 5 minutes before serving to allow the juices to redistribute.
Bonus Tip: Lightly sprinkle with salt immediately after frying. It sticks better while the tenders are hot and enhances the flavor.
Now, you’ve got crispy, golden chicken tenders that would make any chef proud. Serve them hot, and get ready for some serious compliments!
Baking or Air Frying Option
Looking for a healthier version? Good news: you can absolutely bake or air fry these tenders without sacrificing too much crunch. Here’s how to do it right.
Oven-Baked Chicken Tenders
- Preheat oven to 425°F (220°C).
- Line a baking sheet with parchment paper or foil and lightly grease it with cooking spray.
- Place the breaded chicken tenders on the tray, spaced apart.
- Lightly spray the tops with oil to help them brown.
- Bake for 20–25 minutes, flipping halfway through.
- They’re done when golden brown and cooked through (165°F internal temp).
While baked tenders may not be as crispy as fried, you still get a satisfying crunch, especially with panko breadcrumbs.
Air Fryer Chicken Tenders
Air fryers are perfect for making healthier chicken tenders with that fried texture—minus the excess oil.
- Preheat the air fryer to 400°F (200°C).
- Spray the basket with nonstick spray.
- Arrange the tenders in a single layer (cook in batches if needed).
- Lightly spray the tenders with oil.
- Cook for 10–12 minutes, flipping halfway through.
The result? Golden, crunchy, juicy chicken tenders that are better for you and just as delicious.
Tips for Extra Crispy Chicken Tenders
Want your chicken tenders to be the crispiest on the block? Follow these tried-and-true tips to level up your crunch game. These are the secrets restaurants use—but now they’re all yours.
1. Double Dredge for Double Crunch
One of the simplest tricks in the book—double coating. After your initial flour, egg, and breadcrumb process, repeat the egg and breadcrumb step once more. This creates a thicker crust that turns ultra-crispy when fried.
- Make sure each layer is fully coated.
- Gently press the breadcrumbs into the chicken so they stick better.
- Let the coated chicken rest before frying—it helps prevent the coating from falling off.
You’ll thank yourself for the extra step when you hear that audible crunch with every bite.
2. Add Cornstarch to the Flour Mixture
Adding 1–2 tablespoons of cornstarch to your flour mixture helps create a lighter, crisper coating.
Cornstarch absorbs less moisture than flour and promotes more browning, which means:
- Less greasy tenders.
- More golden, crispy texture.
It’s a small addition that makes a huge difference.
3. Season Every Layer
A rookie mistake? Only seasoning the chicken. Season all the layers—flour, egg wash, and breadcrumbs. This builds layers of flavor and ensures the crust tastes just as good as the meat inside.
Try this blend:
- Flour: salt, pepper, garlic powder, paprika
- Egg wash: a splash of hot sauce or mustard
- Breadcrumbs: Italian seasoning, parmesan, cayenne
Your taste buds will thank you.
4. Let the Coating Set Before Frying
After breading your chicken, let it rest for 10–15 minutes. This helps the coating adhere better and reduces the chances of it sliding off during frying.
If you’re short on time, place them in the fridge for a few minutes. Cooler tenders = crispier results.
5. Use the Right Oil Temperature
Don’t eyeball it—oil that’s too cold makes soggy tenders. Use a thermometer and aim for 350°F to 375°F. Keep it steady by not overcrowding the pan.
When frying in batches:
- Let the oil come back to temp between each batch.
- Drain fried chicken on a wire rack—not paper towels.
Perfect oil temp = golden, crispy magic.
Serving Suggestions
Chicken tenders are incredibly versatile. They pair well with just about anything and can be the star of the show or a complement to a bigger meal. Here’s how to serve them up like a pro.
1. Dipping Sauces Galore
The right sauce can take your tenders from tasty to unforgettable. Try these crowd favorites:
- Ranch Dressing: Classic and creamy.
- Honey Mustard: Sweet meets tangy.
- BBQ Sauce: Smoky and bold.
- Buffalo Sauce: For spice lovers.
- Sriracha Mayo: A trendy twist with a kick.
Mix and match to keep things interesting—perfect for parties or picky eaters.
2. Perfect Side Dishes
Make it a full meal with sides that complement the crispiness of your tenders:
- French Fries or Wedges: Classic combo.
- Coleslaw: Cool and crunchy.
- Mac & Cheese: Comfort food heaven.
- Garden Salad: A lighter balance.
- Corn on the Cob: Especially good for summer nights.
Choose one or mix a few—it’s hard to go wrong.
3. Turn Them into a Meal
Chicken tenders don’t just have to sit on a plate—they’re incredibly flexible.
- Wraps: Slice tenders and stuff into tortillas with lettuce and sauce.
- Chicken Tender Sandwich: Toasted bun, lettuce, tomato, and a big juicy tender.
- Tenders & Waffles: Yep, it’s a thing. Sweet and savory heaven.
- Tenders Bowl: Serve over rice or mashed potatoes with gravy or cheese sauce.
Use leftovers to reinvent your meal the next day with minimal effort.
Storing and Reheating Leftovers
Let’s face it—leftover chicken tenders don’t always taste the same the next day unless you know how to store and reheat them properly. Here’s how to keep the crunch alive.
Storing Chicken Tenders
- Cool Completely: Don’t pack hot tenders in containers—it leads to steam and sogginess.
- Use an Airtight Container: Keeps moisture and odors out.
- Refrigerate: Good for 3–4 days max.
- Freeze for Long-Term Storage: Lay on a tray, freeze individually, then store in freezer bags. Lasts up to 2 months.
Label your containers to avoid playing the guessing game later.
Reheating Tips
Say no to soggy microwave tenders. Instead, reheat like this:
- Oven: Bake at 375°F for 10–15 minutes. Place on a rack for airflow.
- Air Fryer: 375°F for 5–7 minutes. Restores the crisp beautifully.
- Skillet: Add a little oil and fry for a few minutes on each side over medium heat.
Avoid microwaving unless you’re in a serious rush. It kills the crunch.
Common Mistakes to Avoid
Even seasoned home cooks can slip up. Here are the most common chicken tender mistakes and how to dodge them like a pro.
1. Overcrowding the Pan
Too many tenders in the pan = a drop in oil temperature = soggy crust. Fry in batches and give them room to breathe.
2. Not Seasoning the Coating
Bland tenders are a total buzzkill. Every layer (flour, egg, breadcrumbs) should be seasoned to create deep flavor from crust to core.
3. Using the Wrong Oil Temperature
Cold oil = greasy tenders. Hot oil = burnt outside, raw inside. Stick to 350°F–375°F and monitor it closely.
4. Skipping the Rest After Breading
Letting your breaded tenders rest for 10–15 minutes before frying helps the coating stick. Frying too soon leads to falling-off breading.
5. Not Draining on a Rack
Paper towels steam the tenders. Use a wire rack over a baking tray for proper airflow and crispness.
Nutritional Information
Wondering what’s really in those crispy, crunchy bites? Here’s a rough nutritional breakdown for a standard serving of homemade chicken tenders (based on deep-frying, not including sauces or sides). Keep in mind, values may vary depending on portion size and ingredients used.
| Nutrient | Per Serving (3 tenders) |
|---|---|
| Calories | 350–450 |
| Protein | 25g |
| Total Fat | 18g |
| Saturated Fat | 3g |
| Carbohydrates | 20g |
| Fiber | 1g |
| Sugars | 1g |
| Sodium | 600mg |
| Cholesterol | 80mg |
Want to Make It Healthier?
- Use air frying or baking methods instead of deep-frying.
- Swap out white flour for whole wheat or gluten-free alternatives.
- Try using low-fat buttermilk and avoid heavy sauces.
It’s all about balancing indulgence with smart choices—crispy chicken tenders can fit into any lifestyle.
Gluten-Free and Keto Variations
Just because you’re avoiding gluten or carbs doesn’t mean you have to miss out. With a few smart swaps, you can still enjoy crispy chicken tenders—your way.
Gluten-Free Crispy Chicken Tenders
Here’s how to keep it gluten-free without compromising on crunch:
- Flour Substitute: Use rice flour or gluten-free all-purpose flour.
- Breadcrumb Substitute: Go for gluten-free breadcrumbs, crushed cornflakes, or even crushed gluten-free crackers.
- Double-Check Labels: Make sure your spices and sauces are gluten-free too.
Follow the same dredging and cooking steps—just switch up the ingredients. You’ll get that same golden, crispy texture.
Keto/Low-Carb Chicken Tenders
Watching carbs? No problem. These substitutions keep things keto-friendly and still delicious:
- Flour Substitute: Use almond flour or coconut flour (start with a light coat).
- Breadcrumb Substitute: Try crushed pork rinds, Parmesan cheese, or keto breadcrumbs.
- Frying Oil: Stick with avocado oil or olive oil for a healthier fat profile.
These keto tenders are perfect for meal prep and can be paired with low-carb dips like homemade ranch or spicy mayo.
FAQs about Crispy Chicken Tenders Recipe
1. How long should I marinate the chicken in buttermilk?
Ideally, let the chicken marinate for at least 1 hour, but 4–24 hours will yield the juiciest and most flavorful results. The acids in the buttermilk tenderize the meat while adding flavor.
2. Can I use chicken thighs instead of breasts or tenders?
Absolutely! Boneless, skinless chicken thighs are a great alternative. They’re juicier and more flavorful but may take slightly longer to cook due to higher fat content.
3. What’s the best oil for frying chicken tenders?
Use oils with high smoke points:
- Vegetable oil
- Canola oil
- Peanut oil
Avoid olive oil or butter—they burn too quickly and can affect the flavor and texture.
4. How do I know when the chicken tenders are fully cooked?
Use a meat thermometer to ensure an internal temperature of 165°F (74°C). No thermometer? Cut one open—juices should run clear and there should be no pink in the center.
5. Can I freeze cooked chicken tenders?
Yes! Let them cool completely, then freeze in a single layer on a tray before transferring to a freezer bag. To reheat, bake at 375°F for 15–20 minutes or air fry for 10 minutes.
Conclusion
There’s a reason crispy chicken tenders never go out of style—they’re simple, delicious, and satisfying every single time. With this detailed step-by-step guide, you now have the tools to make restaurant-quality tenders right from your own kitchen.
Whether you’re sticking to the classic deep-fried version, going healthier with air frying, or tailoring the recipe to meet dietary needs, crispy chicken tenders can be yours any night of the week. Get creative with seasonings, experiment with sauces, and don’t forget to double-dredge for that ultimate crunch.
So go ahead—grab those ingredients and start cooking. Because nothing beats a plate of golden, juicy, crispy chicken tenders made with love and a whole lot of crunch!