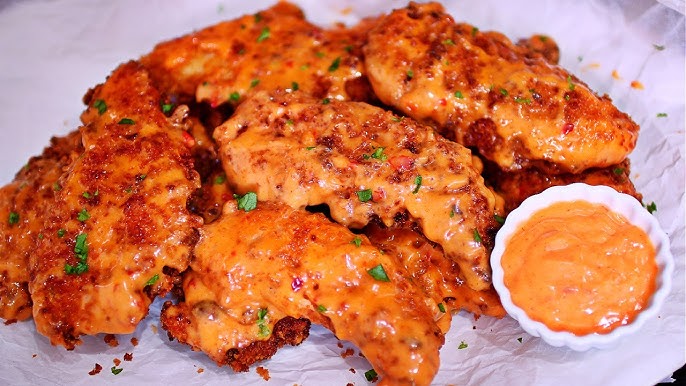
Crispy Chicken Fingers Recipe: Few comfort foods are as satisfying as a plate of crispy chicken fingers. They are golden on the outside, juicy on the inside, and versatile enough for lunch, dinner, parties, or weekend snacking. When we prepare them properly, we get a crunchy coating that holds its texture, tender seasoned meat, and a result that tastes far better than many frozen or fast-food versions.
This crispy chicken fingers recipe is simple, reliable, and packed with flavor. We use everyday ingredients, clear preparation steps, and smart cooking techniques to create chicken fingers that turn out crisp, savory, and crowd-pleasing every time. Whether we fry, bake, or air-fry them, the method below gives us a strong foundation for success.
Why This Crispy Chicken Fingers Recipe Works
A great crispy chicken fingers recipe depends on balance. We need the chicken to stay moist while the coating becomes crisp and flavorful. That happens when we season each layer properly, coat the chicken in the right order, and cook it at the correct temperature.
The flour helps the egg stick. The egg helps the crumbs cling. The breadcrumbs create the crust. A little seasoning in every stage makes a major difference. Instead of bland breading with flavorless chicken inside, we get well-seasoned strips from the first bite to the last.
Another reason this method works so well is that chicken tenderloins or sliced chicken breast cook quickly. That means we can achieve a crisp exterior before the meat dries out. The result is a delicious batch of crispy chicken fingers that look attractive, taste rich, and pair well with many dipping sauces.
Ingredients You’ll Need
To make this crispy chicken fingers recipe, we need simple ingredients that are easy to find and easy to work with.
For the Chicken
- 500g chicken tenderloins or 2 large chicken breasts, cut into strips
- 1 teaspoon salt
- 1 teaspoon black pepper
- 1 teaspoon paprika
- 1 teaspoon garlic powder
- 1/2 teaspoon onion powder
For the Breading Station
- 1 cup all-purpose flour
- 2 large eggs
- 2 tablespoons milk
- 1 1/2 cups breadcrumbs or panko breadcrumbs
- 1/2 cup grated Parmesan cheese (optional, but excellent for extra flavor)
- 1 teaspoon paprika
- 1 teaspoon dried parsley
- 1/2 teaspoon cayenne pepper (optional for a light kick)
- 1/2 teaspoon salt
- 1/2 teaspoon black pepper
For Cooking
- Vegetable oil for frying
Optional for Serving
- Ketchup
- Honey mustard
- Garlic mayo
- Barbecue sauce
- Ranch dressing
- Chili sauce
How to Prepare the Chicken Properly
The quality of our crispy chicken fingers begins before breading. First, we pat the chicken dry with paper towels. This small step helps the seasonings adhere better and keeps the coating from slipping during cooking.
Next, we season the chicken strips directly with salt, pepper, paprika, garlic powder, and onion powder. We toss everything together until each strip is evenly coated. This ensures that the meat itself has flavor, not just the outer crust.
If we have extra time, we can let the seasoned chicken rest for 15 to 20 minutes. That brief rest helps the seasoning settle into the meat and improves the final taste.
Setting Up the Breading Station
A clean breading setup makes the entire process easier and faster. We arrange three bowls:
- Flour bowl – add the flour.
- Egg bowl – whisk the eggs with the milk.
- Breadcrumb bowl – combine breadcrumbs, Parmesan, paprika, parsley, cayenne, salt, and black pepper.
This three-step coating method is essential in any crispy chicken fingers recipe because it builds a coating that stays intact while cooking. The flour creates a dry surface, the egg acts as glue, and the breadcrumbs form the crunchy shell.
For even better texture, we can use panko breadcrumbs. They are lighter and create a more open, crisp crust than regular breadcrumbs.
Step-by-Step Guide to Making Crispy Chicken Fingers
Step 1: Coat the Chicken in Flour
Take one chicken strip and dredge it lightly in the flour. Shake off the excess. We want a thin, even coating, not a heavy flour layer.
Step 2: Dip into the Egg Mixture
Next, dip the floured chicken into the egg mixture. Make sure the strip is fully coated so the breadcrumbs will stick well.
Step 3: Press into the Breadcrumb Mixture
Place the chicken into the breadcrumb bowl. Press the crumbs firmly onto all sides. This step is where the crisp outer layer begins. A good press helps the coating hold during frying or baking.
Step 4: Repeat with the Remaining Chicken
Continue coating all the chicken strips and place them on a tray or plate. Once finished, let them rest for 5 to 10 minutes. This short resting period helps the breading set and reduces the chance of it falling off during cooking.
Step 5: Fry Until Golden and Crisp
Heat oil in a deep pan over medium heat. The oil should be hot enough to sizzle gently when a breadcrumb is dropped in. Fry the chicken in batches. Do not overcrowd the pan, because crowded chicken lowers the oil temperature and leads to soggy results.
Cook each batch for about 3 to 5 minutes per side, depending on thickness, until the chicken fingers are deep golden brown and cooked through. Transfer them to a paper towel-lined plate or a wire rack.
Tips for the Crispiest Chicken Fingers
A standout crispy chicken fingers recipe depends on a few practical details. These tips help us get the best result every time:
Use Dry Chicken
Moisture is the enemy of crispness. Drying the chicken before seasoning helps the breading stick better.
Do Not Skip the Resting Time
Letting the breaded chicken rest before cooking helps the coating stay attached.
Use Medium Heat
Oil that is too hot burns the coating before the chicken cooks inside. Oil that is too cool makes the chicken greasy.
Cook in Batches
Giving the chicken enough space in the pan helps it fry evenly and stay crisp.
Use a Wire Rack After Frying
A wire rack keeps hot air circulating around the chicken, so the bottom stays crisp instead of turning soft.
Baked Crispy Chicken Fingers Option
If we want a lighter version, we can bake the chicken fingers instead of frying them. Arrange the breaded strips on a lined baking tray, lightly spray them with oil, and bake in a preheated oven at 220°C (425°F) for about 18 to 22 minutes, flipping halfway through.
The baked version still gives us a crunchy finish, especially when we use panko breadcrumbs. It is a smart option when we want the flavor and texture of crispy chicken fingers with less oil.
Air Fryer Crispy Chicken Fingers Option
Air frying is another excellent method. Preheat the air fryer to 200°C (400°F). Arrange the chicken strips in a single layer, spray lightly with oil, and cook for 10 to 12 minutes, flipping halfway through.
This method creates a crisp surface and juicy center with minimal oil. It is one of the easiest ways to make a quick crispy chicken fingers recipe on busy days.
Best Dipping Sauces for Crispy Chicken Fingers
A plate of crispy chicken fingers becomes even better with the right sauce. Some of the best options include:
- Honey mustard for a sweet and tangy balance
- Garlic mayo for a creamy, rich finish
- Barbecue sauce for smoky depth
- Ranch dressing for cool, herby flavor
- Ketchup for a classic pairing
- Hot sauce for extra heat
We can also mix mayonnaise with chili sauce or mustard to create a quick homemade dip.
What to Serve with Chicken Fingers
This crispy chicken fingers recipe pairs well with many side dishes. We can serve it with:
- French fries
- Potato wedges
- Coleslaw
- Mashed potatoes
- Corn on the cob
- Fresh salad
- Mac and cheese
- Roasted vegetables
That flexibility makes chicken fingers useful for family meals, parties, and lunchbox planning.
Common Mistakes to Avoid
Even a simple crispy chicken fingers recipe can go wrong if we miss the basics. Avoid these common issues:
Using Wet Chicken
Wet chicken causes uneven coating and weak crispness.
Overcrowding the Pan
Too many pieces at once trap steam and reduce crisp texture.
Underseasoning the Coating
The crust should be flavorful on its own. Season every layer.
Cooking at the Wrong Temperature
Proper heat is the difference between crisp and greasy.
Skipping the Flip
Whether frying, baking, or air-frying, turning the chicken helps it brown evenly.
How to Store and Reheat Leftovers
If we have leftovers, let the chicken cool completely before storing. Place the chicken fingers in an airtight container and refrigerate for up to 3 days.
To reheat, use an oven or air fryer instead of a microwave. The microwave softens the coating, while dry heat restores crispness. Reheat in the oven at 190°C (375°F) for about 8 to 10 minutes, or until hot.
FAQs about Crispy Chicken Fingers Recipe
1. What are crispy chicken fingers?
Crispy chicken fingers are strips of chicken coated in seasoned flour, breadcrumbs, or batter, then fried or baked until golden and crunchy. They are popular as a snack, lunch, or dinner.
2. What cut of chicken is best for chicken fingers?
Chicken breast is the most common choice because it is lean and easy to cut into strips. However, chicken tenderloins also work very well.
3. How do we make chicken fingers extra crispy?
For extra crispiness, coat the chicken well, use breadcrumbs or panko, and cook at the right temperature. Letting the coated chicken rest for a few minutes before cooking also helps.
4. Can we bake chicken fingers instead of frying them?
Yes, we can bake them for a lighter version. They may not be quite as crunchy as fried ones, but they still turn out delicious and crisp when baked properly.
5. How do we know when chicken fingers are fully cooked?
They are ready when the outside is golden brown and the inside is no longer pink. The internal temperature should reach 75°C (165°F).
6. What sauces go well with crispy chicken fingers?
They pair well with ketchup, honey mustard, barbecue sauce, ranch, garlic mayo, or spicy chili sauce.
7. Can we make chicken fingers ahead of time?
Yes, we can bread them ahead and keep them chilled before cooking. Cooked chicken fingers can also be reheated in the oven or air fryer.
8. How do we store leftovers?
Store leftovers in an airtight container in the refrigerator for up to 3 days. Reheat them in the oven or air fryer to keep them crispy.
Final Thoughts
This crispy chicken fingers recipe delivers everything we want in a homemade favorite: a crunchy seasoned coating, tender chicken, easy preparation, and versatile serving options. It works for weeknight dinners, game-day snacks, party trays, and family meals alike. With the right breading method and careful cooking, we get chicken fingers that are crisp, juicy, and deeply satisfying.
Once we master this method, we can easily customize it with extra spices, different crumbs, or new dipping sauces. That makes it more than just a simple meal. It becomes a dependable recipe we can return to whenever we want something comforting, crisp, and full of flavor.