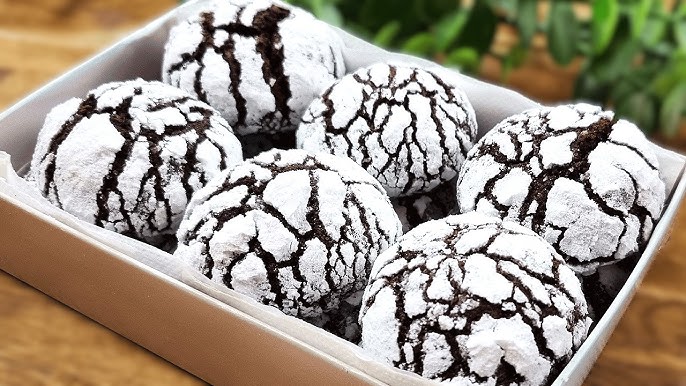
Crinkle Cookies Recipe: There’s something magical about crinkle cookies. With their cracked, snowy tops and soft, fudgy centers, they are the kind of treat that instantly makes people smile. These cookies are not just about flavor—they are about texture and appearance too. The beautiful crinkle effect comes from rolling the dough in powdered sugar before baking, which then spreads and cracks as the cookies rise in the oven. It’s like a sweet little science experiment in your kitchen.
Another reason crinkle cookies are so loved is their adaptability. Chocolate is the most popular version, but you can switch things up with lemon, red velvet, or even matcha flavors. No matter what variation you try, the crinkle pattern remains the star of the show. By the end of this guide, you’ll not only know how to make them but also how to customize them to your taste.
So, if you’re ready to bake cookies that are as eye-catching as they are delicious, let’s get started with the essentials—ingredients and tools.
Ingredients You’ll Need
Before diving into the baking process, let’s gather everything you’ll need. Having your ingredients ready not only makes baking easier but also ensures your cookies turn out perfect. Here’s a complete breakdown:
Dry Ingredients
- 1 cup all-purpose flour
- ½ cup unsweetened cocoa powder (for chocolate version)
- 1 teaspoon baking powder
- ¼ teaspoon salt
- 1 cup powdered sugar (for rolling the dough)
Wet Ingredients
- 1 cup granulated sugar
- ½ cup vegetable oil (or melted butter for a richer flavor)
- 2 large eggs
- 2 teaspoons vanilla extract
Optional Add-ons for Flavor Variations
- Zest of 1 lemon + 1 tablespoon lemon juice (for lemon crinkles)
- 1–2 drops of red food coloring + 1 tablespoon cocoa powder (for red velvet crinkles)
- ½ teaspoon peppermint extract (for holiday-inspired cookies)
- A handful of chocolate chips or white chocolate chunks for extra indulgence
Having all these ingredients pre-measured and set aside before starting is the key to stress-free baking.
Essential Kitchen Tools and Equipment
You don’t need a fancy kitchen to bake amazing crinkle cookies, but a few basic tools will make the process smoother.
- Mixing Bowls: At least two—one for dry ingredients and one for wet.
- Measuring Cups and Spoons: Accuracy matters in baking.
- Whisk or Electric Mixer: A hand mixer or stand mixer makes mixing faster, but a whisk works too.
- Rubber Spatula: For scraping down the sides of the bowl.
- Plastic Wrap: Essential for chilling the dough.
- Baking Sheet/Tray: A flat, non-stick tray is best.
- Parchment Paper or Silicone Baking Mat: Prevents sticking and ensures even baking.
- Cookie Scoop (optional): Helps make evenly sized cookies.
With these tools, you’re fully prepared to move into the fun part—making the dough and watching it transform into crinkly, irresistible cookies.
Step-by-Step Guide to Making Crinkle Cookies
Step 1: Preparing the Dough
The first step is to combine your wet ingredients. In a mixing bowl, whisk together the sugar and vegetable oil until smooth. Add the eggs one at a time, mixing well after each addition. Then, stir in the vanilla extract. This creates the liquid base that will hold your dry ingredients together.
At this stage, the mixture will look glossy and slightly thick. Make sure the sugar dissolves as much as possible—it helps create the right texture later. If you’re making a flavored variation, like lemon or peppermint, this is the stage to add those extracts or zest.
Step 2: Mixing Wet and Dry Ingredients
In a separate bowl, whisk together your flour, cocoa powder (if using), baking powder, and salt. Slowly add the dry mixture into the wet mixture, stirring gently with a spatula or using your mixer on low speed.
The dough will be sticky—don’t worry, that’s exactly how it should be. Sticky dough means soft, chewy cookies later. Be careful not to overmix, as that can make the cookies dense instead of light and soft.
Step 3: Chilling the Dough Properly
Here’s where patience pays off. Cover the bowl of dough with plastic wrap and refrigerate for at least 2–4 hours, or ideally overnight. Why chill the dough? Because it helps the cookies keep their shape while baking and intensifies the flavor.
Skipping this step is a common mistake that results in flat cookies without the signature crinkle look. A chilled dough also makes it much easier to roll into neat balls.
Step 4: Shaping and Rolling the Cookies
Once the dough has been chilled properly, it’s time to shape the cookies. Take the dough out of the refrigerator and let it sit for about 5 minutes to soften slightly. Using a cookie scoop or a spoon, scoop out small portions of dough—about the size of a walnut. Roll each portion between your palms until you form smooth balls.
Next comes the fun part: rolling the dough balls in powdered sugar. Make sure each ball is completely coated, almost like a snowball. Don’t be shy with the sugar—the thicker the coating, the more dramatic the crinkle effect will be once baked. If you want an extra powdery finish, you can roll the dough balls in granulated sugar first and then in powdered sugar. The granulated sugar prevents the powdered sugar from melting too quickly, keeping the cracks more visible.
Line the sugar-coated balls on a parchment-lined baking tray, leaving at least 2 inches of space between each cookie. They will spread as they bake, and that space allows them to crinkle beautifully without sticking together.
Step 5: Baking to Perfection
Preheat your oven to 350°F (175°C) and make sure it’s fully heated before baking. Place your prepared trays in the center of the oven for even heat distribution. Bake the cookies for about 10–12 minutes depending on the size of your dough balls.
How do you know they’re done? The tops should be beautifully cracked, with the inside still looking soft. Don’t overbake—crinkle cookies are meant to have a fudgy center, not a dry one. When you take them out, they may look slightly underbaked, but they’ll firm up as they cool.
Leave the cookies on the tray for 2–3 minutes, then transfer them to a wire rack to cool completely. Once cooled, you’ll have cookies with a crisp, powdered sugar coating, crackly tops, and a melt-in-your-mouth soft center.
Tips and Tricks for Perfect Crinkle Cookies
Even though this recipe is simple, a few insider tips can take your crinkle cookies from good to absolutely irresistible.
- Always Chill the Dough: Skipping the chilling step is the #1 reason crinkle cookies don’t hold their shape. Cold dough bakes more evenly and gives that signature crackle.
- Generous Sugar Coating: Don’t skimp on powdered sugar. A thick coating ensures that snowy-white crinkle look after baking.
- Don’t Overmix the Dough: Overmixing develops the gluten in the flour, making your cookies tough. Mix only until combined.
- Use Room-Temperature Eggs: They blend more easily into the batter, giving a smoother texture.
- Size Matters: If your dough balls are too big, the cookies may not bake evenly. Stick to walnut-sized portions.
- Experiment with Flavors: Swap out vanilla for peppermint during Christmas or add a dash of espresso powder to chocolate crinkles for a mocha twist.
- Storage Tip: Keep leftover cookies in an airtight container at room temperature for up to 5 days. For longer storage, freeze the dough balls and bake when needed.
With these tricks up your sleeve, your crinkle cookies will turn out bakery-worthy every single time.
Flavor Variations to Try
Crinkle cookies don’t have to be limited to chocolate. Here are some mouthwatering variations you can try:
Chocolate Crinkle Cookies
The classic! Made with cocoa powder, they’re rich, fudgy, and a chocolate lover’s dream. Pair them with a glass of cold milk for the ultimate treat.
Lemon Crinkle Cookies
Light, tangy, and refreshing. Add fresh lemon zest and juice to the dough for a citrusy twist that’s perfect for spring and summer.
Red Velvet Crinkle Cookies
Soft, slightly tangy, and beautiful with their deep red color. A festive favorite for Valentine’s Day and Christmas parties.
Holiday-Inspired Crinkles
Add a drop of peppermint extract and crushed candy canes for a wintry version. You can also use pumpkin spice in the fall for cozy, warm flavors.
These variations allow you to enjoy crinkle cookies all year round, no matter the season or occasion.
Serving Suggestions
Crinkle cookies are delightful on their own, but pairing and presentation can make them even more enjoyable.
Pairing with Beverages:
- Coffee or espresso for a bold, rich combo
- Hot cocoa for a cozy holiday treat
- A cold glass of milk for a classic childhood favorite
Presentation Ideas:
- Arrange them on a festive platter with other holiday cookies
- Pack them in decorative tins or jars for gifts
- Dust with extra powdered sugar before serving for a snowy effect
They’re not just cookies; they’re little pieces of happiness that make any gathering sweeter.
Troubleshooting Guide
Even with the best recipe, sometimes things don’t go as planned in the kitchen. Don’t worry—here’s a troubleshooting guide to help you fix the most common crinkle cookie problems.
1. My cookies spread too much
If your cookies turned out flat, the dough was probably too warm when you baked it. Always chill the dough for at least 2–4 hours. If you’re in a rush, pop the dough balls in the freezer for 20 minutes before baking. Also, check your oven temperature—an oven that’s too hot can cause the cookies to melt before they have a chance to rise.
2. The crinkles aren’t showing properly
This usually happens when the powdered sugar melts into the dough. To fix this, roll your dough balls generously in powdered sugar—really coat them. For extra insurance, roll them in granulated sugar first, then powdered sugar. That extra layer keeps the powdered sugar from disappearing during baking.
3. My cookies are too dry
Overbaking is the most common cause of dry cookies. Remember, crinkle cookies are supposed to be soft and slightly chewy inside. Take them out of the oven when they still look a little underdone—they’ll continue to cook as they cool.
4. My cookies taste bland
Crinkle cookies are all about bold flavors. If yours taste a little flat, try upping the flavor with a teaspoon of espresso powder (for chocolate), extra citrus zest (for lemon), or a splash of flavored extract like almond or peppermint. Don’t forget the salt—it enhances the sweetness and makes the flavors pop.
With these fixes, you can turn any “cookie disaster” into a sweet success.
FAQs about Crinkle Cookies Recipe
1. Can I make crinkle cookie dough ahead of time?
Yes! You can prepare the dough up to 2 days in advance and store it in the fridge. Just let it soften slightly before rolling into balls. You can also freeze the dough balls and bake them straight from the freezer—just add 1–2 minutes to the baking time.
2. Do crinkle cookies freeze well?
Absolutely. Once baked and cooled, store them in an airtight container and freeze for up to 3 months. To enjoy later, thaw at room temperature or warm them in the oven for a few minutes.
3. Why do my cookies look underbaked when I take them out?
That’s actually a good sign! Crinkle cookies are supposed to look slightly soft in the middle when you pull them out of the oven. They’ll firm up as they cool, giving you that perfect fudgy texture.
4. Can I make crinkle cookies without cocoa powder?
Yes, you can! Skip the cocoa powder and use flour instead for a plain version, then add different flavors like lemon juice, vanilla, or almond extract to create your own twist.
5. How can I make my crinkle cookies extra festive?
Try adding food coloring to the dough—red for Valentine’s Day, green for St. Patrick’s Day, or orange for Halloween. You can also mix in sprinkles or crushed candy for extra holiday flair.
Conclusion
Crinkle cookies are more than just a treat—they’re little bundles of joy with a perfect mix of textures and flavors. With their crackled tops, soft centers, and endless flavor possibilities, they’re a crowd-pleaser every single time. Whether you stick to the classic chocolate version or experiment with lemon, red velvet, or peppermint, one thing’s certain: they’ll disappear from the plate faster than you can bake them.
The beauty of this recipe is its simplicity. With just a few pantry staples, some chilling time, and a little rolling in powdered sugar, you can whip up cookies that look bakery-perfect but feel homemade. Plus, they’re versatile enough for any occasion—from holiday parties to lazy Sunday afternoons.
So, roll up your sleeves, grab your mixing bowls, and let your kitchen fill with the sweet aroma of freshly baked crinkle cookies. Once you’ve made them, you’ll see why they’ve become a timeless favorite for generations of bakers.