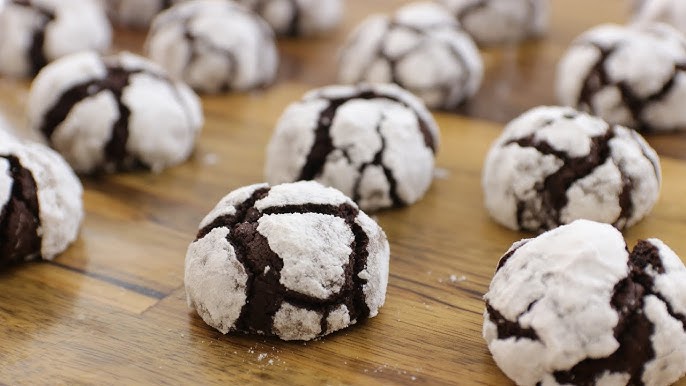
Crinkle Cookie Recipe: Crinkle cookies are a delightful fusion of chewy and crispy, known for their beautifully cracked surface dusted in powdered sugar. They look like they’ve been kissed by snowflakes, making them perfect for holidays or cozy weekend treats. What sets them apart isn’t just the texture—it’s the way they crack open while baking, revealing a soft, fudgy inside and a lightly crisp outer shell. Crinkle cookies are crowd-pleasers not just because they taste incredible but because they look like a treat straight from a bakery.
Let’s be honest—most of us have that one cookie we always crave. Crinkle cookies might just become that one after your first batch. Whether you love the rich, chocolatey ones or something tangier like lemon or fruity raspberry, there’s a version for every palate. This guide breaks down the full recipe, including expert tips, optional flavor variations, and storage hacks to keep them fresh for days. But first, let’s look at what makes them so magical.
What Makes Crinkle Cookies Special
Crinkle cookies are not your average cookies. The dough is rolled in powdered sugar before baking, and as the cookies spread and rise in the oven, they create those signature “cracks.” That crackle is not just pretty—it’s the result of a smart baking technique. The outside bakes faster, while the inside stays soft and moist, resulting in a perfect contrast of textures.
Another reason crinkle cookies stand out? Their versatility. You can play with the base recipe to create dozens of flavors—think red velvet, espresso, lemon, or even peanut butter swirl. And unlike some complex baked goods, crinkle cookies are beginner-friendly, making them a staple for home bakers everywhere.
A Brief History of Crinkle Cookies
Crinkle cookies may feel like a modern-day invention, but they’ve been around for generations. Originally believed to have gained popularity in American kitchens in the early 20th century, crinkle cookies became a beloved holiday tradition. One of the first mentions comes from a 1950s Betty Crocker cookbook, where a chocolate version started turning heads.
Since then, they’ve evolved across cultures and households. Some families have handed down their own twists—adding orange zest, a touch of spice, or even stuffing them with chocolate ganache. Regardless of how they’re made, the spirit of crinkle cookies has remained the same: simple, sweet, and impossible to resist.
Ingredients You’ll Need
Before diving into the recipe, gather all your ingredients to keep things smooth. This ensures you don’t forget anything mid-recipe (we’ve all been there).
Dry Ingredients
Here’s what you’ll need for the classic crinkle cookie:
- All-Purpose Flour – The base of the dough.
- Unsweetened Cocoa Powder – For that rich chocolatey flavor.
- Baking Powder – Helps the cookies rise and crack perfectly.
- Salt – Enhances all the flavors.
- Granulated Sugar – For sweetness and structure.
- Powdered Sugar – For rolling the dough and giving that iconic cracked appearance.
These ingredients provide the dry structure, flavor, and signature look of the cookie. Make sure to sift the cocoa powder and powdered sugar to prevent lumps.
Wet Ingredients
- Eggs – Essential for binding and moisture.
- Vegetable Oil or Melted Butter – Adds richness and helps with spreading.
- Vanilla Extract – Deepens the flavor profile.
Eggs play a crucial role in achieving the cookie’s soft center. Vegetable oil keeps them moist even after a few days, while vanilla brings a subtle warmth to the overall flavor.
Optional Add-ins and Flavor Twists
Want to make your crinkle cookies unique? Try these:
- Espresso Powder – Enhances the chocolate flavor.
- Orange or Lemon Zest – Adds a fresh, zippy note.
- Chocolate Chips or Chunks – Because more chocolate is never a bad thing.
- Crushed Peppermint – Great for the holidays.
- Food Coloring – For red velvet or green mint cookies.
Substitutions for Dietary Preferences
Crinkle cookies can easily be adapted to dietary needs:
- Gluten-Free Option – Use a 1:1 gluten-free flour mix.
- Vegan Alternative – Replace eggs with flaxseed meal or applesauce.
- Sugar-Free – Use monk fruit or erythritol-based sweeteners.
These swaps don’t compromise the texture much and still deliver mouthwatering results.
Tools and Equipment
You don’t need fancy equipment to make perfect crinkle cookies, but a few basics help.
Essential Kitchen Tools
- Mixing Bowls – One large and one medium.
- Measuring Cups and Spoons – Accuracy matters here.
- Whisk or Electric Mixer – To combine wet and dry ingredients properly.
- Spatula or Wooden Spoon – For folding in the flour.
Consistency starts with properly mixed dough. Make sure everything is evenly combined for the best rise and crackle.
Recommended Baking Gear for Best Results
- Cookie Sheets – Non-stick or lined with parchment paper.
- Cooling Rack – To help the cookies cool evenly and prevent sogginess.
- Cookie Scoop or Tablespoon – For evenly sized cookies.
- Plastic Wrap – For chilling the dough.
Using a cookie scoop not only saves time but ensures uniform baking. And don’t skip the cooling rack—it makes a real difference in texture.
Step-by-Step Guide to Making Crinkle Cookies
Let’s get into the heart of it. Here’s your ultimate walkthrough.
Step 1 – Preparing the Dough
In a large bowl, whisk together flour, cocoa powder, baking powder, and salt. In another bowl, mix sugar, eggs, and oil (or melted butter) until smooth. Stir in the vanilla. Slowly incorporate the dry ingredients into the wet mixture. The dough will be sticky—don’t panic! That’s normal.
If you’re adding any optional flavors like espresso or zest, fold them in now. Once combined, cover the dough tightly with plastic wrap.
Step 2 – Chilling the Dough
Chilling is crucial. Place the covered bowl in the refrigerator for at least 3 hours or overnight. This solidifies the fats and makes the dough easier to roll. Skipping this step can lead to flat, oily cookies. When chilled properly, the dough will firm up, making the rolling process a breeze.
Step 3 – Rolling the Dough in Sugar
Now comes the fun part—making those cookies look like they’ve just had a snowball fight. Take the dough out of the fridge and let it sit for about 10 minutes to soften slightly. Using a cookie scoop or tablespoon, portion out the dough into small balls (around 1 inch in diameter).
First, roll each ball lightly in granulated sugar—this helps create a moisture barrier and enhances the crisp edges. Then, roll them generously in powdered sugar. Don’t be shy with it; the more powdered sugar, the better the crinkle effect. The contrast between the dark dough and the white sugar is what creates that dramatic cracked look after baking.
Arrange the cookie balls on a lined baking sheet, spacing them at least 2 inches apart. The dough will spread slightly in the oven, so give them room to breathe.
Step 4 – Baking to Perfection
Preheat your oven to 350°F (175°C). Once it’s nice and hot, bake the cookies for 10–12 minutes—no more, no less. Keep an eye on them, especially toward the end. You want the tops to be cracked and the edges just set, but the center should still be slightly soft. That’s the secret to getting that chewy, brownie-like interior.
Don’t be tempted to overbake. Even if they look a bit underdone, they’ll continue to cook a bit more as they cool. Overbaking leads to dry, cake-like cookies instead of soft, fudgy centers. Trust the process—and the timer.
If you’re making larger cookies, add a minute or two to the bake time. But again, keep checking. Every oven is a little different.
Step 5 – Cooling and Serving
Once baked, let the cookies sit on the baking sheet for 5 minutes before transferring them to a cooling rack. This allows them to set up a bit and hold their shape. After that, move them to the wire rack to cool completely.
By now, your kitchen smells like a dream, and your cookies look like little edible snow-capped mountains. Serve them warm for a gooey treat, or let them cool completely to package for gifts or parties. They’re absolutely divine with a glass of milk, a hot espresso, or even some vanilla ice cream.
If you’re gifting them, stack a few in a clear bag tied with a ribbon for a simple but classy presentation. Or pile them high on a platter for a festive dessert table. However you serve them, they’ll disappear fast—so maybe make a double batch?
Pro Tips for Perfect Crinkle Cookies
Let’s take your cookie game from “yum” to “WOW.” These pro tips will make sure your crinkle cookies are bakery-quality every time.
Preventing Flat Cookies
Flat cookies are often the result of warm dough or too much moisture. Here’s how to avoid them:
- Chill the dough thoroughly. At least 3 hours—don’t cut corners.
- Use fresh baking powder. Old leavening agents lose their power.
- Don’t overmix. Once the flour goes in, mix gently to prevent gluten development.
- Use parchment paper, not a greased pan. Grease can cause cookies to spread too much.
Want puffier cookies? Add an extra tablespoon of flour to the dough or refrigerate your dough balls again after shaping, just before baking.
Getting the Perfect Crackled Top
That crinkled surface is what makes these cookies iconic. To get those bold, beautiful cracks:
- Roll heavily in powdered sugar. Skimping leads to patchy cracks.
- Double coat with granulated and powdered sugar. It creates a barrier for better definition.
- Bake at a high enough temperature. 350°F is ideal—it gives a quick puff to create the crack effect.
Also, don’t flatten the dough balls. Let the oven do the work. You want that “explosion” look, not a pancake.
Flavor Variations to Try
One of the best things about crinkle cookies? You can totally remix the flavor while keeping the same technique. Here are a few of the most delicious variations.
Chocolate Crinkle Cookies
The classic. Rich, deep cocoa flavor, fudgy center, and that powdered sugar coating. This is the original and arguably the best. For extra decadence, stir in some dark chocolate chunks or mini chocolate chips.
Try adding a pinch of cinnamon or espresso powder to elevate the chocolate notes. And if you’re really going for indulgence, sandwich two cookies with chocolate ganache. You’ll never look back.
Lemon Crinkle Cookies
Bright, tangy, and irresistibly fresh. Instead of cocoa powder, use:
- 2 tablespoons lemon zest
- 1 tablespoon lemon juice
- Omit the cocoa powder
- Add yellow food coloring for a sunshine hue (optional)
The lemon version is perfect for spring, baby showers, or afternoon tea. They’re lighter but still full of flavor and beautifully crinkled.
Red Velvet Crinkle Cookies
These are a holiday favorite and look absolutely stunning. To make them:
- Use 1 tablespoon unsweetened cocoa powder
- Add 1 tablespoon red food coloring
- Optional: Add cream cheese chips or white chocolate chunks
Red velvet crinkle cookies are showstoppers at any cookie swap or holiday party. Plus, they have that subtle cocoa-vanilla flavor everyone loves.
Storage and Shelf Life
Once you’ve baked the perfect batch of crinkle cookies, the next logical question is—how do you keep them fresh and tasty for as long as possible? Whether you’re prepping for a party, holiday gift boxes, or just want to make them last longer, proper storage is key.
How to Store Them Properly
The best way to store crinkle cookies is in an airtight container at room temperature. Here’s how to do it right:
- Cool completely before storing. Any residual heat will create moisture in the container, leading to soggy cookies.
- Layer with parchment paper between cookies. This prevents them from sticking together or smudging the sugar coating.
- Store in a cool, dry place. Avoid placing them near the stove, oven, or direct sunlight.
Properly stored, your cookies will stay fresh for about 5–7 days. They’ll retain that chewy center and the slightly crisp edges we all crave.
If the cookies lose their softness, pop one in the microwave for 5–8 seconds to restore some of that gooey goodness.
Freezing Instructions
Want to bake ahead of time? Crinkle cookies freeze beautifully, both baked and unbaked.
To freeze baked cookies:
- Let them cool completely.
- Place in a single layer on a tray to flash freeze for 1 hour.
- Transfer to a freezer-safe bag or container.
- Label and date.
They’ll last for up to 3 months. When you’re ready to enjoy, let them thaw at room temperature or microwave in 10-second intervals.
To freeze unbaked dough:
- Chill the dough first.
- Roll into balls (don’t roll in sugar yet).
- Flash freeze on a tray, then transfer to a bag.
- When ready to bake, thaw slightly, then roll in sugar and bake as usual.
This method is great for spontaneous cookie cravings—you can bake a few at a time without committing to a full batch.
Common Mistakes to Avoid
Even with the simplest recipes, things can go wrong. Here’s how to dodge the most common pitfalls and make crinkle cookies like a pro.
Overbaking or Underbaking
The #1 mistake? Baking them too long or not long enough. Crinkle cookies are meant to be soft and chewy, not dry or gooey messes.
How to avoid it:
- Set a timer. These cookies bake FAST.
- Watch for the tell-tale signs: Cracks on top and set edges.
- Don’t wait for them to look done—they’ll finish setting outside the oven.
Always remember: Slightly underbaked is better than overbaked. You want that melt-in-your-mouth texture—not a hockey puck.
Not Chilling the Dough Enough
It’s tempting to skip the chilling time, especially when you’re craving cookies right now. But here’s the truth: Cold dough = Better cookies.
Skipping the chill leads to:
- Flat cookies that spread too much.
- No cracks or weak crinkle pattern.
- Gummy or greasy texture.
Give the dough at least 3 hours, or ideally overnight. It firms up the fats, enhances flavor, and ensures those Instagram-worthy cracks.
Serving Suggestions
Sure, crinkle cookies are great on their own—but why stop there? Elevate your presentation and pairings to make them even more impressive.
Pairing with Drinks
Crinkle cookies go wonderfully with a variety of beverages. Some popular pairings include:
- Milk: Classic, creamy, and comforting.
- Coffee or Espresso: The bold flavor balances the sweetness.
- Hot Chocolate: For chocolate lovers, this is double the fun.
- Herbal Tea: Lemon or peppermint cookies go great with chamomile or mint tea.
- Red Wine: Yes, really. Try pairing chocolate crinkle cookies with a bold cabernet or merlot for a grown-up dessert night.
Serving cookies with a well-matched drink makes your treat feel intentional and indulgent—perfect for guests or self-care evenings.
Presentation for Holidays and Gifts
Crinkle cookies are practically made for gifting. Here are a few simple yet stunning ways to present them:
- Holiday tins lined with parchment paper.
- Mason jars tied with ribbon and a handwritten tag.
- Clear cellophane bags sealed with festive stickers.
- Cookie boxes with assorted flavors for variety.
You can also personalize your packaging with holiday-themed touches: sprigs of rosemary, cinnamon sticks, or custom labels. It adds a homemade charm that store-bought gifts can’t touch.
Pro tip: Always label the flavor, especially if you’re gifting variations like lemon or red velvet. People love knowing exactly what they’re biting into.
FAQs about Crinkle Cookie Recipe
Let’s wrap things up by answering some of the most common questions people have about making and storing crinkle cookies. Whether you’re a beginner or a seasoned baker, these answers will clear up any doubts you might have.
1. Why didn’t my crinkle cookies crack?
If your cookies came out smooth without those beautiful crinkles, it’s usually because the dough wasn’t cold enough or the oven temperature was too low. Make sure to chill the dough thoroughly and bake at 350°F. Another possible reason is skimping on the powdered sugar coating—don’t hold back!
2. Can I make crinkle cookies without cocoa powder?
Absolutely. Crinkle cookies don’t have to be chocolate-based. You can swap out the cocoa powder and adjust the flavors to create lemon, vanilla, almond, or even strawberry variations. Just make sure to maintain the balance of wet and dry ingredients.
3. How do I keep the powdered sugar from dissolving after baking?
This happens when the sugar absorbs moisture from the dough or the air. To prevent this:
- Roll the dough balls first in granulated sugar, then in a thick coat of powdered sugar.
- Store cookies in a cool, dry container immediately after they cool.
4. Can I freeze the dough and bake later?
Yes! In fact, crinkle cookie dough freezes very well. Roll the dough into balls (before adding sugar), freeze on a tray, then transfer to a freezer bag. When you’re ready to bake, thaw slightly, coat in sugar, and bake as directed.
5. Why are my cookies dry or cakey instead of soft and chewy?
Overbaking is the likely culprit. Take them out when the edges are set, but the centers still look slightly soft. Also, using too much flour or overmixing the dough can lead to a cakier texture. Stick closely to the measurements and mixing times.
Conclusion
Crinkle cookies are one of those timeless treats that look impressive, taste incredible, and come together with just a few basic ingredients. Their unique cracked tops and fudgy interiors make them a go-to favorite for the holidays, parties, or cozy nights in. Plus, with so many flavor possibilities, you’ll never get bored.
Whether you’re sticking to the classic chocolate or experimenting with lemon, red velvet, or espresso twists, the process remains simple and satisfying. Just remember the key steps: chill your dough, roll generously in sugar, and bake until just right.
So next time you’re craving something sweet, skip the store-bought cookies and make your own crinkle magic at home. They’re easy, impressive, and always a hit.
Happy baking—and don’t forget to share your batch (or not, we won’t judge)!